Oh my goodness, are you ready to embrace pure, unadulterated chocolate heaven? Honestly, sometimes you just need a dessert so rich, so breathtakingly impressive, that everyone stops talking the second it hits the table. That’s what this stunning, show-stopping Chocolate Mousse Layer Cake is all about!
The very first time I tried to bake this wonder, it was for my eldest son’s birthday. I wanted something that would absolutely wow him and his friends, but as a Gluten-Free Chef, I faced the challenge of making it completely safe while still being elegant. As I whisked that incredibly silky chocolate mousse, I thought about all the family gatherings and birthdays we’ve celebrated over the years. Seeing my boy’s eyes light up when he took that first, perfect bite made every careful step worthwhile. That cake—this recipe—has become our absolute staple!
This isn’t just a cake; it’s a centerpiece, and believe me, you can achieve this gorgeous result. Ready to dive into the layers of joy? Check out my journey if you want to know more about baking with passion!
Why This Chocolate Mousse Layer Cake is Your New Go-To (Crowd Pleaser)
Look, I know baking an Elegant Cake sounds intimidating, right? But hear me out—this beauty is deceptively simple once you get the chilling times down. It’s truly the ultimate Crowd Pleaser because it looks like you spent days slaving away in the kitchen, but we know differently!
This recipe is perfect for those big celebrations or even just when you need a major chocolate fix. Plus, since we’re focusing on that incredible mousse, it feels so much lighter than heavy buttercream, even though it packs an unbelievably deep chocolate punch. Throw some fresh berries on top, and you’re golden!
Key Benefits of Our Chocolate Mousse Layer Cake
- The mousse has the most incredible, light, and silky texture you’ll ever experience. It just melts!
- That dark chocolate flavor is so intense and satisfying; it really makes a statement.
- It has that ‘wow’ factor! Seriously, people gasp when you bring out this Layered Dessert.
- Even if you tackle this over two days, the actual hands-on time is surprisingly short for such an impressive result.
Don’t forget to check out all my other favorite recipes over at my recipe index for more showstoppers!
Gathering Ingredients for Your Chocolate Mousse Layer Cake
Okay, getting that perfect Chocolate Mousse Layer Cake foundation starts with having everything ready. Seriously, don’t try to eyeball anything here—precision is your best friend, especially when we’re dealing with delicate mousse! We need to make sure our cake ingredients aren’t straight from the fridge; I can’t stress enough how important room temperature items are for a tender cake structure. Grab your list, and let’s get organized before we start baking!
For more general baking tips and tricks, you can always pop over to my baking category for extra reassurance!
Ingredients for the Rich Chocolate Cake Layers
For the actual layers, we need the good stuff. Remember, room temperature sour cream, buttermilk, and eggs are non-negotiable for the fluffiest outcome. Here’s what you’ll need:
- 1.75 cups all-purpose flour (make sure you spoon and level it!)
- 1.75 cups granulated sugar
- 0.75 cup unsweetened natural cocoa powder
- 2 teaspoons espresso powder (if you want that deep chocolate background note)
- 2 teaspoons baking soda and 1 teaspoon baking powder
- 1 teaspoon salt
- 0.75 cup full-fat sour cream (at room temperature!)
- 0.5 cup vegetable oil
- 2 large eggs (at room temperature!)
- 0.5 cup buttermilk (at room temperature!)
- 2 teaspoons pure vanilla extract
- 0.5 cup hot water or black coffee (this booms the chocolate flavor!)
- 1 cup semi-sweet mini chocolate chips (optional, tossed in 1 Tbsp flour)
Ingredients for the Silky Chocolate Mousse
This is where the magic happens, so make sure your heavy cream is COLD before you start whipping. Chocolate quality counts here, too; use something you’d happily snack on!
- 0.5 cup hot water
- 0.25 cup unsweetened natural or Dutch-process cocoa powder
- 8 ounces quality semi-sweet chocolate, finely chopped
- 2 cups heavy cream (very cold!)
- 2 Tablespoons confectioners’ sugar
- 0.5 teaspoon pure vanilla extract
Ingredients for the Decadent Chocolate Ganache and Garnish
The ganache is the final coat of luscious perfection on our Chocolate Mousse Layer Cake. You just need two things for the pour, plus a little something extra if you’re feeling fancy:
- 8 ounces quality semi-sweet chocolate, finely chopped
- 1 cup heavy cream
- Optional Garnish: fresh berries or chocolate shavings
Step-by-Step Guide to Making the Chocolate Mousse Layer Cake
Now we get to the fun part, but remember, this Chocolate Mousse Layer Cake takes concentration! Since we have three major components—the cake, the mousse, and the ganache—we tackle them in order. Don’t rush the chilling; that’s the secret to keeping everything stable and looking like a masterpiece rather than a chocolate landslide.
We often look for spectacular ideas, so don’t forget to check out my recipes for festive candy and treat recipes if you need inspiration for the next holiday! For comparison on incredible mousse cakes, you might also want to peek at this fantastic dark chocolate recipe.
Baking and Cooling the Cake Layers
First things first: crank that oven up to 350°F (177°C). Get those 8-inch or 9-inch pans prepped by greasing them well and lining them with parchment circles. Trust me, that parchment saves your sanity later! In one big bowl, whisk all your dry cake stuff—flour, sugar, cocoa, leaveners—until they’re happy together. Then, in another bowl, beat the room-temperature wet ingredients (eggs, sour cream, oil, etc.). Finally, cautiously mix the dry into the wet, adding that hot water or coffee last. Divide it evenly and bake fast! You are looking for 19–23 minutes until a toothpick comes out clean. Let them cool in the pans on a rack for a full hour before even thinking about turning them out. They need that time to firm up!
Preparing the Silky Chocolate Mousse Filling
While the cakes cool, we start the mousse, which gives our cake that truly amazing, deep chocolate flavor. You need to mix your cocoa powder into the hot water first to bloom that flavor, then stir that into your melted chocolate until it’s smooth. In a separate, clean bowl, whip up that cold heavy cream until you get medium peaks—don’t go too stiff! Now, gently, gently fold the chocolate mixture into the whipped cream. I mean gentle, like you’re tucking a baby in. If you beat it hard, you deflate all that lovely air. Once it’s just combined, put that gorgeous mixture in the fridge for at least two hours—my personal rule is closer to three—so it firms up into spoonable goodness.
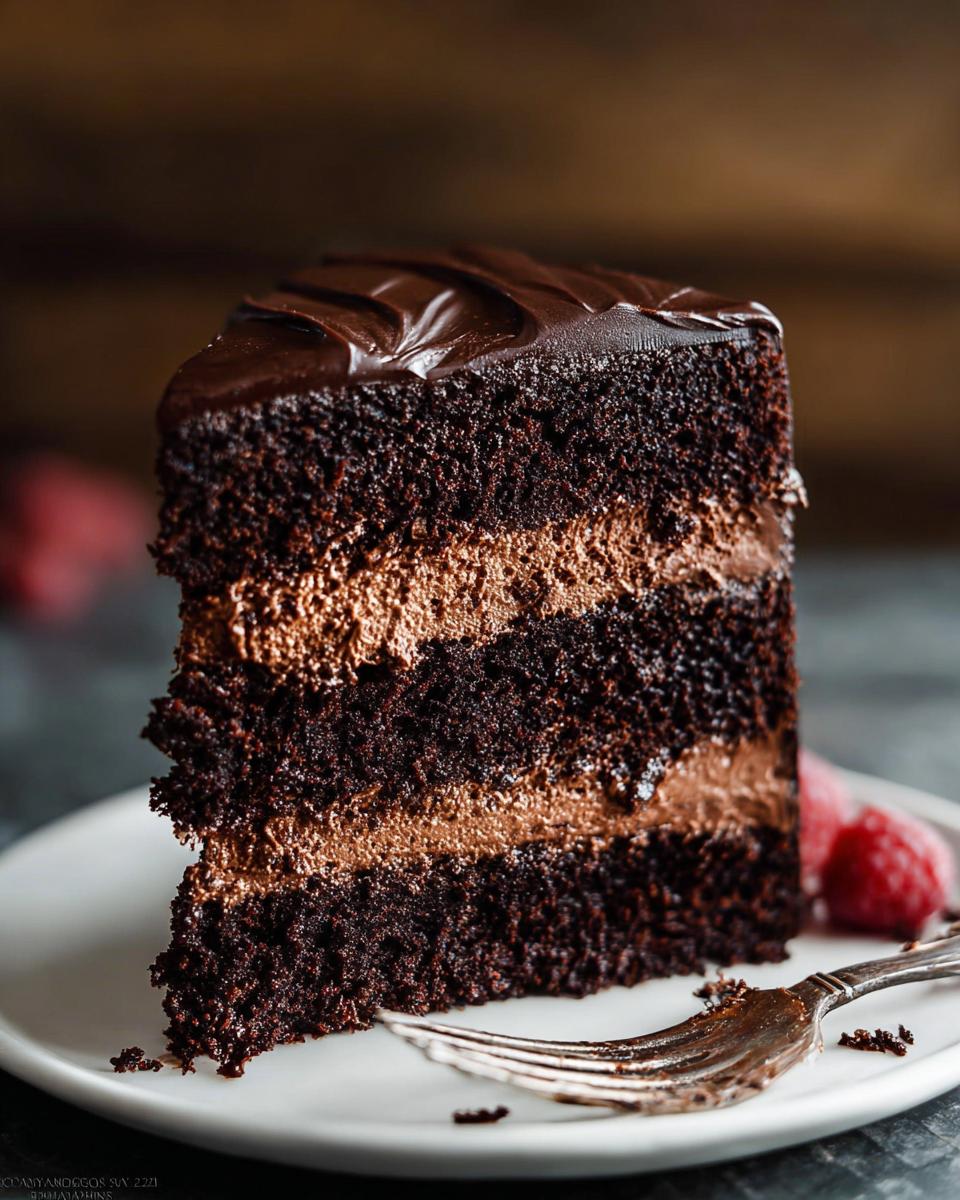
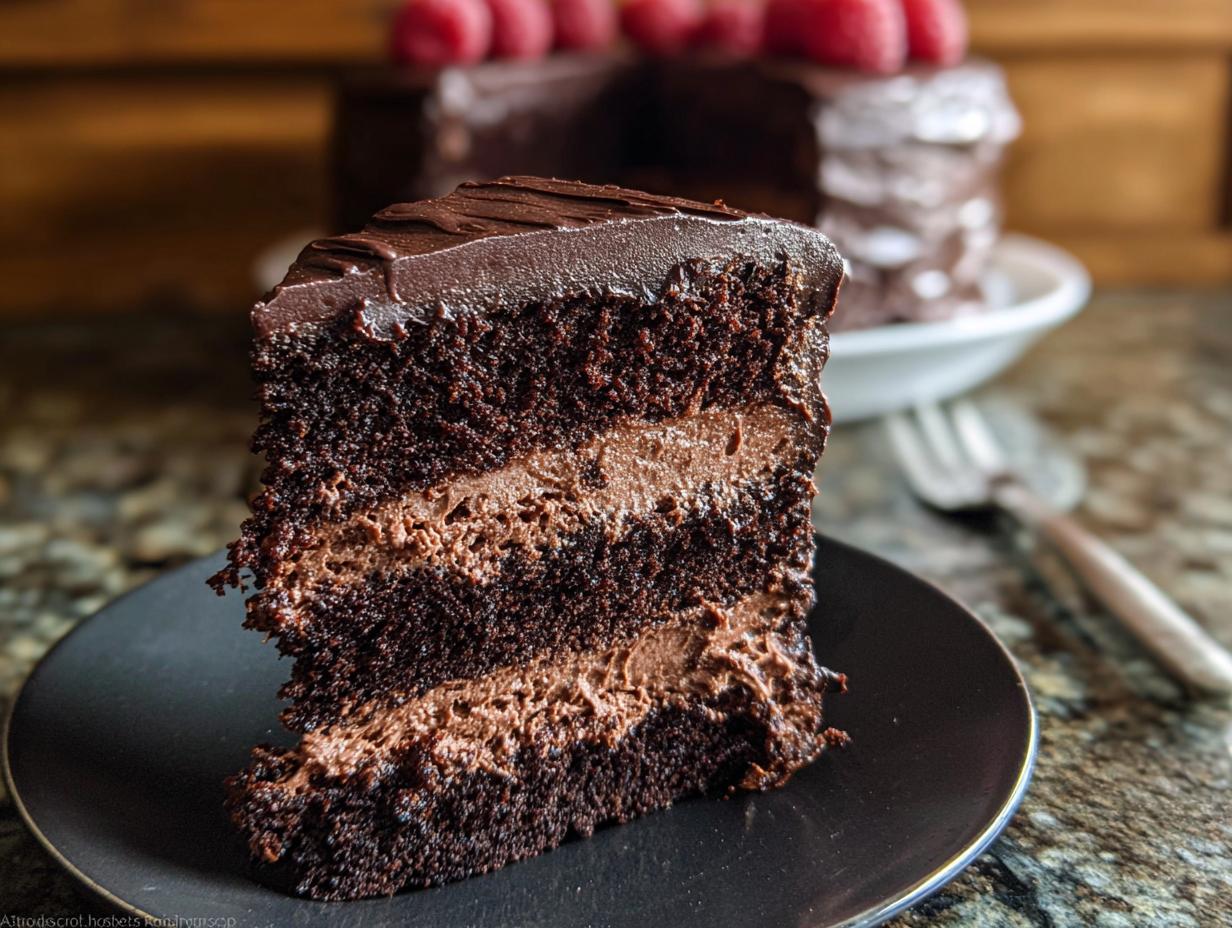
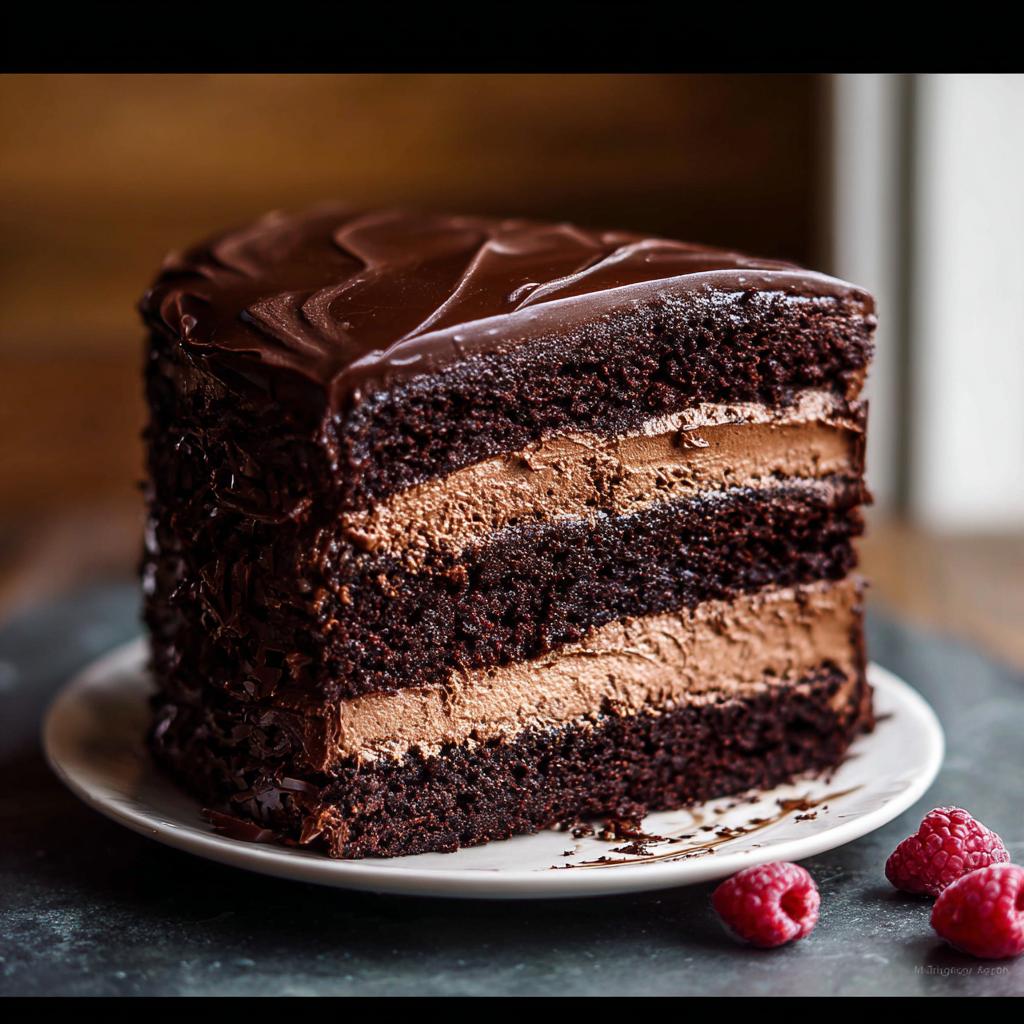
Assembling Your Layered Dessert
Once everything is cool and the mousse is set, it’s time for construction! Level off those cake tops if they domed up on you—we want flat surfaces for this Layered Dessert. Start with one layer on your stand, spread a generous amount of that glorious mousse, and top it with the next layer. Repeat! After the final layer goes on, frost the entire cake, top and sides, with the remaining mousse. This is your crumb coat. Smooth it out as best you can, and then stick the whole thing back in the fridge for at least an hour. This intermediate chill keeps the mousse firm right before we pour the ganache.
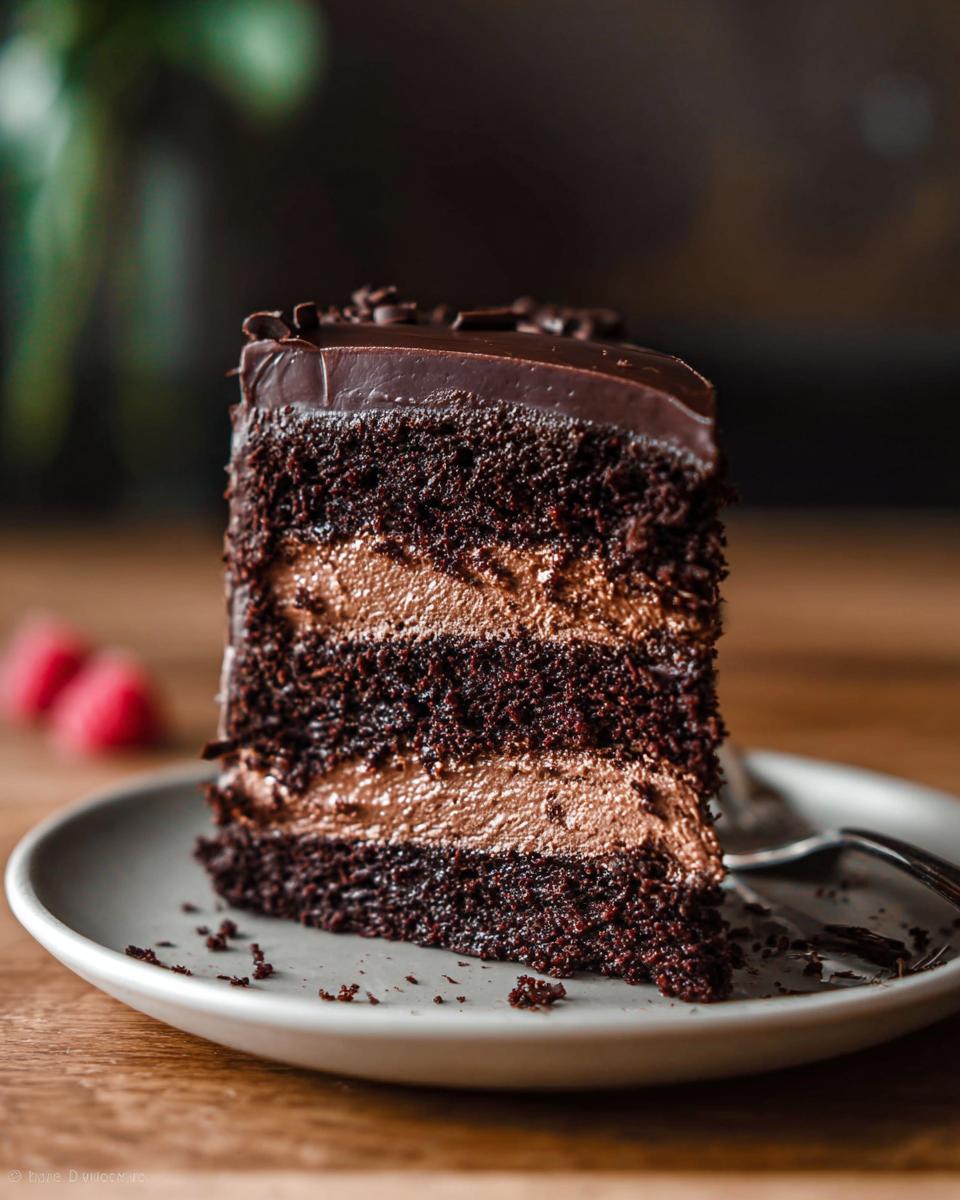
Finishing with Chocolate Ganache
The ganache is the final coat of luscious perfection on our Chocolate Mousse Layer Cake. You just need two things for the pour, plus a little something extra if you’re feeling fancy! Heat your heavy cream until it just starts to steam and bubble gently on the edges—don’t let it boil hard! Pour that hot cream right over your finely chopped chocolate and just let it sit silently for three minutes. No peeking! Then stir slowly from the center outwards until it’s utterly smooth. The trick here is patience: chill this mixture for about 30 minutes to an hour until it’s thick enough to pour, but not completely solid. Spoon it right onto the middle of your chilled cake and use an icing spatula to calmly spread it over the top and let it drip down beautifully. Wow factor achieved!

Expert Tips for the Perfect Chocolate Mousse Layer Cake
Even though this Chocolate Mousse Layer Cake is one of my absolute favorites, I know baking with mousse can sometimes feel like walking a tightrope. But don’t worry your sweet head! I’ve learned a few non-negotiable tricks over the years that guarantee stability and that gorgeous, rich texture every single time. A little prep goes a long way in making this look like an Elegant Cake worthy of a fancy bakery!
If you want to see some of my favorite other small bakes, browse through my section on muffins and cupcakes—some of those tips carry over!
Ingredient Temperature Secrets for Your Chocolate Mousse Layer Cake
This is where so many people get tripped up, especially because we are managing two different temperature worlds here! For the cake layers themselves, those eggs, sour cream, and buttermilk absolutely must be at room temperature. When cold ingredients hit the creamed butter and sugar, they seize up, and you end up with a dense, slightly curdled batter. We want integration, not separation!
However, when it comes to the mousse? Total opposite requirement! Your heavy cream needs to be ice cold from the fridge. If the cream is even slightly warm, it simply won’t whip up into those stiff, airy peaks necessary to hold up all that beautiful melted chocolate. So, cake body = room temp; mousse structure = fridge cold. Keep ’em straight!
Achieving an Elegant Cake Finish
When you’re ready to do the final chill before the ganache pour, use that time wisely! After you’ve done your crumb coat with the mousse and smoothed it out with your bench scraper, you absolutely must let it chill solid. I often pop mine in the freezer for a quick 20 minutes if I’m in a rush, but an hour in the fridge works wonders.
That firm, chilled mousse layer acts like a cement. When you pour the slightly thickened ganache over it, it won’t melt or sink into the mousse structure. Use your icing spatula to gently guide the ganache over the top edge. Don’t overwork it; let gravity and a gentle nudge do the work for you when smoothing the sides! Stability equals elegance, my friend.
Make Ahead and Storage for Your Chocolate Mousse Layer Cake
I know this looks like a big baking project, but honestly, the best thing about this Chocolate Mousse Layer Cake is how perfectly you can plan it out! If you want to Make Ahead, you are in luck because every component loves a break.
You can bake those cake layers a full day or two ahead of time. Just wrap them up tight in plastic wrap—like a little present—and they’re great in the fridge. For longer storage, freeze them! They freeze beautifully for up to three months, just thaw them overnight in the fridge before you frost.
The mousse and the ganache are also fantastic for prepping early. Keep them covered in the fridge. Just remember that the ganache needs to come to room temperature before you pour it nice and smoothly over the chilled cake. It’s the perfect stress-free baking plan! See my tips for future planning in the meal prep section for more ideas!
Once assembled, keep the cake covered in the fridge for up to five days. Isn’t planning ahead the best?
Frequently Asked Questions About the Chocolate Mousse Layer Cake
I know when you see a picture of this towering treat, you probably have a few burning questions! That’s totally normal. Making a truly Elegant Cake that is also a perfect Chocolate Mousse Cake requires knowing a few insider secrets. I put together the things I get asked about most often so you feel totally confident when you start baking. Let’s clear up any last-minute doubts!
If you need to reach out with a specific question, feel free to drop me a line over on my contact page!
Can I substitute the sour cream in this Chocolate Mousse Layer Cake?
That’s a great question, especially for folks who don’t always keep sour cream on hand! Yes, you absolutely can substitute it, but you need to have a plan. I would highly recommend using full-fat Greek yogurt as a direct swap. It has a similar acidity and fat content which keeps the chocolate cake nice and tender.
Just be warned: Greek yogurt can sometimes make the batter a *tiny* bit looser than sour cream does. Don’t panic! It might need an extra minute or two in the oven, but the final texture will still be wonderful. Avoid using low-fat versions, though, because we need that fat percentage to keep the cake moist!
How do I prevent my chocolate mousse from deflating?
Ah, the great mousse deflation mystery! This always happens if you overmix right at the end or if your chocolate base wasn’t cool enough before you added it. Remember, the structure of that mousse is built on air from the whipped cream, so we have to treat it gently.
My foolproof method is to take about a third of the whipped cream and fold that vigorously into the cooled chocolate mixture first. This lightens the heavy chocolate base! Then, once that base is incorporated, you gently fold *that* into the remaining whipped cream using slow, sweeping motions. And please, please, let it chill for the full two hours or more. That chilling time is what sets the mousse so it stays lofty and perfectly structured inside your Chocolate Mousse Layer Cake.

Is this truly an Elegant Cake, even for beginners?
You know, I totally understand why you ask that! It looks like something from a fancy wedding bakery, right? But honestly, yes—you can absolutely nail this! The real secret to making it look elegant isn’t fancy piping; it’s all about the chilling times we discussed.
If your cake layers are level and you let the mousse set up hard after the crumb coat, and then you let the ganache firm up slightly before serving, you’ve done 90% of the work! The layers themselves stack beautifully, and the ganache just flows naturally over a firm surface. Trust the process, let the fridge do the heavy lifting, and you will have an absolutely stunning result that screams “I’m a pastry chef!”
Nutritional Estimates for This Chocolate Mousse Layer Cake
Okay, my culinary adventurers, here comes the part where we talk real numbers for your glorious Chocolate Mousse Layer Cake! Since this is such an incredibly rich, decadent dessert built with quality chocolate, butter, and cream, we expect the numbers to reflect that deliciousness, right?
Based on our recipe yielding 12 generous slices, here are the estimated values. Please take these with a grain of salt—or maybe a tiny dusting of cocoa powder!—because ingredient brands, the exact type of chocolate you use, and how much you decide to drizzle of that ganache can change things dramatically.
- Calories: Approximately 650 – 750 per slice
- Fat: Roughly 45g – 55g per slice (Hello, heavy cream and quality chocolate!)
- Protein: Around 8g – 10g per slice
- Carbohydrates: About 60g – 70g per slice
This is definitely an indulgence, not an everyday treat, but totally worth every spectacular bite for a celebration! Remember, these are just estimates for the whole production, so don’t sweat the specifics; just enjoy the masterpiece you created. If you want to read more about how I handle ingredients and privacy on the site, you can check out my privacy policy here.
Share Your Stunning Chocolate Mousse Layer Cake Creations
That’s it! You’ve baked it, you’ve chilled it, and now you have this incredible, towering Chocolate Mousse Layer Cake sitting on your counter. Doesn’t it look magnificent?
Seriously, I want to see what you’ve done! When you pour your heart into a recipe like this, sharing the result is half the fun. Did you manage a perfect drip with the ganache? Did the kids devour it in five minutes flat? I want to hear ALL the details!
Please take a moment to leave a rating right near the top of the page—five stars if you’re feeling the chocolate love! Your feedback helps other bakers feel confident taking on their own version of this impressive bake. And snap a picture!
When you post photos on Instagram or Facebook, please, please tag me so I can properly admire your work. Let everyone know how your Chocolate Mousse Layer Cake turned out for your special event—was it the highlight of the birthday party? I absolutely thrive on seeing your successes! If you have any detailed feedback or just want to share a quick note, the comments section below is always open. Happy, happy baking, and don’t forget to check out the site terms of service!
Chocolate Mousse Layer Cake
Ingredients
Equipment
Method
- Preheat the oven to 350°F (177°C). Grease four 8-inch or 9-inch cake pans, line with parchment paper rounds, then grease the parchment paper. Parchment paper helps the cakes release from the pans.
- Make the cake: In a large bowl, whisk the flour, sugar, cocoa powder, espresso powder, baking soda, baking powder, and salt together. Set aside.
- In another large bowl, mix the sour cream, oil, and eggs together on medium-high speed until combined. Add the buttermilk and vanilla and mix until combined. Pour the dry ingredients into the wet ingredients, add the hot water/coffee, and whisk or beat on low speed until combined. Fold in the floured mini chocolate chips, if using. Divide the batter evenly among the prepared pans.
- Bake for 19–23 minutes. The cakes are done when a toothpick inserted in the center comes out clean. Cool the cakes in the pans set on a cooling rack for 1 hour. Run a knife around the edges to help loosen the sides, remove the cakes from the pans, peel off the parchment, and place on the rack to finish cooling.
- Make the chocolate mousse: In a small bowl, whisk the hot water and cocoa powder together until smooth. Melt the chopped chocolate in a double boiler or microwave. Pour hot water/cocoa mixture into the melted chocolate and stir until thick and smooth. Set aside. In a large bowl, whip the heavy cream, confectioners’ sugar, and vanilla extract together on medium-high speed until medium peaks form, about 3 minutes. Pour in the chocolate mixture and gently fold together with a spatula. Do not overmix. Cover the mousse and refrigerate for at least 2 hours or up to 2 days.
- Assemble the cake: Level the cakes if needed by slicing off the tops. Place 1 cake layer on your cake stand. Spread about 1.5 cups of chocolate mousse on top. Top with the second layer, upside down, and spread with mousse. Top with the third cake layer, right side up, and spread with mousse. Top with the final cake layer. Spread the remaining mousse on top and around the sides of the cake as a crumb coat. Smooth the sides with a bench scraper. Refrigerate for at least 1 hour and up to 4 hours.
- Make the chocolate ganache: Place the chocolate in a heat-proof bowl. Heat the cream in a saucepan over medium heat just until it begins to gently simmer. Pour the warm cream over the chocolate and let it sit for 2–3 minutes. Stir slowly until the chocolate has melted and the mixture is smooth. Refrigerate the ganache for at least 30 minutes or up to 1 hour to thicken.
- Pour or spoon the thickened ganache on the chilled cake. Smooth the top and sides with an icing spatula. Top with optional garnish. Serve cake immediately or chill, uncovered, for up to 4–6 hours before serving.
Notes
Tried this recipe?
Let us know how it was!
Gluten-Free Chef & Latin Cuisine Innovation Specialist
My youngest son’s celiac diagnosis at four changed everything. Suddenly, all those traditional Brazilian and Portuguese recipes from my avó needed to be completely reimagined without losing their soul.
After graduating from Johnson & Wales and working Miami’s Latin fusion scene, my son’s diagnosis became my calling. How do you make gluten-free empanadas that taste like childhood? Over eight years, I’ve developed 320+ gluten-free recipes celebrating authentic Latin flavors using cassava flour and plantain alternatives.
My gluten-free empanada recipe won “Best Appetizer” at the 2023 Miami Gluten-Free Food Festival. I ran “Sabores Sin Gluten,” a catering business serving Miami’s Latino community—quinceañeras, family gatherings, all the celebrations that matter.
Food is culture, and everyone deserves to experience the joy of sharing traditional family meals, regardless of dietary restrictions.