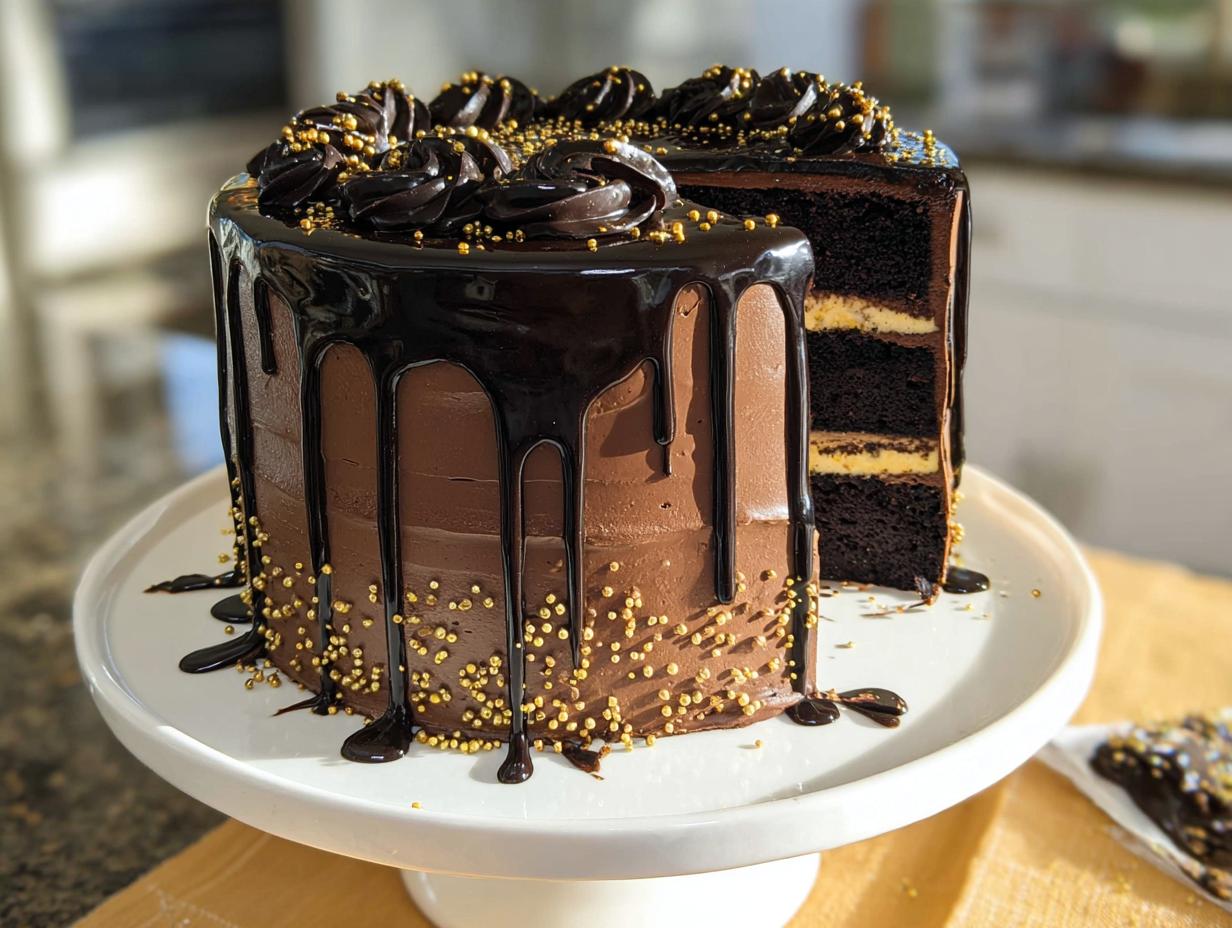
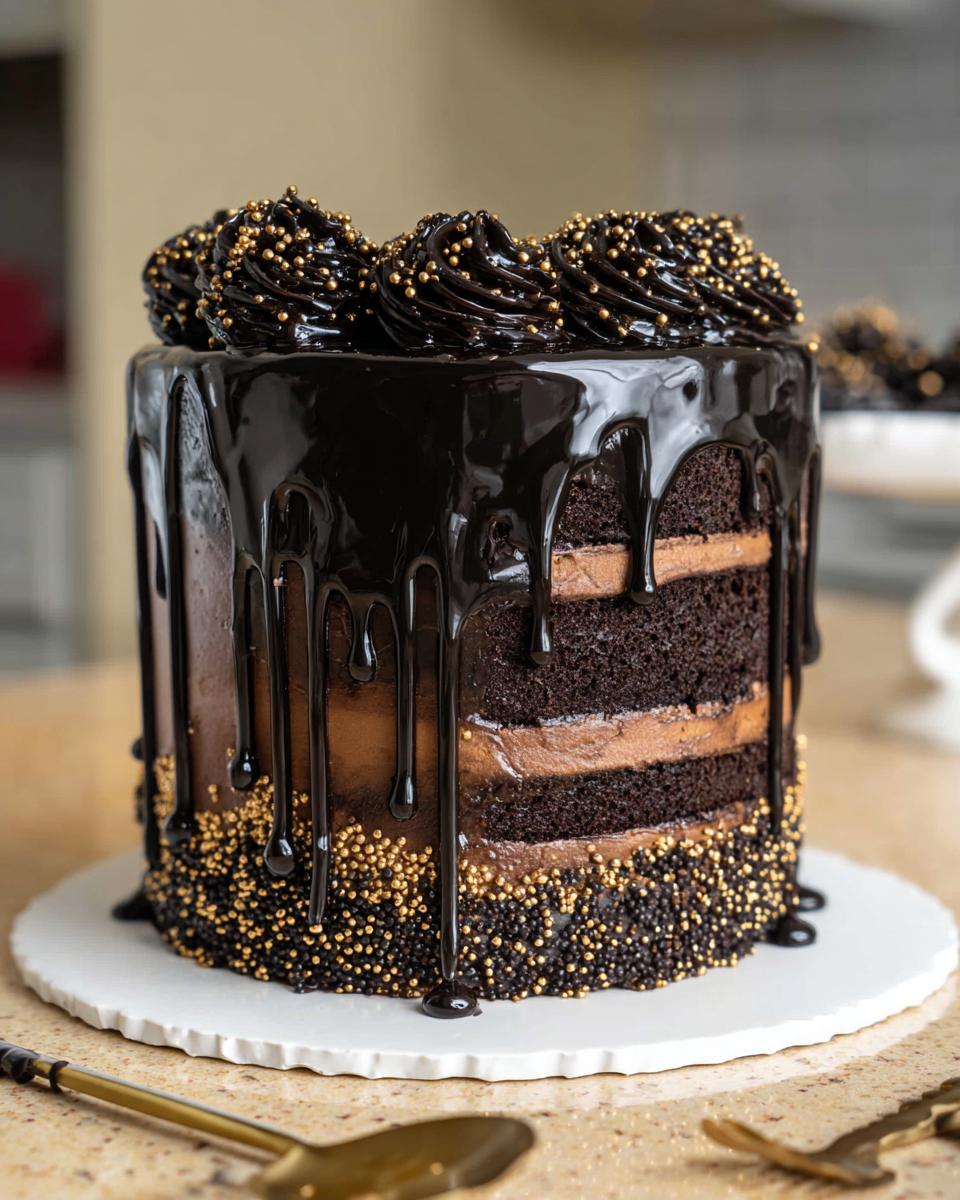
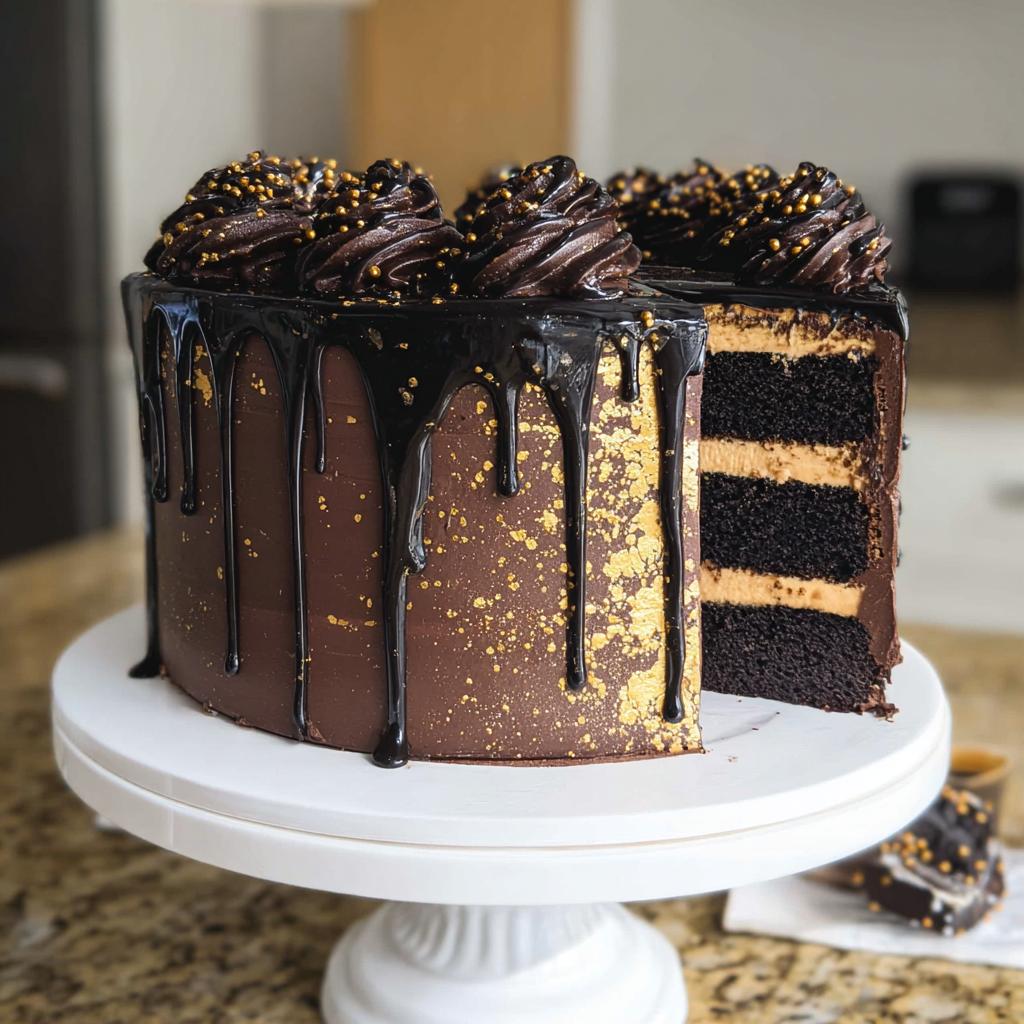
If you think stunning, show-stopping desserts are off-limits when you’re baking gluten-free, you have got to try this recipe! I am so excited to share my showstopper with you today: the most gorgeous, decadent, and completely show-stopping Black and Gold Drip Cake you’ll ever see. This isn’t just a pretty face, either; it’s totally safe for our gluten-free friends and family!
I still remember the first birthday party I hosted for my daughter when she turned six. She had just been diagnosed with celiac disease, and I wanted her to have a birthday cake that was as beautiful as it was delicious. I decided to attempt a “Black and Gold Drip Cake,” inspired by her favorite colors. As I crafted the cake, I felt the excitement and pressure balancing on my shoulders—would it turn out? But when I finally unveiled that cake, dripping with rich chocolate ganache and adorned with golden sprinkles, the look of happiness on her face was priceless. It became a beautiful reminder that gluten-free baking could be both fun and fancy, bringing joy to special celebrations without compromising on taste or elegance.
I learned so much about my own limitations and creativity during that time, just like I’m always learning new things about baking. If you want to know more about my philosophy on family nutrition and avoiding tricky allergens, you can check out my ‘About Me’ page over here. Trust me when I say that using black cocoa powder creates a cake layer so deeply rich and moist, even veteran bakers won’t guess it’s gluten-free. Grab your mixers; we are making magic today!
Why This Black and Gold Drip Cake Recipe Works for Every Celebration
When you’re hosting a big party, especially with dietary needs in the mix, you need a cake that steals the show but doesn’t cause drama in the kitchen. This Black and Gold Drip Cake is that hero! It’s gorgeous, it’s fun, and it’s completely safe for everyone to enjoy.
- It tastes incredible—seriously, you won’t believe it’s gluten-free!
- The dark layers and gold accents mean it works for everything from fancy birthdays to fun New Year Cake Ideas.
- The texture holds up perfectly, even when traveling to a party venue—big win for busy parents!
Impressive Visuals for Any Party Theme
Black and gold isn’t just a color scheme; it’s a whole mood! Whether you’re throwing a milestone birthday bash or planning sophisticated New Year Cake Ideas, this design reads instantly elegant. You just need a few gold sprinkles and boom—instant Party Theme upgrade.
Guaranteed Gluten-Free Success
This is the best part for me. Because we are using wonderful, naturally gluten-free black cocoa powder, the rich flavor is all there, without worrying about weird flour substitutes messing up the delicate Buttercream Drip. It’s proof positive that allergy-friendly food can be absolutely show-stopping!
Essential Equipment for Your Black and Gold Drip Cake
Okay, here’s the deal with showstopper cakes like this one: you can have the best recipe in the world, but if your tools aren’t cooperating, you’ll end up frustrated. Since this cake involves layering, crumb coating, and that tricky drip, you need a few specific pieces of gear to make it look professionally done. Don’t worry, most of these are things you might already have, especially if you get into serious baking!
The absolute MVP for decorating is the spinning cake stand. Trust me on this one! When you’re trying to get that smooth, flawless coat of dark chocolate buttercream (that’s the layer underneath your drip), being able to spin the cake effortlessly while holding your bench scraper steady is a game-changer. It saves your arm and ensures you don’t leave smears where you touch the cake.
You’ll also want to make sure you have your basics ready. Having sturdy 8-inch cake pans guarantees your layers bake evenly. And for the actual drip application, I highly recommend grabbing a small piping bag. It lets you control exactly where the ganache starts dripping down the side, so you aren’t just pouring it everywhere and hoping for the best.
Here’s the master list of what you’ll need to make construction easy:
- 8-inch cake pans: You need three of these for good height!
- Spinning cake stand: Seriously, buy one if you don’t have one. It reduces stress immediately.
- 10-inch greaseproof cake board: This gives you a nice wide base to work on when decorating.
- Large offset spatula: Essential for smoothly spreading that dark frosting.
- Bench scraper: This tool helps you get those perfectly smooth, sharp sides on your buttercream.
- Electric hand mixer or stand mixer: Whipping that butter takes time, save your arm strength!
- Small piping bag with an open star frosting tip: This is for those gorgeous swirls you pipe on top for the final decoration.
Having all this ready before you even start mixing means you can focus entirely on the fun parts—the dark colors and the shiny gold!
Ingredients Needed for the Black and Gold Drip Cake Layers
When you are aiming for a showstopper like this Black and Gold Drip Cake, the ingredients list for the cake itself needs precision, especially since we are skipping the gluten. Don’t skip the steps that call for room temperature ingredients, though! That simple step is what keeps the structure beautiful and light, even with the heavy black cocoa. I promise, taking the time to gather everything properly is half the battle won.
We need ingredients for the actual cake layers, and then we’ll cover the frosting and the drip later, but look at what goes into the cake structure itself. Notice the balance between the dry ingredients (flour, sugar, and that crucial black cocoa) and the wet ones (buttermilk and warm water). The water helps bloom that cocoa powder perfectly, giving us that deep, almost velvety color we are aiming for.
Make sure your eggs and buttermilk are out on the counter for about an hour before you start. This helps them emulsify so much better with the oil and vanilla. If you want more secrets on how I handle gluten-free baking in general, including tips for moisture control, I broke down my favorite techniques right here.
For the layers, here’s the must-have list:
- 2 cups all-purpose flour (260g)
- 2 cups granulated sugar (400g)
- 3/4 cup black cocoa powder (75g)—don’t substitute this!
- 2 tsp baking powder and 1 1/2 tsp baking soda
- 1 tsp fine salt
- 1 cup warm water (240g)
- 1 cup buttermilk (room temperature, 240g)
- 1/2 cup vegetable or canola oil (110g)
- 2 large eggs (room temperature, 112g)
- 2 tsp vanilla extract or vanilla bean paste (8g)
Crafting the Rich Black Dark Chocolate Buttercream Frosting for Your Black and Gold Drip Cake
Now that our deep, dark cake layers are cooling off, it’s time to tackle the beautiful, velvety canvas for our masterpiece: the dark chocolate buttercream! This is the frosting that holds everything together and gives our Black and Gold Drip Cake its dramatic foundation. Honestly, getting this right is the secret to that luxurious, smooth finish that makes the gold pop.
The biggest non-negotiable here is using room temperature butter. I cannot stress this enough for achieving that smooth Buttercream Drip texture later. If the butter is cold, you’ll get lumps, and if it’s too warm, it will turn oily and won’t hold its shape when you try to stack the cake. We want butter that yields just slightly when you press it gently.
We’re using black cocoa powder again, which is intense! It gives us that incredibly dark color without adding a ton of extra cocoa flavor that can make frosting taste bitter or dry. Start by beating your butter alone until it’s super fluffy—we’re incorporating air right at the start.
Here’s the order I follow for the best result. We mix in the sifted black cocoa, vanilla, and salt first. Then, we very, *very* slowly add the powdered sugar, alternating with the heavy cream. Low speed is your best friend here until it’s incorporated, or you’ll have a sugar cloud filling your entire kitchen! I always give mine a good splash of cooled, melted semi-sweet chocolate right at the end. That tiny bit of melted chocolate actually helps stabilize the buttercream and deepen the black color even further. If you want more visual tips on getting that perfect black shade, I often look at pros like Chel Sweets for inspiration on their incredible drip techniques!
Once it’s all mixed—slow speed until combined, then whip it up medium for a minute until fluffy—cover it immediately. This stuff crusts over faster than you can say “gold leaf.” We need it ready and waiting for that chilling time we talked about!
Preparing the Glossy Black Chocolate Drip for Your Black and Gold Drip Cake
Getting that perfect, dramatic drip on your Black and Gold Drip Cake feels like the final magic trick, doesn’t it? This chocolate ganache is super simple, but the temperature control is everything. Too hot, and it runs right down to the cake board in a sad puddle; too cool, and it clogs your spoon or bottle and creates chunky peaks instead of smooth lines. We only need a few ingredients here: semi-sweet chocolate chips and heavy whipping cream, plus that important black gel coloring to keep the look cohesive.
The secret is heating the cream until it’s steaming—I usually do mine in the microwave for about 45 seconds. Pour that hot cream over the chips and just let it sit there for two full minutes without touching it! This gives the heat time to work its gentle magic instead of forcing a mix. Stir slowly once you return to it. Then, add your black coloring and stir until it’s perfectly smooth and shiny.
Now, here’s the crucial bit: you must wait! Let it cool down slightly until it’s just warm to the touch, maybe 90 degrees F if you are using a thermometer, but honestly, just test it on your finger. You want it thin enough to pour nicely but thick enough to feel slightly like thick syrup. That consistency is what gives you those gorgeous, defined drips when you apply it to your firmly chilled cake.
Step-by-Step Instructions to Assemble Your Black and Gold Drip Cake
We’ve mixed it, we’ve baked it, we’ve made that gorgeous dark frosting, and we’ve prepared the mirror-like drip. Now comes the fun, rewarding part: putting this stunning Black and Gold Drip Cake together! Take a deep breath—this is like building a gorgeous, edible tower, and we’re going to take it slow so everything stays neat and level. Remember, patience during assembly is just as important as precision when measuring the dry ingredients!
Baking and Preparing the Cake Layers
First things first, always preheat that oven to 350 F/ 175 C. Remember that thin, dark batter? Divide it evenly across your three 8-inch pans—I use my kitchen scale here to make sure every layer is the exact same height! Bake them for about 24 to 27 minutes. They should spring back lightly when touched. Once they come out, let them cool in the pans for about 10 minutes—don’t rush them out too soon! Once inverted onto a wire rack, let them cool completely, which means cool to the touch all the way through. Once they’re fully cool, I always take a serrated knife and level the tops. A flat top makes stacking SO much easier; nobody wants a tilted cake!
Assembling and Crumb Coating the Black and Gold Drip Cake
Place your first layer onto your cake board—use a tiny dab of buttercream underneath to stop it from sliding around. Now, spread a generous, even layer of that dark chocolate buttercream on top of that first layer using your offset spatula. Stack the next layer, add frosting, and top with the final layer. Now we tackle the crumb coat! Spread a very thin layer of frosting all around the entire cake. This coat traps any loose crumbs floating around. This is where you get familiar with your bench scraper to smooth the sides. Here’s where the chilling time comes in: Pop the entire cake into the fridge for a solid 30 minutes (or the freezer for 10 minutes if you’re in a hurry!) until that thin layer is rock hard.
Applying the Drip and Final Black and Gold Decoration
Once that crumb coat is firm, apply your second, thicker, final layer of buttercream. Smooth it out as best you can, then chill it again for about 20 minutes. You need the cake totally cold when the drip goes on! Test your cooled ganache consistency—if it’s too stiff, warm it up for just 5 seconds in the microwave. Then, using a spoon or a small squeeze bottle, gently start placing the drip just over the edge of the cake, letting gravity do the hard work. Don’t flood the top! Let the drips fall naturally. After the drips have set up a little (give them 10 minutes!), grab your piping bag fitted with that open star tip. Pipe those dramatic swirls right across the top center. Finish it off by flicking some edible gold luster dust mixed with clear alcohol onto the swirls, or just scattering on some pretty gold and black edible sprinkles around the base and the top edges. It looks expensive!
Tips for Success When Making a Black and Gold Drip Cake
You’re so close to having that magnificent Black and Gold Drip Cake sitting on your counter! But before you get there, let me share a few things I learned the hard way so you don’t have to. The biggest struggle with black cakes is taste. If you use standard unsweetened cocoa powder and try to dye it black, it tastes bitter and chalky. That’s why we use black cocoa powder—it’s processed differently, giving us that intense color without ruining the flavor profile of that rich dark chocolate buttercream.
Next, beware the flowing drip! If your cake layers aren’t properly chilled—I mean really, truly cold—the ganache will melt the exterior buttercream, and your drips will turn into thin, messy rivulets running all the way to the board. Make sure you give that final layer of frosting at least 20 minutes in the fridge to set up hard before you attempt the pour.
Also, for stability, especially if you are transporting this beauty, load up on that crumb coat and the second layer of frosting. A thick coating acts like structural cement. If you are looking for other baked goods that use deep flavors like this, I have some great recipes for cupcakes and muffins that play with dark chocolate bases you might like right over here. Stick to these three points, and your cake will be picture-perfect for any Party Theme!
Storing and Serving Your Finished Black and Gold Drip Cake
Whew! You did it! Your stunning creation is complete. Now, the million-dollar question: how do we keep this beautiful thing looking—and tasting—perfect until the party starts? Since we used a real, honest-to-goodness dark chocolate buttercream frosting (not that shortening-based stuff that lasts forever), we have to keep this cake cool.
That beautiful buttercream is packed with butter, which means your cake needs to stay snugly tucked into the refrigerator. Do not leave it sitting out on the counter for hours, especially if your house is warm; nobody wants a sagging cake! Just cover it loosely with a cake dome or a large, upturned bowl. This keeps the fridge air off the surface and prevents it from drying out or picking up any weird smells from dinner.
How long does it last? Well, if your family is anything like mine, it won’t last long! But genuinely, this cake stays fantastic for about three days when refrigerated properly. Keep an eye on any delicate gold decorations, like dust or edible paint, as the moisture in the fridge can sometimes dull them slightly.
Here is my best pro-tip for serving: If you’ve had the cake chilling for more than an hour, it’s going to be rock hard straight from the fridge. Buttercream gets tough when cold! You want those amazing dark layers to be tender again. So, about one to two hours before you plan to slice it, take the whole thing out and let it sit on the counter. I use that time to plate things up or get the coffee ready. When the frosting is soft again, that’s when you get the best flavor and the easiest slicing. If you need more organization tips for planning big family celebrations involving delicious bakes, I have a whole section on managing occasions over here that might help!
Frequently Asked Questions About the Black and Gold Drip Cake
I get so many questions whenever I post pictures of this cake because honestly, it seems way more complicated than it is! If you’re worried about pulling off the look, or you’re trying to figure out how it fits into your schedule or Party Theme, here are the things people ask me most often. We’ll make sure your Drip Cake turns out perfectly!
Can I make the cake layers ahead of time for my Black and Gold Drip Cake?
Oh, absolutely! In fact, I highly recommend it! Baking the layers ahead of time is my biggest sanity saver. Once the layers are completely cool—and I mean totally, 100% cooled—wrap each one tightly in plastic wrap. You can keep them like that on the counter for a day, but for the best texture, I usually pop them into a freezer bag and freeze them for up to a month. When you’re ready to decorate, let them thaw on the counter for just an hour or two before you begin leveling and frosting. They actually slice and handle so much better when slightly chilled or partially frozen!
How do I make the buttercream a true, non-grey black color?
This is the trickiest part! If you just use standard cocoa powder, you’ll end up with a muddy brown or grey color, which is a total letdown. You MUST use good quality black cocoa powder. It’s darker and less acidic than regular cocoa. Even with that, you’ll still need a bit of help. I always mix in a nice, concentrated black gel food coloring right at the end. Start with just a drop or two, mix on low speed until it’s incorporated, and let it sit for five minutes, as the color deepens as it sits. Gel is better than liquid drops because it won’t change the texture of your beautiful buttercream!
What are good New Year Cake Ideas if I want a different flavor profile?
That’s a great question! While the dark chocolate is fantastic for New Year Cake Ideas, if you want a little kick to go with that black and gold glamour, try this easy swap during the buttercream stage. Before you mix in the powdered sugar, add about two teaspoons of instant espresso powder right along with the sifted black cocoa powder. The coffee doesn’t make the cake taste like coffee, but it seriously deepens and intensifies the chocolate flavor. It adds an extra layer of sophistication that pairs perfectly with the festive look!
If you have any other lingering questions about technique or need to get in touch with me directly about an ingredient substitution, feel free to send me a message through my contact page. Happy baking!
Black and Gold Drip Cake
Ingredients
Equipment
Method
- Preheat your oven to 350 F/ 175 C. Prepare three 8-inch cake pans by lining and greasing them.
- In a large bowl, whisk together 2 cups all-purpose flour, 2 cups sugar, 3/4 cup black cocoa powder, 2 tsp baking powder, 1 1/2 tsp baking soda, and 1 tsp salt.
- In a separate large bowl, combine 1 cup warm water, 1 cup buttermilk, 1/2 cup oil, 2 eggs, and 2 tsp vanilla extract. Stir to combine.
- Pour the dry ingredients into the wet ingredients and mix by hand until fully incorporated. The batter will be thin.
- Divide the batter evenly between the prepared cake pans. Bake for 24-27 minutes. Use a kitchen scale to ensure even batter distribution for uniform cake layers.
- Let the cake layers cool in the pans for 10 minutes. Loosen the edges with an offset spatula and invert them onto wire racks to cool completely.
- Once cooled, level the top of each cake layer with a serrated knife. Wrap and freeze layers if making in advance.
- For the buttercream, beat 2 cups of butter on medium speed for 30 seconds until smooth.
- Add 1 cup sifted black cocoa, 1 tsp vanilla extract, and 1/2 tsp salt. Mix on low speed until incorporated.
- Slowly mix in 4 cups powdered sugar and 1/2 cup heavy cream on low speed until combined.
- Mix in 1 cup cooled, melted semi-sweet chocolate on low speed until the desired consistency is reached.
- For a deeper black color, add black gel food coloring. Cover the frosting with plastic wrap to prevent crusting.
- For the drip, place 1/2 cup semi-sweet chocolate chips in a heatproof bowl.
- Heat 1/3 cup heavy cream in the microwave for 45 seconds to 1 minute until steaming. Alternatively, heat on the stovetop until simmering.
- Pour the hot cream over the chocolate chips. Let sit for 1-2 minutes.
- Add black gel food coloring and stir slowly until the mixture is smooth and combined.
- Let the ganache cool for about 10 minutes until slightly warm to the touch.
- Stack and frost the cake layers on a cake board, using a dab of frosting to secure the first layer.
- Apply an even layer of buttercream between each cake layer with a large offset spatula.
- Spread a thin coat of frosting around the entire cake to cover the layers. Smooth with a bench scraper.
- Chill the cake in the fridge for 30 minutes or freezer for 10 minutes until the frosting is firm.
- Apply a second, thicker layer of frosting and smooth with a bench scraper.
- Chill the cake again for 20 minutes in the fridge or 10 minutes in the freezer until the buttercream is firm.
- Test the ganache consistency. Gently warm it in the microwave for a few seconds if needed.
- Add the drips to the chilled cake using a squirt bottle or spoon.
- Decorate the top of the cake with piped buttercream swirls using an open star tip. Add gold and black sprinkles around the base and paint the swirls with edible gold paint or a mixture of gold luster dust and clear liquor.
Notes
Tried this recipe?
Let us know how it was!
Gluten-Free Nutritionist & Family Meal Planning Expert
Working as a pediatric dietitian at Children’s Hospital of Denver, I kept meeting families overwhelmed by managing their children’s celiac disease. Parents stressed, kids frustrated, everyone eating bland boxed “gluten-free” products.
That’s when I realized my calling: creating practical, balanced gluten-free solutions for real families with busy schedules. I’ve developed 375+ family-friendly recipes focusing on lunch boxes, after-school snacks, and make-ahead dinners that actually work.
My meal planning system was featured in Parents Magazine, and I presented research at the Rocky Mountain Pediatric Nutrition Conference. My evidence-based approach ensures recipes meet both taste and health standards—families need solutions that work in the real world, not just perfect test kitchens.