
Baking with kids is so much more than just mixing flour and sugar; it’s about making moments stick! If you’re looking for a sweet way to help your little ones grasp those tricky concepts of minutes and hours, I’ve got just the thing. We used to struggle turning the clock face into something fun, but then I landed on these amazing Clock Face Countdown Cookies. They are just so satisfying to make and even better once covered in icing!
I remember one evening, I was in the kitchen with my youngest son, Alex, trying to invent a unique way to teach him about time. As we rolled out dough, the idea to create these special cookies just hit me. We shaped each one like a clock and decorated them with bright icing. It wasn’t just baking for us that night—it turned into a really delightful lesson and a huge bonding moment. Watching him count down to dinner using his cookie really showed me how food can turn small things into big memories. This little project? It’s now a beloved family tradition, fueling our love for baking while helping Alex finally master telling time in the sweetest way possible.
What I love most is that these sugar cookies themselves are sturdy enough to handle enthusiastic decorating (perfect for little hands!). And hey, if you or someone you know avoids gluten, don’t sweat it; this dough adapts beautifully, which is something I always make sure of in my own kitchen. Check out my baking philosophy to see why small tweaks make a huge difference!
Why You Will Love These Clock Face Countdown Cookies
Seriously, why wouldn’t you love these? They tick all the boxes for family baking sessions:
- They are amazingly easy to keep track of—finally, baking with kids isn’t stressful!
- The sturdy cookie base is perfect for little decorators who get a little heavy-handed with the icing.
- It’s secret learning time! It turns teaching the concepts of time into a delicious treat.
- You can adapt the recipe easily if you need a gluten-free version, which is a huge bonus for our family.
Essential Equipment for Making Clock Face Countdown Cookies
Before we even think about creaming that butter, we need our tools lined up! Having the right gear makes rolling out these Clock Face Countdown Cookies so much smoother. Don’t worry if you don’t have everything; I promise, we can usually improvise, but these items truly make the process fly by.
If you look over my ingredient list, you’ll see I rely on my trusted stand mixer. Trust me, while you *can* do this by hand, your arm will thank you later!
- Stand Mixer: This is key for getting the butter and sugar perfectly creamed for the best cookie structure. Watch closely though, because you don’t want to overmix once the liquid goes in!
- Plastic Wrap: Essential. You need this to wrap the dough tightly before the chilling stage. A good wrap keeps the dough from drying out and maintaining that perfect cold temperature.
- Rolling Pin: Absolutely necessary for getting that even 1/4 inch thickness we need. If your pin is too light, the cookies will bake unevenly, and we want crisp edges, not burnt ones!
- Cookie Cutters: This is where the magic happens! You’ll need round cutters, ideally in a couple of different sizes if you want to create variety for your clock faces.
- Baking Sheets: Make sure these are clean and ready to go. I always line mine with parchment paper (even though it’s not technically listed, it’s my secret trick for easy cleanup!).
Specialized Tools for Perfect Clock Cookies
When cutting out the clock shapes, the size of your round cutter really dictates how much detail you can get in with the icing later. If you use a cutter that’s much larger than 3 inches, piping the 1 through 12 numerals gets a little fiddly.
My favorite rolling pin has a good, solid weight to it. It helps get that dough flattened consistently across the board. Remember what I said about rolling thin but staying even? A heavy rolling pin helps you achieve that uniform thickness so your Clock Cookies all finish baking at the same time. No sad, doughy centers in this house!
Ingredients for Perfect Clock Face Countdown Cookies
We are focusing just on the cookie base here, since the icing is a whole separate adventure! The dough for these Clock Face Countdown Cookies comes together so fast, you’ll be surprised we need all that chilling time later. Remember, everything being exactly right here supports that perfect, sturdy shape we need for decorating later on.
Make sure your butter is truly softened—not melted! That really matters for the creaming step later on.
Here’s what you need for the 24 cookie yield:
For the Cookies:
- 1/2 cup (1 stick) softened butter
- 2/3 cup white sugar
- 1 whole egg, plus 1 egg white (we skip that extra yolk for better crispness!)
- 1/4 tsp vanilla extract
- 1 2/3 cups all-purpose flour
- 3/4 tsp baking powder
- 1/4 tsp salt
If you’re heading down the gluten-free route, check out my dedicated guides on gluten-free substitutes; using a good 1-to-1 blend works wonders here without losing that essential crumb strength.
Step-by-Step Instructions for Clock Face Countdown Cookies
Okay, let’s get our hands dirty! The instructions might look simple, but I have a few tricks to make sure your Clock Face Countdown Cookies don’t spread into sad, flat puddles on your baking sheet. Pay close attention to the temperatures and chilling, because that’s where you build the structure.
We have two big phases here: getting the dough perfect and then getting it baked perfectly. Grab that mixer, and let’s go!
Mixing and Chilling the Clock Cookies Dough
First up, if you are using a stand mixer—please use it! Cream that softened butter and the white sugar together until it gets nice and fluffy. We’re looking for a pale yellow, light mixture here. Next, toss in the egg and that vanilla extract. Mix just until it all looks combined; don’t overdo it yet!
Now, you’ll mix in the dry ingredients: the flour, baking powder, and salt. This is important: mix only until the flour streaks *just* disappear. Once you see those dry bits vanish, STOP. Overmixing cookie dough is the enemy of a sharp shape! Seriously, stop mixing when it just comes together.
Wrap that beautiful dough up tight in plastic wrap. It needs a good chill session—at least 60 minutes in the fridge. I always leave mine overnight because it makes the dough so much easier to handle, like cold clay. You can read some other great baking timeline ideas over at my breakfast inspiration section, but for these clocks, chilling is non-negotiable!
Shaping and Baking Your Clock Face Countdown Cookies
Time to wake up that dough! Preheat your oven to 400 degrees Fahrenheit—it needs to be hot when they go in. Dust your counter lightly, then roll that dough out. Your target thickness is exactly 1/4 inch. If you go much thinner, they’ll bake too fast and risk cracking. Too thick, and your clock hands might not look as sharp after baking.
Use your round cutter to stamp out all those clock faces. Make sure you place them on your prepared baking sheets with a little breathing room between each one.
Pop them into that hot oven for about 7 to 8 minutes. You’re watching for just barely-golden edges. Once you see that slight color change, pull them out! They will firm up beautifully as they cool, giving you that sturdy base you need for the next steps.
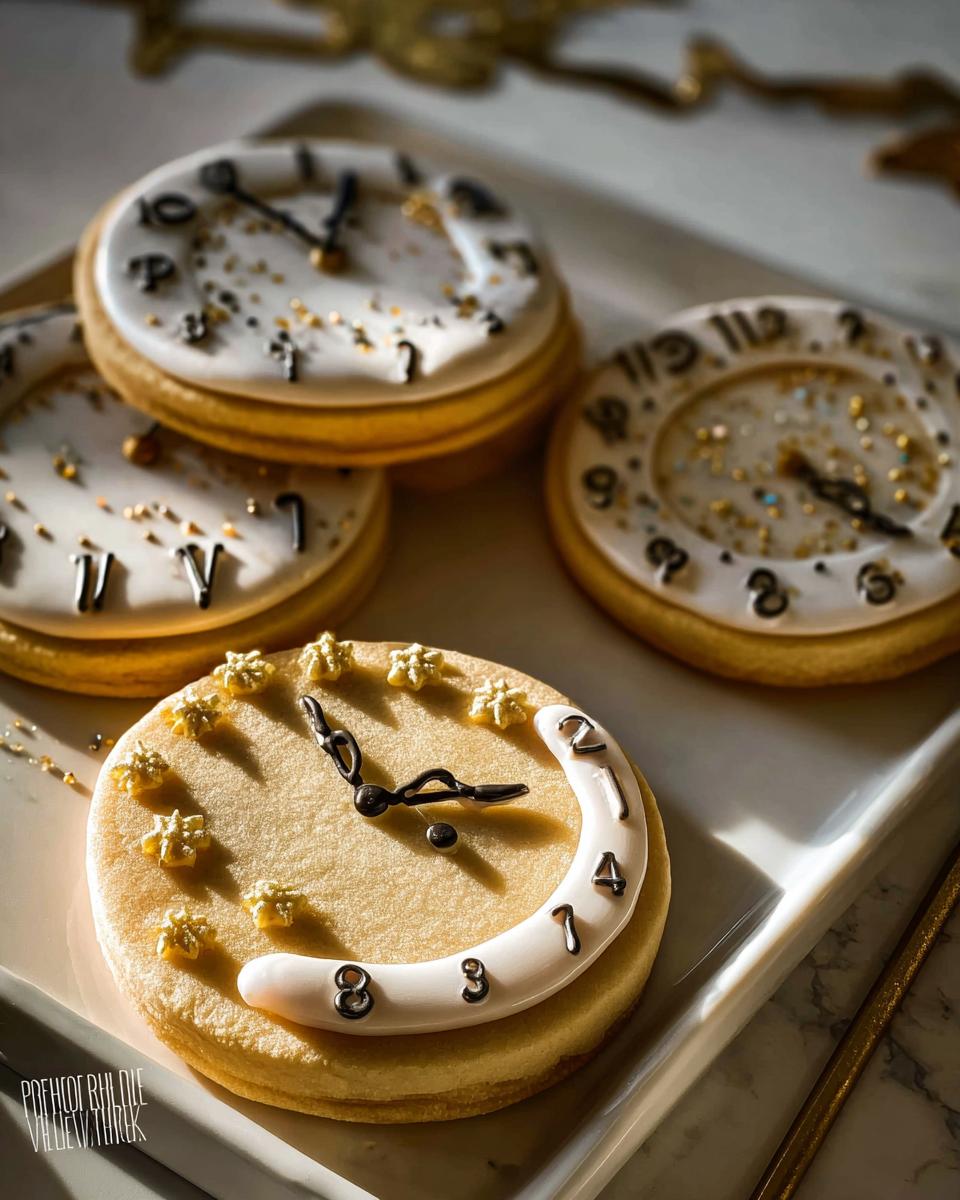
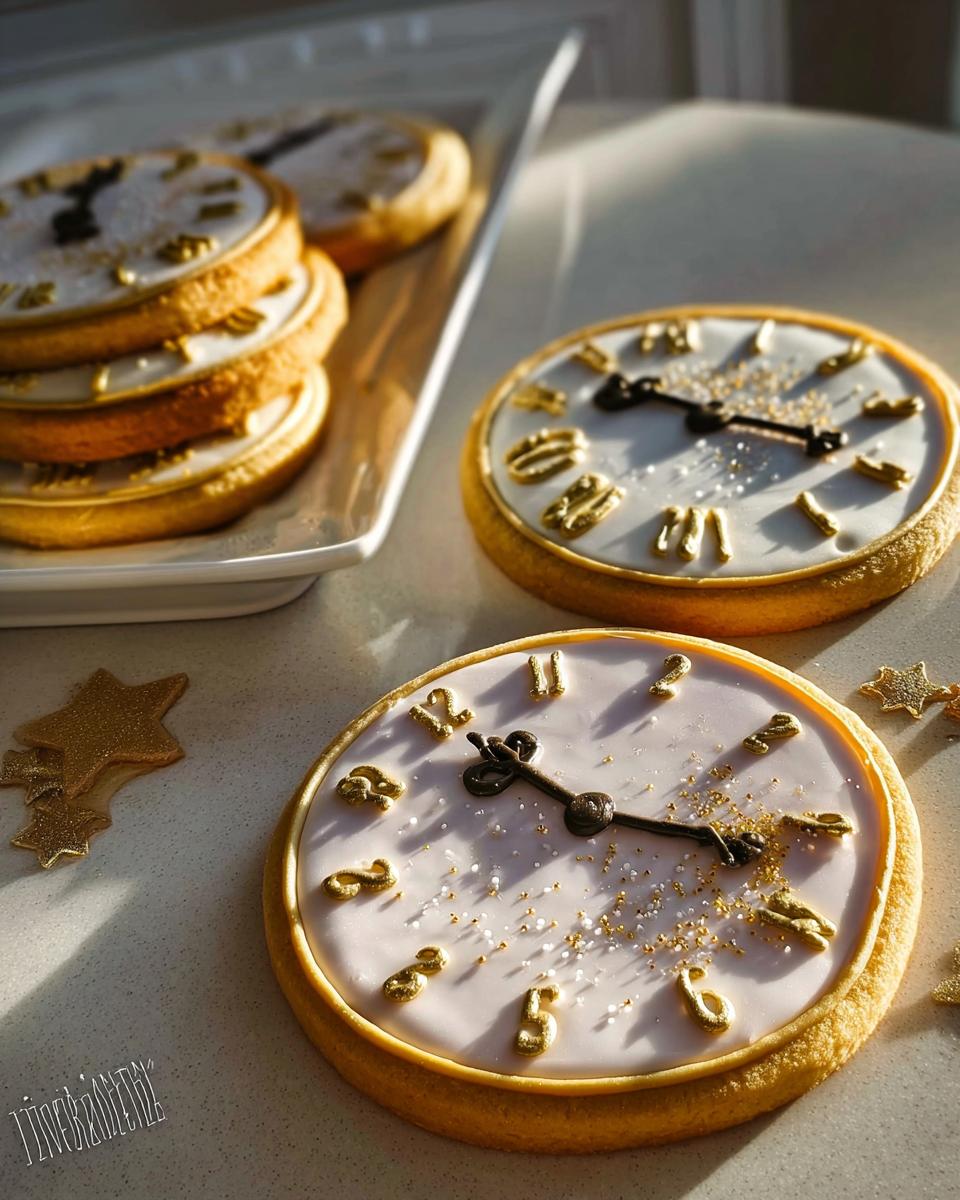
Decorating Tips for Your Clock Face Countdown Cookies
Once the cookies are totally cool—and I mean *totally* cool, otherwise that icing melts into a puddle of sadness—it’s time for the fun part! These Clock Face Countdown Cookies really shine when you use Royal Icing. It dries hard, which is exactly what a clock needs to look crisp and professional.
You can go for a simple, fixed look where you pipe the numbers and the hands on permanently. Or, if you want to get really interactive for a party theme, you can use a bit of melted chocolate or a tiny dab of buttercream to attach a removable (and edible!) little hand made from extra cookie dough or even a piece of candy. Imagine setting the cookie to midnight for New Year’s Eve! You can find some other fun ideas for sweet treats in my festive candy collection.
If you want a really polished New Year’s Eve look, check out how they handle the timing on this site, which gave me some great visual ideas for the hands here.

Achieving Perfect Royal Icing Consistency
This is my number one tip for any cookie decorator, especially when dealing with details like the small numbers on a clock. You actually need *two* consistencies of Royal Icing.
First, you need a thicker icing, often called the “outline” consistency. This should be stiff enough to hold its shape when you pipe it, perfect for marking the ’12’, ‘3’, ‘6’, and ‘9’. Then, you thin some out slightly more—the “flood” consistency. This thinned icing fills in the areas without spilling over your stiff outlines. Just add water one tiny drop at a time until it flows off your spatula in a smooth ribbon that disappears back into the bowl after about 10 seconds. Too thin, and your numbers will bleed; too thick, and you’ll have lumpy hands!
Tips for Success When Making Clock Face Countdown Cookies
Even with a great recipe, sometimes the execution needs a little nudge, right? I’ve learned a few things over the years about keeping these Clock Face Countdown Cookies looking perfectly round and keeping them from spreading out into funky ovals while baking. It all comes down to temperature management and handling!
Here are my top secrets to ensure you get sharp edges and sturdy canvases for your icing masterpiece:
- Super Cold Dough is Your Best Friend: I know I mentioned chilling for an hour, but honestly, if your kitchen is warm, or if you handle the dough a lot while cutting, it needs an emergency chill session. If your cutouts look like they are starting to soften even slightly before they hit the oven, pop the entire tray back into the freezer for five minutes. Seriously! Cold dough spreads less, and those sharp clock edges stay put.
- Bake on Parchment or Silicone Mats: Never place your cookie cutouts directly onto an unlined, hot baking sheet. Even though the recipe uses a good amount of fat, direct contact can create a greasy bottom layer that encourages spreading. Using parchment paper or a silicone baking mat ensures even heat transfer from the bottom up, helping those perfect shapes stay intact.
- Sifting the Dry Ingredients: This is a tiny step, but I swear by it for sugar cookies. Sifting the flour, baking powder, and salt together aerates them. This prevents you from having to mix the dough longer to break up clumps, which means less gluten development and, ultimately, a more tender final cookie that doesn’t shrink oddly when baked.
- Gluten-Free Adaptation Insight: For my friends baking gluten-free, you can absolutely use your favorite 1-to-1 GF blend here! However, because GF flours often absorb moisture differently, you might find you need an extra 15 minutes of chilling time. If you are working with a GF dough, treat it with a little extra care when handling. You can find some great tips on managing GF batters in my muffin and cupcake section, which often highlights the same structural needs!
Storing and Keeping Clock Face Countdown Cookies Fresh
Once you’ve gone through the hard part—the baking and the decorating—you probably want these beauties to last, right? We made these Clock Face Countdown Cookies for a party centerpiece, and they need to hold up not just in looks but in taste too!
If you are decorating them with Royal Icing, you have to store the base cookies and the decorated cookies differently until they are fully ready to go. I learned this the hard way during a big birthday bash years ago—icing slid right off warm cookies!
Storing Uniced Cookie Bases
For the plain, baked cookies (the clock bases), storage is super simple. As soon as they are completely cool, stack them loosely in an airtight container. Don’t pack them too tightly if you plan on icing them the next day, or they might lose a little shape. Kept like this at cool room temperature, they stay perfectly fresh for almost a week. That’s plenty of time to bake ahead for a big party!
Storing the Iced Clock Face Countdown Cookies
Once you’ve piped on your numbers and hands, the game changes because Royal Icing needs air circulation to truly set hard. You absolutely do not want to crowd these!
The best way to store finished Clock Face Countdown Cookies is unwrapped on a baking sheet for the first 12 hours so the icing cures completely. After they are rock hard, then you can carefully layer them. Use parchment paper or wax paper sheets between each layer in your airtight container.

When stored correctly at room temperature, these decorated masterpieces will stay delicious for about 5 to 7 days. Don’t even think about the fridge, though! Humidity is the enemy of glossy royal icing, so keep them on the counter, away from any direct sunlight or heat. They taste best when they’ve had a day or two for those flavors to settle, anyway!
Frequently Asked Questions About Countdown Cookies
It’s completely normal to have a few questions swirling around when you’re trying out a new themed cookie, especially one that involves teaching time! We’ve had tons of success with these, and I’ve gathered the most common ones people ask about making their perfect batch of Clock Face Countdown Cookies.
Can I make these Clock Cookies ahead of time?
Yes, absolutely! This is one of the biggest perks of using a sturdy sugar cookie base. You can bake all your plain clock bases—the actual cookie part—up to a week in advance and store them tightly wrapped at room temperature. Keep in mind, though, that if you plan on using them for a specific Party Theme countdown, you should only ice them 1 to 2 days before the event. This gives the Royal Icing enough time to fully cure so it doesn’t smudge or get sticky from condensation.
What is the best icing for these Clock Face Countdown Cookies?
I’m so glad you asked this! For the best, sharpest, and most professional-looking results on any numbered cookie, you really must use Royal Icing. It dries hard and matte, which gives you that clean, structural look a clock needs. Buttercream icing is tasty, yes, but it stays softly textured and can easily smear if you’re handling the cookies a lot, which is a disaster for a countdown theme! Stick to Royal Icing for crisp lines and durability.
If you ever have trouble or just want to drop me a line with a question about a specific adaptation, please don’t hesitate to reach out through my contact page. Happy baking!
Share Your Clock Face Countdown Cookies Creations
Whew! We made it through the mixing, the baking, and the surprisingly detailed decorating process for our Clock Face Countdown Cookies! Now comes my absolute favorite part—seeing what you all come up with in your kitchens. I’ve shared my family’s story and my best tips for getting those sharp edges, but I genuinely love seeing the crazy, creative ways you bring these clocks to life.
Are you sticking to a classic party theme look, or did you decorate them for a specific milestone countdown? Maybe you tried making edible, moving hands? Whatever you did, I want to hear all about it!
Please, if you enjoyed this recipe and it brought some fun chaos into your afternoon, take a moment to leave a rating for the recipe below. Seeing those stars always encourages me to keep sharing these family traditions!
And if you snapped a picture of your beautifully iced Clock Face Countdown Cookies, share them with me! You can tag me on social media or show them off in the comments section right here. I always check back to browse through the gallery of your delicious work. If you’ve got questions about adapting ingredients or need future recipe ideas, you can always browse my main recipe index for more inspiration. Happy decorating, everyone!

Clock Face Countdown Cookies
Ingredients
Equipment
Method
- If you have a stand mixer, cream together the softened butter and white sugar until well combined. Add the egg and vanilla extract, and stir until incorporated.
- Stir in the all-purpose flour, baking powder, and salt. Mix until the dough comes together.
- Cover the dough with plastic wrap. Chill in the refrigerator for at least 1 hour, or preferably overnight.
- Preheat your oven to 400 degrees Fahrenheit. Roll out the chilled dough to 1/4 inch thickness. Use cookie cutters to shape the dough into clock faces.
- Place the shaped cookies on baking sheets and bake for 7-8 minutes, or until the edges are lightly golden.
Notes
Tried this recipe?
Let us know how it was!
Gluten-Free Chef & Latin Cuisine Innovation Specialist
My youngest son’s celiac diagnosis at four changed everything. Suddenly, all those traditional Brazilian and Portuguese recipes from my avó needed to be completely reimagined without losing their soul.
After graduating from Johnson & Wales and working Miami’s Latin fusion scene, my son’s diagnosis became my calling. How do you make gluten-free empanadas that taste like childhood? Over eight years, I’ve developed 320+ gluten-free recipes celebrating authentic Latin flavors using cassava flour and plantain alternatives.
My gluten-free empanada recipe won “Best Appetizer” at the 2023 Miami Gluten-Free Food Festival. I ran “Sabores Sin Gluten,” a catering business serving Miami’s Latino community—quinceañeras, family gatherings, all the celebrations that matter.
Food is culture, and everyone deserves to experience the joy of sharing traditional family meals, regardless of dietary restrictions.