When the sun is hot and the thought of turning on the oven makes me sweat just imagining it, I turn immediately to my collection of no-bake desserts. There is something so wonderfully satisfying about throwing ingredients together and trusting the magic of the refrigerator to do all the hard work for you! Out of all those freezer and chiller heroes, nothing beats the ultimate simple, nostalgic treat: the Oreo Cookies and Cream Icebox Cake. I remember the very first time I had this—it was at a summer picnic my friend hosted, and honestly, I nearly wept with happiness.
That cool, creamy layer sandwiched between crunchy Oreos just took me right back to childhood, those days of dipping cookies in milk until they nearly melted. It tasted like pure summertime joy. When I finally figured out how to adapt the recipe to be gluten-free for my own table, I knew I had a keeper. Now, whenever I serve it at family gatherings, watching everyone savor every single creamy, dreamy slice feels like continuing a tradition. This cake proves that the simplest desserts are often the ones that connect us the most.

Why This Oreo Cookies and Cream Icebox Cake is Your New Favorite No Bake Cake
Honestly, if you’re looking for a showstopper that requires zero actual oven time, stop your search right here. This Oreo Cookies and Cream Icebox Cake is the answer to your busy weeknights and surprise guests. It’s the kind of dessert where you feel like a genius baker without actually having to turn on the heat.
- It is the ultimate easy no bake cake! You just mix, stack, and chill. That’s it!
- The active work time is laughably short. Seriously, we’re talking minutes before it goes into the fridge to work its magic.
- Who doesn’t love Oreos and cream? This flavor profile is guaranteed to make every single person happy. For more easy wins, you can check out all my go-to flavor combinations over on my main recipes page.
Quick Assembly, Maximum Impact
You really only need one big bowl, your mixer, and a standard 8×8 pan. Forget complicated pastry bags or fancy folding techniques. We are layering cookies and whipped cream, and that’s the beautiful simplicity of this recipe. It means less cleanup, which is always a win in my book!
Perfect for All Ages: A Kid Friendly Treats Staple
If you need something that the kids will absolutely devour, look no further. This is the definition of kid friendly treats. They can help you arrange that first layer of cookies or press the topping on later. It’s just fun, familiar food, and it always disappears fast!
Gathering Items for Your Oreo Cookies and Cream Icebox Cake
Before we get into the fun part—the layering—we need to make absolutely sure we have everything ready to go. Since this is a no-bake recipe, preparation is everything! You’re looking at two main component groups: the filling and the cookies themselves. Don’t skimp on the chilling time, either! This cake needs that full 8 hours in the fridge, or even better, overnight, for the cookies to soften up properly against that dreamy cream. If you try to slice it early, you’ll end up with a stack of cream and hard cookies, and nobody wants that sad outcome!
Ingredients for the Creamy Layer
This is where the richness comes from, so pay attention to the quality of your cream! We are whipping everything fresh here to get those perfect, stable peaks for structure.
- You need 2 full cups of heavy whipping cream. Make sure it’s cold, straight from the fridge!
- For sweetness, grab 1 cup of powdered sugar. Don’t swap it for granulated sugar; powdered dissolves much better into the cream for that smooth texture.
- And 1 tablespoon of pure vanilla extract. Trust me, the pure stuff makes a huge difference in the final aroma!
Components for Assembly of the Oreo Cookies and Cream Icebox Cake
This is the fun part—the star ingredient! I like to slightly overbuy cookies just in case I sneak a few while I’m setting up the layers. Keep the cookies you need for the structure separate from the ones you’ll crush for the top garnish.
- You need 30 whole Oreos ready for the actual layers. You might have to break a couple in half to fit them snugly into the corners of your dish, but that’s part of the charm!
- Then, set aside 12 more Oreos that you’ll crush up later. These are strictly for that gorgeous, crunchy topping we add right at the end.
Essential Equipment for Making the icebox cake recipe
Look, you don’t need a high-tech kitchen for this incredible icebox cake recipe. That’s the beauty of it! When you’re avoiding the oven completely, cleanup is already halfway done. But a few specific tools are key to getting that perfect, pillowy whipped cream and seamless layers. Having them ready prevents scrambling mid-assembly, which always leads to lopsided layers, trust me!
First up, you absolutely need a good, deep large mixing bowl. You’ll be whipping up those 2 cups of heavy cream, and you want sufficient headspace so you’re not wearing cream splatters all over your shirt when the mixer starts humming. Speaking of mixing, your hand mixer or stand mixer with a whisk attachment is non-negotiable. Trying to whip cream to stiff peaks by hand is a full arm workout, and frankly, you deserve to save your energy for eating cake!
Next, for assembly, you’ll need an 8×8 baking dish or pan. This standard size is perfect for getting dense, satisfying layers. If you go too large, your layers will be too thin and won’t have that classic, soft cookie-to-fluffy-cream ratio we are aiming for. And finally, keep a good spatula handy. You’ll use this for smoothing out the whipped cream layers evenly over those whole Oreos—smooth application ensures every slice is picture-perfect.

Step-by-Step Instructions for the Oreo Cookies and Cream Icebox Cake
Alright, now that we have all our gear ready, it’s time to actually build this beauty! Watching this cake come together is so satisfying because it feels productive without forcing you to slave over any hot appliances. We’re building layers of creaminess and crunch, and the secret is careful assembly so that structure stays solid when it hits the fridge. I always make sure my cream is perfectly whipped before I even *look* at the Oreos, because the filling can’t wait!
Preparing the Whipped Cream Filling
In your biggest mixing bowl, dump in the heavy cream, the powdered sugar, and that lovely vanilla extract. You have to start low and slow—I mean it! If you crank the mixer to high immediately, it’s going to splash everywhere, and we need every bit of that cream. Mix on low speed until it starts looking a little thicker, then bump it up. You’ll keep mixing for maybe 7 to 8 minutes total until you get what I call “stiff peaks.” That means when you lift the beaters out, the cream should stand straight up on its own without flopping over. That’s perfect lift!
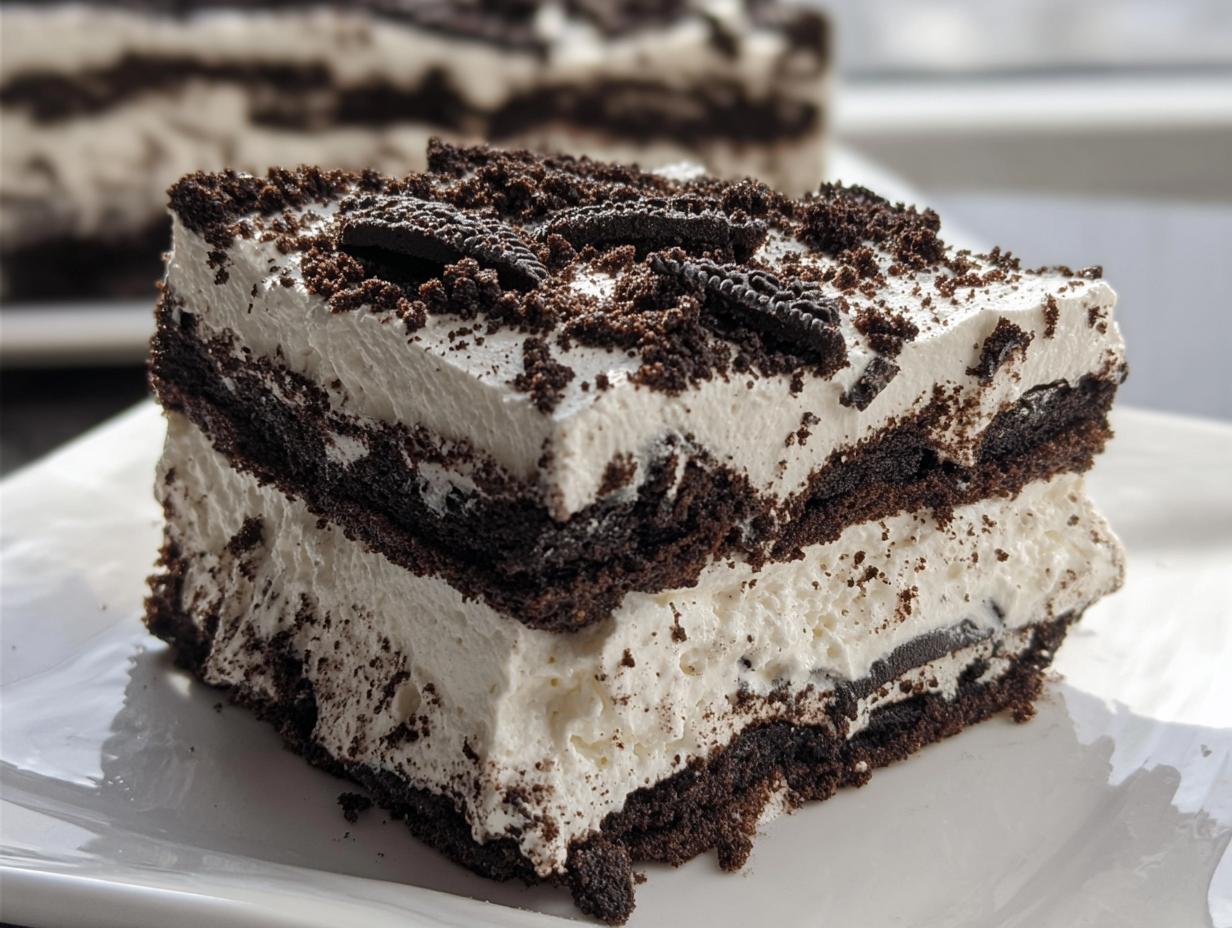
Layering the Cookies and Cream Desserts
Time for architecture! Grab your 8×8 dish. Lay down your first snug layer of whole Oreos right on the bottom. If you have little gaps at the edges, don’t stress; use a few broken pieces to fill those spots so the cream doesn’t just leak out the sides. Next, carefully spread half of your glorious whipped cream mixture over that cookie base. Smooth it gently with your spatula. Then, we repeat the cookie step: place another layer of whole Oreos right on top of that smooth cream. Finish the construction by spreading the rest of that delicious cream on top, smoothing it out nicely so the top looks uniform.
Chilling and Finishing the Oreo Cookies and Cream Icebox Cake
This is the hardest, yet most crucial, part: waiting! Cover that dish tightly with plastic wrap or a lid. This needs to chill for a solid 8 hours minimum, but honestly, overnight is what makes the magic happen—it lets those whole cookies soften perfectly. Don’t peek! Once you’re ready to serve this masterpiece, *then* you sprinkle those 12 crushed Oreos right over the top for the final flourish. That crunch has to stay crunchy, so don’t add it too soon!

If you want to check out how I manage to build sturdy chocolate layers sometimes, you can see my technique for a make-ahead mousse that uses similar stability principles. And if you love seeing these kinds of simple stacked desserts, my friend over at Together As Family has a fantastic take on the classic Oreo icebox cake!
Tips for the Perfect Oreo Cookies and Cream Icebox Cake Texture
You know, I’ve seen people try to cheat this recipe, and it never ends well! The texture of this Oreo Cookies and Cream Icebox Cake is 90% dependent on using the right ingredients and respecting the process. Since we aren’t baking anything, the whipped cream isn’t held together by egg structure or flour—it’s holding the whole thing together! So yes, we need to be sticklers about a few things here.
Ingredient Quality and Substitutions
First, let’s talk about that vanilla. I know the clear stuff is tempting, but trust me when I say use pure vanilla extract. It adds a depth of flavor that makes the cream taste rich, not just sweet. It’s one of those minor upgrades that really shouts ‘homemade excellence’!
Now, the big one: I see so many people reaching for Cool Whip thinking it’ll save time. Save your energy, because you’ll just ruin the structure! Cool Whip might seem stable, but it just doesn’t hold up when it sits overnight absorbing moisture from the cookies. It gets watery and starts weeping, and then your gorgeous layers slide apart. When you make your own whipped cream, you control the stiffness, and that stiffness is what keeps the cake standing proud for those 8 hours of chilling. If you’re interested in how I focus on quality ingredients even in my standard recipes, take a peek at my post on chocolate chip cookies; the principle is the same!
Remember my notes on the cookies? Make sure you crush those topping cookies *right* before you need them. If you crush them too early and store them, they absorb humidity from the air and clump up, losing that wonderful crisp edge we need for the final presentation.
Making Your Oreo Cookies and Cream Icebox Cake Gluten-Free
Because my own journey has forced me to bake gluten-free for years, this specific Oreo Cookies and Cream Icebox Cake was one of the first recipes I tackled for my family after figuring out my own dietary needs. It’s naturally so close to being GF already—it’s just cream and cookies! The secret, of course, is finding a sandwich cookie that truly mimics the beloved original.
Luckily for us, the market for gluten-free chocolate sandwich cookies has exploded in recent years! You have so many fantastic options now that give you that classic crunchy chocolate wafer and sweet filling. When you are substituting, pay attention to size. You want the cookie to be close to the same diameter as a standard Oreo so you can successfully layer that 8×8 dish without huge gaps. Use a brand you already trust, or one that you know holds up well against moisture.
When I make the gluten-free version, I tend to be a *little* more generous with the cream. Sometimes the GF wafers can be a touch harder than the wheat-based ones, so giving them an extra hour or two submerged in that sweet whipped cream ensures they soften into that perfect, fudge-like texture. If you’re interested in reading more about my favorite gluten-free flour blends—which come in handy even in a no-bake recipe—you can check out my detailed write-up on gluten-free bread recipes. Understanding how flours behave is key, even when you aren’t baking!
The process is identical to the classic version, which is honestly part of why I love serving this adaptation. Nobody can tell the difference once it’s chilled and covered in that yummy topping!
Storing and Serving Your Cookies and Cream Desserts
So, you’ve successfully navigated the layering, you’ve waited the agonizing 8 hours (or maybe you wisely left it overnight!), and now you have this beautiful, tall slice of nostalgia ready to go. The biggest question now is: how do I keep it perfect until everyone has had their fill? Since this dessert is all about that soft cream layer, storage is different than say, hiding away leftovers of a baked casserole.
The key to preserving the texture of your cookies and cream desserts is keeping it well-covered and cold. Think of it like protecting a giant whipped cream dollop! Always cover your 8×8 dish tightly. If you’ve lost the original lid, good quality plastic wrap works fine, but make sure it’s pressed down slightly so air doesn’t dry out that pretty top surface.
You must keep this cake refrigerated. Seriously, room temperature is the enemy of cream! It will start to melt and lose the structure that the chilling process worked so hard to achieve. If you’re planning ahead for a party next week, you might be wondering how long it lasts. Generally, I find that this cake is at its absolute peak texture on Day One or Day Two. By Day Three, the cookies have absorbed so much moisture—which some people actually prefer, making it almost fudge-like—that the cake gets a bit softer overall.
But here’s my biggest tip, and I can’t stress this enough, especially if you followed the instructions correctly: do not put the crushed Oreo topping on until you are ready to slice and serve. If you put those crumbly bits on before storing it, they absorb refrigerator moisture and turn into sad, dark little smudges instead of crunchy garnish. Keep your topping stored separately in an airtight container, and then sprinkle it liberally just moments before you walk the dish over to the dessert table. This separation maintains that wonderful textural contrast we worked so hard for!

If you’re interested in other make-ahead desserts that sit beautifully in the fridge, I highly recommend checking out my tips for prepping a make-ahead breakfast strata; the principles of covering and chilling are surprisingly similar for keeping things fresh!
Frequently Asked Questions About the icebox cake recipe
I always get the best questions after people have tried to make this, and honestly, that’s when I know you’re truly getting into the spirit of this super easy icebox cake recipe! Since it’s so simple, sometimes people wonder about tweaking it. Here are a few things I hear all the time when readers reach out!
Can I use a different type of cookie in this no bake cake?
You certainly *can*, but you’re messing with perfection! The whole point of this specific recipe is that classic, recognizable flavor combination—cookies and cream. If you have to substitute, I’d recommend sticking to a similar chocolate sandwich cookie, especially if you’re making the gluten-free version I mentioned earlier. If you’re aiming for a different flavor profile entirely, chocolate wafers will work beautifully as they soften wonderfully, though it won’t be *exactly* the same profile as the classic Oreo. Just know that whatever you swap in might change how much soaking time the cookies need to get that soft, cake-like texture we want!
How long can I keep the Oreo Cookies and Cream Icebox Cake refrigerated?
This is a delicate balance, my friend! Because we’re using homemade whipped cream, we need to respect its structure. I always tell people this cake is at its absolute, undeniable peak magnificence on Day One. It is firm, the cookies are slightly softened but still have a little backbone, and the cream is holding strong. By Day Two, it’s still wonderful, but the cookies will have gotten significantly softer, almost melting right into the cream. I’d say you can keep it safely covered in the fridge for up to 3 days. After that, the texture starts to get a little *too* mushy for my liking, and I worry about it weeping. If you ever have trouble reaching me with a question on storage or technique, you can always send a quick note via my contact page!
Estimated Nutritional Value for This Oreo Cookies and Cream Icebox Cake
You know, because this recipe relies on heavy cream and cookies, it’s definitely a treat we save for special moments—it’s rich, decadent, and full of flavor! But since I’m often adapting recipes for the gluten-free community, providing transparency on what we’re eating is super important to me. So, let’s look at the rough numbers for a good, solid slice of this Oreo Cookies and Cream Icebox Cake.
Keep in mind these numbers are just estimates, based on standard recipe measurements and typical commercial Oreo cookies. If you use specialty cookies or heavier cream, things might shift a little. But for a standard serving of 1 slice, here’s what we’re generally looking at:
- Calories: Around 469 calories per slice. Yep, worth it!
- Fat: This is where the richness lives—expect about 29 grams of fat.
- Carbohydrates: We’re looking at about 51 grams, mostly from the sugar in the cream and the cookies.
- Protein: Expect roughly 4 grams of protein per serving.
It packs a dessert punch, but honestly, nothing beats that texture! It’s indulgence in the best, easiest way possible.
Share Your Experience Making This Delightful Dessert
I have poured my heart and a whole lot of cream into showing you just how easy and rewarding this Oreo Cookies and Cream Icebox Cake is! But honestly, the best part of developing and sharing these family-inspired recipes is hearing from all of you. Did you make it for a summer potluck? Did your kids help layer those cookies? I absolutely need to know!
Please don’t be shy! Head down to the comments section right now and let me know what you thought. Did you stick to the classic recipe, or did you try any small variations I didn’t even think of? Give this recipe a star rating so future bakers know what to expect. I really value hearing about your successes—or even if you ran into a little trouble and need advice!
If you took photos (and I hope you did, because this cake photographs beautifully!), please share them with me on social media! Tag me so I can see your stunning layers and that perfect crunchy topping. Nothing makes me happier than seeing my kitchen inspiration bringing joy to yours. You can find all the ways to connect with me and follow along with more recipe heritage stories when you check out my About page. Happy baking—or should I say, happy chilling!

Oreo Cookies and Cream Icebox Cake
Ingredients
Equipment
Method
- Add the heavy whipping cream, powdered sugar, and vanilla extract to a large mixing bowl. Use a hand mixer or a stand mixer with the whisk attachment.
- Start mixing on low speed, increasing the speed as the mixture thickens. Beat until stiff peaks form, which takes about 7 to 8 minutes.
- In an 8×8 baking dish or pan, place a single layer of the whole Oreo cookies on the bottom. You might need to cut a few cookies to fill the gaps.
- Spread half of the prepared whipped cream over the layer of cookies and smooth the top using a spatula.
- Add another layer of the whole Oreo cookies on top of the cream.
- Spread the remaining whipped cream over the second cookie layer and smooth the top surface.
- Cover the pan with a lid or plastic wrap. Refrigerate for a minimum of 8 hours, or preferably overnight.
- Top the icebox cake with the crushed Oreos just before you plan to serve it.
Nutrition
Notes
Tried this recipe?
Let us know how it was!
Gluten-Free Culinary Storyteller & Recipe Heritage Specialist
Getting diagnosed with non-celiac gluten sensitivity in my late twenties felt like losing my Italian identity. Growing up in nonna’s Brooklyn kitchen, learning traditional techniques that suddenly became off-limits—I decided to fight for those family food traditions instead of giving up.
With my food journalism background and European baking training, I became obsessed with recreating authentic flavors in gluten-free formats. I’ve adapted 400+ traditional recipes from various cultures, with my gnocchi recipe winning “Recipe of the Year” from the National Gluten-Free Living Awards in 2022.
I collaborate with the Italian-American Cultural Center to document traditional family recipes and volunteer with the Westchester Celiac Support Group, teaching monthly pasta-making classes.
Food is the heart of family storytelling. No one should sacrifice their cultural heritage due to dietary restrictions.