When you need a dinner that brings everyone running to the table without needing hours of fuss, you know I’m ready to share the secret! For busy families, the best meals feel like they took all day, but only took about an hour from start to finish. That’s exactly what we get with these incredible Honey BBQ Baked Chicken Legs. They give you that perfect, sticky baked legs texture with the best sweet and smoky flavor—the kind that makes everyone reach for seconds.

I’ll never forget the first time I made these for a family get-together. I had just started exploring gluten-free recipes, trying to ensure my son could enjoy our classic meals without worry. As the sweet, smoky aroma filled the kitchen, I felt a wave of nostalgia wash over me—this was a dish my own parents had often made for us. When I served it, I watched my son’s face light up with joy, a moment that reinforced my love for recreating our culinary heritage. Those chicken legs became a staple in our home, a reminder that a delicious meal can bridge the gap between tradition and dietary needs. Trust me, this Honey BBQ Baked Chicken Legs recipe is going to be your new weeknight champion.
By MARCO SANTOS Gluten-Free Chef & Latin Cuisine Innovation Specialist
Why You Will Love These Honey BBQ Baked Chicken Legs
Honestly, if you need a winner tonight, this is it. I keep coming back to this recipe because it just delivers that comforting, satisfying flavor that busy nights demand. You should definitely check out my comforting dinner recipes inspiration page for more easy ideas!
- They are ridiculously easy to prep—we’re talking less than ten minutes of actual work before the oven takes over!
- We nail that incredible sweet and smoky flavor every single time, making them fantastic for game day dinners or just Tuesday night.
- The final texture is perfectly glazed, giving you those highly desirable sticky baked legs everyone craves.
- Plus, they are naturally gluten-free, provided you check your favorite BBQ sauce bottle!
Essential Ingredients for Perfect Honey BBQ Baked Chicken Legs
You know I’m all about transparency in the kitchen! When the ingredients are simple, you can focus on making sure they’re good quality. For this bbq chicken recipe, we truly only need two groups of items: the stuff to season the chicken first, and the sauce that makes them sticky later. Trust your taste buds, but don’t skimp on the seasoning foundation!
For the Chicken and Seasoning
This is what gives us that foundational savory kick before the honey sweetness takes over. If you skip this rub, you’ll end up with bland chicken, and we can’t have that!
- 1.5 pounds chicken drumsticks (We need about three people to get a decent serving each!)
- 1/4 cup extra-virgin olive oil
- 1 teaspoon salt
- 1/2 teaspoon freshly ground black pepper
- 1/2 teaspoon paprika
- 1/4 teaspoon garlic powder
- 1/4 teaspoon onion powder
- 1/4 teaspoon cayenne pepper (This is just a hint, pinky swear!)
For the Sticky Glaze
This is where the magic happens—the honey BBQ sauce! I usually grab a bottle of something thick, like Sweet Baby Ray’s, but use whatever heavy, flavorful sauce you love. Since we’re keeping things friendly for my son, make sure whatever you grab is certified gluten-free if that’s important to you!
- 1.5 cups barbeque sauce (or maybe a little extra if you like extra saucy chicken!)
Equipment Needed for Honey BBQ Baked Chicken Legs
We keep the gear minimal here. Seriously, this is a low-fuss recipe, which is why it’s perfect for game day! You don’t need fancy smokers or specialized grills to get a great result. You just need the basics that most of us have rattling around in the kitchen drawers.
Here is the short list of what you’ll pull out for this simple bbq chicken recipe:
- An Oven: Obviously! We are baking these beauties until they are tender.
- A Sturdy Baking Sheet: This is crucial because we are going to need a place to line up those drumsticks in a single layer later on—no crowding allowed!
- A Large Bowl: You need space to toss those drumsticks around with the oil and spices until every piece is coated perfectly. Don’t try to rush this coating step!
- An Instant-Read Thermometer: This isn’t optional, even though my grandmother never used one! Since we are dealing with chicken, we absolutely must make sure we hit that safe internal temperature to know the Honey BBQ Baked Chicken Legs are done near the bone.
Step-by-Step Instructions for Honey BBQ Baked Chicken Legs
Okay, deep breath! Even though this has a few parts, it’s super straightforward. We are building layers of flavor here to get those amazing sticky baked legs. If you want more easy chicken ideas, check out my easy chicken recipes inspiration page. We’re going straight into the process!
Prepping the Oven and Chicken
First things first: we crank that oven up to 400 degrees F (that’s 200 degrees C for my friends using the metric system!). Line your baking sheet with aluminum foil—this makes cleanup unbelievably easy, and trust me, we want that efficiency.
In your large bowl, mix up all those dry spices—the salt, pepper, paprika, garlic powder, onion powder, and that little pinch of cayenne—with the olive oil. Now, toss those 1.5 pounds of drumsticks right in there! You need to rub that mixture all over every nook and cranny of the chicken. It needs good coverage so that first 20 minutes of baking gives you a great base flavor.
The Initial Bake and First Glaze
Lay your seasoned drumsticks out on that foil-lined sheet. Don’t let them overlap; they need space to breathe and brown a bit. Pop them in the 400°F oven for exactly 20 minutes. Don’t peek too much!
When 20 minutes are up, pull the tray out. Now, grab your brush and coat them generously with the BBQ sauce. Put them back in the oven, but this time, we only bake them for another 7 to 8 minutes. They are starting to get sticky now, which is exactly what we want!

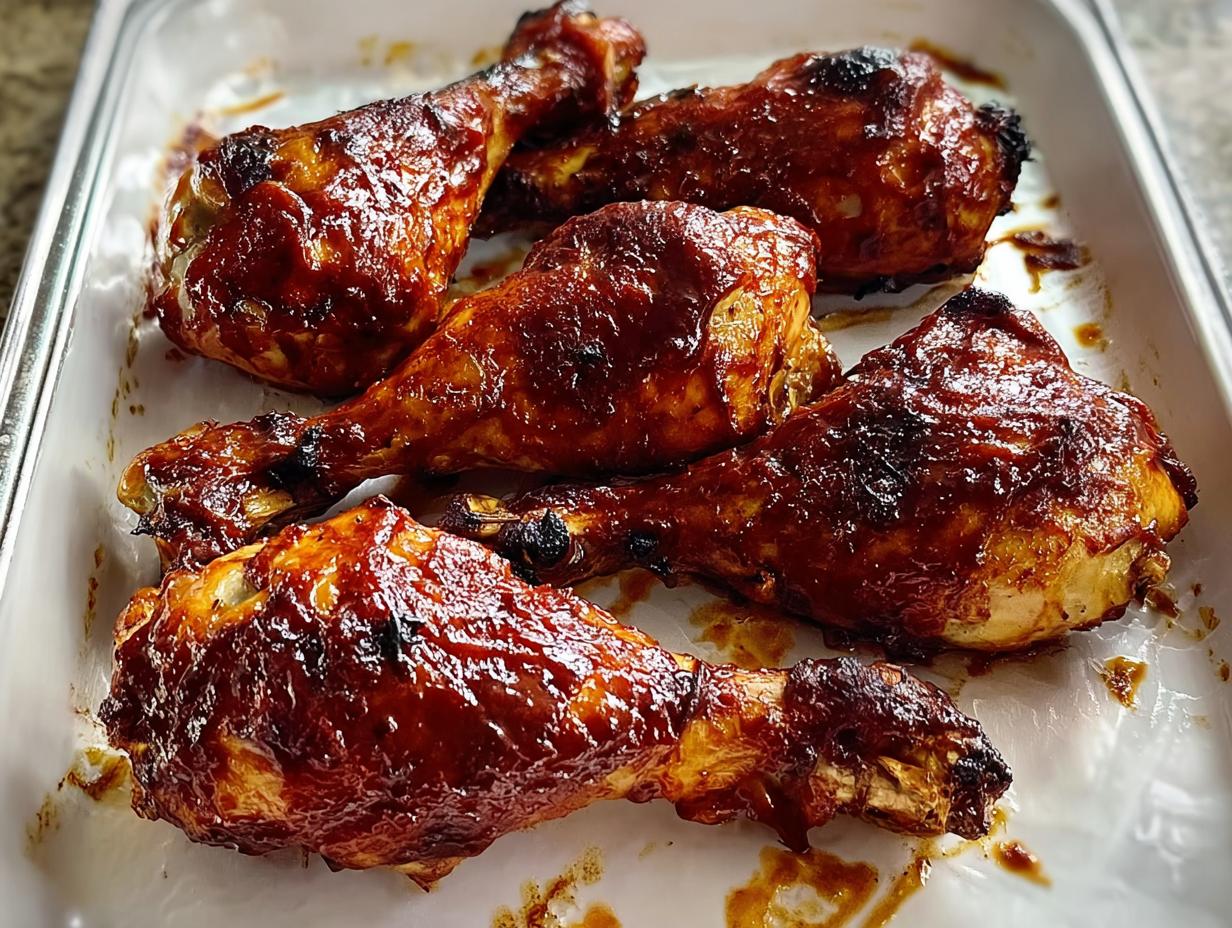
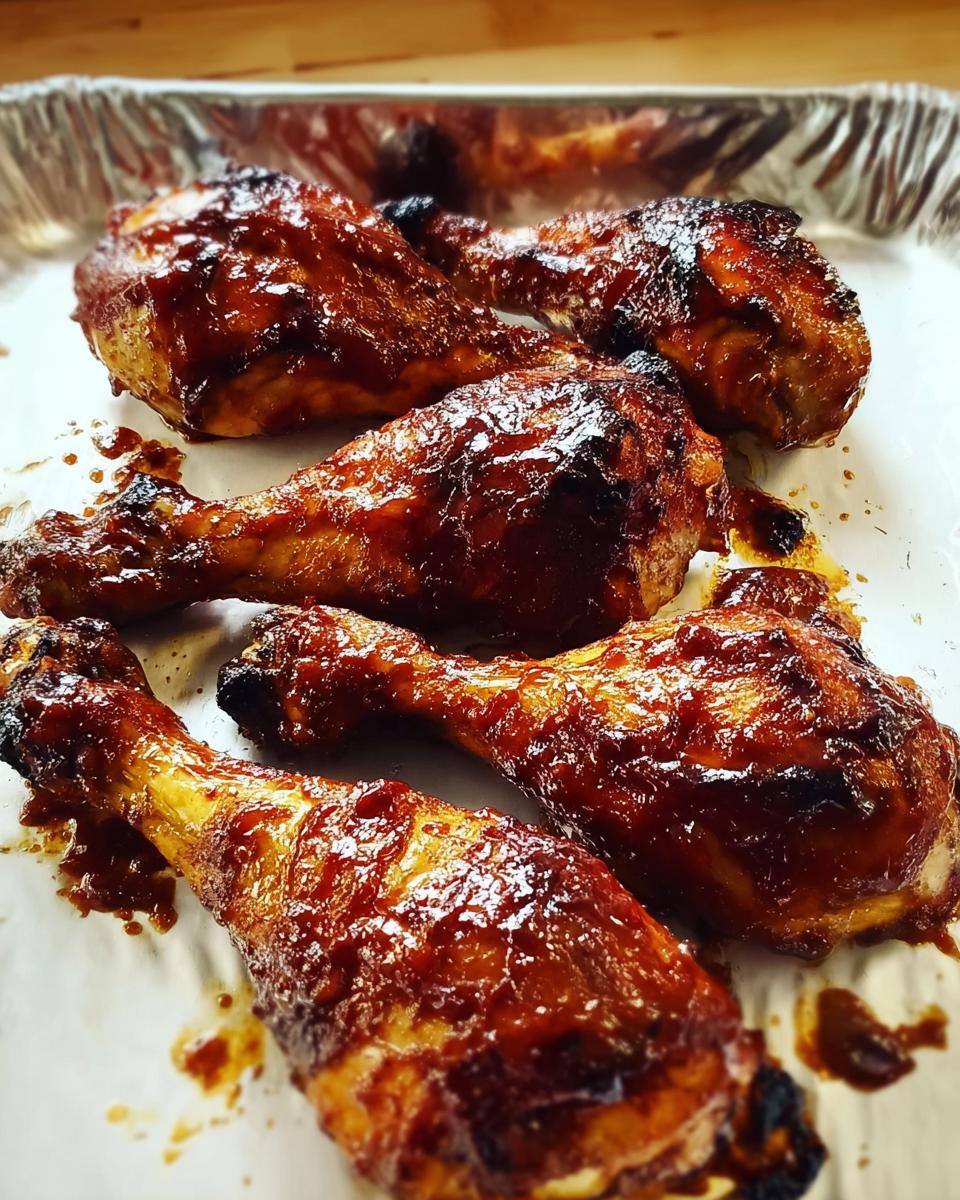
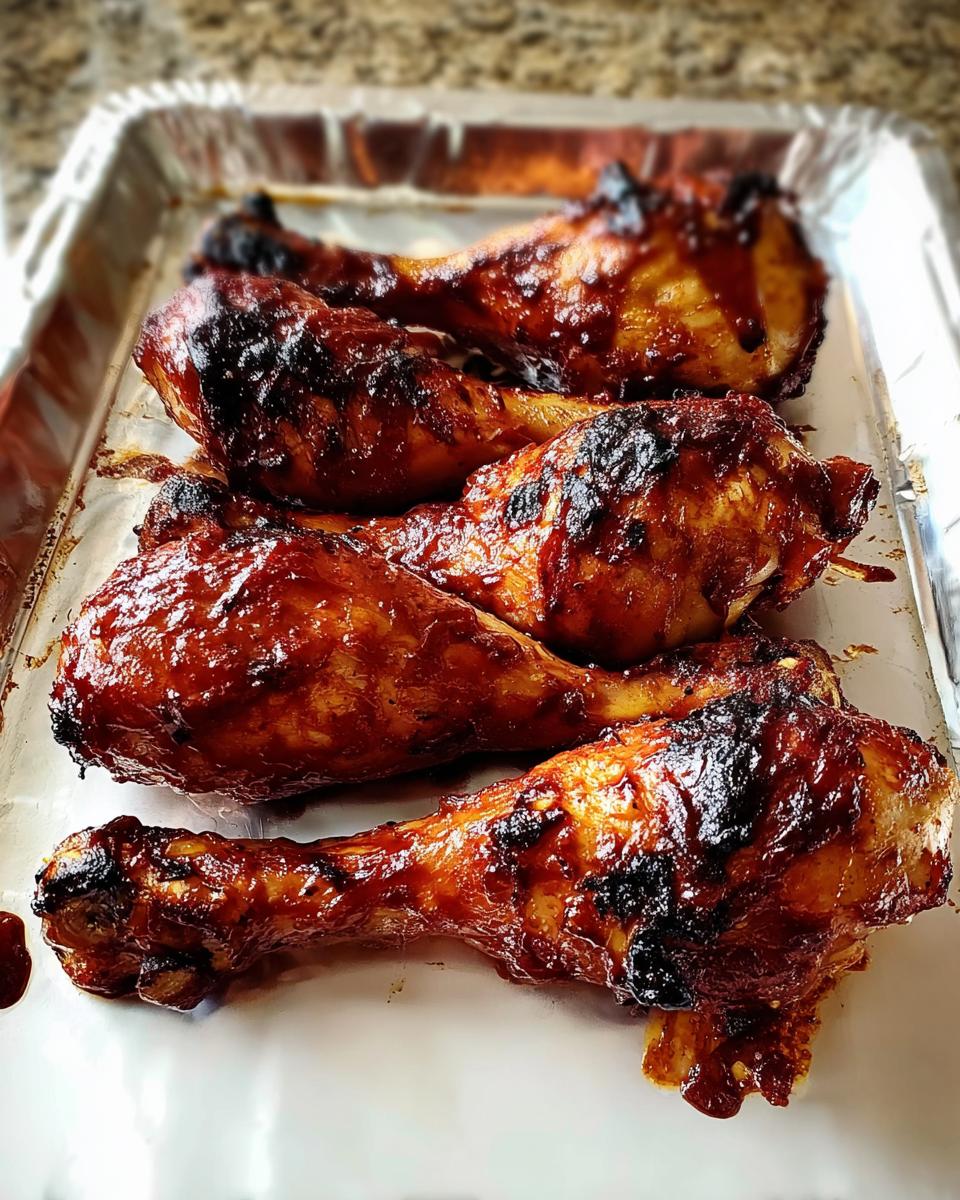
Achieving Sticky Baked Legs with the Broiler
This is the final, crucial step for that caramelized, restaurant-quality finish. Move an oven rack so it’s about 6 inches away from the heat source, and switch your oven setting to the broiler. Be ready, because broiling happens fast!
Brush the drumsticks again with more of that yummy sauce. Slide them under the broiler for 3 to 4 minutes. Watch them like a hawk, seriously! Flip them, brush them one last time, and broil for another 3 to 4 minutes. You are looking for that deep, bubbly color. The absolute final check—and this is super important for safety—is using your instant-read thermometer to make sure the thickest part near the bone hits 165 degrees F (74 degrees C). If it’s there, pull them out! Check out the original Baked BBQ Chicken Drumsticks recipe if you want to see another take, but stick to these steps for the best honey BBQ finish!
Expert Tips for Perfect Honey BBQ Baked Chicken Legs
Look, I love this recipe because it’s so forgiving, which is great when you’re juggling kids or trying to get dinner out fast. But if you want to elevate these Honey BBQ Baked Chicken Legs from “good” to “famous at every cookout,” I have a few little tricks I’ve picked up over the years. These tips focus on getting that deep, sticky coating without letting the skin get mushy underneath.
My first big tip? Don’t be afraid of the initial dry bake! That 20 minutes at 400 degrees F without any sauce is essential. It dries out the skin just enough so that when you apply the sauce later, it clings beautifully instead of just sliding off into a puddle on the foil. It’s the secret to avoiding soggy skin, I promise you.
Also, pay attention to that BBQ sauce quantity. The recipe calls for 1.5 cups because that’s usually enough for two good coats when you’re feeding three people. But if you know your family loves coating everything in sauce—and I mean *everything*—go ahead and grab that extra half-cup! It’s better to have too much sauce than not enough when it’s broiling time. We want maximum saturation for that ultimate sweet and smoky flavor.
When you’re brushing on the sauce during the middle steps, apply it thinly the first time. The second time, get a little more liberal. The very last coat, right before and during the broiler stage, should be the heaviest. This layering builds that thick, tacky glaze we’re aiming for. For more ideas on perfecting side dishes that go with these, you should check out my 5 ingredient Caprese skewers recipe!
Finally, when you use the broiler, stand there! Don’t walk away to chop veggies or check email. Broiling is fast, and that beautiful caramelization can turn into burnt charcoal in about sixty seconds flat. You want that dark, glossy brown, not black!
Ingredient Substitutions for Honey BBQ Baked Chicken Legs
One of the best things about home cooking, especially for something like my go-to Honey BBQ Baked Chicken Legs, is that you can totally tweak it for what you have or what your family prefers! Don’t stress if you don’t have drumsticks specifically, or if you want to mix up the flavor a bit! We’re looking for good, sturdy chicken pieces here.
If you’re using chicken thighs instead of drumsticks, they are usually a bit thicker, so you might need to add about 10 to 15 minutes to that initial baking time before you start saucing them. Wings are another great option for game day dinners, but since they’re smaller, they cook much faster! I would pull the wings out to sauce them around the 15-minute mark instead of 20, and watch the broiler like a hawk because they burn in seconds!
Now, let’s talk about kicking that sweet and smoky flavor up a notch. If you find your usual BBQ sauce a little too sweet, the easiest fix is grabbing a smoky chipotle BBQ sauce or even mixing in a teaspoon of liquid smoke into your regular sauce before you start glazing. That really boosts the smoky depth!
If you want a little heat instead of smoke, just swap out that tiny 1/4 teaspoon of cayenne pepper for a full teaspoon, or add a dash of your favorite hot sauce into the final glaze layers. Remember the goal is always flavor control! For some amazing appetizer swaps to go alongside these, take a peek at my bacon-wrapped dates recipe secrets—those are always a crowd-pleaser!
Serving Suggestions for Game Day Dinners with Honey BBQ Baked Chicken Legs
When you’re making Honey BBQ Baked Chicken Legs, you’ve got the star of the show ready to go—that rich, sticky main course that everyone flocks to! But let’s be real, game day dinners aren’t complete if you just serve a plate of chicken all by itself. We need sides that can stand up to that big, bold, sweet flavor without fighting it.
I always look for things that are cool, creamy, or crunchy to balance the heat and stickiness. Think about what would be perfect scooped up with leftover BBQ sauce! Since we are making this for a hangout, I always make sure I have an appetizer ready to go while the chicken finishes its glaze under the broiler. You’ve just got to try these classic deviled eggs recipe alongside the chicken; they are creamy, tangy, and nobody ever leaves them alone!
For bigger sides that round out the meal, you can’t go wrong with anything starchy or slaw-based. If you want something warm, creamy mac and cheese is always the answer, but if you prefer to keep things cool and fresh, a vinegar-based coleslaw is perfect. The tanginess cuts right through the richness of the BBQ sauce, leaving your mouth ready for the next bite of chicken.
Also, think about textures. Those sticky baked legs are tender, so crunchy corn on the cob (that you grill right alongside the chicken!) adds a nice snap. Or, if you’re serving a crowd, baked beans loaded with extra bacon and molasses are the ultimate comfort pairing that just matches that hearty, smoky profile perfectly. It just screams “gathering” when dinner looks like this!
Storage and Reheating Instructions for Leftover Honey BBQ Baked Chicken Legs
Oh man, if you manage to have any leftovers of these Honey BBQ Baked Chicken Legs, you are in for a treat tomorrow! These things reheat surprisingly well, which is a miracle since anything baked and saucy usually turns into rubber in the fridge. The key is treating that glaze right—you do NOT want to microwave them if you can help it!
When you wrap these up, use an airtight container. Sticking them between sheets of parchment paper helps keep the last bit of glazed surface from sticking to the chicken underneath. They should keep just fine in the fridge for about three days, though honestly, they rarely last that long in my house. For even more great ideas for easy meals that turn into great leftovers, you should check out my recipe for queso dip—stovetop or slow cooker recipe!
Now, for reheating, we have to prioritize keeping that exterior from getting soggy and restoring some of that caramelized crispness we worked so hard to achieve under the broiler.
Best Way to Reheat for Crispy Skin
Forget the microwave unless you’re in a serious hurry and don’t care about texture. The best results come from getting them back into a hot, dry environment.
I always go with the oven or even better, the air fryer if you have one! For the oven, preheat it to about 350 degrees F (175 degrees C). Pop the chicken legs directly onto a wire rack set over a baking sheet. That little bit of space underneath lets air circulate. Heat them up for about 10 to 12 minutes. They should be piping hot all the way through, and the sauce will re-tackify nicely.
The Air Fryer Speed Trick
If you want them ready in five minutes, the air fryer is your hero. Set it to 375 degrees F (about 190 degrees C). Lay the legs down without overlapping them—just like we did for the first bake. They usually only need about 5 to 7 minutes in there. This method gives you the closest thing to ‘fresh-from-the-oven’ texture. It really crisps up that sticky layer beautifully without drying out the meat underneath.
If You Must Use the Microwave
If you are truly desperate and need speed, at least try to mitigate the damage! Place the chicken on a microwave-safe plate, and place a small, wadded-up paper towel right next to it. The paper towel actually helps wick away some of the moisture that turns into steam, which is what makes it rubbery. Heat them in 30-second bursts until they are warm. But please, try the oven first!
Frequently Asked Questions About This bbq chicken recipe
It seems like every time I post a picture of these incredible Honey BBQ Baked Chicken Legs, I get the same handful of questions popping up! That’s okay, because it just means you’re as excited to nail this recipe as I was when I first started making them gluten-free for my family. Here are the answers to the ones I hear most often, especially about getting that signature sticky glaze!
What internal temperature must the chicken reach?
This is the most important question, especially when we’re cooking poultry! For safety, you absolutely must check the thickest part of the chicken, right near the bone, using an instant-read thermometer. We are looking for 165 degrees F, which converts to 74 degrees C. Anything under that means it’s not safe to eat, and anything way over, and your meat might get a little dry! Trust the thermometer, not just your eyes!
How do I ensure the chicken has a sweet and smoky flavor?
That wonderful balance of sweet and smoky flavor comes from two things working together. First, use a BBQ sauce that already packs a smoky punch—if your go-to sauce is mostly sweet, you might want to add just a splash of liquid smoke, or use one with chipotle notes mixed in. Second, and this is crucial, you *have* to let the final layers of sauce caramelize under the broiler! That high heat turns the sugars in the sauce into that deep, slightly charred, sticky coating that tastes smoky, not just sweet.
Can I make these Honey BBQ Baked Chicken Legs ahead of time?
Yes, you totally can, and this is a lifesaver before hosting a big group for game day dinners! Here’s what I do: I follow the instructions right up to the point *after* the very last broiler step. Bake them until they are totally cooked through and have reached that 165°F internal temperature (Step 3’s initial bake plus the first glaze bake is usually perfect). Let them cool, refrigerate them sealed tight. Then, right before serving, you just need to brush them with the final layer of BBQ sauce and pop them under the broiler for just 3 to 4 minutes per side until they boil up nicely. Saves so much time when guests arrive!
If you’re looking for more easy appetizer ideas to serve alongside that baked chicken, you have to check out my recipe for mini pigs in a blanket recipe—always a huge hit!
Nutritional Estimates for Honey BBQ Baked Chicken Legs
When we’re cooking for the family, I always try to keep track of what we’re eating, but you know how it is—when you use a store-bought BBQ sauce, those numbers can swing wildly! Since this recipe uses a good amount of sauce for that amazing glaze, the sugar and sodium are definitely higher than just plain baked chicken. But hey, that’s the cost of amazing, sticky baked legs, right?
Below you’ll find the breakdown based on using the standard ingredients listed. Remember, these are just estimates, and the real difference will come down to which brand of BBQ sauce you choose. If you decide to use a low-sugar option or cut back on the glaze slightly, your values will change! For more general tracking and staple recipe ideas, you can always browse my main recipes page.
Estimated Nutrition Per Serving (Makes 3 Servings)
- Calories: Around 550
- Protein: Wow, we get about 45 grams here! Great for keeping everyone full.
- Carbohydrates: Roughly 40 grams (most of this is from the sauce!)
- Fat: About 25 grams
- Sugar: Naturally high, coming in around 35 grams.
- Sodium: About 950 mg (This is why checking your sauce label is important if you are counting sodium!)
I try not to stress too much about the exact numbers when making something this comforting, like these perfect Honey BBQ Baked Chicken Legs. The most important thing for me is that my family is sitting down together enjoying a delicious, homemade meal!
Share Your Experience Making These Honey BBQ Baked Chicken Legs
Whew! We made it through the whole recipe for these amazing Honey BBQ Baked Chicken Legs. Now it’s your turn! I really want to know what you thought once you get these sweet and smoky beauties out of the oven. Did you manage to nail that sticky glaze without burning it? I sure hope so!
Please, please, please leave a rating below! Did this recipe save your weeknight dinner plans? Did it hold up as a winner for your recent game day dinners? Every star rating and every comment you leave helps other cooks feel confident giving this recipe a try. Plus, I love hearing about the little things you changed—maybe you used a different spice, or maybe you found an even better gluten-free BBQ sauce!
If you snapped a picture of your beautifully glazed drumsticks, I would absolutely love to see them! Tag me on social media so I can admire your handiwork. Seeing your family enjoying a meal that started right here in this recipe is the best reward for me. Happy cooking!

Honey BBQ Baked Chicken Legs
Ingredients
Equipment
Method
- Preheat your oven to 400 degrees F (200 degrees C). Line a baking sheet with aluminum foil.
- Mix the olive oil, salt, pepper, paprika, garlic powder, onion powder, and cayenne pepper together in a large bowl. Add the chicken drumsticks and toss them to coat completely.
- Spread the coated drumsticks out on the prepared baking sheet in a single layer. Bake in the preheated oven for 20 minutes.
- Remove the chicken from the oven and brush it with barbeque sauce. Return the chicken to the oven and bake for another 7 to 8 minutes.
- Flip the drumsticks over, brush them again with barbeque sauce, and bake for an additional 7 to 8 minutes.
- Set an oven rack about 6 inches from the heat source and turn on your oven’s broiler.
- Brush the drumsticks with more barbeque sauce and place them under the broiler for 3 to 4 minutes. Flip the drumsticks, brush with sauce again, and broil for 3 to 4 more minutes, or until the chicken is no longer pink at the bone and the juices run clear. Check the internal temperature with an instant-read thermometer; it should read 165 degrees F (74 degrees C) near the bone.
Nutrition
Notes
Tried this recipe?
Let us know how it was!
Gluten-Free Chef & Latin Cuisine Innovation Specialist
My youngest son’s celiac diagnosis at four changed everything. Suddenly, all those traditional Brazilian and Portuguese recipes from my avó needed to be completely reimagined without losing their soul.
After graduating from Johnson & Wales and working Miami’s Latin fusion scene, my son’s diagnosis became my calling. How do you make gluten-free empanadas that taste like childhood? Over eight years, I’ve developed 320+ gluten-free recipes celebrating authentic Latin flavors using cassava flour and plantain alternatives.
My gluten-free empanada recipe won “Best Appetizer” at the 2023 Miami Gluten-Free Food Festival. I ran “Sabores Sin Gluten,” a catering business serving Miami’s Latino community—quinceañeras, family gatherings, all the celebrations that matter.
Food is culture, and everyone deserves to experience the joy of sharing traditional family meals, regardless of dietary restrictions.