Oh, I love talking about baking! There’s just nothing quite like the smell of something wonderful coming out of your own oven, is there? It’s pure magic, even if you’re just starting out. I want you to feel that joy immediately, so forget all the scary cookbooks for a minute. This article, The Ultimate Cake Ideas Recipes Guide for Beginners, is here to prove that beautiful dessert ideas are totally within your reach.
I remember the first time I decided to bake a cake from scratch. It was for my daughter’s birthday, and I felt a mixture of excitement and anxiety as I gathered the ingredients. The kitchen became my playground, flour dust dancing in the air as I mixed and stirred. When that cake finally came out of the oven, perfectly risen and golden, I felt an overwhelming sense of pride. Decorating it together with my daughter turned a simple recipe into a cherished memory. That cake not only delighted our taste buds but also brought our family closer together, proving that baking is truly about sharing joy, no matter your skill level.
Why This Peach Upside Down Cake is The Ultimate Cake Ideas Recipes Guide for Beginners
Okay, listen up, because this is why this peach cake is perfect for your debut! We are taking a shortcut—using a great box cake mix as the base—but we’re adding real butter, sour cream, and those gorgeous peaches to make it taste gourmet. You don’t need complicated piping bags here! The upside-down method means the fruit layer looks amazing automatically when you flip it. Seriously, this recipe shows you how easy it is to make something beautiful that tastes homemade. That’s exactly what The Ultimate Cake Ideas Recipes Guide for Beginners is all about!
Essential Equipment for Your First Cake Baking Adventure
Don’t panic about fancy gear! You likely have most of this stuff already, but having the right simple tools makes the process so much smoother. We aren’t using any oddly shaped items here, I promise.
- Two 8″ cake pans: Having two means your cakes bake evenly and relatively quickly. You want even heat penetration, especially when you are new to baking!
- Stand mixer: This really helps get your butter the right fluffy texture for the frosting without tiring out your arm too much. If you don’t have one, a sturdy hand mixer will work just fine.
- Wire rack: This is non-negotiable. You must cool your cakes completely, and the wire rack allows air underneath so the bottoms don’t get soggy while they steam.
- Scallop cake comb: This is the fun part! It’s optional, but it’s super cheap and instantly gives your side frosting a professional-looking textured swirl without any real skill needed.
Gathering Ingredients for The Ultimate Cake Ideas Recipes Guide for Beginners
When you’re just starting out, knowing exactly what you need before you even turn on the oven saves so much headache. Baking relies on precision, so grab your measuring cups now! We aren’t doing anything super complicated here, but paying attention to details like ‘room temperature’ will make sure this cake turns out fantastic. This recipe is a cornerstone of The Ultimate Cake Ideas Recipes Guide for Beginners because it uses ingredients you can find easily, blending them into something spectacular. Let’s see what we need for our three main components!
Peach Brown Sugar Layer Ingredients
This is the gooey, delicious bottom that becomes our stunning top! Do this first so everything is ready to go.
- Unsalted butter: You need 1/4 cup, and it absolutely must be melted so it coats the pan perfectly.
- Brown sugar: We’re talking 2/3 cup of this stuff. It mixes with the melted butter beautifully.
- Large peaches: You need 3 of them, sliced. Feel free to peel them if you want, but I usually keep the skins on for a bit more texture!
Peach Yellow Cake Ingredients
Since we are easing into this, we use a cake mix as our foundation, but we’re doctoring it up so much it won’t know what hit it! The temperature of your wet goods matters here, so take them out of the fridge early!
- Whole eggs: 3 of these, and they need to be at room temperature. Cold eggs can shock the batter.
- Sour cream: Grab 2/3 cup, also room temperature, please!
- Vegetable oil: A straight 1/3 cup of oil keeps things moist without needing extra butter here.
- Buttermilk: 2/3 cup, yep, room temperature again!
- Vanilla: 1 teaspoon for that classic warmth.
- Cinnamon: 1 teaspoon to spice things up just a tiny bit.
- Peach flavoring (LorAnn): This is optional, but if you find it, it really boosts that peach flavor—just 1/2 teaspoon.
- Yellow Cake Mix: One 15.25oz Box. I personally stick with Duncan Hines here, I find it mixes the best for this type of recipe.
Classic Vanilla Buttercream Ingredients
This frosting is sturdy enough for decorating but light enough that it doesn’t crush the delicate peach cake layers underneath.
- Unsalted butter: 1.5 cups, and this MUST be room temperature. Soft, bendable butter is key for fluffy frosting.
- Salt: Just a tiny pinch to cut the sweetness.
- Pure vanilla: 1 Tablespoon! Don’t skimp here for the best flavor.
- Heavy cream: We start with 1/4 cup for mixing.
- Powdered sugar: You’ll need 7 cups, but don’t be afraid to use up to 8 if it seems too thin.
Step-by-Step Instructions for The Ultimate Cake Ideas Recipes Guide for Beginners
This is where the action happens! I’m going to walk you through this so slowly you’ll feel like I’m standing right next to you in the kitchen. Don’t rush any step here, especially with the frosting—patience is your secret ingredient when you are learning baking. If you follow these directions clearly, you’ll finish up feeling like a real pro baker!
Preparing Pans and Oven
First things first, let’s get that oven warm! Preheat it to 325 degrees. Now, for the pans—you need two 8-inch rounds. For a beginner, pan prep is crucial. Take some shortening and really rub it all over the inside bottoms and sides. Then, dump a spoonful of flour in and tilt the pan around until the shortening is completely coated. Tap out the extra flour. This coating is your non-stick insurance policy, trust me!
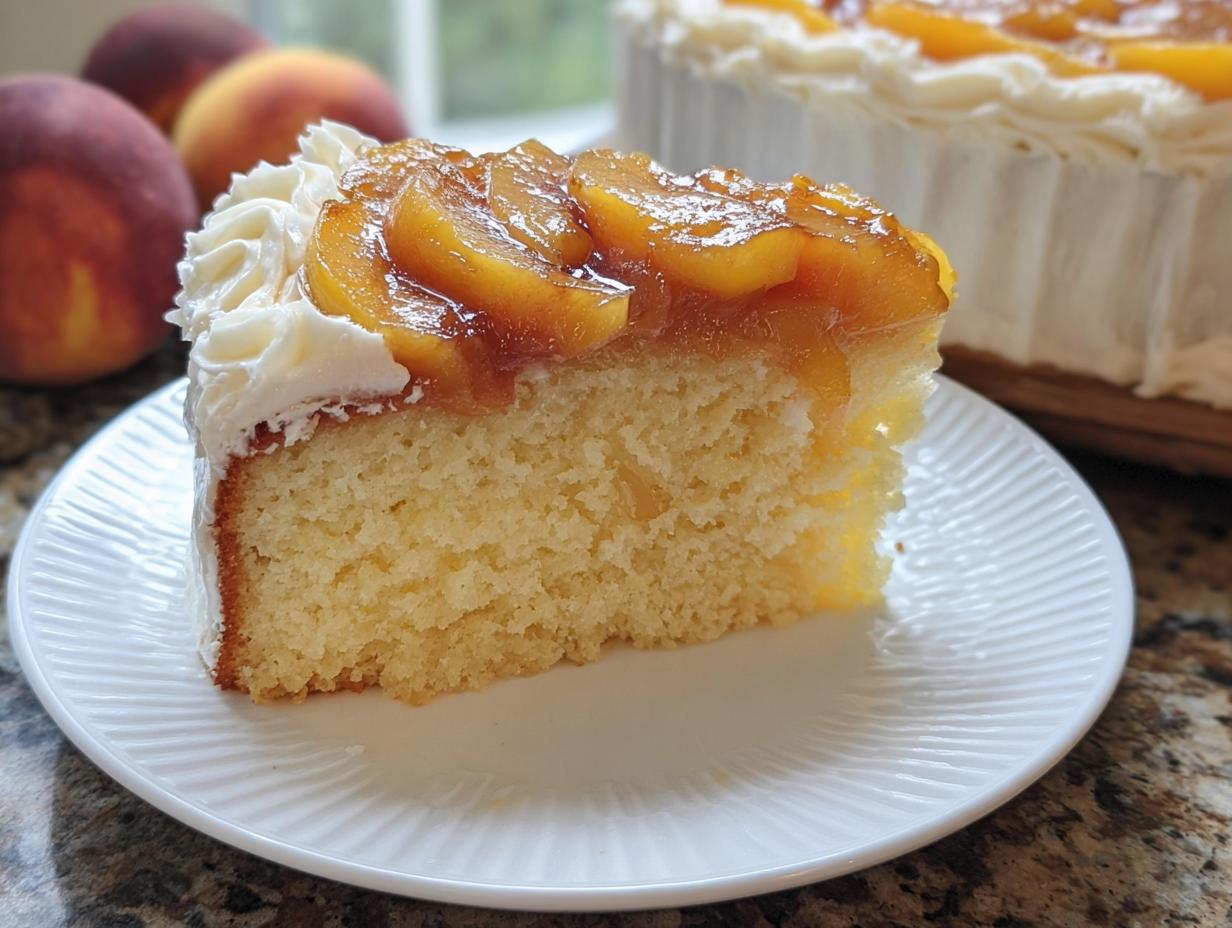
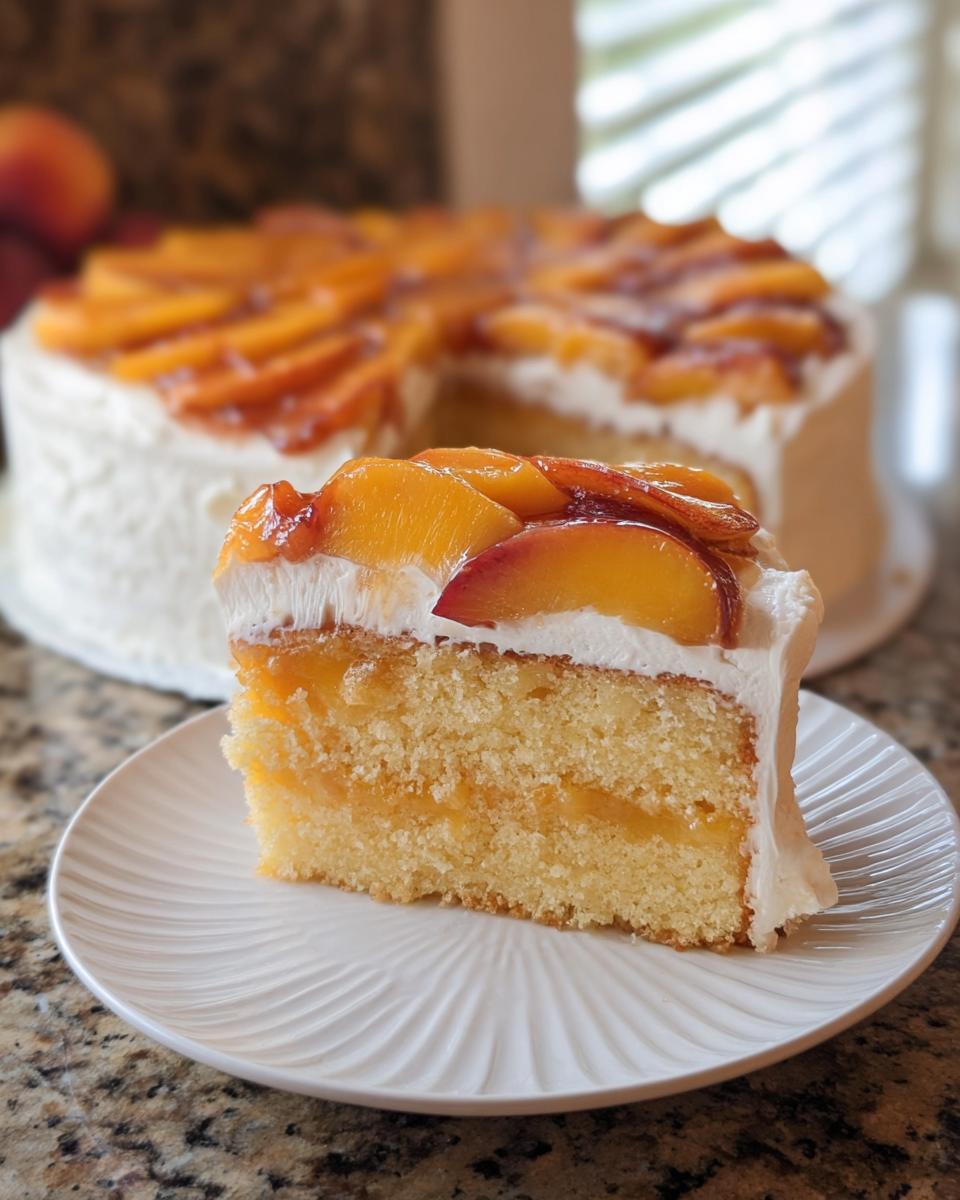
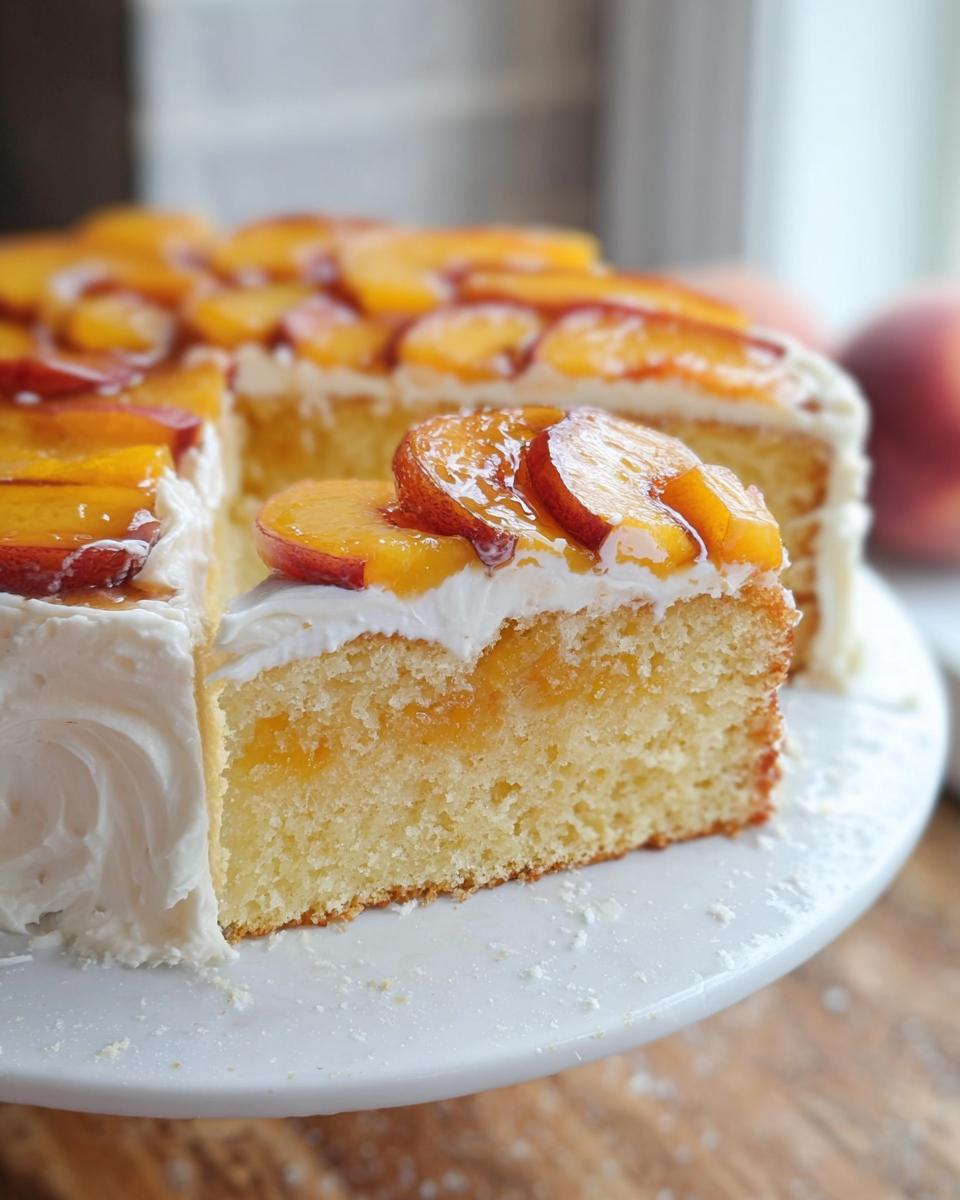
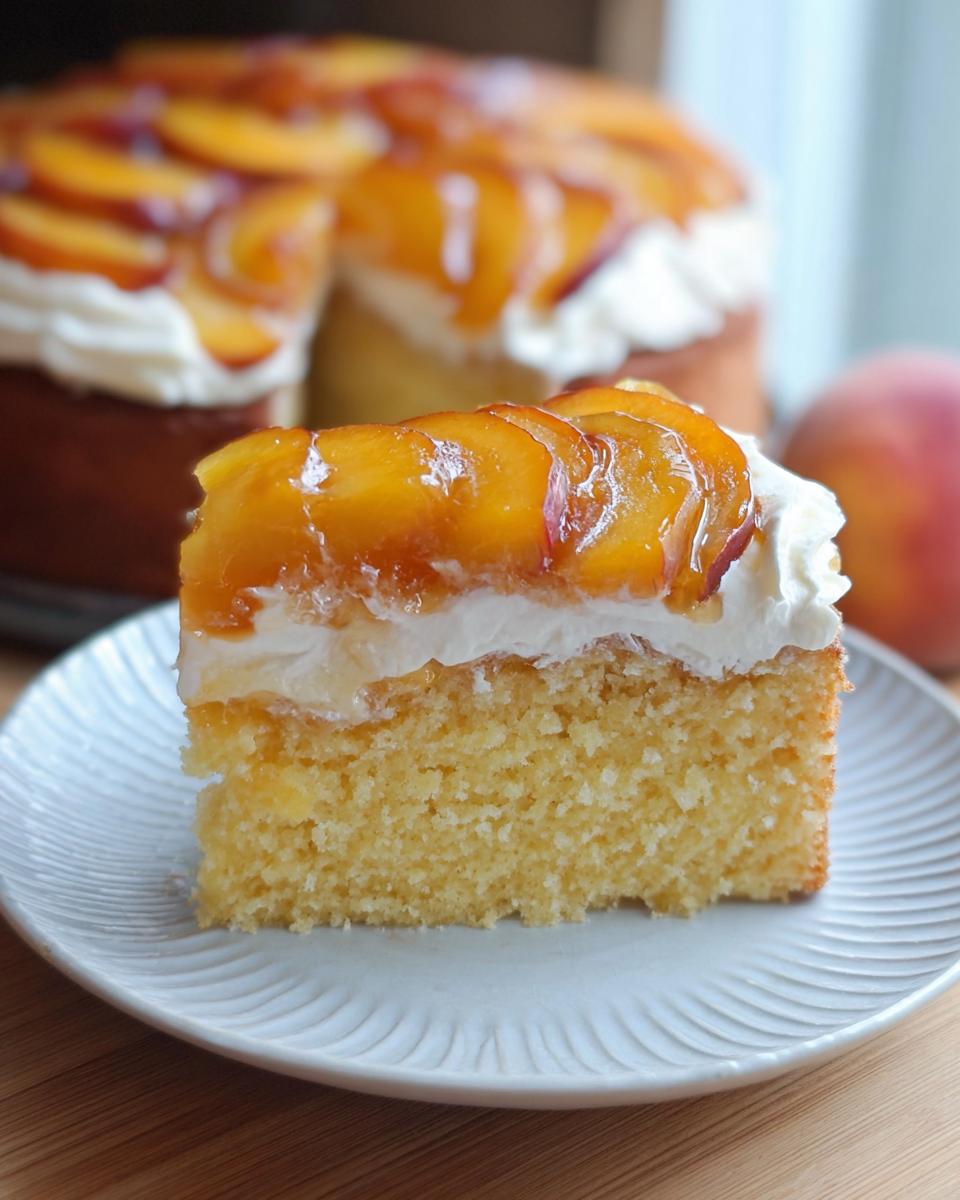
Creating the Upside-Down Peach Base
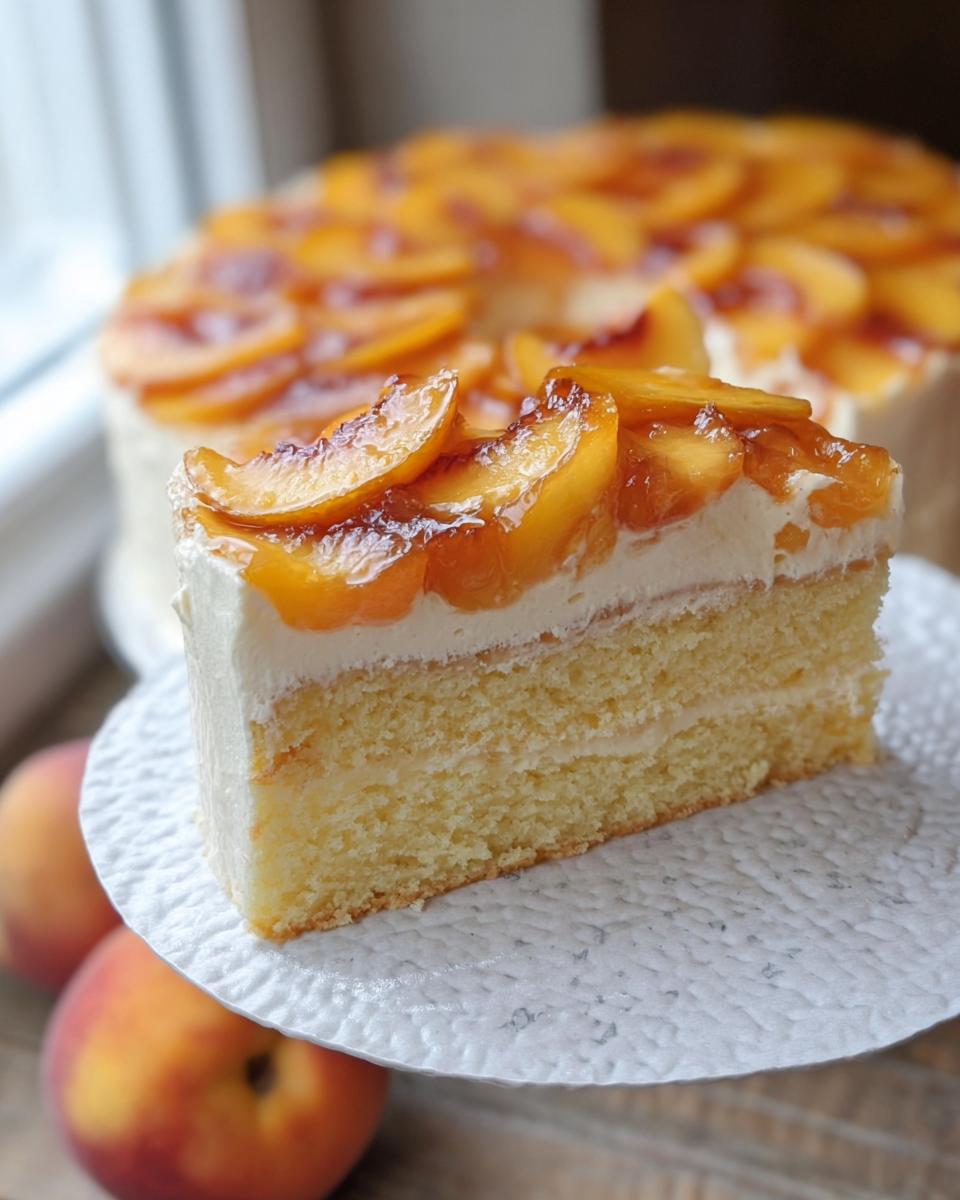
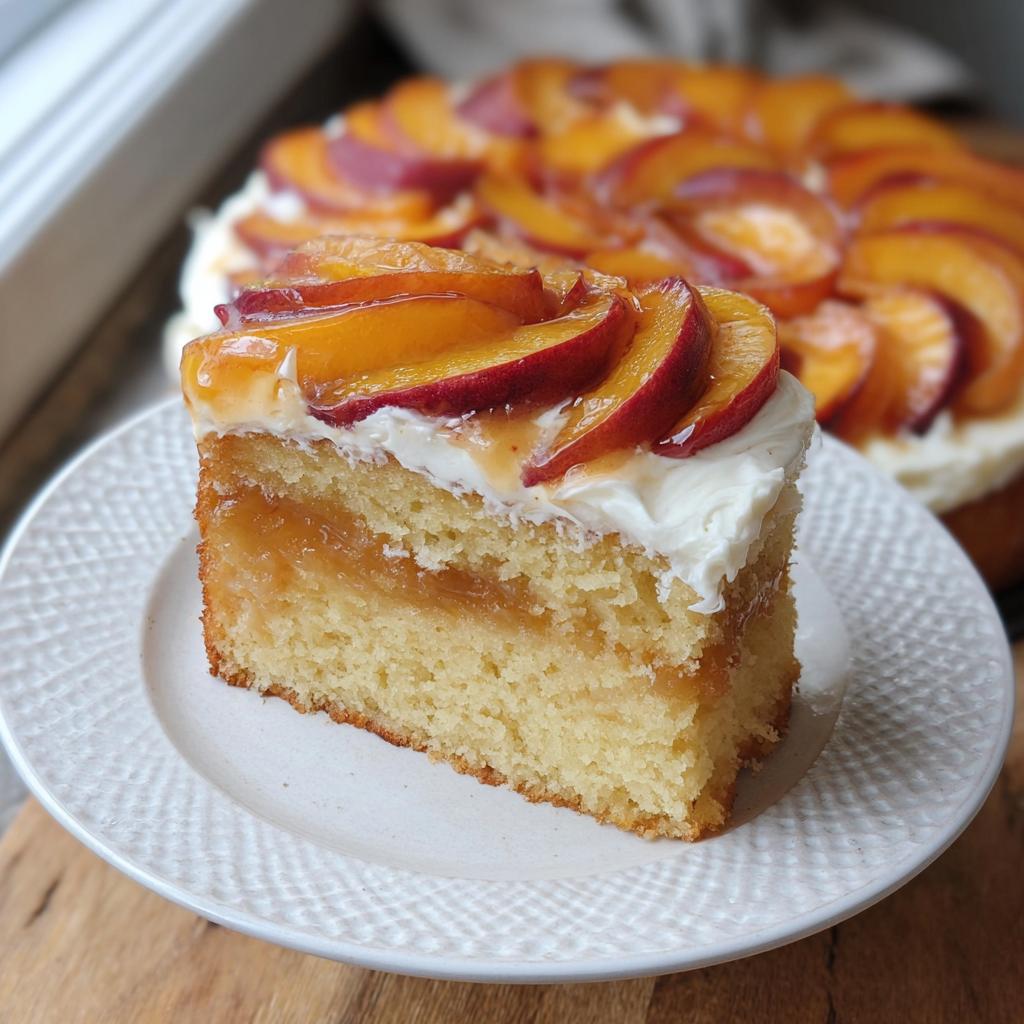
This layer is what makes this cake look like it took days! Divide your melted butter evenly between the bottoms of those two prepared cake pans. Then, take your brown sugar and divide that evenly, sprinkling it right over the butter. Next, arrange those sliced peaches. Try to make one nice, even layer across the bottom of each pan. They should fit snugly against each other.
Mixing the Cake Batter
Grab a large bowl for this. Whisk together all the ‘wet’ components by hand first: the room temperature eggs, sour cream, oil, buttermilk, vanilla, cinnamon, and that optional peach flavoring if you have it. Just get those combined well. Then comes the box mix! Sift the dry mix right over your wet ingredients. Now, this is important: stir gently just until everything comes together. Stop mixing the second you don’t see white streaks of dry mix anymore. Overmixing means a tough cake, and we want tender layers!
Baking and Cooling for Assembly
Pour the batter evenly over your peach layers in the two pans. Pop them into the preheated oven and set your timer for 30 minutes. Check them around 30 to 32 minutes. You want them baked all the way through. Once they look done, get them out! You need to flip these layers almost immediately onto a wire rack to cool. Let them sit for maybe 10 minutes, and then carefully invert them so the peaches face up! Once they are totally cool, wrap each layer tightly in plastic wrap and stick them in the freezer for at least 30 minutes. This chilling step makes them super firm and much easier to handle when we frost them later.
Whipping the Classic Vanilla Buttercream
Time to tackle the frosting! Put that room temperature butter into your stand mixer and whip it until it looks light and fluffy—it will turn pale yellow. Add your salt, vanilla, and heavy cream, and just beat it again for a solid minute. Now, turn the mixer speed way down low. Slow as a snail, add that powdered sugar in batches. Once it’s all in, turn the speed up to high for about 2 minutes until it’s super light. If it looks stiff while you are mixing, add a splash or two more of that heavy cream until it’s spreadable.
Assembling and Decorating Your Cake
Take one layer out of the freezer—keep the fruit side facing UP. Place a dab of buttercream on your cake board first; this is your cake ‘glue.’ Set the first layer on top of that glue. Spread a nice, thick layer of the buttercream over the top of this peach layer. Take your second frozen cake layer and put it on top. Now, you apply a very thin layer of frosting all over the top and sides—this is the crumb coat. It traps all those loose crumbs! Chill it for 15 minutes. After that chill, apply your final, thicker layer of frosting. Grab that scallop cake comb and gently run it around the sides as you slowly spin the turntable. Because this is an upside-down cake, we are leaving the top surface exposed to show off those gorgeous peaches!
Tips for Success in The Ultimate Cake Ideas Recipes Guide for Beginners
Okay, now that you’ve tackled the actual construction, I want to give you my secret weapons—the little things that separate a good beginner cake from a truly great one. These habits will serve you well through The Ultimate Cake Ideas Recipes Guide for Beginners and every other dessert you try!
First, let’s talk temperature again. Seriously, pull out your eggs, buttermilk, and sour cream at least an hour before you start mixing the batter. If those ingredients are cold, they won’t blend correctly with the room-temperature butter, and your cake structure will suffer. It’s a small step that makes a huge difference in creating that fluffy crumb we love!
Secondly, when you are adding the cake mix to the wet ingredients—remember what I said about being gentle? Once that flour hits the liquid, you are building gluten structure. If you hammer it on high speed, you end up with a tough, chewy cake instead of a tender one. Mix only until *just* combined. A few streaks of dryness are fine; they’ll disappear when the batter settles in the pan.
And finally, for the bake test? Don’t rely only on the toothpick! If you touch the top center of the cake gently, it should immediately spring back at you. If your finger leaves a permanent dent, put it back in the oven. That spring-back sensation tells you the cake is set, which means it’s ready to cool beautifully for the next steps in this guide.
Ingredient Notes and Substitutions for Your Cake
I get tons of emails asking about what happens if you’re missing one little thing, especially when dealing with a doctored box mix like this. That’s totally normal! Baking is flexible, but you have to know where you can cheat a little and where you need to respect the science.
Since we use a boxed yellow cake mix here, the flour and leavening agents are already perfectly balanced. That means we have more room to play with the wet ingredients to boost moisture and flavor. Don’t sweat it if you can’t find sour cream right away!
You can certainly swap out the 2/3 cup of sour cream with an equal amount of full-fat Greek yogurt. Greek yogurt is actually a little thicker and tangier, which I find makes the cake crumb even richer. Just make sure it’s room temperature, or you risk that curdled batter look we talked about earlier.
What about those peaches? If you can’t get fresh ones, canned sliced peaches work in a pinch, but you absolutely must drain them really, really well. Like, pat them dry with paper towels well. Too much extra liquid from the can will make the brown sugar layer runny, and we want that thick, caramel-y pool on the bottom.
If you’re a flavor fanatic and can’t find that specific peach flavoring I mentioned, don’t worry too hard about it! A fantastic substitute is using the juice from a can of good quality pineapple (if you happen to have it lying around) instead of some of that buttermilk—maybe swap 1/4 cup of buttermilk for 1/4 cup of pineapple juice. It really enhances the fruitiness, and I often do that when I feel like I want a brighter taste in my dessert ideas.
Storing and Serving The Ultimate Cake Ideas Recipes Guide for Beginners
You’ve done the hard part! You baked, you layered, and you even managed that fancy scallop comb finish. Bravo! Now we need to keep this masterpiece looking and tasting perfect until it’s time to eat. Since this cake features a big dose of real butter in that beautiful vanilla buttercream, we have a mandatory storage rule you just have to follow.
You must keep this cake refrigerated. Buttercream frosting, even the sturdy kind, is happiest when it’s cool, and keeping it chilled prevents the peaches from getting mushy, too. Cover the cake loosely so it doesn’t dry out. I usually place toothpicks or skewers strategically around the sides of the cake if I’m using plastic wrap so the wrap doesn’t touch the frosting and ruin your gorgeous texture!
When it’s time to serve up a slice of The Ultimate Cake Ideas Recipes Guide for Beginners success, don’t serve it straight from the fridge. Cold cake is dense and the flavor locks up! Pull the cake out about an hour before you plan on eating it. Letting it sit on the counter gives the butter in the cake and the frosting time to soften just a little bit. That 15 minutes of softening completely changes the texture for the better.
You’ll notice the time listed here is about 82 minutes total, which is really fast for a cake that looks this stunning! That’s because we relied on a mix and that quick 30-minute chill/freeze time. So, your effort was low, but the payoff is huge. Enjoy every bite!
Frequently Asked Questions About Beginner Cake Baking
I always get so many questions after people try a new dessert idea for the first time! That’s totally normal in the world of baking. Don’t ever feel silly asking; these little hurdles are just part of the learning curve. Here are the ones I hear most often when people are trying their hands at their very first layer cake!
Can I use fresh instead of canned peaches for this cake?
Absolutely, you can! Fresh is often best, but you have to treat them slightly differently than the canned ones. If you use fresh peaches, you’re going to want to blanch them first, which just means dropping them into boiling water for about 30 seconds and then plunging them right into ice water. This makes the skin super easy to slip off if you don’t want it. Then, slice them thin, just like the recipe calls for, and you can toss them gently with maybe a teaspoon of extra brown sugar before you lay them in the pan. They’ll be a little juicier than canned, but the flavor payoff is wonderful!
Why is my buttercream too thin or too thick?
This is the most annoying problem because it throws off your decorating! If your buttercream is too thin—maybe it looks a bit like soup—you need more powdered sugar. Add it half a cup at a time while the mixer is running on low speed, then turn it up. If it’s too thick, it will be stiff and hard to spread, not fluffy. That means you need more liquid! Add just one Tablespoon of heavy cream (or even a teaspoon of milk) at a time until it starts loosening up. Remember, you want that ribbon consistency so it flows nicely but still holds its shape when you use the cake comb.
What is a ‘crumb coat’ and why is it necessary?
Oh, the crumb coat—it’s life-changing for beginners! Think of it as the primer coat for a wall. When you first frost a cake, tiny little crumbs from the cake itself always get mixed into your beautiful, clean frosting. If you try to put a thick final layer on top of that crumbly mess, the whole cake will look messy and shredded, not smooth.
A crumb coat is just a very thin, messy layer of frosting applied quickly to the entire cake—top and sides. This thin layer traps all those loose crumbs underneath. Then, you pop the cake into the fridge for about 15 minutes until that first layer firms up. Once it’s chilled, you can apply your final, gorgeous layer of frosting on top of a perfectly sealed surface. It guarantees a clean, professional finish for your new cake!
Next Steps in Your Baking Journey with The Ultimate Cake Ideas Recipes Guide for Beginners
Wow, you actually did it! Now that you’ve mastered this amazing peach upside-down beauty, I really hope you feel that surge of pride I felt making my daughter’s first cake. You crushed it! Don’t stop here though, because baking is definitely a journey, not a destination.
I want to see what you create! Head over to my main recipe listing and pick another one that catches your eye. Maybe something chocolate next time? Knowing you tackled this cake makes me so excited for what you’ll try next. Tag me on social media or leave a comment right here and tell me how your frosting turned out!
If you found this guide helpful—if it made you realize that baking isn’t nearly as scary as it seems—please take a second to leave a rating. Your feedback helps other nervous novice bakers see that The Ultimate Cake Ideas Recipes Guide for Beginners is the right place for them to start their sweet adventure. Happy baking, friends!
Peach Upside Down Cake with Classic Vanilla Buttercream
Ingredients
Equipment
Method
- Preheat the oven to 325 degrees. Prepare two 8″ cake rounds by coating them with shortening and dusting them with flour to prevent sticking.
- Divide the melted butter between the two cake pans and brush it evenly across the bottom. Divide the brown sugar between the two rounds, then arrange the peach slices in an even layer on the bottom of each pan. Set the pans aside.
- In a large bowl, whisk all the cake ingredients together by hand, excluding the cake mix. Sift in the cake mix and stir gently to combine everything. Divide the cake batter evenly between the two prepared peach-layered cake rounds.
- Bake for 30 to 32 minutes, or until the cakes are baked through completely. Remove the cake rounds from the oven and flip them out onto a wire rack to cool completely. Wrap the cooled cake rounds carefully in plastic wrap and freeze them for at least 30 minutes to make assembly easier.
- For the buttercream, use a stand mixer fitted with a paddle attachment to whip the butter until it becomes light and fluffy. Add the salt, vanilla, and heavy cream, and whip again. Scrape down the sides of the bowl.
- Turn the mixer to low speed and slowly add the powdered sugar. You might need to add 2 to 3 extra Tablespoons of heavy cream to thin the mixture if necessary. Set the mixer to high speed for 2 minutes until the buttercream is light and fluffy.
- Place a small amount of buttercream in the center of a cardboard cake round on a cake turntable to act as glue. Place the first cake layer down with the fruit side facing up, then add a layer of buttercream on top.
- Apply a crumb coat to the cake, leaving the top surface exposed to show the peaches. Add a layer of buttercream around the sides of the cake. Use the cake turntable and the scalloped cake scraper to carefully move around the outside of the cake, creating the textured finish. Slice and serve.
Nutrition
Notes
Tried this recipe?
Let us know how it was!
Gluten-Free Chef & Latin Cuisine Innovation Specialist
My youngest son’s celiac diagnosis at four changed everything. Suddenly, all those traditional Brazilian and Portuguese recipes from my avó needed to be completely reimagined without losing their soul.
After graduating from Johnson & Wales and working Miami’s Latin fusion scene, my son’s diagnosis became my calling. How do you make gluten-free empanadas that taste like childhood? Over eight years, I’ve developed 320+ gluten-free recipes celebrating authentic Latin flavors using cassava flour and plantain alternatives.
My gluten-free empanada recipe won “Best Appetizer” at the 2023 Miami Gluten-Free Food Festival. I ran “Sabores Sin Gluten,” a catering business serving Miami’s Latino community—quinceañeras, family gatherings, all the celebrations that matter.
Food is culture, and everyone deserves to experience the joy of sharing traditional family meals, regardless of dietary restrictions.