Get ready to wow your guests with the most adorable and delicious snack on the table this fall! My Pumpkin‑Shaped Cheese Ball with Ritz Crackers is seriously the perfect centerpiece for any autumn get-together or holiday party. It looks super festive, almost too cute to eat, but trust me, it flies off the plate! I remember thinking after my son’s celiac diagnosis, how could I make sure he felt included and celebrated during holidays? That’s when this idea sparked. It’s a flavor fiesta that’s surprisingly simple to whip up, and it proves that festive, crowd-pleasing food can totally be gluten-free too. It’s a little bit of magic for your holiday entertaining!
Why You’ll Love This Pumpkin‑Shaped Cheese Ball with Ritz Crackers
Seriously, what’s not to love? This recipe is like a party in itself!
- Festive Presentation: It looks just like a little pumpkin, perfect for fall and Halloween!
- Super Easy: You can whip this up in a flash, even if you’re busy.
- Always a Hit: It’s got that amazing cheesy flavor everyone craves.
- Diet-Friendly: Perfect for everyone, especially if you need gluten-free options!
Gather Your Ingredients for the Perfect Pumpkin‑Shaped Cheese Ball
Alright, let’s get this pumpkin party started! To make this amazing Pumpkin‑Shaped Cheese Ball with Ritz Crackers, you’ll need a few things that probably are already hiding in your fridge. Don’t worry, I’ll break it all down so it’s super clear.
To Make the Cheese Ball
Here’s what goes into the magic filling:
- 8 ounces cream cheese, softened (make sure it’s nice and squishy!)
- 8 ounces vegetable cream cheese (this adds a subtle tang that’s just lovely)
- 2 Tablespoons Spicy Ranch mix (or regular if you’re not feeling the heat!)
- 3 green onions, just the green parts sliced up
- 1 red pepper, diced super fine
- 2 cups shredded sharp cheddar cheese, and here’s the trick: we’ll divide this!
For Serving
And to get this party ball rolling, you’ll need:
- Buttery crackers (like those classic Ritz, or if you need gluten-free, grab your favorite GF version!)
## Step-by-Step Guide to Making Your Pumpkin‑Shaped Cheese Ball
Ready to get your hands a little cheesy? Making this Pumpkin‑Shaped Cheese Ball is honestly super fun and way easier than it looks. Just follow these simple steps and you’ll have a festive masterpiece in no time!
Mixing the Base
First things first, grab your electric mixer or stand mixer. Toss in that softened cream cheese and the vegetable cream cheese. Let them get to know each other for a minute until they’re super smooth and creamy. Then, stir in the ranch mix, the sliced green onions, that finely diced red pepper, and about a cup of the shredded cheddar. Mix it all up until it’s just combined – you don’t want to overmix!
Shaping and Coating
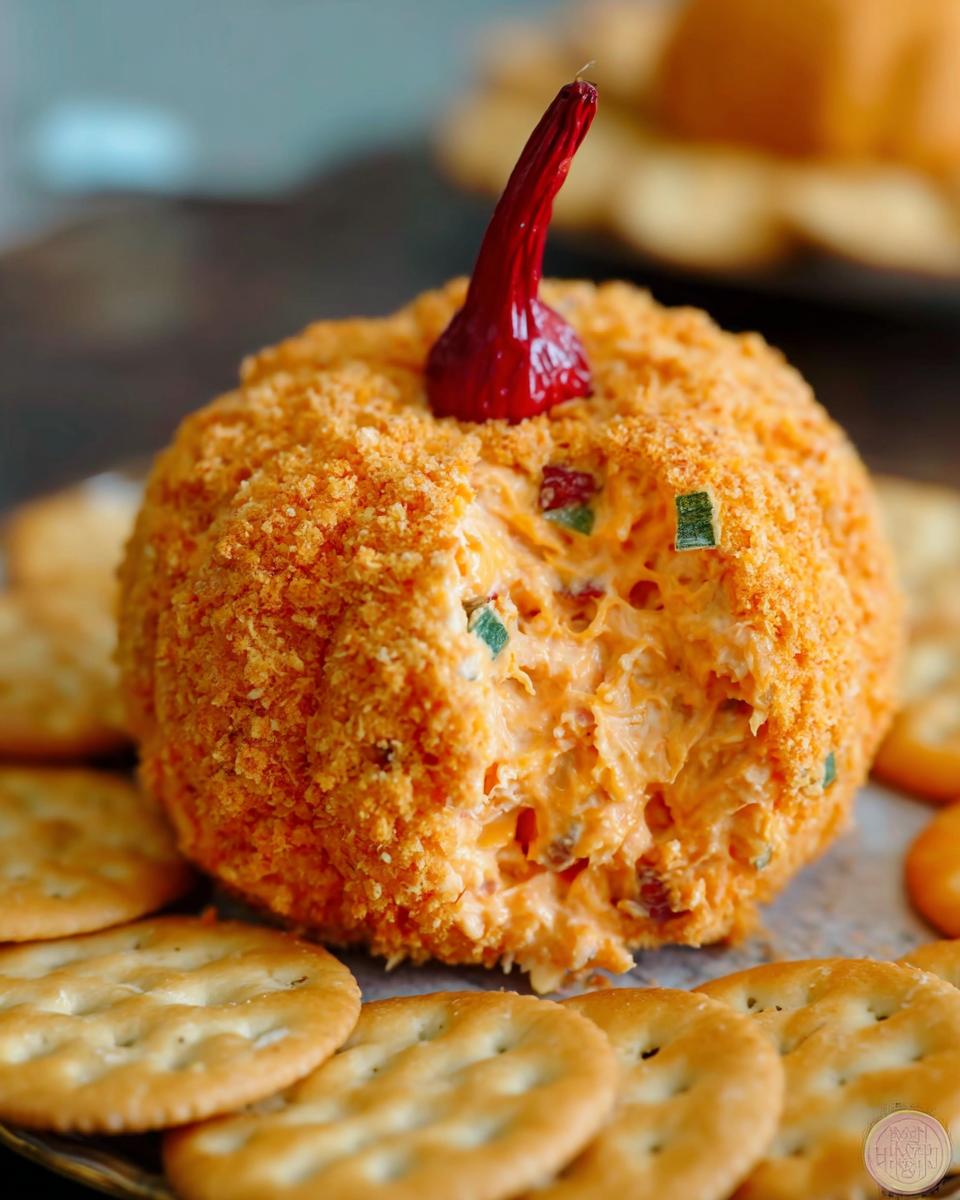
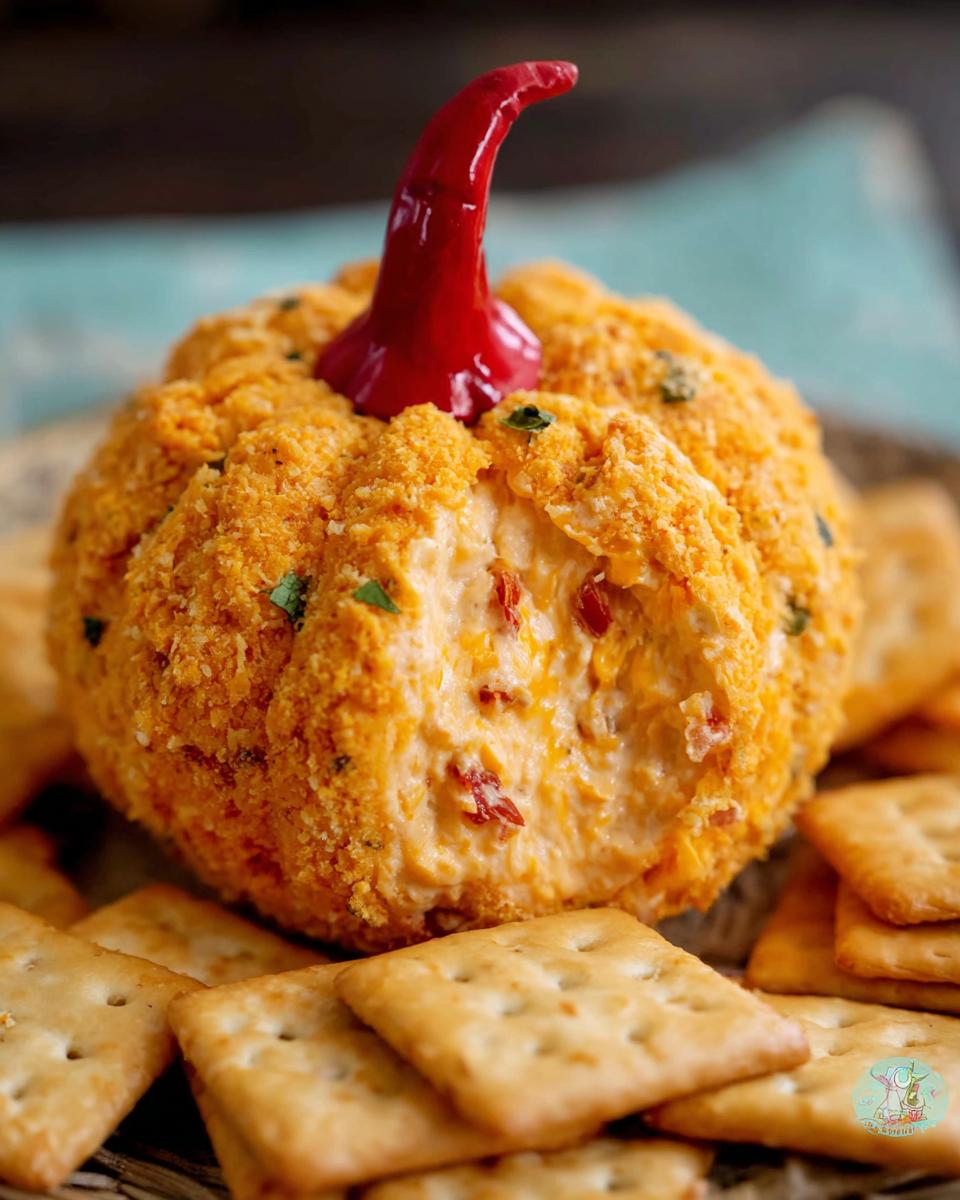
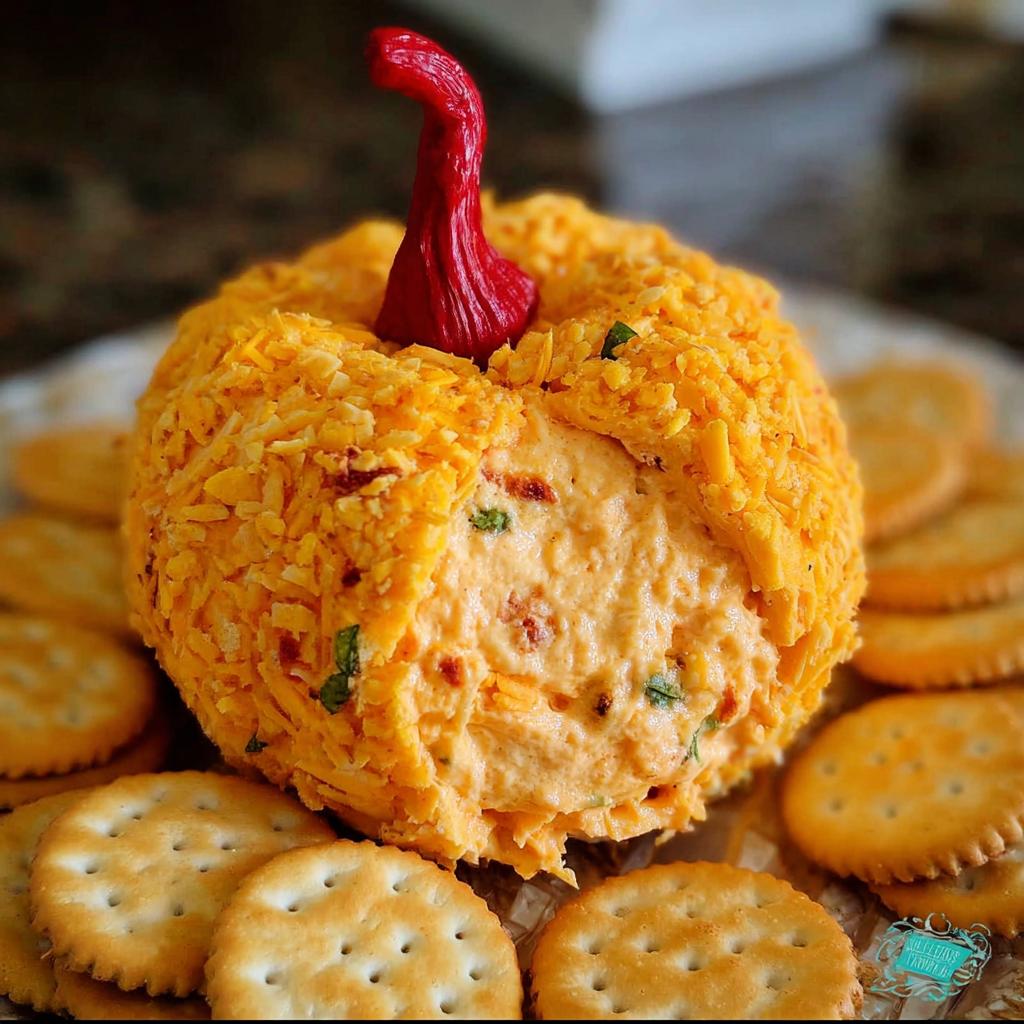
Now, lay out a big sheet of plastic wrap – and I mean BIG. Sprinkle about a quarter cup of the remaining shredded cheddar cheese all over the center of the plastic wrap. This is going to give our pumpkin its beautiful orange rind! Carefully scoop the cheese mixture onto the cheesy plastic wrap. Now, take the rest of that shredded cheddar and gently coat the top and sides of the cheese mixture. Think of it like giving your pumpkin its cozy fall glow!
Creating the Pumpkin Shape
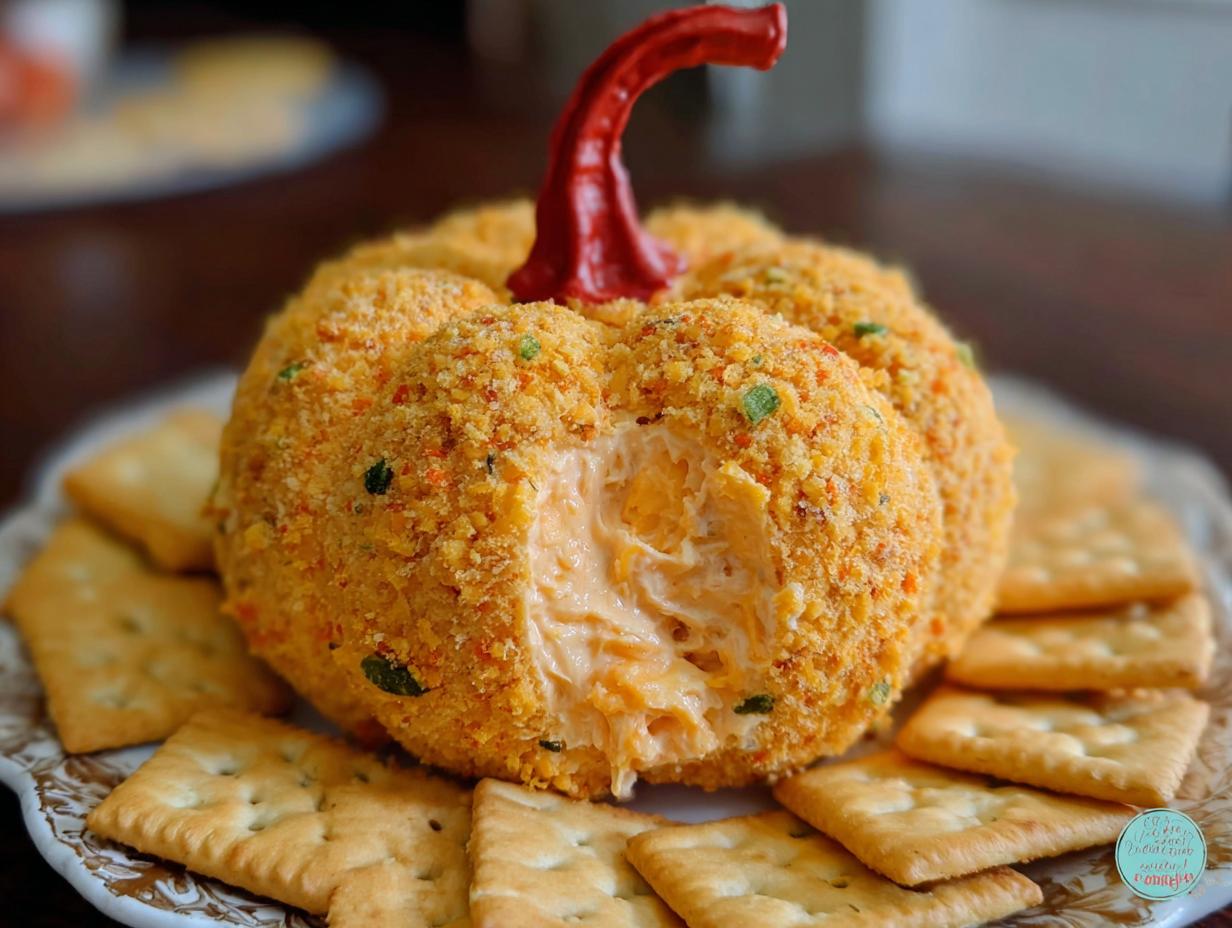
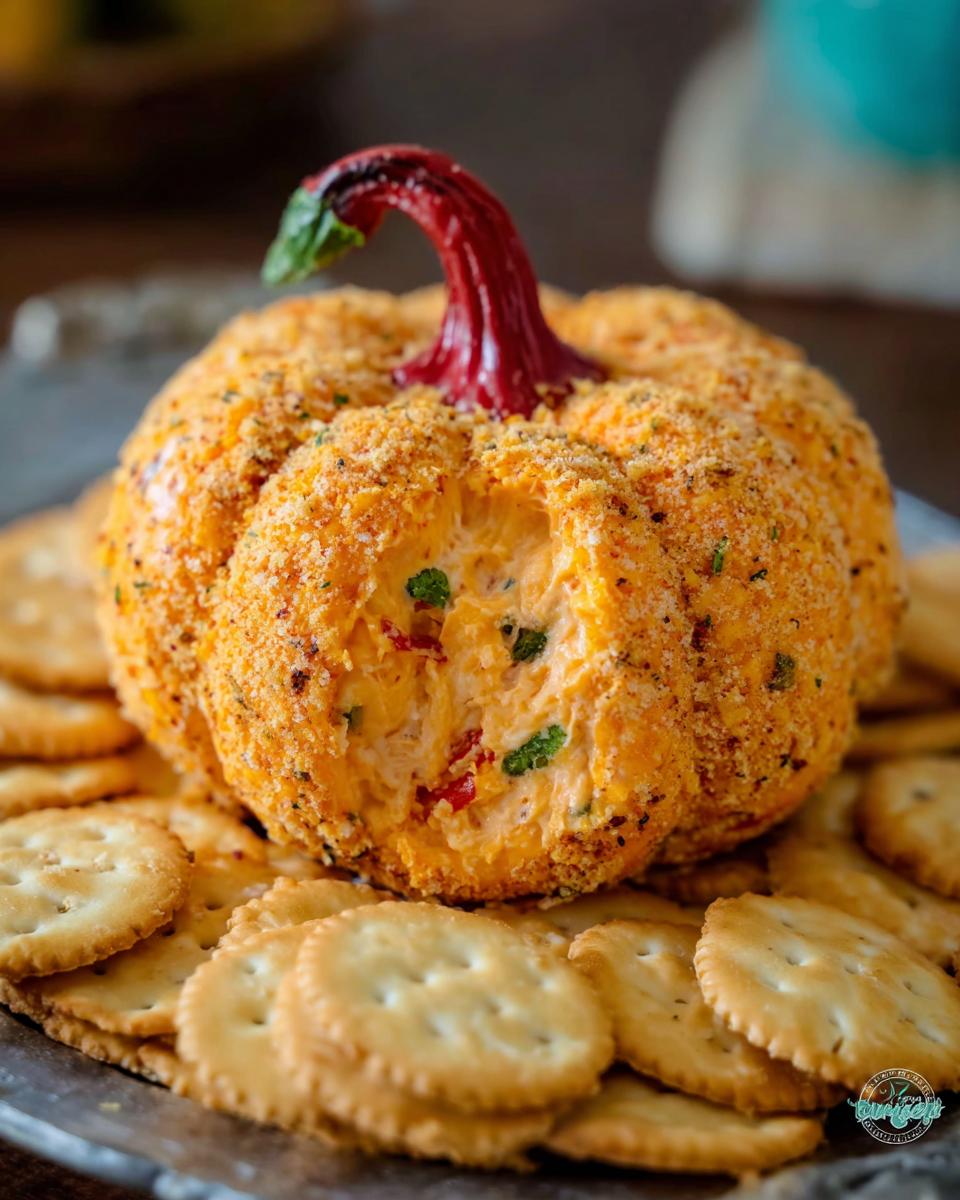
This is where the magic really happens to make it look like a real pumpkin! Take your plastic wrap, bringing the edges up and around the cheese ball mixture. Wrap it up nice and tight, like a little cheese present. To get those classic pumpkin lines, grab four large rubber bands or some kitchen twine. Carefully loop them around the cheese ball, creating indentations that look like pumpkin segments. Make sure it’s all snug and secure, so nothing escapes during chilling!
Chilling and Finishing Touches
Now, into the fridge it goes! You’ll want to let this chill for at least 2 hours, but honestly, giving it all day or even overnight is best. This is super important—it lets all those yummy flavors meld together and, more importantly, helps the cheese ball set so it holds its pumpkin shape perfectly. Once it’s nice and firm, carefully take off the rubber bands and peel away the plastic wrap. For the final touch, gently push that reserved piece of red pepper into the top center to look just like a little pumpkin stem. Ta-da!

Tips for a Perfect Pumpkin‑Shaped Cheese Ball
Alright, let’s talk about making this Pumpkin‑Shaped Cheese Ball absolutely perfect every single time. As a chef, I’ve learned a few tricks that really make a difference, especially when you want that festive shape to look just right and taste amazing. Don’t stress – it’s totally doable!
First off, make sure your cream cheese is *really* softened. I mean, leave it on the counter for a good hour or two! It makes it so much easier to mix everything up smoothly without lumps. Plus, when it’s soft, it blends better with the ranch and other goodies, giving you a more cohesive base. Trust me on this one!
The plastic wrap is your best friend here for shaping. Don’t skimp on it! Using a couple of layers ensures everything stays sealed when you’re looping those rubber bands. And speaking of rubber bands, don’t pull them *too* tight or you risk tearing the plastic or having the cheese ooze out. Just snug enough to create those defined lines for the pumpkin segments. It’s all about gentle perfection!
Ingredient Notes and Substitutions
Okay, let’s chat about making this Pumpkin‑Shaped Cheese Ball work perfectly for YOU! Sometimes you might not have exactly what a recipe calls for, or you might have specific needs, and that’s totally fine. We can totally swap things around!
For the ranch mix, the recipe calls for Spicy Ranch, which gives it a little kick. But if you’re not a fan of spice, or just can’t find it, regular ranch seasoning mix works like a charm. You really won’t miss the heat if you’re going for a milder flavor. Also, feel free to play with the cheese! While sharp cheddar is fantastic, you could try a mix of cheddar and Monterey Jack for a creamier melt, or even something like Colby or a mild cheddar if that’s what you have on hand. Just make sure it shreds well!
Serving Your Pumpkin‑Shaped Cheese Ball
Alright, the hard part’s over – your gorgeous Pumpkin‑Shaped Cheese Ball is ready to shine! The absolute must-have pairing is with some buttery crackers. Think classic Ritz for that perfect crunch, or if you went the gluten-free route, grab those crunchy GF crackers you love. Arrange them all artfully around the cheese ball on your favorite serving platter. It looks so festive, and people will go crazy for it!
Storage and Reheating Instructions
Got leftovers of this amazing Pumpkin‑Shaped Cheese Ball with Ritz Crackers? Lucky you! Just wrap it up tightly in plastic wrap again, making sure it’s nice and sealed, and pop it back in the fridge. It’ll stay good like that for up to about 3 days. You don’t really need to reheat it since it’s best served cold or at room temperature. If it’s been in the fridge for a while and feels a bit too firm, just let it sit out on the counter for about 15-20 minutes before serving again. It’ll come back to that perfect dippable texture!
Frequently Asked Questions about Pumpkin‑Shaped Cheese Ball
Got some burning questions about making this adorable Pumpkin‑Shaped Cheese Ball? I totally get it! It’s always good to have a little extra guidance, especially for holiday entertaining. Let’s dive in! If you want even more inspiration, check out this Pumpkin Cheese Ball recipe too!
Can I make this cheese ball ahead of time?
Oh absolutely! That’s actually my favorite way to do it. You can totally make the cheese ball up to 2-3 days in advance. Just keep it wrapped up tight and chilling in the fridge. That extra time really lets all those yummy flavors meld together beautifully. Just add the little red pepper stem right before you serve it!
What are good gluten-free cracker options?
For my gluten-free friends, there are SO many great choices now! Brands like Crunchmaster, Schär, or even Mary’s Gone Crackers make fantastic buttery-tasting gluten-free crackers that are perfect for dipping. You can also find rice crackers or even some corn-based crisps that work wonderfully. Just make sure they’re sturdy enough to hold up to a good scoop of cheese!
How do I get the best pumpkin shape?
Getting that perfect pumpkin look is all about the plastic wrap and those rubber bands (or twine!). Wrap the cheese ball *really* snug in a couple of layers of plastic wrap first. Then, use about four rubber bands, spaced evenly around, to create those pumpkin lines. They don’t need to be super tight, just snug enough to make an indent. Chilling it really helps set those lines, so don’t skip that step!
## Estimated Nutritional Information
Now, let’s talk numbers! While this Pumpkin‑Shaped Cheese Ball with Ritz Crackers is absolutely delicious and a hit at parties, it’s definitely on the richer side. These are just estimates, of course, because how cheesy things get can depend on exactly what you use! Think of this as roughly 150-200 calories per serving when you include the crackers. It’s a treat, for sure, and perfect for those holiday entertaining moments!
Pumpkin‑Shaped Cheese Ball with Ritz Crackers
Ingredients
Equipment
Method
- In an electric or stand mixer, combine the softened cream cheese and vegetable cream cheese.
- Stir in the Spicy Ranch mix, sliced green onions, diced red pepper, and 1 cup of the shredded cheddar cheese.
- Lay out a large sheet of plastic wrap. Sprinkle about 1/4 cup of the remaining shredded cheddar cheese onto the plastic wrap.
- Place the cheese ball mixture on top of the sprinkled cheese. Use the rest of the shredded cheddar cheese to coat the top and sides of the mixture.
- Wrap the cheese ball mixture tightly with the plastic wrap. For best results, use two layers of plastic wrap.
- Secure the wrapped cheese ball with four large rubber bands or kitchen twine to create indentations for the pumpkin shape. Ensure no mixture squeezes out.
- Refrigerate for at least 2 hours, or preferably overnight, to allow flavors to meld and the shape to set.
- When ready to serve, carefully remove the rubber bands and plastic wrap.
- Gently push the reserved red pepper stem into the top of the cheese ball to resemble a pumpkin stem.
- Serve with your favorite crackers.
Notes
Tried this recipe?
Let us know how it was!
Gluten-Free Chef & Latin Cuisine Innovation Specialist
My youngest son’s celiac diagnosis at four changed everything. Suddenly, all those traditional Brazilian and Portuguese recipes from my avó needed to be completely reimagined without losing their soul.
After graduating from Johnson & Wales and working Miami’s Latin fusion scene, my son’s diagnosis became my calling. How do you make gluten-free empanadas that taste like childhood? Over eight years, I’ve developed 320+ gluten-free recipes celebrating authentic Latin flavors using cassava flour and plantain alternatives.
My gluten-free empanada recipe won “Best Appetizer” at the 2023 Miami Gluten-Free Food Festival. I ran “Sabores Sin Gluten,” a catering business serving Miami’s Latino community—quinceañeras, family gatherings, all the celebrations that matter.
Food is culture, and everyone deserves to experience the joy of sharing traditional family meals, regardless of dietary restrictions.