Oh, when I think about the perfect comfort food, my mind always drifts back to vibrant spice markets and family gatherings. There is just nothing that compares to that deeply savory, tender meat soaked in rich broth. That’s why I spent so much time perfecting My Fave Birria Tacos. I wanted that incredible, authentic taste, but after figuring out my gluten sensitivity years ago, I knew I had to adapt it so everyone could join in the feast!
The first time I experienced birria tacos was during a vibrant family gathering where laughter filled the air and the aroma of spices danced in the background. I was immediately captivated by the tender, slow-cooked meat nestled in those warm tortillas, each bite bursting with flavor. After my diagnosis with gluten sensitivity, I took on the challenge of creating a gluten-free version that honored that unforgettable flavor. When I finally nailed it, serving my own rendition to family and friends brought back those cherished memories while allowing others to join in the joy and tradition without compromise. It was a beautiful reminder that sometimes our favorite dishes can evolve to include everyone at the table.
Why My Fave Birria Tacos Recipe Works for Everyone
Look, I know the full birria process can look intimidating if you’ve never done it before. That’s why I love this assembly method! We are focusing solely on getting that perfect, cheesy, crispy taco built up, assuming you have a fantastic batch of birria ready to go, whether you made it or picked some up. It takes the pressure off!
This recipe is magic because:
- It maintains that unbelievably authentic, deep chile flavor you crave.
- It’s incredibly fast for dinner—we are talking 30 minutes max! If you’re looking for fast weeknight meals, this is your ticket. I have a few other fast favorites, too!
- Every component is naturally gluten-free, so nobody at the table feels left out of the fun.
It really proves you don’t have to spend all day cooking to get heritage flavor on your plate!
Equipment Needed for My Fave Birria Tacos
Honestly, you don’t need a ton of fancy gadgets for this part. Since we are mostly just assembling and frying, we keep the tool list short and functional! If you have these basics, you’re set up for crispy success.
Make sure you grab:
- A good non-stick skillet—this is vital so nothing tears when you flip those cheesy tacos!
- A sturdy spatula for folding and pressing.
- A baking sheet or platter to stack the finished tacos on while you make the rest of the batch.
Ingredients for Assembling My Fave Birria Tacos
Okay, here’s where things get real simple! Remember, this part of the recipe is all about the final layering, not the hours of stewing that came before (thank goodness!). Having the birria ready makes this feel like cheating, but trust me, the flavor payoff is huge. Don’t forget, if you can’t find the perfect shredded cheese, I’ve put a little note below about that mozzarella substitute. You can peek at some other great ideas over here too: check out what others are doing!
For the Tacos Assembly
This is the structure for your perfect, cheesy, red tortilla taco. Pay close attention to that birria note—it’s important for the crispiness!
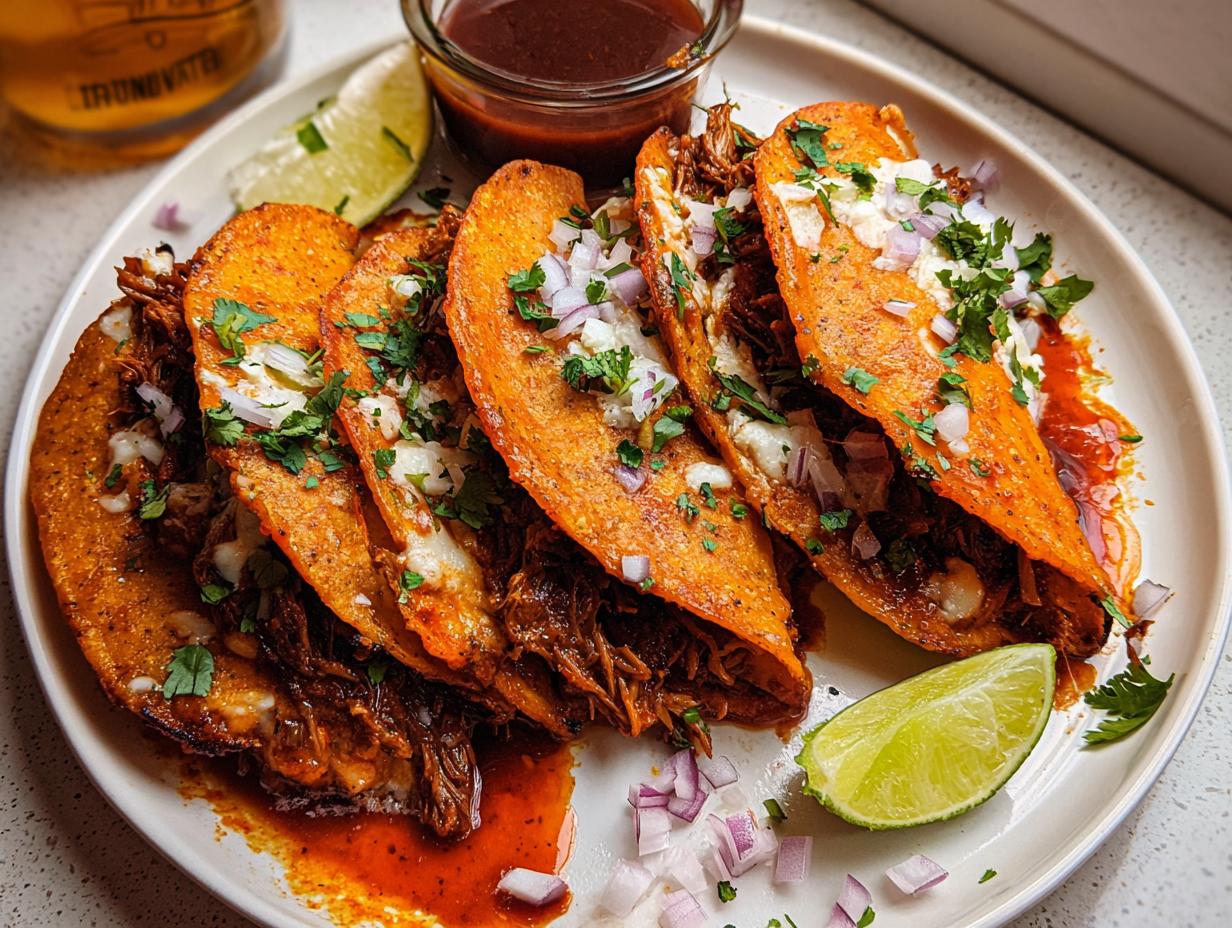
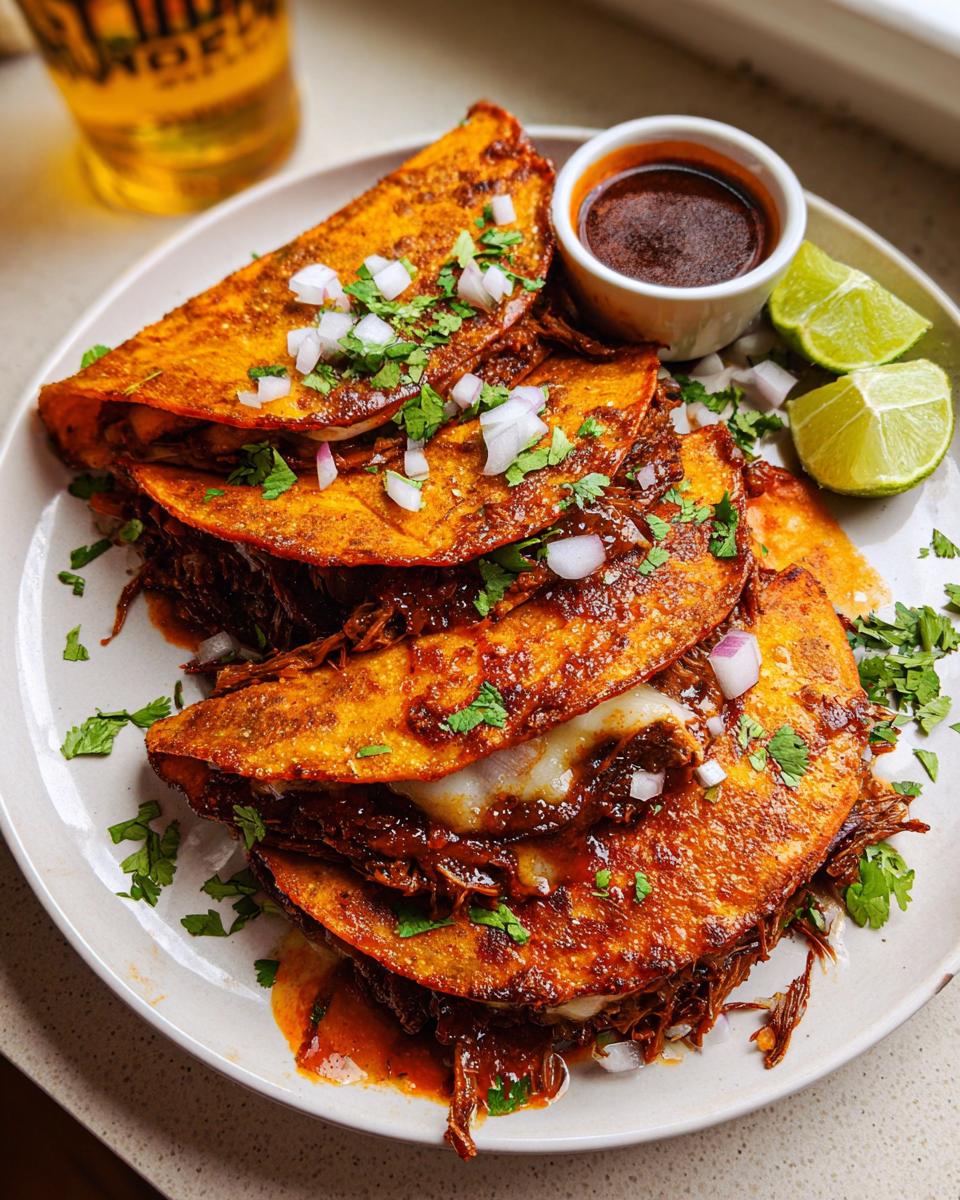
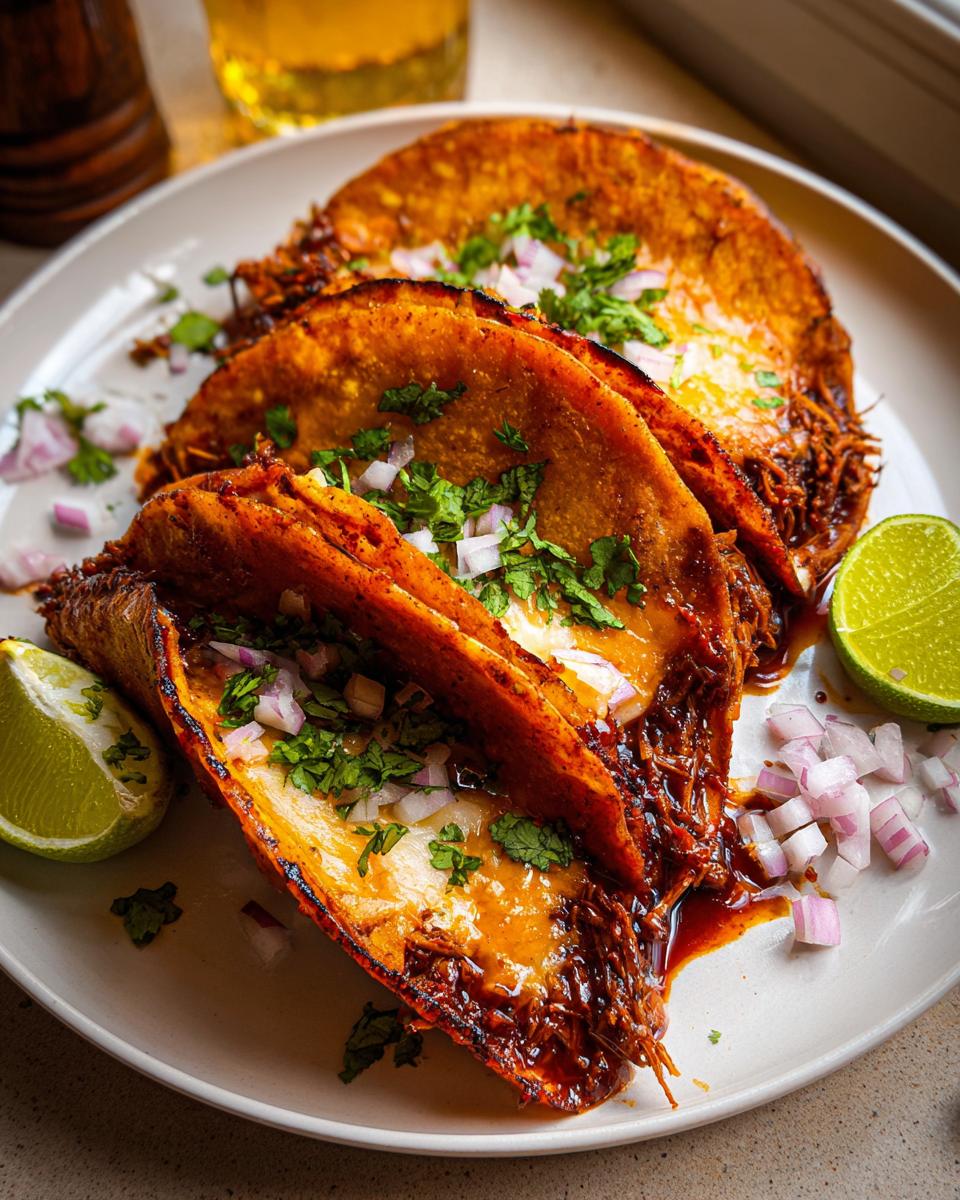
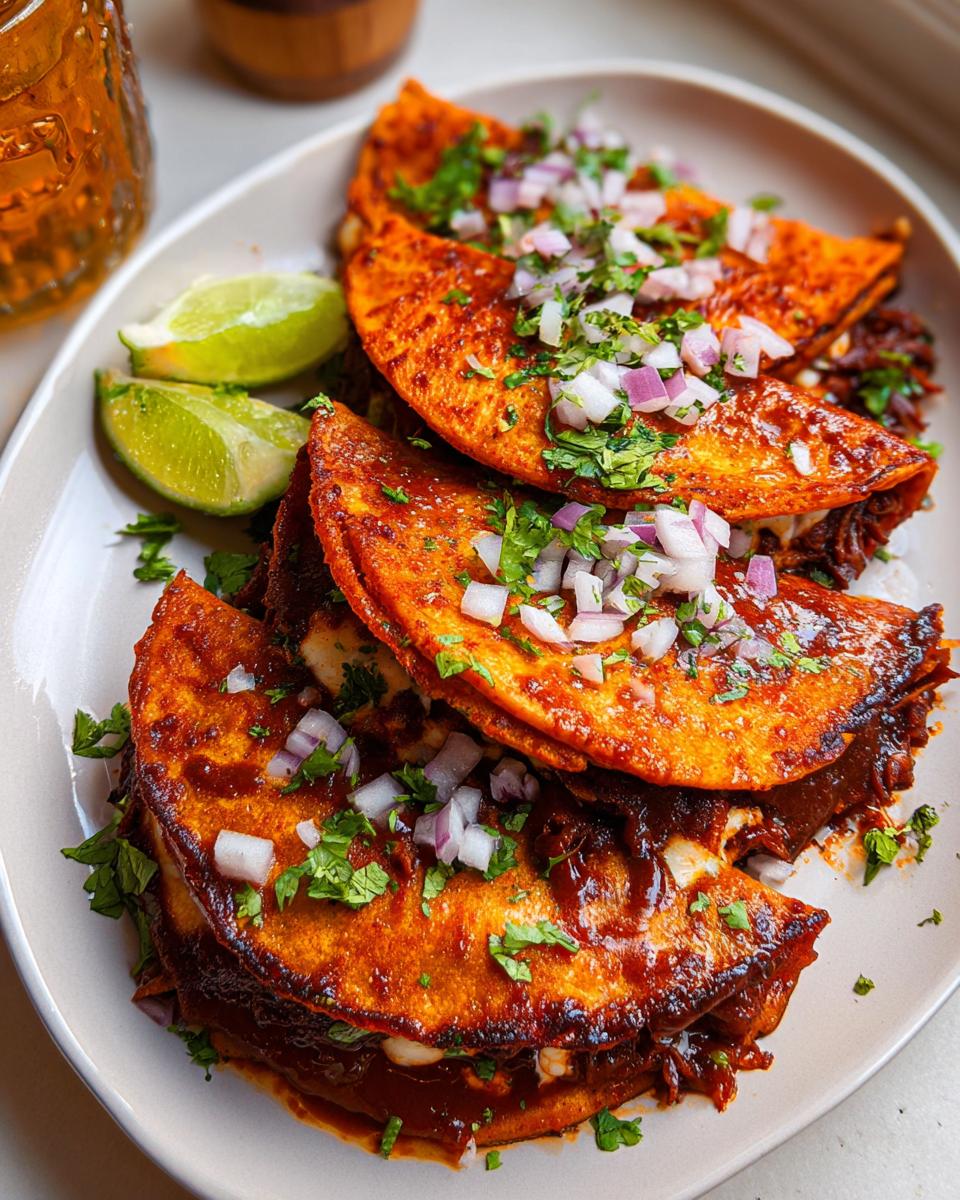
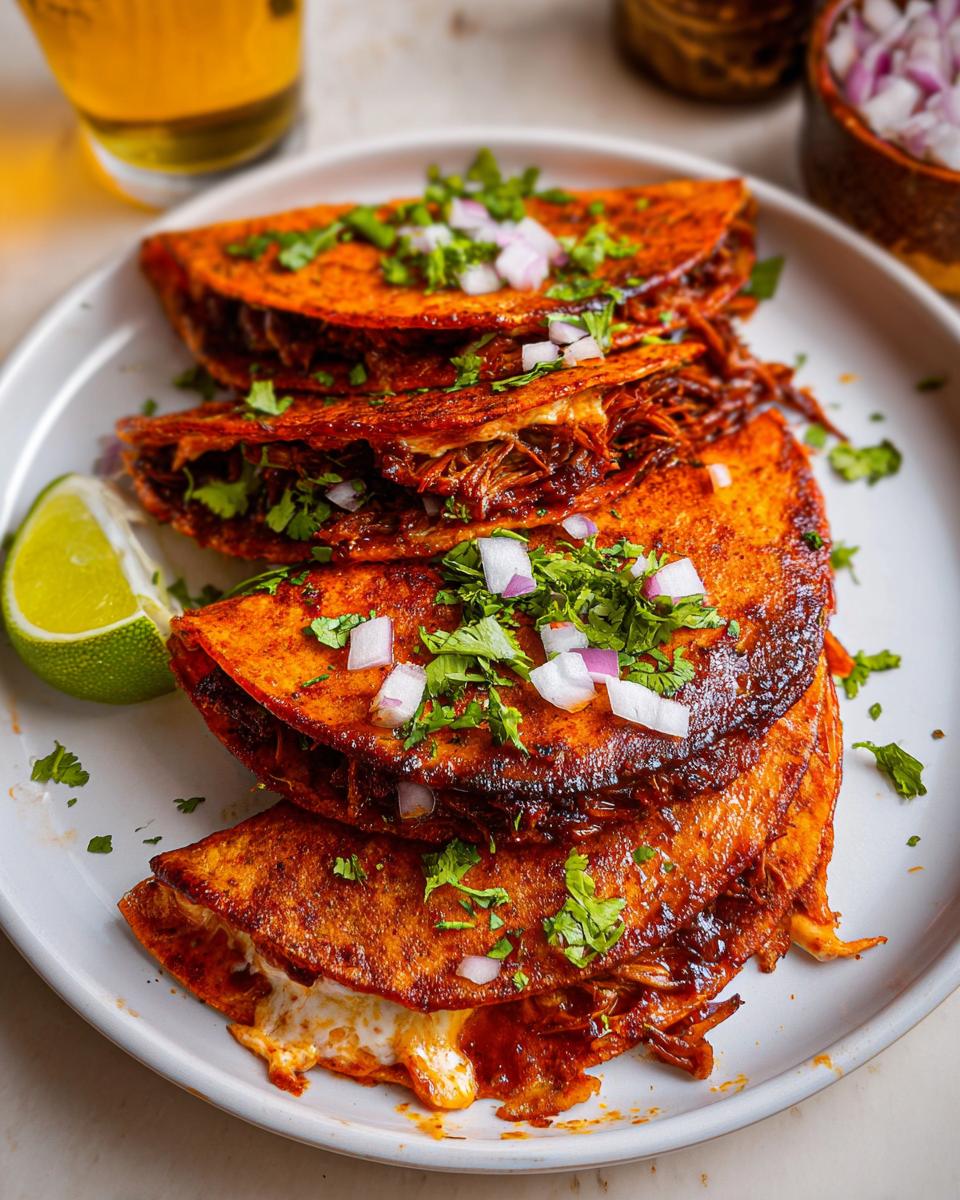
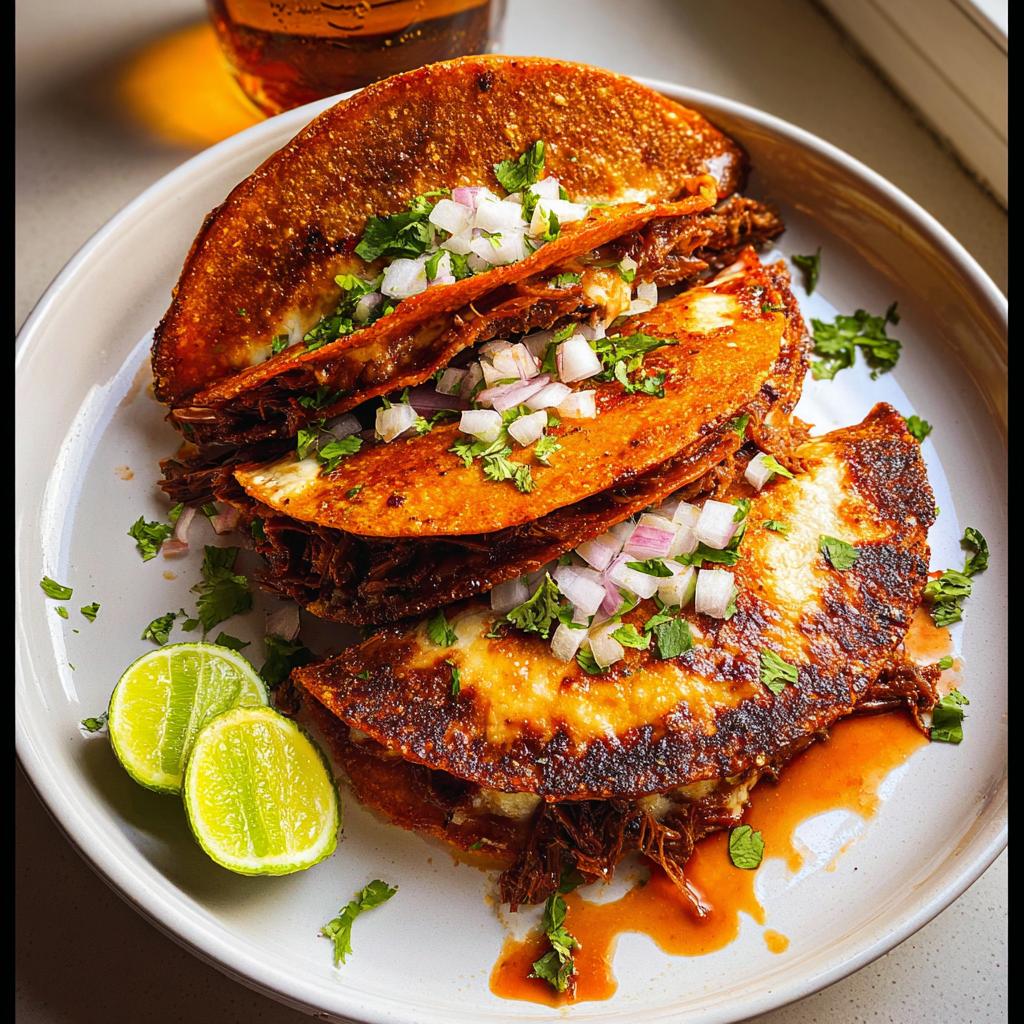
- 1 batch Mexican Birria (Ensure this is heated through and the flavorful, bright red fat is skimmed and sitting right on top.)
- As needed Corn tortillas (We need these spongy and ready for a bath!)
- 2 cups Oaxacan cheese (Shredded is best! If you can’t find it, freshly shredded mozzarella works in a pinch.)
For Garnish and Dipping
These elements bring the fresh pop against the rich meat. Don’t skip the lime; it cuts through the richness perfectly!
- As needed Fresh chopped cilantro
- As needed Finely chopped red onion
- As needed Lime wedges (A non-negotiable squeeze over the top!)
Step-by-Step Instructions to Make My Fave Birria Tacos
Now for the fun part! We take that incredible, slow-cooked birria richness and turn it into the crispiest Taco you’ve ever eaten. Don’t fret about timing here; just watch the skillet. If you stick to this dipping method, you’ll see why I say these tacos are an absolute weeknight winner. Seriously, you can have these assembled faster than you think, especially if you’re already prepping sides! If you’re looking for more quick meals like this, check out my fast dinner roundup!
Preparing the Consomé and Tortillas
First thing’s first: you need that glorious red stew piping hot. You want the fat that separated on top—that’s liquid gold for crisping the tortilla! Take one corn tortilla and dip it completely on both sides right into the runny, oily top layer of the consomé. Don’t let it soak too long, or it’ll get soggy! Just a quick dunk to coat it red, and then immediately place that wet tortilla onto your medium-high non-stick skillet.
Building and Frying the Tacos
Once the tortilla hits that hot pan, you’ve got about ten seconds before you need to work fast. Sprinkle a good layer of that Oaxacan cheese onto one half of the tortilla, then scoop a couple of big spoonfuls of the tender birria meat onto the same side. Quickly fold the empty half over to create your taco. Gently press down with your spatula—don’t smash it, just encourage it to seal! Fry for about 1 to 2 minutes until the bottom is perfectly crisp, then carefully flip and do the other side. If you want them super crisp, just let that second side cook a little longer. When they look beautifully golden and the cheese is oozing, slide them onto your platter. Now we just repeat until everyone is happy!
Tips for Perfect Crispy My Fave Birria Tacos
Crispiness is where a basic taco becomes an absolute showstopper, right? We want that satisfying crunch when you bite in, fighting against that tender stewed meat. It all comes down to managing your heat and your fat content. Trust me, these little details make all the difference between a soft tortilla and a true crispy masterpiece.
Here are my top tricks. If you love simple chicken tacos, you know how important the shell texture is, and it’s the same here! I always apply these crispy rules to shredded chicken tacos, too.
- Don’t Skimp on the Fat Dip: When you dip the tortilla in the consomé, make sure you are really getting that top layer of rendered red fat onto both sides. That oil is what fries the corn and makes it crisp, not just the broth!
- Get That Skillet Hot: Medium-high heat is your friend here. Too low, and the tortilla just soaks up the fat without getting crispy. You want sizzle right away!
- A Gentle Press Works Wonders: Use your spatula to lightly press the taco down once it’s folded over on the pan. Don’t smash it flat, though! You just want to encourage the cheese to melt and the edges to seal together while it crisps up evenly.
Follow those three steps, and you’ll be pulling perfectly sturdy, crispy tacos off that skillet every single time!
Ingredient Notes and Substitutions for My Fave Birria Tacos
When tackling anything with cultural roots, sourcing the right elements makes all the difference. For these tacos, the heavy lifting is done by the birria itself! You absolutely need a batch of authentic, rich Mexican Birria—the slow-cooked meat and that bright red consomé are the soul of the dish. Don’t try to fake the broth part; it’s worth using a good quality pre-made batch if you aren’t simmering for hours.
As for the cheese, Oaxacan is traditional because it melts so beautifully into long, stringy strands. If your local market is out, don’t panic! You can use good quality, freshly shredded mozzarella. It melts well and gives you that cheesy pull we look for, even if it’s not exactly the right regional cheese. It keeps the process painless, which is what this recipe is all about!
How to Store and Reheat My Fave Birria Tacos
We all know leftovers are part of eating good food, but nobody wants a sad, floppy taco the next day! If you have extra birria stew, store that separately in the fridge—it’s good for days. For the assembled tacos, the microwave is an absolute no-go; it steams them right back to sogginess.
To bring back that beautiful crispness, I highly recommend the air fryer or a quick trip in the oven on a baking sheet until they are hot and crunchy. It’s amazing how good they taste the second time around! I always make extra just for lunch the next day. If you need help with general make-ahead strategies, I put together a guide!
Frequently Asked Questions About My Fave Birria Tacos
I get so many questions about this recipe because I think everyone deserves an amazing taco experience, gluten sensitivity or not! It’s all about shortcuts while keeping that traditional heart, and these answers usually clear up the biggest questions right away. If you’re looking for more taco inspiration—especially for Taco Tuesday—check out my roundup of favorites!
Is the consomé broth gluten-free?
Usually, yes! The consomé is just the rich, chile-infused broth left over from cooking the beef birria. Traditional recipes usually just use dried chiles, spices, and water or vinegar for the broth base, which keeps it naturally gluten-free. However, if you are buying a pre-made broth base or relying on a restaurant’s ingredients, you should always double-check. When I make mine at home, I know exactly what’s going into that beautiful dipping cup!
Can I use flour tortillas instead of corn for My Fave Birria Tacos?
Oh, honey, I tried it once, and I really wouldn’t recommend it for this specific process. If you are going gluten-free, corn tortillas are generally safe, but they work better here because of the texture. Flour tortillas just don’t crisp up the signature way when dipped in the birria fat. Corn gets that beautiful, slightly browned, robust crunch that locks in the meaty juices. If you’re having trouble finding good corn tortillas, look for ones specifically labeled as 100% corn—they are the best for that authentic fry!
Sharing Your Experience with My Fave Birria Tacos
I truly hope making these tacos brought you as much joy as it brought me when I finally perfected the gluten-free version. Seeing these traditions survive and thrive—maybe even adapting to fit new ways of eating—is what cooking is all about for me. I’m Elena, by the way, and I love hearing from everybody who tries my recipes!
Now that you’ve dipped, folded, and crisped, I’d be so grateful if you took a minute to share your adventure below. Did you manage to find the perfect Oaxacan cheese? How did your family react to these crunchy, cheesy beauties?
Please let me know what you thought! You can give the recipe a star rating right here on the page. If you have any questions about substitutions or need tips for the next batch, drop a comment! I read every single one, and I love seeing your kitchen successes. If you want to learn more about my journey in the kitchen and why I focus on heritage recipes, you can read more about my philosophy here. Happy cooking, friends!
My Fave Birria Tacos
Ingredients
Equipment
Method
- Make sure your batch of Birria is heated through. The fat rendered from the beef should be on top; you will use this to coat and pan-fry the tortillas.
- Use a non-stick skillet over medium-high heat. Dip both sides of a corn tortilla into the top layer of the red chile broth/consomé, including the fat. Transfer the dipped tortilla to the heated skillet.
- Top the tortilla with shredded cheese and wait a few seconds for it to start melting. Add a few spoonfuls of the Birria to one end of the tortilla and fold the other end over using a spatula to create a taco shape. Lightly press the taco down with the spatula until it holds its shape.
- Pan-fry the taco for about 1 to 2 minutes on each side until it is crispy and the cheese is bubbly. Add a spoonful of the consomé over the taco as needed. Pan-fry longer if you want more crispiness. Transfer the finished taco to a baking sheet or platter.
- Repeat this process until you have made the desired number of Birria Tacos.
- Serve the Birria Tacos warm. Garnish with chopped cilantro, red onion, and lime wedges. Serve with a small bowl of the consomé broth for dipping.
Notes
Tried this recipe?
Let us know how it was!
Gluten-Free Culinary Storyteller & Recipe Heritage Specialist
Getting diagnosed with non-celiac gluten sensitivity in my late twenties felt like losing my Italian identity. Growing up in nonna’s Brooklyn kitchen, learning traditional techniques that suddenly became off-limits—I decided to fight for those family food traditions instead of giving up.
With my food journalism background and European baking training, I became obsessed with recreating authentic flavors in gluten-free formats. I’ve adapted 400+ traditional recipes from various cultures, with my gnocchi recipe winning “Recipe of the Year” from the National Gluten-Free Living Awards in 2022.
I collaborate with the Italian-American Cultural Center to document traditional family recipes and volunteer with the Westchester Celiac Support Group, teaching monthly pasta-making classes.
Food is the heart of family storytelling. No one should sacrifice their cultural heritage due to dietary restrictions.