There’s nothing quite like the smell of a big, bubbling casserole coming out of the oven when you’re feeding a family. It just screams comfort, right? Well, get ready to meet your new go-to weeknight hero—my incredibly easy, hearty, and totally gluten-free Italian Sausage Rigatoni Bake. I’ll never forget the first time I introduced this to my kids. They were skeptical about the gluten-free part, honestly. But as that cheesy aroma filled our house, their eyes lit up! When they took that first bite of the rich, slightly spicy sauce, there was instant silence, followed by demands for seconds. That little moment reminded me how powerful a great meal is for bringing everyone together, dietary needs and all.
Why This Italian Sausage Rigatoni Bake Is Your New Family Favorite
This recipe isn’t just good; it’s genuinely practical for families like ours who juggle busy schedules but still want that amazing, satisfying dinner feel. Trust me, this delivers pure comfort food magic.
- It’s hearty enough for a weekend gathering but fast enough for a Tuesday night dinner.
- The spicy Italian sausage gives it such a deep flavor without needing hours of simmering.
- And yes, it handles gluten-free substitutes like a champ!
Quick Prep for Busy Weeknights
Seriously, you can get this masterpiece assembled in about 15 minutes before it goes into the oven. I know you’re busy, so I focused on making the prep part quick. We’re talking chopping veggies and tossing things together. Once it’s baking, that’s your free time—go check email or wrestle the kids!
The Cheesy Factor in Your Italian Sausage Rigatoni Bake
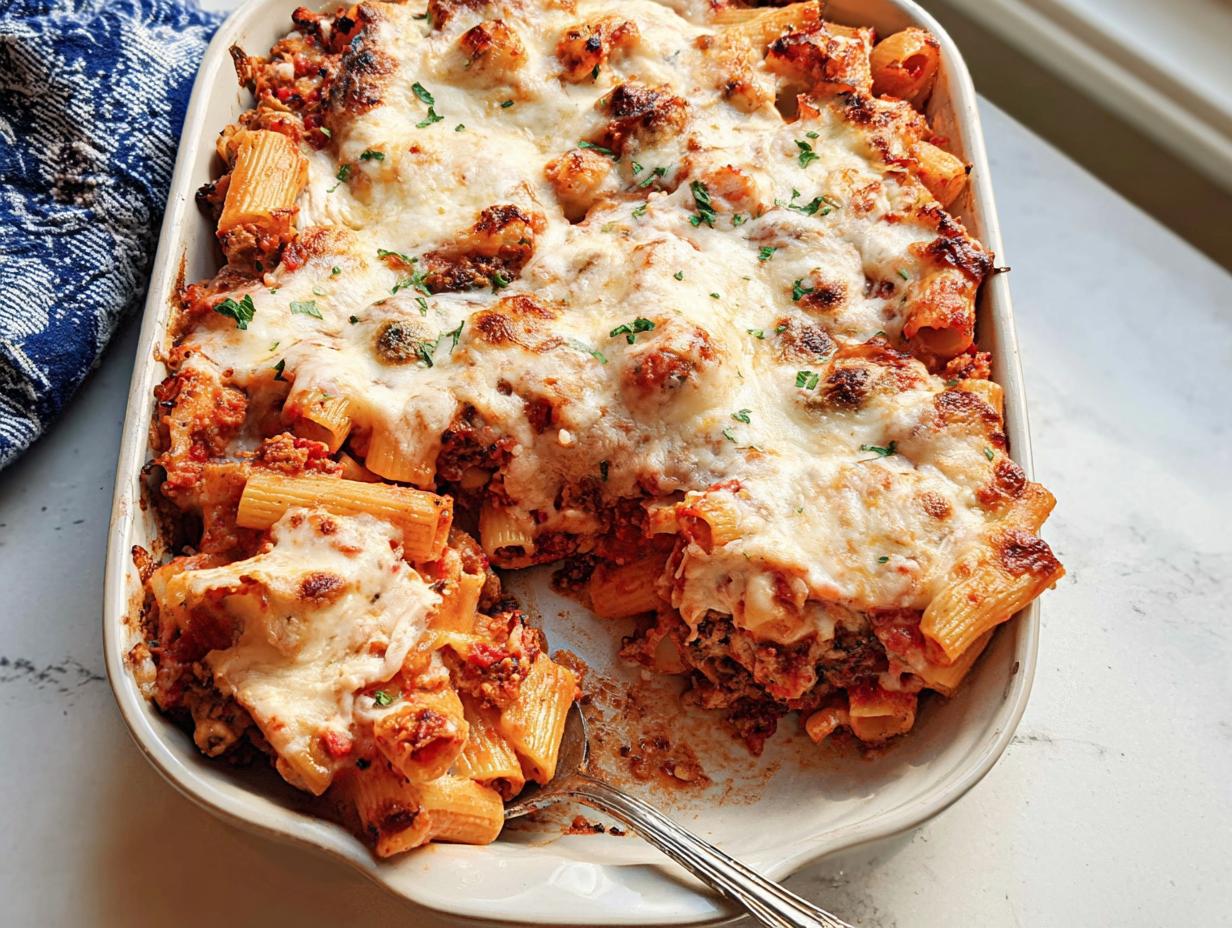
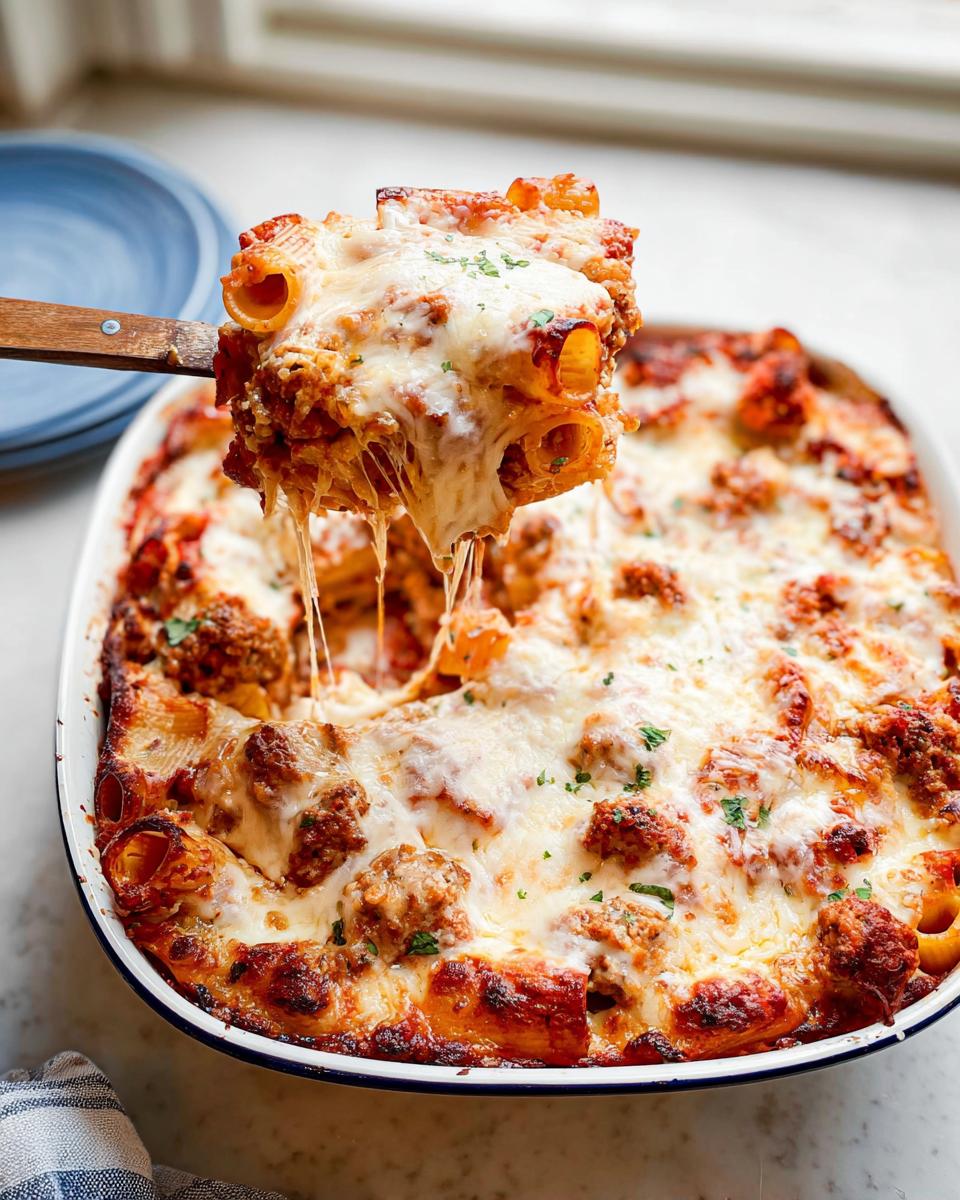
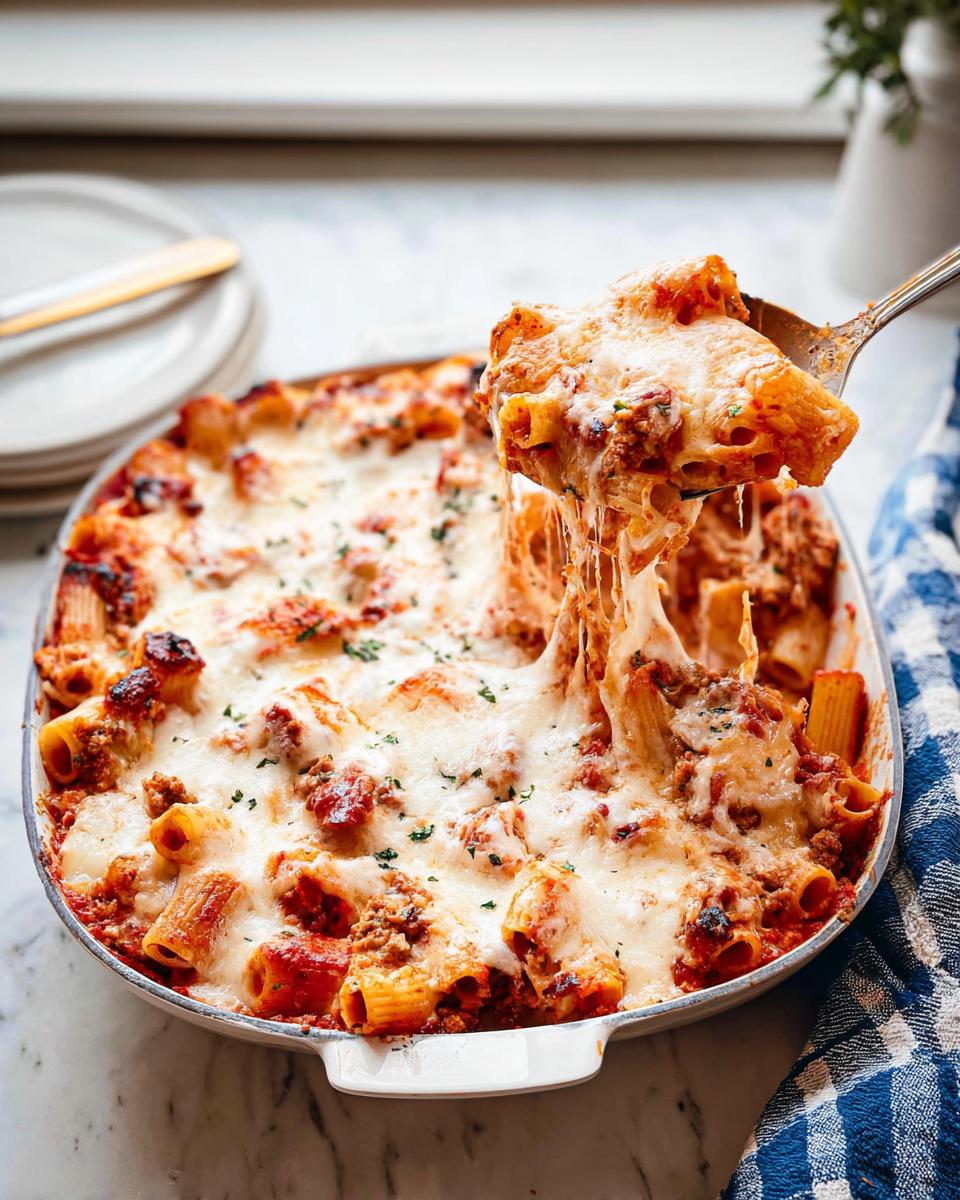
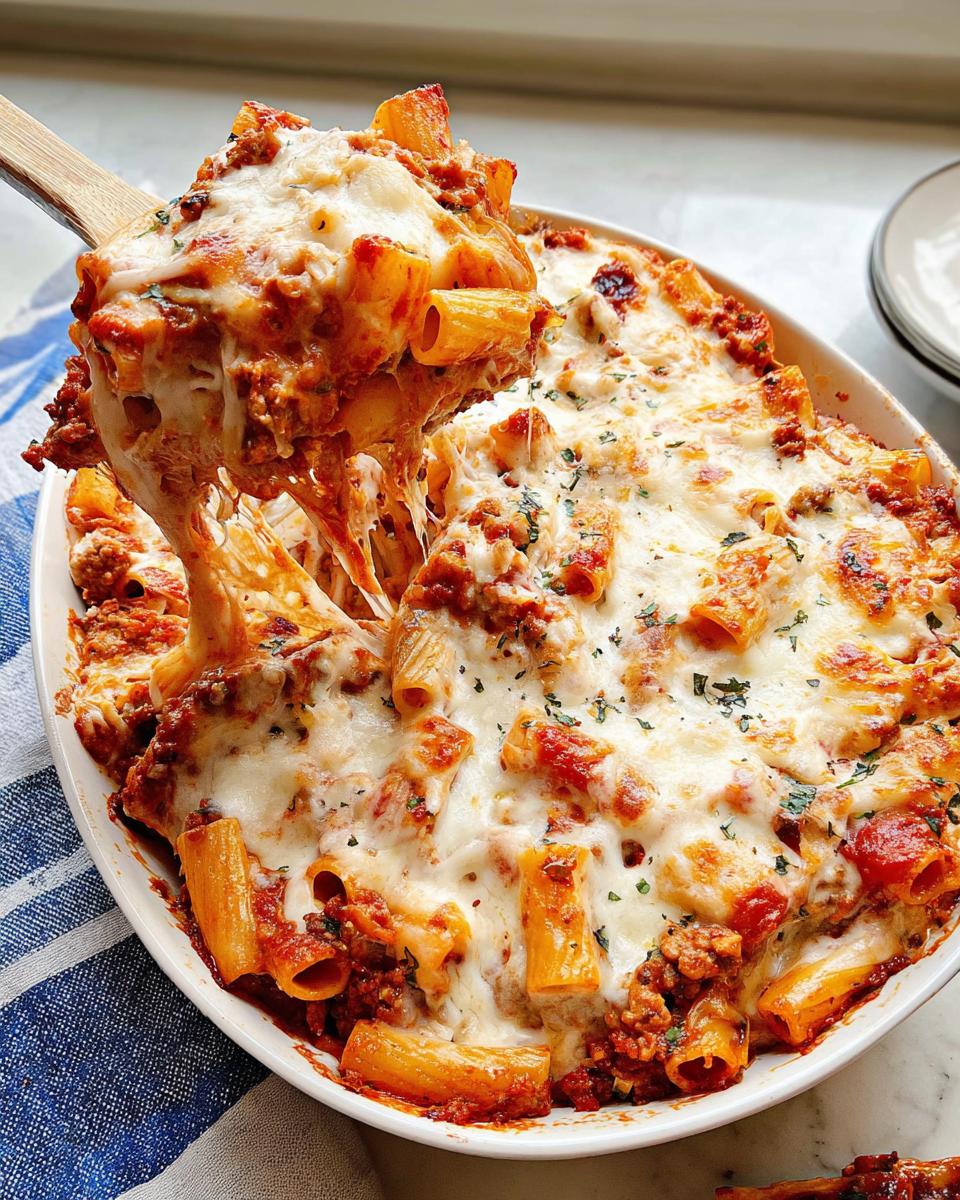
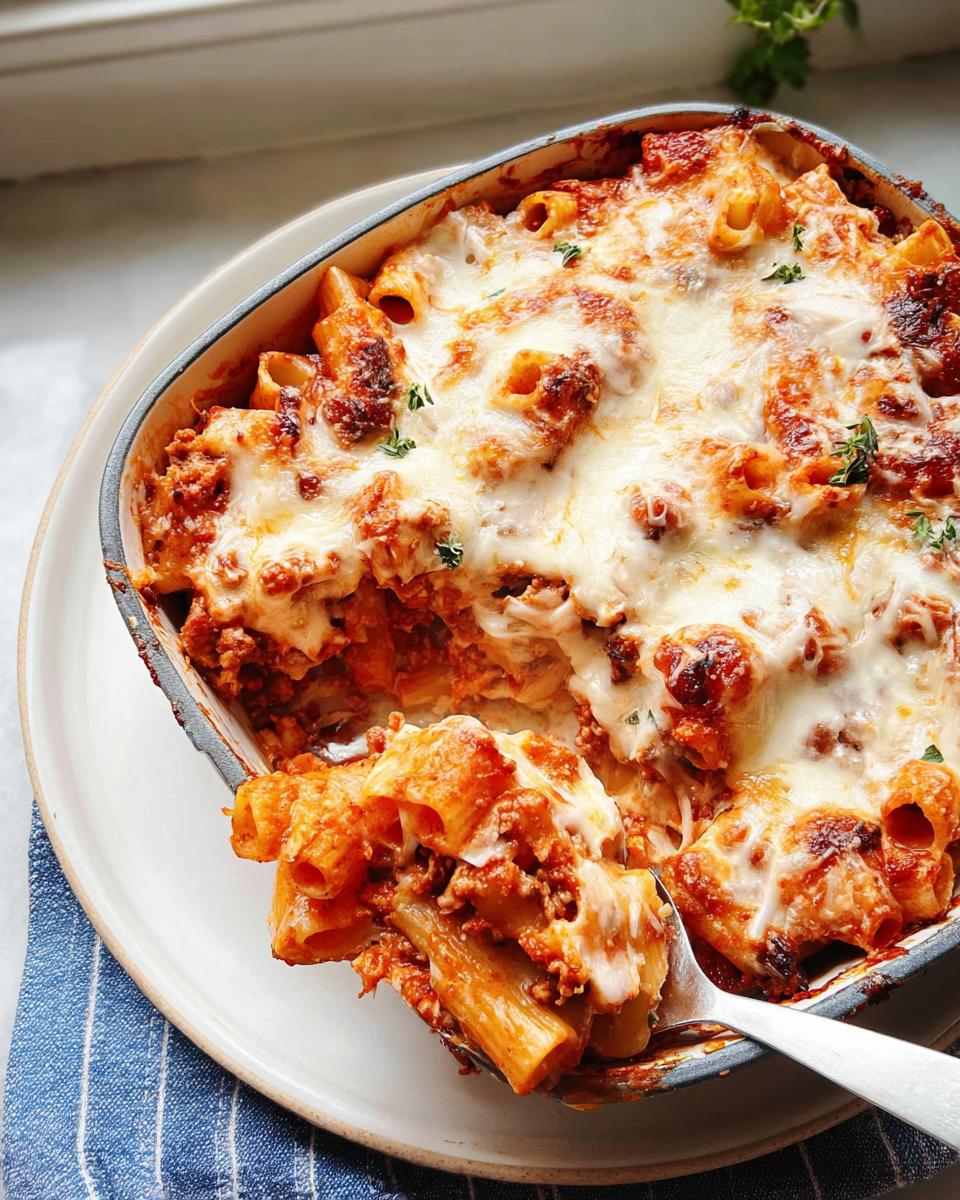
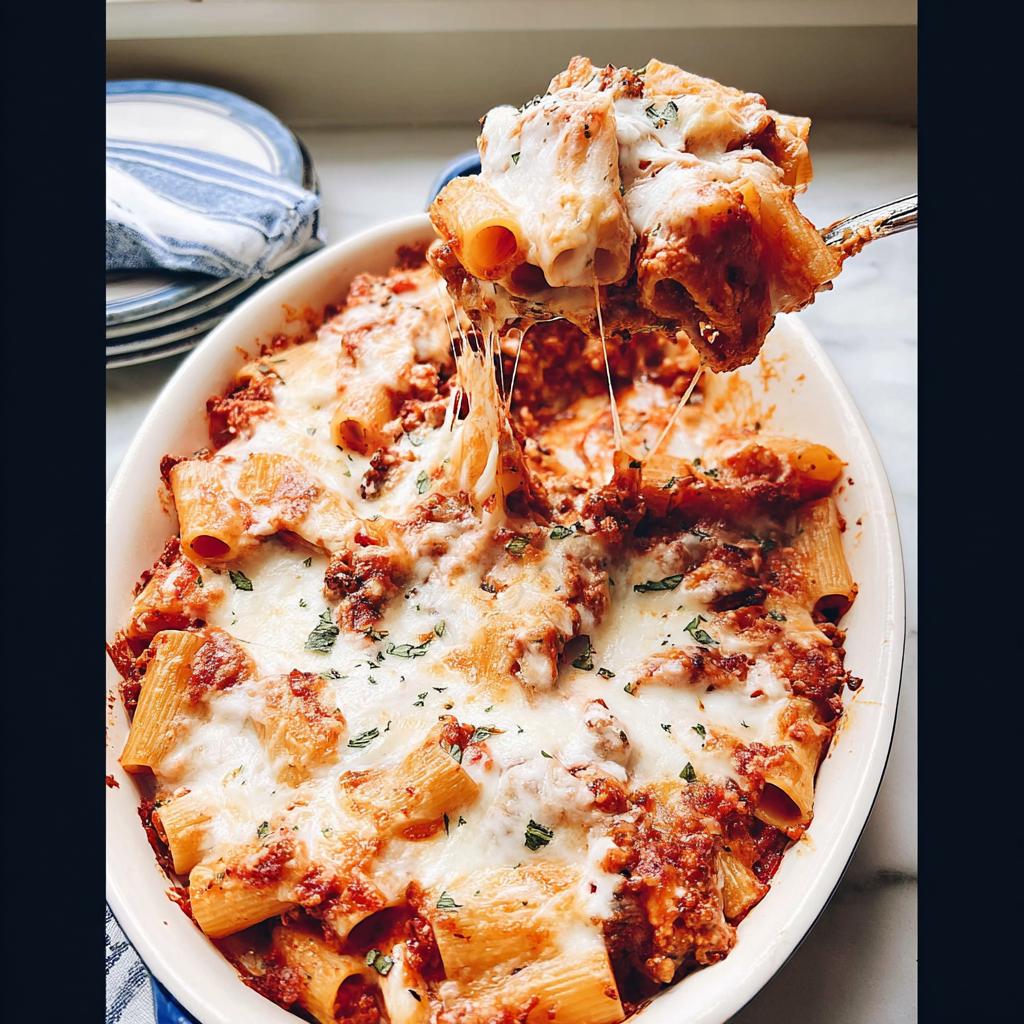
If you want instant family harmony, offer three kinds of melted cheese, that’s my secret! We pile on the ricotta for creaminess, lots of mozzarella for that incredible cheese-pull, and parmesan for a sharp kick right on top. This classic trio is what makes my Italian Sausage Rigatoni Bake so irresistibly gooey and golden brown underneath the broiler.
Essential Ingredients for the Best Italian Sausage Rigatoni Bake
Okay, let’s talk about what goes into this masterpiece. When you’re making comfort food that needs to stand up to freezing and reheating, quality matters! I learned that adding those little extras—the good garlic, the right herbs—makes a huge difference in the final taste, especially since we aren’t relying on traditional flour thickeners here. Pop over to my recipes page if you’re looking for other ways to pack flavor into your meals!
Pasta and Sauce Base Components
For me, the pasta needs to be sturdy enough to hold up to all that cheese and sauce. I always recommend mezzo rigatoni—they’re just the right size for a perfect bite, but ziti or penne will work just fine if that’s what you have. Key flavors come from dicing up the pepper and onion (red or yellow are best!) and grating your garlic finely—don’t just chop it roughly!
The real umami boost comes from a quick step: after browning the sausage, we add tomato paste and cook it until it deepens in color, then we deglaze the pan with some crisp white wine. That scraping step pulls up all the delicious browned bits left by the sausage, giving the sauce so much more depth before the tomatoes even hit the pan.
The Three-Cheese Blend for Your Baked Rigatoni
You can’t skimp on the cheese here; it’s what holds this whole thing together and makes it worthy of the name baked rigatoni! We use three stars: whole milk ricotta. Please use whole milk; trust me, the low-fat kind gets watery. Then, we use loads of mozzarella for that wonderful blanket of stretchiness, and Parmesan to provide that salty, nutty finish.
Remember, you divide all three cheeses up! They aren’t just dumped on top; we layer spoonfuls of ricotta right into the middle of the pasta to keep things moist and creamy from the inside out.
Expert Tips for Perfect Italian Sausage Rigatoni Bake Texture
Getting the texture just right in a baked pasta dish is kind of an art, especially when you’re working with pasta that needs to absorb liquid later. We want tender pieces of pasta coated in sauce, not a mushy mess! If you follow these little secrets, your Italian Sausage Rigatoni Bake will come out perfectly structured every time.
Pasta Cooking: Undercooking is Key
This is honestly the most important step for any baked pasta, so listen up! You must pull your rigatoni out of the boiling water a good 2 or 3 minutes before the package says it’s done—we are aiming for seriously under al dente. Why? Because it’s going to keep cooking and soaking up all that amazing tomato juice while hidden under the foil in the oven. If you cook it fully now, you’ll end up with sad, overcooked tubes baking into submission later.
Building Flavor: Toasting Aromatics and Paste
Once the sausage is browned and out of the way, we take just a minute to wake up the dried spices. I always push the veggies and sausage bits to the side of the skillet and put my garlic, fennel seeds, and Italian seasoning right onto that hot pan surface. They toast up in seconds, smelling incredible! But the real trick? Stir in the tomato paste and let it cook until it turns a deeper, almost rusty red color. Cooking the moisture out of the paste concentrates that sweet tomato flavor beautifully before you add the wine and canned tomatoes. For more ideas on building incredible sauces, check out what my friends over at Plays Well With Butter are doing!
Step-by-Step Instructions for Your Italian Sausage Rigatoni Bake
Alright, time to put it all together! This stage moves fast, so make sure your ingredients are ready to go before you start mixing anything. We’re using the same skillet we built that awesome sauce in, minimizing cleanup which, let’s be honest, is half the battle on a busy night.
Cooking the Pasta and Building the Italian Sausage Pasta Sauce
First thing’s first: get that water boiling salty and cook your rigatoni until it’s ridiculously underdone, like I mentioned before. While that’s happening, you should already have the sausage, veggies, and tomato sauce simmered together. Once the sauce has cooked down for that crucial five minutes—which concentrates the flavor beautifully for your italian sausage pasta—take it off the direct heat. Now, toss in the cooked pasta and mix everything until every tube is coated in that smoky red sauce. Remember, no rinsing the pasta!
Assembling and Baking the Cheesy Oven Dinners
Now for the fun, messy part! Get your 9×13 pan ready; I like to spray the foil with a little cooking spray too, just for insurance. We layer: half the pasta mixture goes in first. Then dollop half of your ricotta across the top—don’t try to spread it, just dot it! Sprinkle on half of the mozzarella. Repeat that whole pattern one more time: pasta, ricotta, mozzarella. Finish the whole thing off with the last of the parmesan on top.
Cover the whole dish tightly with that prepared foil and pop it into the 400-degree oven for 25 minutes. This lets everything heat through evenly. But don’t stop there! Once the 25 minutes are up, yank off the foil and switch the oven to broil for about 5 minutes. You want that top layer of cheese to turn bubbly and golden brown for the perfect cheesy oven dinners experience. Watch it close during the broil, though; ovens can be dramatic!
Making This Italian Sausage Rigatoni Bake a Sunday Family Meal
While this dish whisks together fast enough for a Wednesday, it truly shines when you serve it up as a proper Sunday family meal. There’s something about a baked pasta centerpiece that just makes the table feel fuller, you know? It’s the kind of meal that sits there bubbling, inviting everyone to share a big scoop.
I remember serving my first big batch of the Italian Sausage Rigatoni Bake when my sister was visiting. Seeing everyone pile their plates high—no complaining about the gluten-free aspect, just happy faces—was worth every minute I spent chopping onions!
Serving Suggestions for a Complete Dinner
Since the rigatoni bake is super rich with sausage and cheese, you want sides that are bright and fresh to cut through that richness. Honestly, a simple green salad tossed with good olive oil and balsamic vinegar is all you really need. It balances everything out perfectly!
Since we have to skip regular garlic bread when we eat gluten-free, one of my family hacks is to serve simple toasted slices of a good quality GF baguette brushed lightly with garlic powder and olive oil. It hits that warm, carb-y craving without all the stress. You don’t need to overcomplicate the table when the main event is this satisfying!
Ingredient Notes and Gluten-Free Substitutions
I know how confusing ingredient swaps can be, especially when you’re trying to keep everything gluten-free without sacrificing that deep, savory flavor. Since this recipe is designed to be flexible, I wanted to give you a quick rundown on the swaps that work best, so you can feel confident heading into the kitchen. Building those reliable go-to options really helps cut down on weekly stress!
Pasta Choices for Your Italian Sausage Rigatoni Bake
When buying gluten-free pasta, you really can use any short, tube shape that holds sauce well. Penne, ziti, or shells are perfect substitutes for the mezzo rigatoni. Now, be warned: gluten-free pasta can sometimes get a little softer than traditional wheat pasta when it bakes, which is exactly why we cook it for those extra few minutes less—remember, we want it basically crunchy before it goes in the oven! If you want to check out some of my favorite GF baking hacks in general, take a peek at my GF bread recipe guide.
Sausage Variations and Flavor Adjustments
If you aren’t a fan of the spice, ditching the spicy Italian sausage for mild is super easy! You could even use sweet Italian sausage if your kids prefer that flavor profile. Or, if you’re trying to sneak in some leaner protein, ground turkey sausage works great, too.
But here’s the catch with leaner meat: you lose some of that rich pork fat that adds so much flavor to the sauce. If you go for turkey, just add an extra tablespoon of olive oil when you’re sautéing your veggies so you don’t lose that luxurious mouthfeel.
Storing and Reheating Your Baked Rigatoni
One of the absolute best things about making a big, cozy casserole like this is knowing you have dinner taken care of for the next few days! Nobody wants to cook every single night, right? This cheesy oven dinner holds up beautifully, which means leftovers are just as delicious as the first serving, with hardly any extra effort on your part.
If you have any of this amazing baked rigatoni left over—though I doubt you will have much!—storage is super simple. Just make sure it cools down a bit after it comes out of the oven before you cover it. Putting hot food directly into the fridge can mess with your fridge temperature, and we don’t want that!
Keep sealed leftovers in an airtight container in the refrigerator for up to four whole days. Trust me, reheating this is even faster than making lunch!
Quick Reheating Tips for the Fridge Stash
For a quick lunch or dinner portion, the microwave is your best friend here. Pop a scoop in a microwave-safe bowl and heat it until it’s piping hot all the way through. It takes just a minute or two, depending on how big your piece is.
If you’re trying to reheat a larger section, say a quarter of the whole dish, the oven is better for keeping the texture. Cover that portion tightly with foil (spray the foil first, just like we did for baking!) and warm it in a 350-degree oven for about 15 to 20 minutes. That low, slow heat melts the cheese back into gooey perfection without drying out the noodles.
Freezing Instructions for Future Family Meals
Because we know life gets crazy, I always suggest making a double batch just to freeze half. This is perfect for those nights where you just can’t face the drive-through. This Italian sausage pasta freezes like a dream!
Once the bake has cooled completely, either cut the whole thing into individual servings or wrap large sections tightly in plastic wrap first. Then, put those wrapped portions into a heavy-duty freezer bag or an airtight container. You can keep this delicious frozen comfort food on hand for up to three months. When you realize you need dinner tomorrow, just move the frozen portion to the fridge to thaw overnight before reheating as described above. Instant weekend-quality meal on a Tuesday night!
Frequently Asked Questions About Italian Sausage Rigatoni Bake
I always get a ton of questions after readers make this dish for the first time—it’s just so different from a stovetop lasagna! Most of the questions usually revolve around cheese melting or pasta texture, which makes total sense. I’m happy to share what I’ve learned from making dozens of batches of this wonderful Italian Sausage Rigatoni Bake over the years!
Can I use a different type of pasta in this Italian Sausage Rigatoni Bake?
Absolutely, you can swap out the pasta! While mezze rigatoni is my favorite shape for texture, feel free to use ziti or penne. Just remember our golden rule: whatever you choose, pull it off the heat when it’s super firm—about three minutes under done. That undercooked pasta is what ensures your final baked rigatoni isn’t soft and mushy after the oven time!
How do I make this recipe less spicy for my kids?
That’s an easy fix! The heat really comes from the ‘spicy’ Italian sausage you buy, and the crushed red pepper flakes. If your little ones are sensitive to heat, just grab the mild Italian sausage instead. And for the red pepper flakes, start by using just half a teaspoon, or skip them entirely. You still get great flavor from the fennel and garlic; you just dial down the fire!
What is the best way to prevent the top cheese layer from burning while baking this cheesy oven dinner?
This is where that foil comes in handy! We cover the entire dish tightly for the first 25 minutes of baking time. This low and slow heat melts everything, gets the sauce bubbling hot all the way to the center, and warms the cheese through beautifully. Only after that initial bake do we pull the foil off and turn on the broiler for those last few minutes to get that gorgeous golden, bubbly crust that makes this cheesy oven dinners dish so appealing!
Share Your Italian Sausage Rigatoni Bake Experience
I truly hope this recipe brings as much comfort and joy to your table as it has to ours. Cooking for family is such a rewarding thing, even when we’re juggling gluten-free needs on a busy schedule. I’ve shared all my secrets for getting that perfect texture and maximum flavor in this Italian Sausage Rigatoni Bake!
Now it’s your turn! I absolutely love hearing from you once you’ve made one of my favorite family meals. Did your kids love the melted cheese? Did you manage to sneak in some extra veggies while keeping it gluten-free? Don’t be shy!
Please take a moment to leave a little star rating right below this section—it helps other busy families find this recipe when they need a reliable, hearty dinner. If you happen to snap a photo of your bubbly, golden creation, share it! Tag me on social media so I can see your beautiful work. Hearing from you means the world to me, Sophie Williams, and helps me know what kinds of simple, satisfying meals you need next!
Italian Sausage Rigatoni Bake
Ingredients
Equipment
Method
- Season a large pot of water generously and bring it to a boil. Add the rigatoni and cook, stirring sometimes, until the pasta is 2-3 minutes under al dente. Drain the pasta and set it aside. Do not rinse the pasta.
- Add the olive oil to a large skillet over medium-high heat. When the oil is hot, add the bell pepper and onion, seasoning with 1 teaspoon kosher salt. Cook, stirring occasionally, until soft and fragrant, about 4-5 minutes. Add the sausage to the skillet. Let it brown for 2-3 minutes, then use a wooden spoon to break it into fine crumbles. Keep cooking and crumbling until the sausage is browned and rendered, about 2-3 more minutes. Stir to mix with the softened vegetables.
- Push the sausage and vegetables to one side of the skillet. Add the garlic, Italian seasoning, fennel seeds, and crushed red pepper flakes (if using) to the empty side so they touch the hot surface. Cook until fragrant, about 30 seconds to 1 minute.
- Stir the tomato paste into the skillet, coating the sausage and vegetables. Cook for 2-3 minutes until deep red. Slowly pour in the white wine, using a wooden spoon to scrape up any browned bits from the bottom of the pan. When the wine is almost gone, add the crushed tomatoes, diced tomatoes (with juices), spinach, and ½ cup grated parmesan cheese. Stir to combine and wilt the spinach. Bring the mixture to a simmer, then lower the heat to medium-low. Let the sauce simmer for 5 minutes, stirring sometimes, to thicken slightly and develop flavor. Taste and adjust seasoning, then remove the skillet from the heat.
- Preheat your oven to 400 degrees F. Position a rack in the upper third of the oven. Lightly spray a large piece of foil and a 9×13 pan with nonstick cooking spray, then set them aside. Add the cooked rigatoni to the tomato sauce, tossing well so all the pasta is coated. Transfer half of the pasta and sauce to the prepared baking dish. Dot half of the ricotta over the pasta surface, then sprinkle half of the shredded mozzarella cheese on top. Repeat this layer: pasta and sauce, ricotta, mozzarella. Finish by sprinkling the remaining ½ cup grated parmesan over the top layer.
- Place the baking dish on top of a baking sheet, then cover it with the prepared foil. Once the oven is preheated, place the dish in the oven and bake for 25 minutes, until the rigatoni is bubbling and the cheese is melted. Carefully remove the foil and turn the oven’s broiler on high. Broil the baked rigatoni for about 5 minutes, watching closely to prevent burning, until it is golden brown and bubbly.
- Carefully remove the baked rigatoni from the oven. Let it cool slightly, then serve it topped with extra grated parmesan or fresh chopped herbs if you like. Enjoy your meal!
Notes
Tried this recipe?
Let us know how it was!
Gluten-Free Nutritionist & Family Meal Planning Expert
Working as a pediatric dietitian at Children’s Hospital of Denver, I kept meeting families overwhelmed by managing their children’s celiac disease. Parents stressed, kids frustrated, everyone eating bland boxed “gluten-free” products.
That’s when I realized my calling: creating practical, balanced gluten-free solutions for real families with busy schedules. I’ve developed 375+ family-friendly recipes focusing on lunch boxes, after-school snacks, and make-ahead dinners that actually work.
My meal planning system was featured in Parents Magazine, and I presented research at the Rocky Mountain Pediatric Nutrition Conference. My evidence-based approach ensures recipes meet both taste and health standards—families need solutions that work in the real world, not just perfect test kitchens.