
Oh, there is nothing quite like biting into a grilled cheese sandwich that achieves that mythical state: perfectly crisp, buttery gold on the outside, with lava-hot, gloriously gooey cheese pooling inside. That beautiful nostalgia is why I’m showing you How to Make Grilled Cheese Recipes Like a Pro (2025). I learned this first-hand when my youngest son was diagnosed with celiac disease. I had to rethink everything! Using gluten-free bread and some artisan cheeses, I made a sandwich that felt like a giant, buttery hug from childhood. That effort transformed the simple classic into a canvas for creativity, and I want you to explore that too. Trust me, once you master the technique, you’ll be impressing everyone!
Why Mastering How to Make Grilled Cheese Recipes Like a Pro (2025) Matters
Look, anyone can slap cheese between two slices of bread and call it lunch, right? Wrong! When you learn the pro techniques, you unlock something truly special. It moves from being a quick snack to actual comfort food craftsmanship. We aren’t just making lunch; we are aiming for perfection!
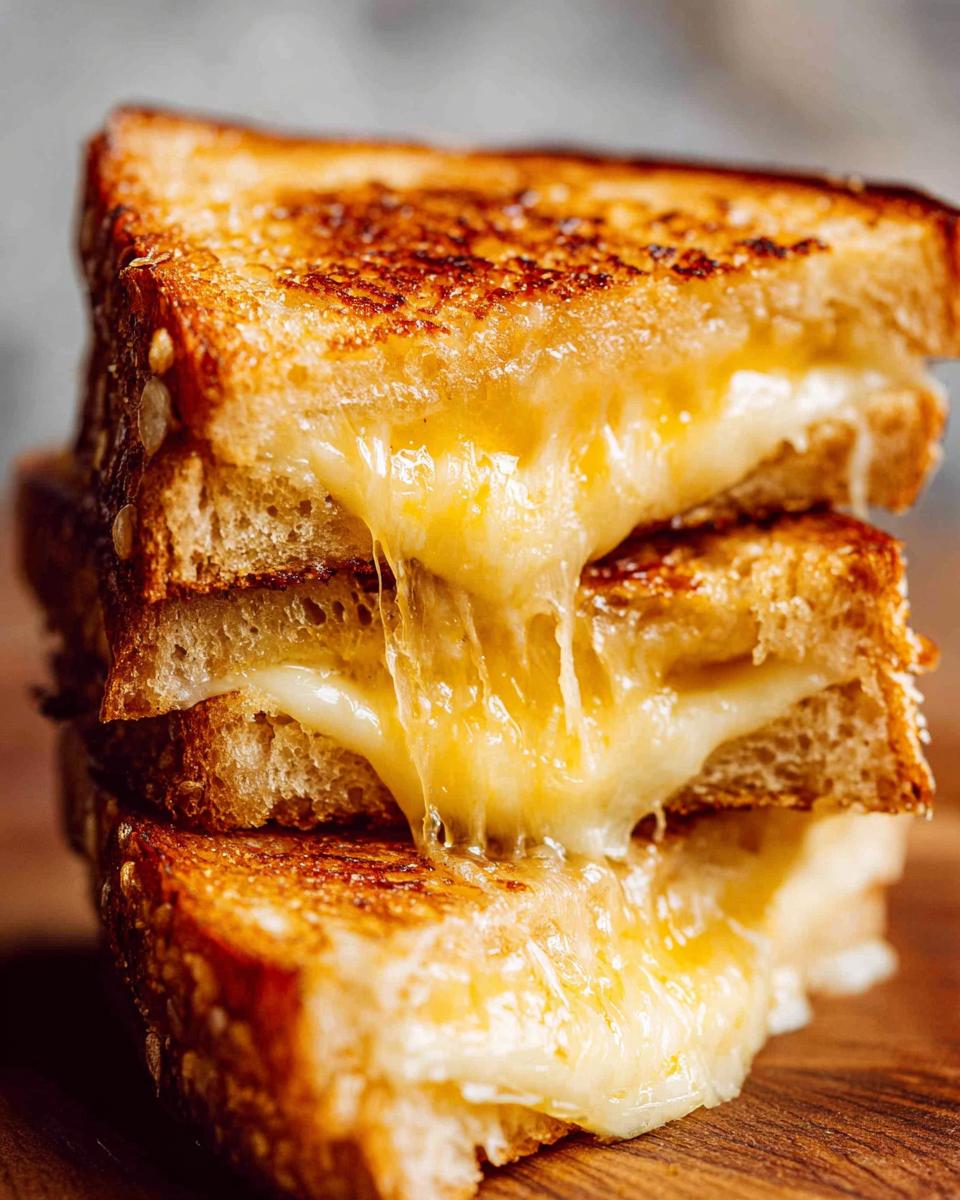
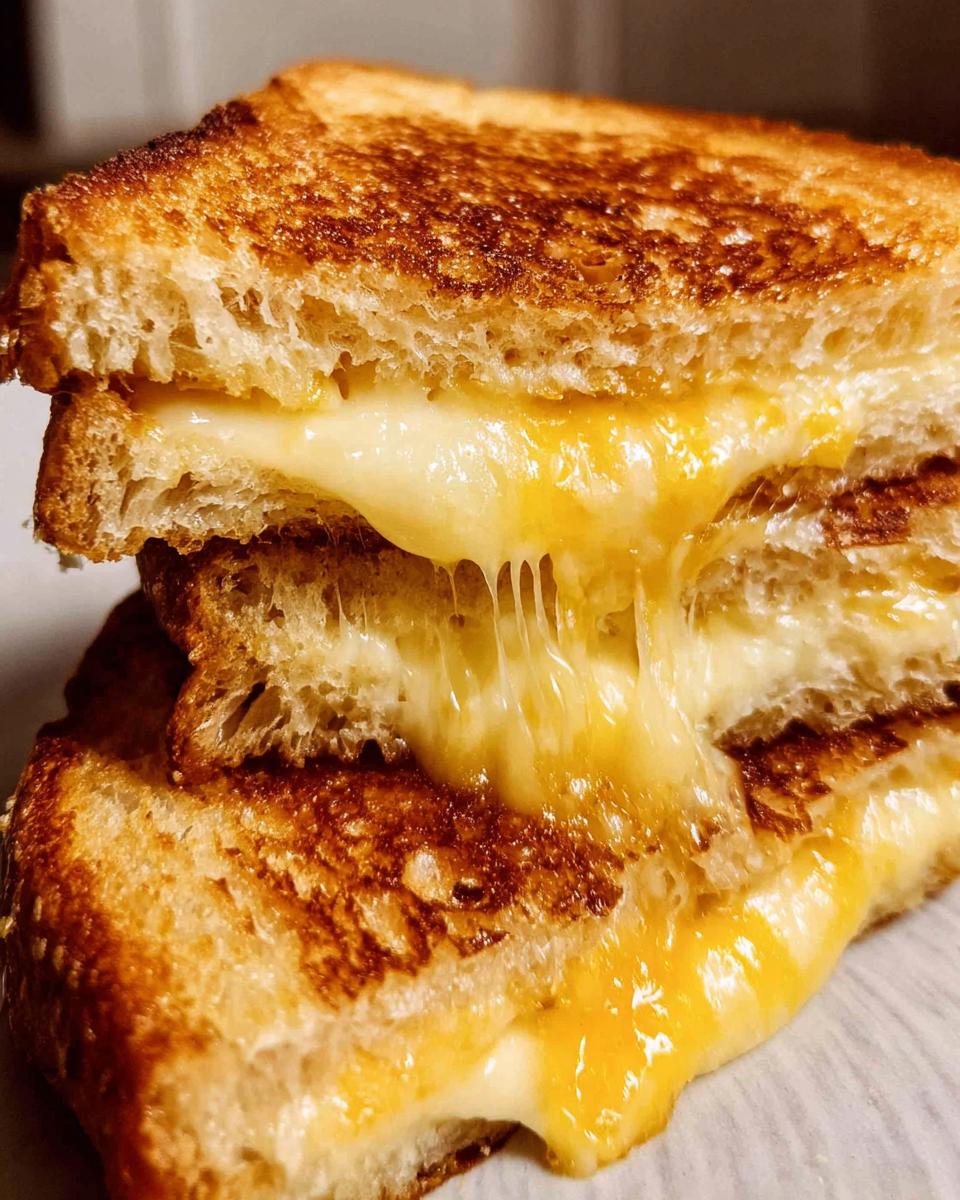
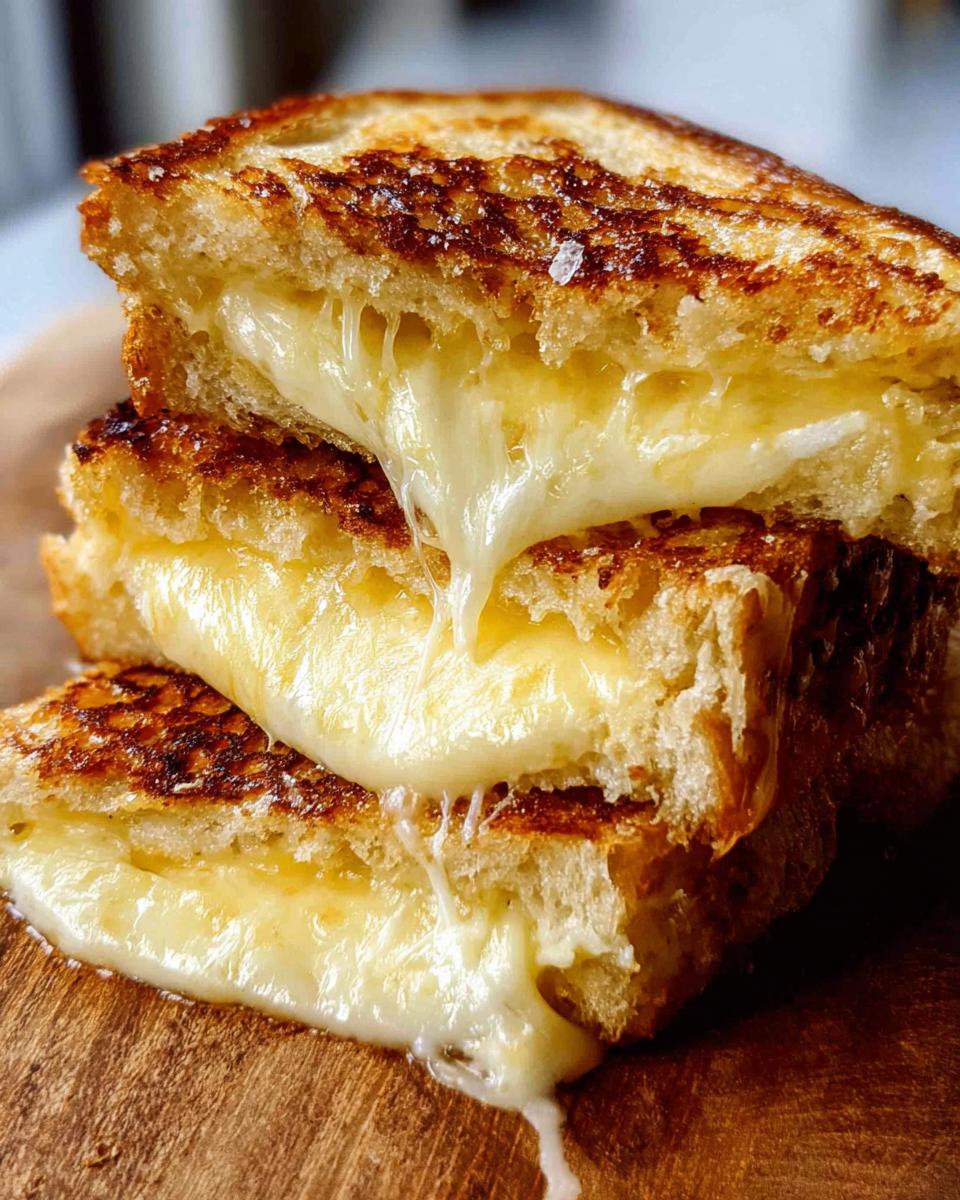
- You hit that supreme texture: crunchy exterior that shatters slightly, leading right into that perfect, stretchy cheese pull.
- The flavor depth you get from using quality ingredients really shines through when you cook it correctly.
- It opens up so much versatility! Suddenly, simple grilled cheese is ready for gourmet additions or even a protein boost, just like some of the creative ideas you can find over here on my main recipe page.
Mastering these little secrets means you never have to settle for greasy, soggy bread again. It’s worth the extra minute of attention, I promise!

Essential Ingredients for How to Make Grilled Cheese Recipes Like a Pro (2025)
Getting this right starts before the heat even goes on. You need the right foundation. Don’t feel overwhelmed by the list; it’s really about quality and preparation, not quantity. For this classic sandwich, which serves one hungry person, we’re using two slices of sourdough bread, sliced just right—about 1.3 to 1.5cm thick. Too thin and it collapses; too thick and the cheese won’t melt before the bread burns!
Selecting the Right Bread and Butter
I chose sourdough because it has this fantastic tang that cuts through the richness of the cheese, and it develops the best sturdy crust. Now, here’s where you might mess up: you need 30 grams of salted butter, and you need to use it generously. My secret? Slather both sides of *each* slice of bread with butter. Yes, all four sides that will eventually touch the pan or the other slice get coated. This ensures maximum golden crispness!
The Perfect Cheese Blend for Melting
You need flavor, but you also need that glorious, impossible stretch. That’s why we blend! We grab about a third of a cup of sharp vintage cheddar—Gruyère is a fantastic swap if you have some—and toss it with 30 grams of mozzarella. The cheddar brings the savory punch, and the mozzarella brings the magic melt. Now listen to me closely: you have to grate your own cheese! Pre-shredded stuff is coated in starches to keep it from clumping in the bag. Those starches actively fight against getting that gooey, melty masterpiece we are aiming for. Skip the bag, grab your box grater, and grate it fresh, okay?
Step-by-Step Guide: How to Make Grilled Cheese Recipes Like a Pro (2025)
This is where the rubber meets the road, or perhaps where the butter meets the pan! The secret to getting that coveted golden crust before the cheese even thinks about softening is temperature control. Patience, my friends, is the main ingredient here.
Prepping the Bread and Pan Temperature Control
First things first—heat the pan! We want it good and warm, but NOT ripping hot. Set your heavy-based skillet over medium-low heat. You won’t add any extra oil or butter to the pan itself, even though the bread is already slathered. We want to lightly toast those buttered slices for about one minute just to get the surface warm and create that first layer of crispness. Think low and slow, the way I approach big oven dishes like my creamy chicken lasagna. This slow approach stops the outside from scorching while the inside is still cold.
Assembling and Cooking for the Ideal Crust
Once that initial toast is done, flip one slice. Now, layer up! Pile all your grated cheddar on first, then top it with the mozzarella. Make sure the cheese covers the surface edge-to-edge! Place the other slice of bread on top, making sure the toasted side touches the cheese pile. Cook that side for about three minutes. As it cooks, press down gently with your spatula—just a light press, nothing aggressive! That’s how you encourage contact and seal those edges. If you see it getting dark brown too fast, lift the pan off the burner for thirty seconds to let it cool down a touch, then put it back on. Flip it over and cook the second side for another three minutes until it’s equally golden and the cheese is completely melted through. Slice immediately and devour!
Pro Tips for Elevating Your How to Make Grilled Cheese Recipes Like a Pro (2025)
Okay, you’ve nailed the basic assembly—that’s fantastic! But we aren’t stopping at basic, we are going pro, remember? The little things separate a good sandwich from one that makes people stop talking mid-sentence. These advanced tricks are what I use when I want to show off my skills, even with something as simple as this classic comfort food. Check out some of my favorite tweaks for next-level results.
The Secret to Even Browning
When I talk about even browning, I’m talking about a uniform, deep, golden color across the entire surface of the bread, not patchy light and dark spots. You need a good, heavy-based skillet for this! Thin pans get hot spots really quickly, and you end up with burned bread before the center is truly molten. Keep that heat steady and low, like we talked about earlier. Seriously, if you have to take it off the heat for five seconds to stop it from darkening too fast while you adjust the stove knob, do it! Consistency in heat management is pure pro magic, and you can read more about these heating techniques over at RecipeTin Eats, they have some great visual guides here.
Adding Flavor Boosters Before Cooking
Sometimes the cheese and bread just need a little extra wink of flavor on the outside. Don’t be afraid to jazz up that butter before you spread it on! My favorite trick is taking that 30 grams of cold salted butter and mixing in just a tiny pinch of garlic powder right before I slather it on the bread. It toasts up right on the crust and it’s subtle—no one will know why it tastes so much better!
If you want a bit more depth inside, try mixing about half a teaspoon of Worcestershire sauce directly into your grated cheese pile before you layer it. It adds this incredible savory background note that just screams *gourmet*!
Variations on How to Make Grilled Cheese Recipes Like a Pro (2025)
Once you’ve mastered the low-and-slow technique, the real fun begins: creating your own signature sandwich! This is your canvas, so don’t be afraid to swap things out. We talked about making this hearty enough for dinner—maybe you need extra staying power to get you through the afternoon? Think bigger than just cheese!
Adding Protein for a Heartier Meal
If you’re eating this for a late lunch or need some solid protein to keep you going until dinner, you need an addition. A thin slice of leftover cooked chicken or even some crispy prosciutto works wonders tucked right under that cheese layer. We want flavor that holds up to cheddar, so cured meats are usually my first choice. If you love prepping meals ahead like I do for speedier dinners, you can find heavy-duty options like my meat and cheese lasagna for busy nights, but for this sandwich, a bit of ham or bacon goes a long way!
Gourmet Cheese Swaps
While the cheddar/mozzarella combo is classic, you can get wild with your flavor profile. If you want something nuttier and earthier—something that tastes almost smoky—trade out the cheddar for good Gruyère. Fontina is creamy and melts beautifully, and Havarti is incredibly mild and super soft. Feel free to mix one of these gourmet cheeses with just a little bit of Monterey Jack for stretch. It’s amazing how changing just one cheese can completely change the whole experience. Sometimes I even throw in a little pepper jack when I want something with a bit of a kick after I’m done cooking, similar to the heat in my stuffed peppers.
Serving Suggestions for Your Pro Grilled Cheese
Alright, that golden masterpiece is made! Now, what do we serve it with? This sandwich is rich and comforting, so you don’t want anything too heavy that competes with it. Honestly, sometimes I just stand over the counter and eat the whole thing while it’s still dripping cheese—don’t judge me!
But if you’re feeling civilized and serving guests, you need the right sidekick. Tomato soup is the obvious, classic partner for a reason. The acidity of the soup just cuts through the fat of the butter and the richness of the cheese perfectly. Heat up a quality canned soup, or even better, make a quick homemade creamy tomato bisque if you have a minute!
If soup feels too heavy, especially on a warmer day, lighten things up. A simple side salad works wonders. I’m talking baby greens, maybe some thinly sliced cucumber, and a bright, sharp vinaigrette dressing—lemon juice, olive oil, salt, pepper. That little bit of freshness and tang makes the next bite of that glorious, buttery grilled cheese taste even better. It balances the whole meal out beautifully, making it feel less like a feast and more like a sophisticated lunch!
Storage and Reheating Instructions
Even the best grilled cheese doesn’t last long in my house, but sometimes you end up with a half sandwich or you just want to make four at once for a different time. What you absolutely, positively do *not* want to do is attempt to revive it in the microwave. That is a recipe for sad, rubbery bread and congealed cheese, and we simply can’t have that after all the hard work we put into that perfect crust!
If you have leftovers, wrap them tightly in foil or plastic wrap and keep them in the fridge. They should be good for about two days before the bread starts getting funky. Remember, the bread loses most of its crispness once it’s chilled, but don’t worry, we can bring it back!
For reheating, the oven or an air fryer is your best friend. Preheat your oven to about 350°F (175°C). You want to return that heat slowly so the cheese melts before the outside burns. Wrap the cold sandwich in a fresh piece of aluminum foil, leaving just a tiny bit of the crust peaking out, or place it directly on the rack if you don’t mind a little cheese escape.
Let it warm up in the oven for about 10 to 15 minutes. If you’re using an air fryer, 350°F (175°C) for about 6 or 7 minutes works like a charm, usually without the foil needed. This gentle heat warms the center back up, melts the cheese beautifully, and re-crisps that beautiful golden exterior. It comes out almost as good as the original batch, I promise!
Frequently Asked Questions About How to Make Grilled Cheese Recipes Like a Pro (2025)
I get so many questions about grilled cheese because everyone has a strong opinion on what makes it perfect! It’s such a simple food, but tweaking one little thing can totally throw it off balance, so it’s smart to ask!
Can I use mayonnaise instead of butter for grilling?
Oh, this is the big debate in the grilling world! Yes, you absolutely can use mayonnaise instead of butter, and a lot of chefs swear by it, especially when aiming for a super even, slightly tangy crust. Mayo has a higher smoke point than some butters, which means it’s more forgiving if your heat creeps up when you aren’t looking. The crust it creates is wonderfully smooth and golden brown. My personal preference? I still use butter because I love that pure, salty dairy flavor, but if you want a thinner, tangier crust that’s hard to burn, go for the mayo! Just use it sparingly; you don’t need nearly as much as butter.
What is the best way to incorporate an egg for extra protein?
If you want to bulk up this sandwich and add some serious protein—perfect for a hearty weekend breakfast—adding an egg is a fantastic move! You have two main options here. The easiest is to fry an egg sunny-side up or over-easy separately, then carefully slip it inside the melt right when you assemble the cheese layers. You get that yummy yolk action when you slice into it!
Another fun way, which makes it feel like a full breakfast sandwich, is to scramble a couple of eggs, maybe with a dash of milk, and cook them fluffy. Before you add the bread slices to melt the cheese, create a thin layer of that cooked scrambled **egg** mixture right on top of the cheddar. It adds bulk and serious **protein**. If you are looking for other great **breakfast** ideas that prep fast, check out my quick egg cups!
Just remember to keep the heat low when you add the pre-cooked egg so the bread doesn’t burn before that cheese gets gooey around the edges of the **protein**!
Understanding the Nutrition of How to Make Grilled Cheese Recipes Like a Pro (2025)
Now, I know this isn’t exactly a diet food, but when you track quality, you know exactly what you’re eating! Based on this specific recipe—sourdough, real butter, cheddar, and mozzarella—you’re looking at about 807 calories per sandwich. We’ve got 33 grams of wonderful **protein** in here, 67 grams of carbs, and 46 grams of fat. Just remember that these numbers are estimates based on the specific ingredients I listed, like the 30g of butter and the two cheeses. Because we use real ingredients and freshly grated cheese, this is way better than anything pre-packaged!
Share Your Perfect Grilled Cheese Creations
Whew! You’ve done it! You’ve officially learned all the tricks for making a grilled cheese that rivals the best diner in town. Now that your skillet is clean and your belly is full of flaky, cheesy goodness, I absolutely need to hear about it!
This is where the fun really starts for me—seeing how you make this recipe your own. I can talk about sourdough and butter ratios all day, but nothing beats seeing your results.
Did you stick with the cheddar and mozzarella? Or did you sneak in some smoked gouda? Let me know! Drop a comment below and tell me what cheese combination you used and how that low-and-slow heat treatment worked for you. Seriously, your feedback helps me tweak my own approach for next time, maybe even for future ideas like these awesome power bowls!
If you snapped a photo of that perfect golden crust, please tag me on social media! I love seeing your creations lined up on the counter. If you think this technique is the best way to achieve that perfect melt, hit that 5-star rating button so others know they’ve found the real deal. Happy grilling, and thank you for trusting me with your comfort food!

How to Make Grilled Cheese Recipes Like a Pro (2025)
Ingredients
Equipment
Method
- Slather both sides of each piece of bread with the butter. Cover all four sides.
- Heat a heavy-based skillet or frying pan over medium low heat. Do not add oil or butter. Place both pieces of bread in the skillet and lightly toast for 1 minute to warm them through and create a light crust.
- Flip one slice of bread. Pile the cheddar cheese onto the bread, followed by the mozzarella. Place the other slice of bread on top, ensuring the hot toasted side contacts the cheese.
- Cook for 3 minutes or until the bread is evenly golden and crisp. Press down lightly with a spatula occasionally. If the bread browns too fast, remove it from the heat briefly to cool and lower the stove temperature.
- Turn the sandwich over. Cook the other side for 3 minutes or until the bread is golden and the cheese is melted.
- Transfer the sandwich to a cutting board. Cut it in half in one motion and eat immediately.
Nutrition
Notes
Tried this recipe?
Let us know how it was!
Gluten-Free Chef & Latin Cuisine Innovation Specialist
My youngest son’s celiac diagnosis at four changed everything. Suddenly, all those traditional Brazilian and Portuguese recipes from my avó needed to be completely reimagined without losing their soul.
After graduating from Johnson & Wales and working Miami’s Latin fusion scene, my son’s diagnosis became my calling. How do you make gluten-free empanadas that taste like childhood? Over eight years, I’ve developed 320+ gluten-free recipes celebrating authentic Latin flavors using cassava flour and plantain alternatives.
My gluten-free empanada recipe won “Best Appetizer” at the 2023 Miami Gluten-Free Food Festival. I ran “Sabores Sin Gluten,” a catering business serving Miami’s Latino community—quinceañeras, family gatherings, all the celebrations that matter.
Food is culture, and everyone deserves to experience the joy of sharing traditional family meals, regardless of dietary restrictions.