Have you ever stared at those gorgeous, glossy cakes online and thought, “There’s no way I can make that messy but perfect drip at home?” I totally get it! I used to feel that way, believing professional results needed a professional kitchen. But trust me, that first cake I made for a family gathering—a simple chocolate thing, decorated with basic buttercream—turned out better than I hoped. Watching my kids and relatives devour it filled me up more than anything!
That joy is what drives me now: making incredible, show-stopping bakes accessible. This guide is going to show you exactly How to Make Cake Ideas Recipes Like a Pro (2025), starting today with this rich Chocolate Mocha Cake. We’re diving deep into the techniques so you can impress everyone!
Why You Should Master How to Make Cake Ideas Recipes Like a Pro (2025)
Look, sometimes you just want your dessert to feel special, right? Baking a cake that tastes incredible *and* looks like it came from a fancy bakery gives you such a boost of confidence. This guide isn’t just about following steps; it’s about learning the *why* behind those professional finishes. Once you nail these techniques, you’ll stop feeling nervous about big celebrations.
It’s completely doable, even if you’re juggling dinner prep or helping with homework. Think of the satisfaction when people ask where you bought this amazing creation! Here are the main reasons why learning these methods pays off:
- You get that phenomenal texture that sticks with you—rich, moist, and perfectly balanced. Check out my recipe index for proof!
- You save money not buying custom cakes for every event.
- You control every ingredient, making sure it tastes exactly how you love it.
Achieving Bakery-Quality Texture and Flavor
We aren’t making a box mix here, though those are great in a pinch! This chocolate cake uses strong coffee and quality cocoa to build serious depth. The mocha buttercream relies on a specific meringue technique that creates this unbelievably light, velvety mouthfeel. It’s the difference between just a good cake and one people talk about for months.
Impressing Guests with Professional Finishes
The visual payoff is huge! That glossy, perfect ganache drip we’re tackling? It looks intimidating, but honestly, it’s one of the easiest ways to make a cake look high-end. It takes just two ingredients, and once you see that chocolate cascade down the side, you’ll realize you are totally capable of making incredible-looking desserts!
Essential Equipment for How to Make Cake Ideas Recipes Like a Pro (2025)
Okay, let’s talk tools. I’m not saying you need a commercial bakery setup, but certain items really bridge the gap between ‘home baked’ and ‘pro finish.’ If you want to nail this gorgeous chocolate mocha cake, having the right setup makes everything smoother! Don’t rush pan preparation or frosting application; use the tools that help you be precise.
For this recipe, since we are dealing with a stable meringue frosting, you really need something to handle the mixing time. I broke my arm once trying to whip Italian meringue by hand—don’t be me! Having the right gear lets you focus on technique, not arm fatigue.
Tools for Precision Baking
Precision stops things from turning into a dense brick! When you are aiming for perfectly cooked layers and stable frosting, measuring accurately is key. I always recommend weighing, but if you don’t have a scale, take your time with standard cups.
- Stand mixer: This is non-negotiable for this buttercream. You need that consistent, high-speed whipping for the meringue to get stiff and glossy. Any hand mixer will struggle to keep up with the time required here.
- Three 6” round baking pans: Baking in thin, even layers ensures they cook through at the same rate. If you only have two pans, you’ll just need to bake in batches, but the center layer might get slightly overdone waiting for the others.
- Kitchen scale (optional but encouraged): This is how the pros work! Using a scale to divide the batter evenly between your three pans guarantees layers that stack perfectly flat and don’t lean!
- Candy thermometer (optional but helpful for safety): When we heat the egg whites for the meringue, hitting that magic 160F number confirms all the bacteria are gone and ensures the sugar is fully dissolved. It removes so much guesswork!
- Offset spatula: This tool is a game-changer for crumb coating and smoothing the final frosting layer. It lets you work close to the cake surface without accidentally digging in a finger, giving you that sharp, clean professional edge.
Gathering Ingredients for Your Chocolate Mocha Cake
Alright, now for the fun part: getting everything lined up! You know how when you’re watching a cooking show, they always have these gorgeous little piles of ingredients ready to go? That’s called *mise en place*, and it’s one of the biggest secrets to making this process feel calm instead of chaotic. Chocolate and coffee are powerful partners, so using good quality ingredients for both the cake itself and the frosting really pays off visually and flavor-wise.
Don’t stress if you don’t have a kitchen scale; we’ll measure things out, but having everything prepped and measured before you even turn on the oven means you won’t be frantically measuring buttermilk while the dry ingredients are sitting there waiting for you. I found a great guide on pairing chocolate flavors that helped me dial in the exact amounts of cocoa and coffee needed for this one if you want to deep dive into the science!
For the Chocolate Cake Layers
- 1.5 cups all-purpose flour
- 1.5 cups granulated sugar
- 0.75 cup Dutch-processed cocoa powder sifted
- 1.5 tsp baking soda
- 1 tsp baking powder
- 1 tsp salt
- 0.25 cup vegetable oil
- 0.75 cup buttermilk
- 0.75 cup strong brewed coffee hot
- 2 large eggs
- 2 tsp vanilla extract
For the Mocha Buttercream
This Swiss Meringue style buttercream is ultra-stable, perfect for stacking, but it needs specific additions to get that amazing coffee zing!
- 3 large egg whites
- 1 cup granulated sugar
- 1.5 cups unsalted butter room temperature, cubed
- 1 tsp vanilla extract
- 1 Tbsp instant espresso powder dissolved in 1 tsp hot water, cooled
- 3 oz dark chocolate chopped, melted, and cooled
For the Ganache Drip
Keep these two ingredients close by for the final decorating stage. Remember, the chocolate needs to cool down just enough so it drips nicely rather than running straight off the cake!
- 3 oz dark chocolate
- 3 oz heavy whipping cream
Step-by-Step Guide: How to Make Cake Ideas Recipes Like a Pro (2025)
Okay, deep breath! This is where the magic happens. We are going from raw ingredients to a stunning, towering chocolate cake. Don’t let the number of steps scare you; each one is simple—it’s the combination of steps that creates that impressive look. I swear, if you follow these steps exactly, you’ll feel like you just graduated from cake decorating school!
Baking the Perfect Cake Layers
First things first, let’s get those ovens hot! You need to preheat to 350F. Pro tip: Forget dusting your pans with flour! Because we’re using cocoa powder everywhere, we need to prep those three 6” pans by greasing them well and then dusting them generously with cocoa powder. This is called ‘cocoa-ing a pan,’ and it prevents those dry white streaks on your dark chocolate edges. Line the bottoms with parchment paper, too, just for extra insurance!
In your stand mixer, whisk all your dry ingredients together—flour, sugar, sifted cocoa, baking soda, powder, and salt. Keep them moving! In a separate bowl, whisk the wet stuff, making sure to add that hot coffee in slowly so you don’t accidentally scramble your eggs. Then, dump the wet into the dry and mix it on medium speed for about 2 or 3 minutes. Yes, the batter is going to look super thin, almost like soup. Don’t panic; that’s totally normal for this style of rich cake! Pour it evenly into your prepared pans—using a scale helps here, I promise—and pop them in the oven for about 30 to 35 minutes. A tester should come out mostly clean.
Creating the Swiss Meringue Mocha Buttercream
This buttercream is your ticket to pro status. We have to stabilize those egg whites using heat. Put your very clean (and I mean spotless!) egg whites and granulated sugar into the mixer bowl. Set that bowl over a pot of simmering water—we call this a double boiler. Whisk constantly by hand until the sugar is totally dissolved and the mixture feels hot, around 160F if you have that thermometer. If you don’t have one, just rub a little mix between your fingers; if it feels gritty, keep heating!
Once it’s hot and smooth, lock that bowl onto your stand mixer. Whip that meringue on medium-high speed until it’s stiff, glossy, and most importantly, totally cool—this takes about 5 to 10 minutes. Then, switch to the paddle attachment, and start adding that room-temperature, cubed butter slowly, one cube at a time. Keep mixing! It might look like it’s curdling for a minute, but trust me, keep going until it smooths out beautifully. Finally, mix in your cooled espresso mixture and the melted, cooled dark chocolate.
Preparing the Ganache Drip
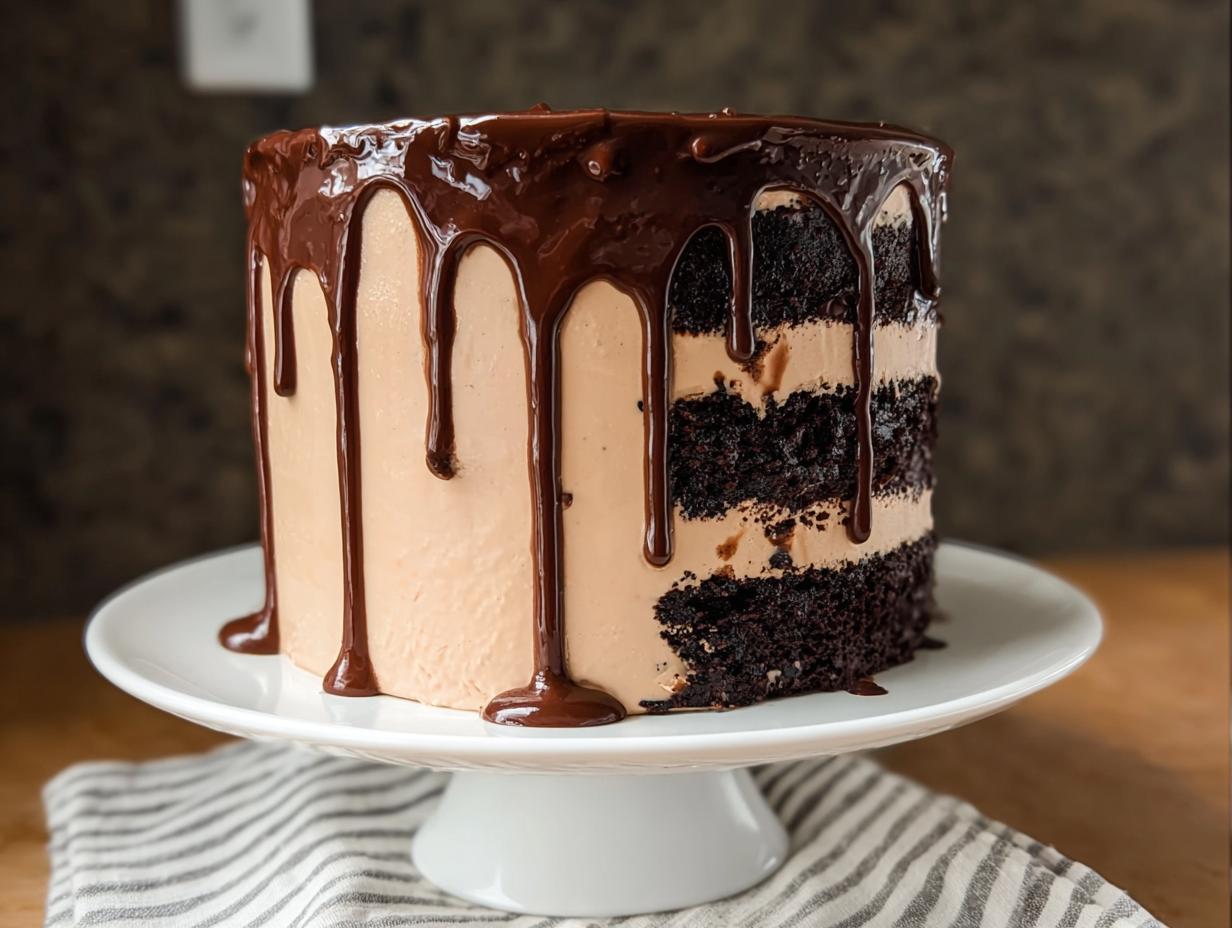
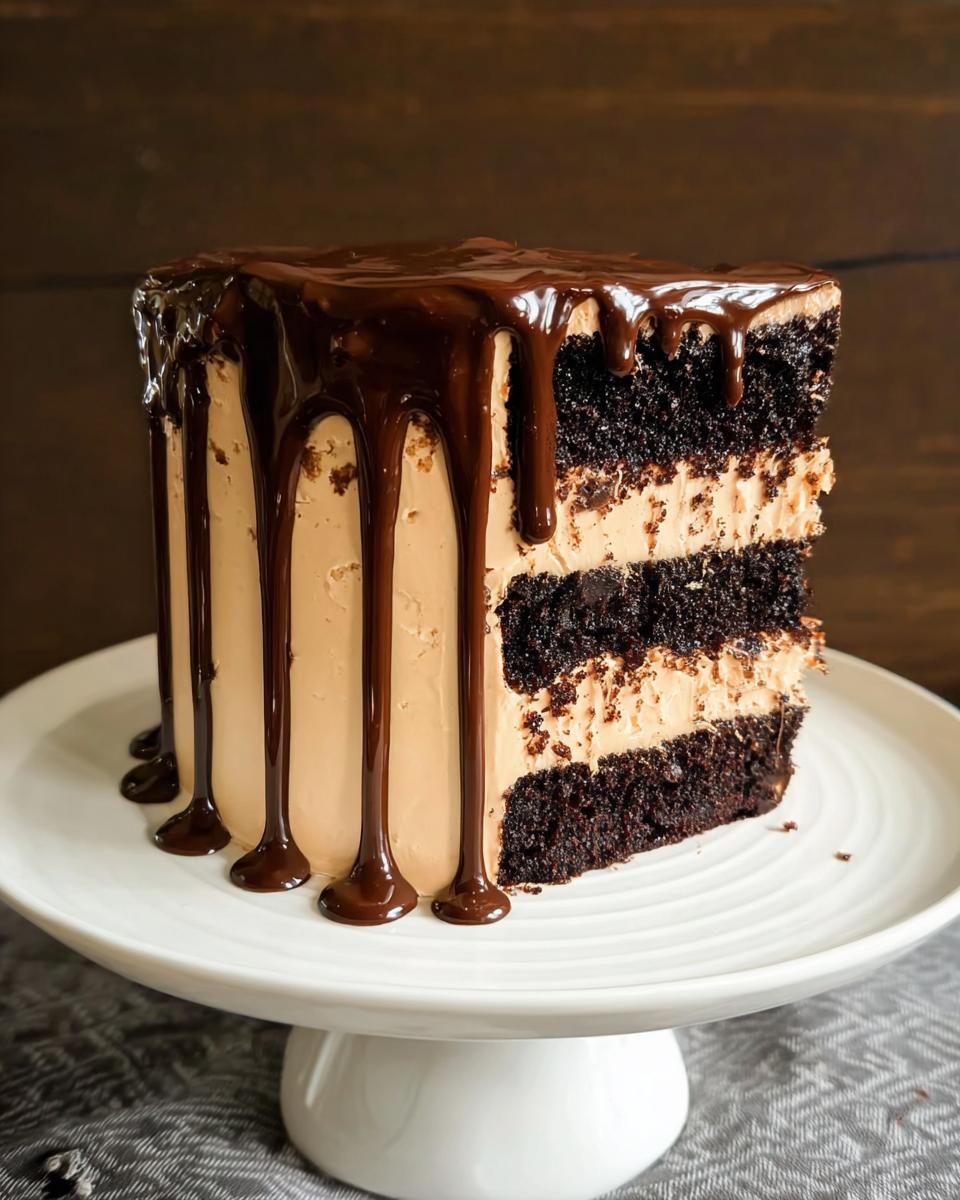
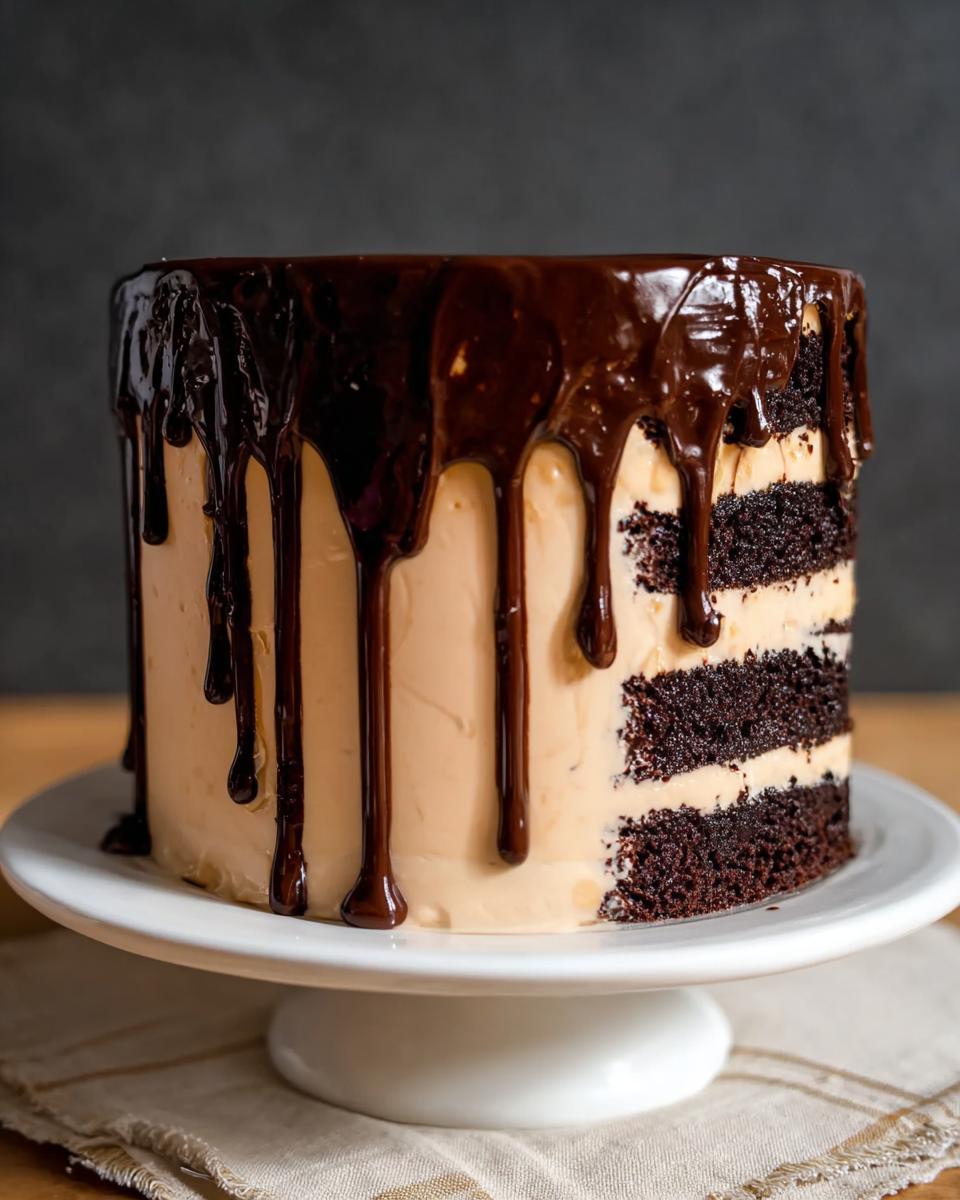
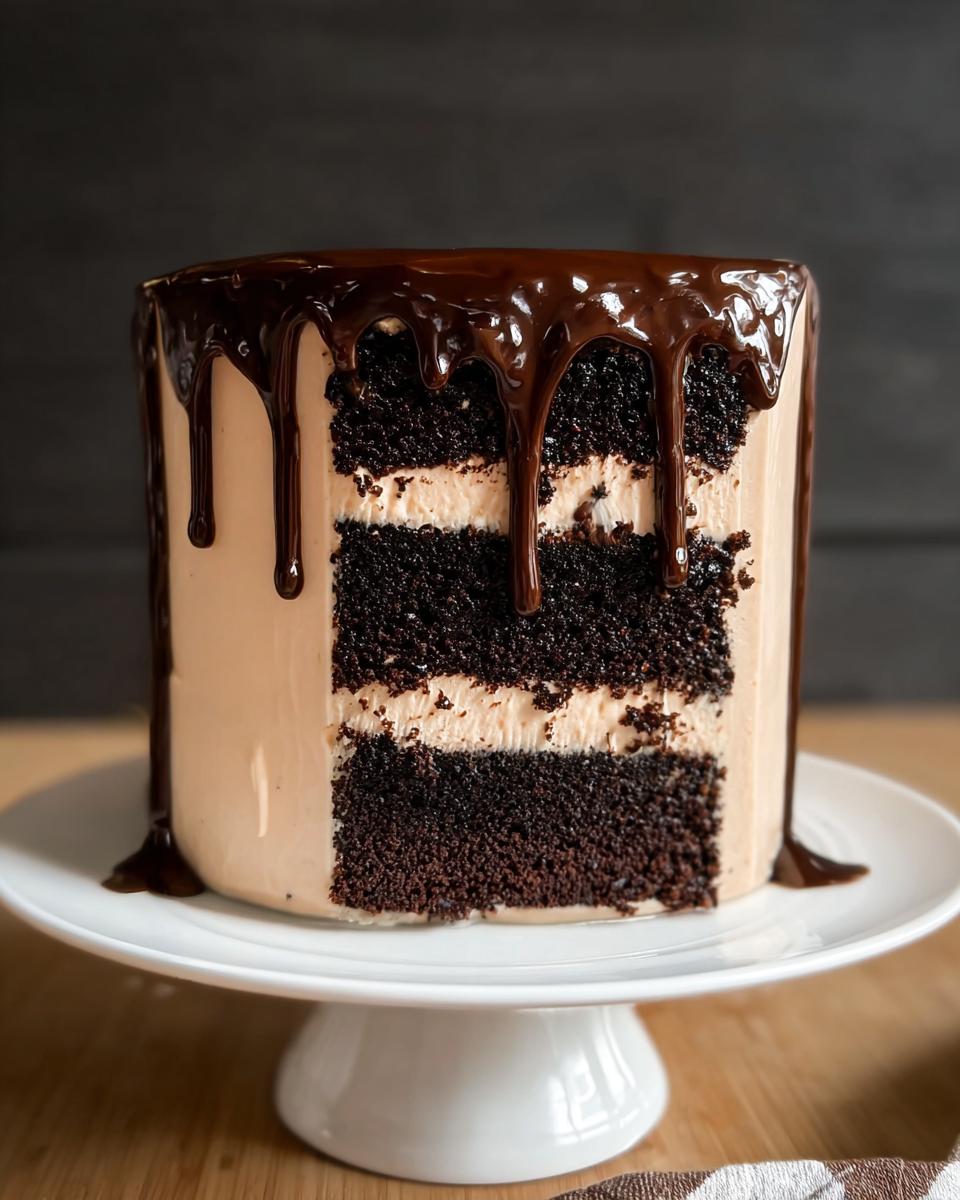
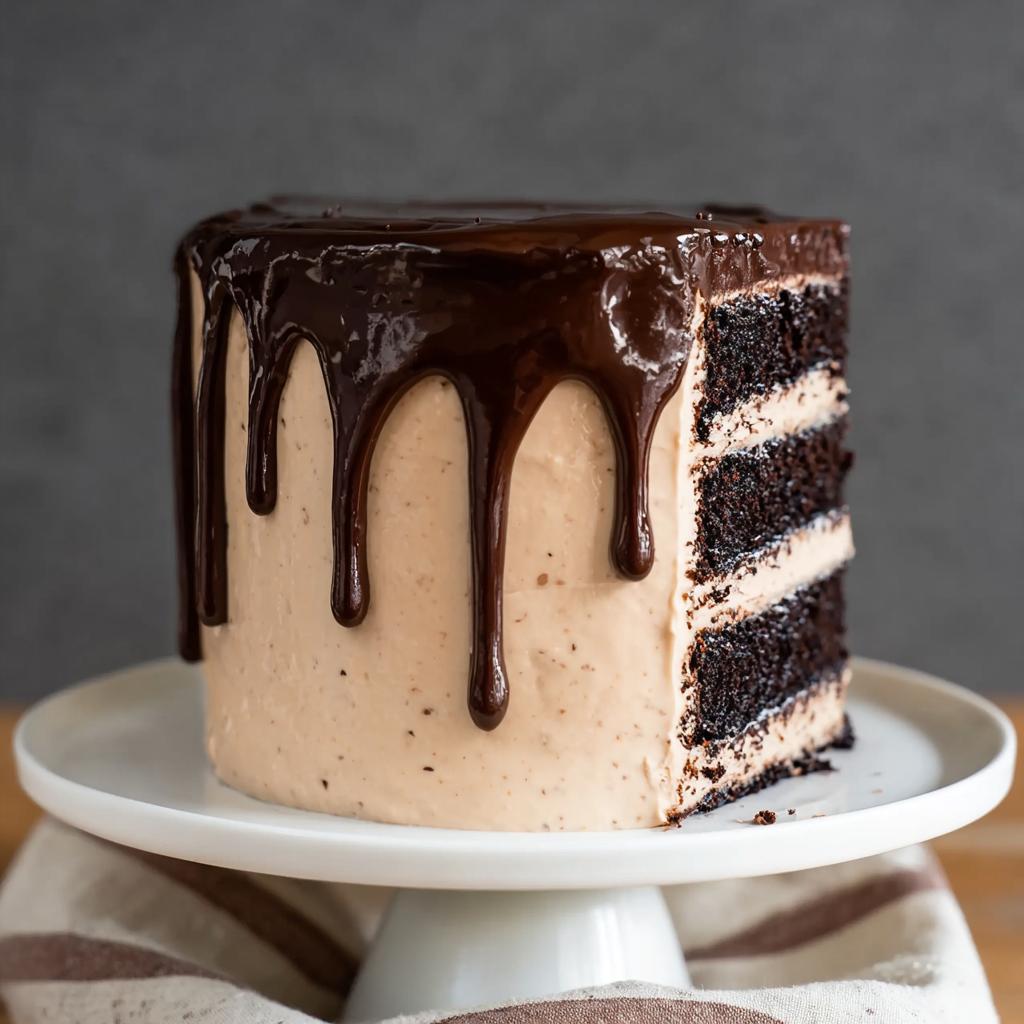
Making this drip is ridiculously easy once the buttercream is done. You need to chop your dark chocolate finely and put it in a bowl. Heat your heavy whipping cream until it just barely starts to simmer—you don’t want a rolling boil! Pour that hot cream right over the chocolate. Cover the bowl and let it sit for two minutes; this lets the heat do the work of melting the chocolate evenly. Then, whisk it gently from the center outward until it’s one beautiful, shiny pool of shiny ganache. You must let this cool down and thicken up a bit before you drizzle it, or it will just run straight off the cake!
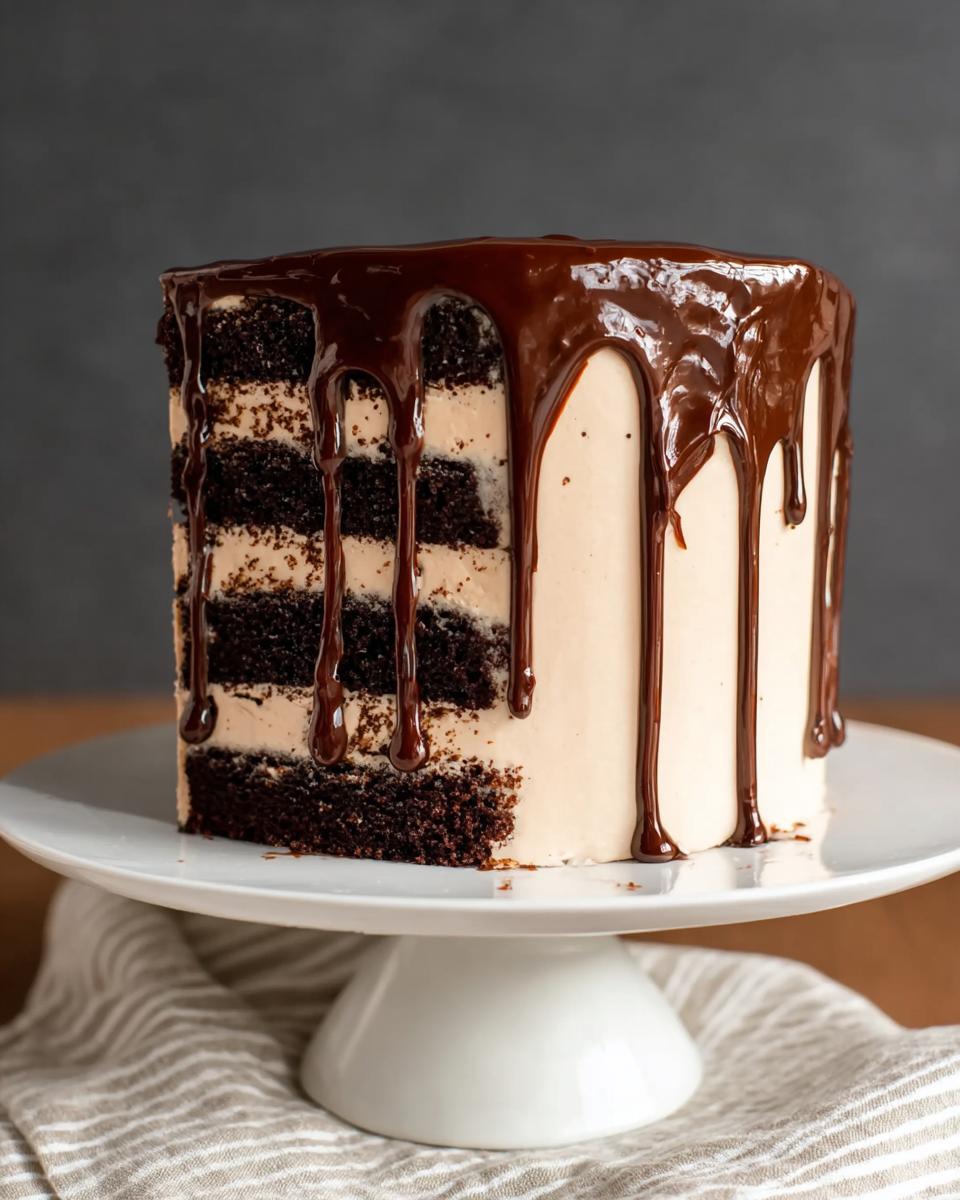
Assembly and Professional Finishing Touches
Time to build! Put your first cake layer on your serving plate. Use about 2/3 cup of that gorgeous buttercream and smooth it out. Repeat with the second layer. Now, apply a very thin layer of frosting all over the entire cake—this is the crumb coat, designed to trap all those messy loose crumbs. Place the cake in the fridge for a good 20 minutes to let that coat firm up. This step is crucial for a clean finish!
Pull it out, and apply the rest of your frosting, smoothing the sides as best you can with your offset spatula. Back into the cold for another 20 minutes. Once it’s firm, take your slightly thickened ganache and spoon dollops around the very edge of the top layer, encouraging some to drip down naturally. Fill in the rest of the top layer with the remaining ganache and spread it smooth. You’ve done it! Look at that shine! I love seeing how everyone manages their drips. You can peek at some great finishing ideas right here.
Expert Tips for How to Make Cake Ideas Recipes Like a Pro (2025)
Even when you follow the steps perfectly, sometimes the frosting has other plans, doesn’t it? That’s okay! Knowing how to fix small hiccups is what separates the pros from the beginners. I keep these little pearls of wisdom handy, especially when I’m wrestling with meringue, which can be super dramatic if it’s unhappy!
Meringue and Buttercream Troubleshooting
Let’s talk about meringue first because that’s the foundation of this gorgeous buttercream. The one thing that will absolutely ruin your stiff peaks is *any* trace of fat. I mean it—not a drop of egg yolk, no grease on the whisk, and the bowl has to be spotless, scrubbed clean! If there’s any lingering butter residue from a previous batch, your egg whites will weep at you instead of whipping up stiff. It’s such a common rookie mistake, and it’s so frustrating when it happens!
Now, about the buttercream after you add the butter: don’t freak out! I’ve seen it happen countless times. While you are mixing the butter into that beautiful meringue base, the mixture might suddenly look like it’s separating, almost curdling, or it might even look soupy. Seriously, don’t stop mixing! Keep that machine running on medium speed. It’s just waiting for the temperature to equalize and the emulsion to grab hold. Keep whipping, and within a minute or two, it will snap back—smooth, silky, and ready to frost your masterpiece!
Storage and Make-Ahead Options for Your Cake
I know that making a layer cake feels like a whole day’s project, and who has time to do that the morning of a party? That’s why planning ahead is a baker’s best friend! You can definitely break this project up over a couple of days, and honestly, the cake tastes even better the next day once the mocha flavor really settles in.
If you are prepping ahead, store the components separately until you are ready to assemble. This keeps everything fresh and stops the buttercream from getting too soft prematurely. We’ve put together some great make-ahead strategies so you aren’t rushed at the last minute. If you love prepping things on the weekend, you might find some great organizational ideas in this post about make-ahead meals!
Storing Baked Cake Layers
Once your cake layers are completely cool—and I mean totally room temperature, no warm spots anywhere—wrap each layer tightly first in plastic wrap, and then maybe foil around that. Store them wrapped up on the counter for about two days. If you need them to last longer than that, they freeze beautifully! Just make sure they are wrapped tightly to avoid freezer burn; they will last a good month this way.
Keeping the Mocha Buttercream Fresh
The Swiss meringue buttercream is sturdy, which is one of its best features. If you’ve already frosted the cake smoothly, the whole thing is fine covered loosely and kept in the fridge for up to four days. When you pull it out for serving, let it sit on the counter for an hour to come back to room temperature so the frosting softens up nicely.
If you didn’t frost the cake yet, keep leftover buttercream sealed tight in an airtight container in the fridge for about a week. When you bring it out to use it again, it might look separated or lumpy at first, but just whip it again with your mixer until it turns smooth and fluffy again. It always comes back!
Using the Ganache Ahead of Time
You absolutely can make the ganache ahead! This is my favorite time-saving step. Make the ganache mixture exactly as described, then pour it into a small, sealable container. Be sure to press plastic wrap directly onto the surface of the chocolate mixture to seal it off from the air. Store it in the fridge for up to a week.
When you want to use it for the final drip, you need to reheat it slightly. Just microwave it in short 5 to 10-second bursts, stir it in between each blast, until it reaches that perfect drizzly consistency again. If it gets too thin, just let it sit for a few minutes at room temperature; it thickens up fast!
Variations on How to Make Cake Ideas Recipes Like a Pro (2025)
Part of mastering How to Make Cake Ideas Recipes Like a Pro (2025) is knowing when you can tweak things slightly without completely wrecking the structure, right? Once you nail the basic technique, especially the way we made that stable buttercream, you can start playing! It’s fun to see how a tiny change can completely shift the flavor profile of your dessert.
I always challenge myself to make a small switch when I bake this cake for a different occasion. It keeps things exciting, and you might discover a new family favorite! If you love experimenting with different baked goods, you can find loads of ways to adapt foundational recipes, like tweaking these chocolate bases for cupcakes or brownies, over in my baking section.
Switching Up the Coffee Flavor
We used strong brewed coffee to really bring out the chocolate in the cake layers, but you don’t have to stick with that! If you aren’t a big fan of the mocha taste in the frosting, simply skip the instant espresso powder. The chocolate melts into the Swiss meringue beautifully on their own, making a rich, dark chocolate buttercream. It’s simple, classic, and still tastes amazing!
For the cake itself, if you’re out of coffee altogether, you can just use hot water instead. However, I really encourage you to try using hot water that has one teaspoon of instant **chocolate-flavored** powder dissolved in it, or even a strong black tea. It won’t give you that deep mocha note, but it keeps the cocoa powder happy and blooming properly, so you don’t lose any chocolate intensity.
Playing with Chocolate Types
In the buttercream and ganache, we called for dark chocolate, but that’s just where I landed after lots of testing! Feel free to swap that out based on what you have or what you prefer. If you use semi-sweet chocolate instead of the dark chocolate in the ganache, the drip will be much sweeter and lighter in color.
For a real punch, try using milk chocolate in the ganache—but you MUST reduce the heavy cream slightly, maybe down to about 2.5 ounces. Milk chocolate has more milk solids, so it sets up softer than dark chocolate. If you use too much cream, you’ll end up with warm chocolate syrup instead of a nice, controllable drip!
Adding a Nutty Crunch
If you want to add texture—and who doesn’t love a good surprise crunch?—you can fold in some finely chopped toasted nuts just before you finish coating the cake. Walnuts or pecans work great with chocolate and coffee flavors.
The key here is to add them right at the very end when you are adding the vanilla and espresso to the buttercream. You only need about half a cup, and mix them in on the lowest speed, just until they are distributed. If you add them too early, the mixer blades can chew them up too much, and we want that nice chunky texture when you slice into the layers!
Frequently Asked Questions About Professional Cake Making
I’ve collected all the questions I constantly get asked at gatherings when people see this cake. Sometimes, tackling a big layer cake seems harder than making a quick dinner, but the payoff is worth the specialized time investment! Let’s clear up any lingering doubts so you feel totally ready to tackle this chocolate masterpiece.
Can I skip the hot coffee in the cake batter?
Oh, I really, really wouldn’t suggest it! The hot coffee isn’t there to make the cake taste like a coffee shop drink, not really. It’s a baking secret! Coffee acts as a liquid that ‘blooms’ the Dutch-processed cocoa powder. Blooming means that the heat forces the cocoa powder to release all its deep, intense chocolate flavor compounds. If you skip the hot liquid, your cake will taste flat and dull.
If you absolutely cannot have coffee, use hot water, but mix in about one teaspoon of instant espresso powder or a teaspoon of intensely strong black tea instead. You need that heat to wake up that cocoa!
My buttercream looks soupy; what went wrong?
This is the most common panic moment when making Swiss Meringue Buttercream, so breathe! Usually, this happens for one of two reasons. First, your butter was too soft—it needs to be room temperature, meaning if you gently poke it, it leaves a slight indent, but it’s not greasy or melty at all. Second, the mixture hadn’t whipped long enough after you added the butter.
If it looks soupy, don’t sweat it! Just keep mixing! Put your stand mixer on medium speed and let it run. It’s going to look completely broken and curdled for a minute or two, but if you are patient, the emulsion will finally come together, becoming incredibly silky smooth. Give it at least two solid minutes of mixing after it looks weird; it always fixes itself!
Is this recipe kid friendly for decorating?
Absolutely, especially when it comes to cleanup! While I wouldn’t hand a piping bag of mocha buttercream over to a toddler—that’s intricate work—the ganache drip is fantastic for involving older kids. It’s messy in a fun, controlled way. They can help spoon the slightly cooled ganache around the edge, watching it slowly trickle down the sides. It’s much more forgiving than trying to get piping lines perfectly straight, making it super **kid friendly** for a simple visual effect. Plus, tasting the scraps is mandatory for quality control, right?
Share Your Success How to Make Cake Ideas Recipes Like a Pro (2025)
And just like that, you’ve gone from feeling nervous about layer cakes to conquering a rich, professional-looking Chocolate Mocha Cake! Doesn’t that feel amazing? I hope seeing how simply these techniques translate into show-stopping results helps you feel more confident stepping into the kitchen for your next big celebration.
Baking is always better when it’s shared. I truly want to see what you create! Did your ganache drip look perfect? Did you skip the espresso powder and go for straight chocolate buttercream? Please, take a picture of your gorgeous creation and share it with me—it truly makes my day to see you succeeding!
If this recipe helped you master a new skill or solve a baking mystery, please consider hopping over to the recipe card and giving it a rating. Those little stars really help other nervous bakers decide to give this amazing chocolate cake a try. If you ever have specific questions or just want to say hi, you can always reach out to me directly through my contact page. Happy baking, friend!
How to Make Cake Ideas Recipes Like a Pro (2025)
Ingredients
Equipment
Method
- Preheat oven to 350F. Grease three 6” round baking pans and dust them with cocoa powder. Line the bottoms with parchment paper.
- Place all dry ingredients into the bowl of a stand mixer fitted with a paddle attachment. Stir to combine them.
- In a medium bowl, whisk all wet ingredients together. Add the hot coffee slowly to avoid cooking the eggs if the coffee is very hot.
- Add the wet ingredients to the dry ingredients and mix on medium speed for 2 to 3 minutes. The batter will be very thin.
- Pour the batter evenly into the prepared pans. You can use a kitchen scale to help distribute the batter equally.
- Bake until a cake tester comes out mostly clean. This takes about 30 to 35 minutes.
- For the mocha buttercream, place the egg whites and sugar into the bowl of a stand mixer and whisk until combined.
- Place the bowl over a pot with 1 to 2 inches of simmering water. Stir constantly with a whisk until the mixture is hot and no longer grainy to the touch, or it reads 160F on a candy thermometer (about 3 minutes).
- Place the bowl on your stand mixer and whisk on medium-high speed until the meringue is stiff and cooled. The bowl should no longer feel warm to the touch (approximately 5 to 10 minutes).
- Switch to the paddle attachment (this step is optional). Slowly add the cubed butter and mix until the mixture is smooth.
- Add the vanilla, melted chocolate, and espresso powder. Whip until the buttercream is smooth.
- For the ganache drip, finely chop the dark chocolate and place it into a bowl.
- Bring the heavy cream just barely to a simmer and pour it over the chopped chocolate. Cover the bowl with plastic wrap and let it stand for 2 minutes.
- Stir gently with a spatula until the ganache is combined and smooth. Allow it to cool and thicken slightly before you use it on the cake.
- Place one layer of cake on a cake stand or serving plate. Top with approximately 2/3 cup of frosting and spread it evenly.
- Repeat this process with the remaining layers and apply a thin coat of frosting all over the cake. Chill the cake for 20 minutes.
- Frost and smooth the sides of the cake. Chill the cake for another 20 minutes.
- Using a small spoon, place dollops of ganache around the top edges of the cooled cake, allowing some to drip down the sides. Fill in the top of the cake with more ganache and spread it evenly with an offset spatula.
Nutrition
Notes
Tried this recipe?
Let us know how it was!
Gluten-Free Nutritionist & Family Meal Planning Expert
Working as a pediatric dietitian at Children’s Hospital of Denver, I kept meeting families overwhelmed by managing their children’s celiac disease. Parents stressed, kids frustrated, everyone eating bland boxed “gluten-free” products.
That’s when I realized my calling: creating practical, balanced gluten-free solutions for real families with busy schedules. I’ve developed 375+ family-friendly recipes focusing on lunch boxes, after-school snacks, and make-ahead dinners that actually work.
My meal planning system was featured in Parents Magazine, and I presented research at the Rocky Mountain Pediatric Nutrition Conference. My evidence-based approach ensures recipes meet both taste and health standards—families need solutions that work in the real world, not just perfect test kitchens.