Oh, the grilled cheese sandwich. Isn’t it just the perfect comfort food? Seriously, nothing beats that crunch giving way to a flood of gooey, warm cheese. But let’s be real, standing over the stove every single lunch break just isn’t realistic when life gets busy. That’s why I got obsessed with turning this classic into something truly fantastic for make-ahead meals. Learning how to master Grilled Cheese Recipes Meal Prep That Actually Tastes Great changed my weeknights!
I remember the first time I tried meal prepping these beauties. My son had just been diagnosed with celiac disease, and I was determined not to let him miss out on his favorite sandwich. It took ages experimenting with different flaky gluten-free breads and just the right cheese blend until I finally hit gold. Seeing his face when he bit into that perfectly *melty* sandwich alongside his tomato soup? That’s when I knew easy meal prep wasn’t just about saving time; it was about creating happy memories for the whole family. Trust me, these flavor-packed versions hold up way better than you think!

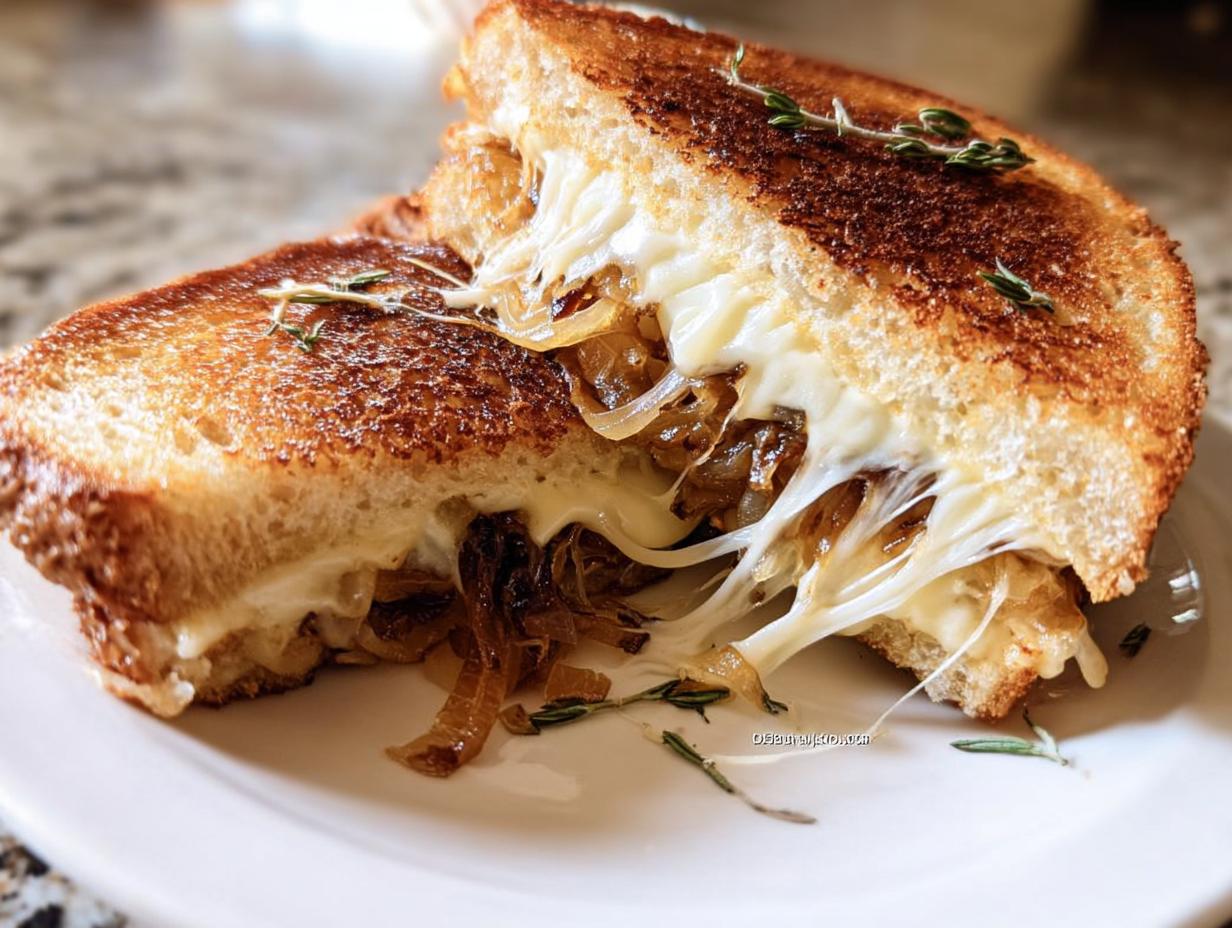
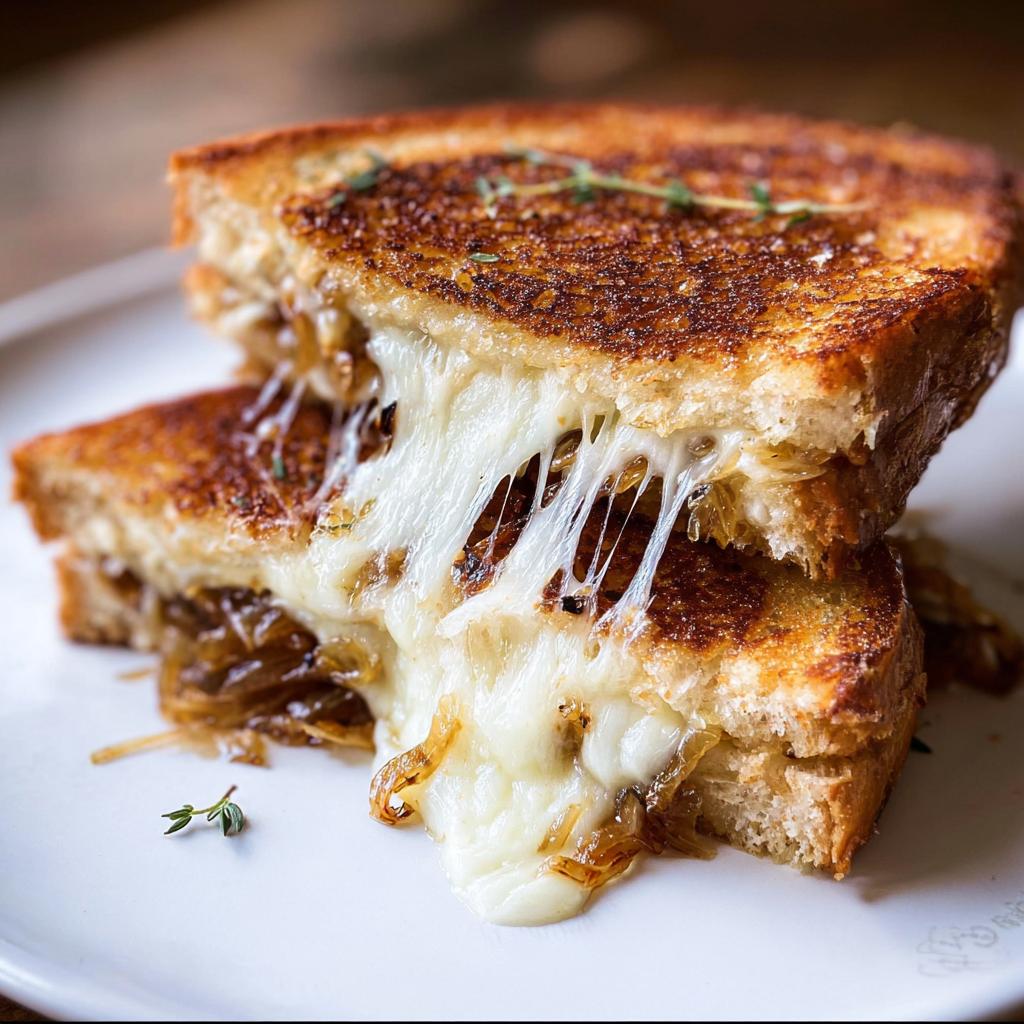
Why Caramelized Onion and Gruyere Make the Best Grilled Cheese Recipes Meal Prep That Actually Tastes Great
When you’re meal prepping, flavor has to travel well, right? That’s why we skip the plain stuff and go straight for deeply savory onions. Taking the time to caramelize them slowly brings out this incredible sweetness that cuts through the richness of the cheese. It’s a flavor powerhouse that just tastes better the next day, honestly. This method elevates the sandwich way beyond what you’d expect from a Grilled Cheese Recipes Meal Prep That Actually Tastes Great idea.
These onions aren’t going to steam themselves into soup inside the wrapper; they absorb just enough of the butter richness to stay moist but firm enough to give you that great texture when you reheat it.
The Cheese Blend for Maximum Melt
You absolutely need a trio for that truly epic pull. Gruyere is nutty and melts like a dream, but sometimes it needs help. Adding white cheddar gives it that necessary sharpness, and Muenster—oh, Muenster is the secret weapon for making sure everything is perfectly melty. When you pack these layers together, you get a structure that won’t fall apart when you press it, guaranteeing that incredible, gooey center every single time you pull one out of the fridge to grill.
Gathering Ingredients for Grilled Cheese Recipes Meal Prep That Actually Tastes Great
Okay, you can’t rush perfection, especially when it comes to those deep-flavored onions! We need to gather everything up before we even think about turning on the stove. Remember, this is about making great Grilled Cheese Recipes Meal Prep That Actually Tastes Great, so the quality of your starting materials really matters here. Don’t skimp on the good bread—trust me on this part.
For the Caramelized Onions
This is where the magic starts, and those onions need time! You’ll need:
- 2 yellow onions that you dice up fine.
- 1 teaspoon of fresh thyme, minced up.
- 2 teaspoons of fresh rosemary, minced (we save half for later!).
- 1 teaspoon of brown sugar—this helps them get that deep color.
- Salt and pepper, just season it how you like it.
- 1 1/2 tablespoons of butter and 1 tablespoon of olive oil to get things started nice and smooth in the pan.
For the Sandwich Assembly
For the actual sandwiches, we are focusing on layers of incredible melt potential. To keep things crisp when we reheat later, we are skipping butter on the outside and using mayo instead. You’ll need these next:
- 8 slices of good quality bread; I really push for thick-cut Artisan style for sturdiness.
- Mayonnaise, of course, spread thin on the outside of the bread.
- 12 ounces of Gruyere cheese, sliced or grated, and make sure it’s at room temperature so it melts fast!
- 6 ounces of white cheddar cheese, also sliced or grated and room temp.
- 4 slices of thin Muenster cheese—that’s our insurance policy for gooiness!
- The remaining 1 1/2 tablespoons of butter and 1 teaspoon of fresh rosemary for the final grilling step.
Step-by-Step Instructions for Delicious Grilled Cheese Recipes Meal Prep That Actually Tastes Great
Alright, let’s get cooking! This process is split into two main parts: making those amazing onions and then bringing the sandwich together. Don’t rush the onions; that slow cook is everything. This way, we make sure those caramelized additions are ready to go for our Grilled Cheese Recipes Meal Prep That Actually Tastes Great session later in the week. Remember, even for a quick treat, flavor takes time!
Caramelizing the Onions to Perfection
First things first, grab your skillet and heat up 1 1/2 teaspoons of butter along with the olive oil over medium-low heat. Next, toss in your diced onions, thyme, half of that rosemary we chopped, plus just a sprinkle of salt and pepper. Stir them regularly until they get nice and soft and start looking golden brown—that takes about 10 minutes. You’re looking for serious depth here! Once they are browning nicely, stir in that teaspoon of brown sugar and cook for one more minute until it smells deep and gorgeous. Scoop those babies out onto a plate; they’re done creating flavor!

Assembling and Grilling Your Quick Grilled Cheese
Now for the assembly line! We are focusing on the bread outside first. Spread a thin layer of mayo on the outside of two bread slices. To the same skillet, add the remaining butter and rosemary, then heat over medium heat. Butter side down goes the bread. Cook until that bottom gets wonderfully golden and crunchy, which should take 2 to 3 minutes. As soon as you set the bread down, start layering the cheese on the inside faces—Gruyere, cheddar, and that thin Muenster. Then, sprinkle a couple of tablespoons of those caramelized onions right over the cheese on one slice. When the bread is golden brown, sandwich the pieces together and immediately drop the heat back down to low. Keep pressing gently until that cheese is completely melty all the way through. For more ideas on getting that perfect crust outside the meal prep, check out this great guide on gourmet versions right here.

Tips for Perfect Grilled Cheese Recipes Meal Prep That Actually Tastes Great
Okay, so you’ve assembled your little masterpieces, and they are tucked away safely. Wonderful! But the real test for any good meal prep, especially for a sandwich like this, is how it tastes on Tuesday when you’re desperate for a quick lunch. We want that crunch back, we want that cheese gooey again, and we absolutely do not want a soggy mess. These tips are the difference between a sad reheated sandwich and a flavor bomb that tastes just as good as the day you made it.
Making This Recipe Gluten-Free
When I first started doing this for my son, gluten-free bread was the absolute weak link. Most grocery store GF loaves turn into cardboard quickly, especially after refrigeration. My biggest piece of advice? Don’t use the soft, fluffy types of gluten-free bread if you plan on keeping them assembled in the fridge. You need something with structure!
Look for artisan-style gluten-free loaves; they are usually denser and have better structural integrity. If you can handle it, assemble them right before you head out the door by packing the pre-cooked onions and cheese separately. That way, the bread stays perfectly dry until grilling time. You can find some of my favorite reliable GF baking resources over here if you need inspiration!
The Best Way to Reheat Your Melty Sandwich
The microwave is your enemy here. I cannot stress that enough. It makes the bread soft and steams all the beautiful crispness right out of your amazing crust. We need dry heat to bring back that perfect texture.
Your best bet is always the non-stick skillet again. Medium-low heat is key. Pop the chilled sandwich in, maybe add just a tiny whisper of oil or butter to the pan—barely enough to coat it. Heat it slow and low for about 3 to 4 minutes per side. This gently warms the center so the cheese turns beautifully melty again while the outside gets crispy again. If you’re doing a huge batch, the oven at 350°F (175°C) on a baking sheet works perfectly too, just watch them so they don’t dry out!
Meal Prep Ideas with Grilled Cheese and Flavor Variations
Okay, once you’ve mastered the technique for keeping the cheese gooey and the crust crisp after reheating, you start thinking about what else you can cram in there! Meal prepping grilled cheese doesn’t mean you have to eat the same onion-Gruyere masterpiece five days in a row, unless you want to, of course! We are keeping things easy here; no fussy ingredients that are going to wilt in storage.
Tasty Grilled Cheese Variations
If you want to shake things up, I have a couple of swaps that don’t involve adjusting the cooking time, which is crucial for keeping things quick. This is my favorite part—creativity!
- Apple and Sharp Cheddar: Swap those caramelized onions for ultra-thin slices of tart green apple (like Granny Smith). The moisture from the apple releases perfectly when heated, and it pairs amazingly with a sharp cheddar. Make sure to use a bread with good structure here!
- Pesto-Mozzarella Melt: Replace the rosemary in the onion mix with a thin layer of store-bought pesto spread directly onto the cheese side of the bread before you assemble. Mozzarella is super melty, so you might want to use an extra slice of Muenster to maintain stability during the chill time.
- Spicy Kick: If you like heat, skip the herbs entirely in the caramelized onion step and instead mix in just a dash of chipotle powder into your mayo before spreading it on the outside of the bread. It adds a smoky note that contrasts beautifully with the richness of the Gruyere.
If you’re looking for broader inspiration for planning your week, I always find new motivation checking out these healthy prep ideas here.
Essential Equipment for Perfect Grilled Cheese
You don’t need a mountain of gadgets to master these meal prep sandwiches. Seriously, this is one of the most streamlined meals you can cook, which helps keep things quick! But there is one piece of equipment that truly makes the difference between an okay grilled cheese and a truly perfect, evenly golden one.
The star here is simple: your skillet. I always reach for my heavy-bottomed cast-iron skillet when I make these. Why? Because once you get that heat even, it stays even! That heavy metal base distributes the heat so beautifully that you don’t get those dreaded hot spots that burn one patch of bread while the next patch is still soggy. That consistent, gentle warmth is how you guarantee that amazing, melty interior!

Beyond that, you only need the basics:
- A good cutting board and a sharp knife for your onions.
- A mixing spoon or spatula for stirring those onions while they caramelize slowly.
- A flat spatula for flipping and pressing your sandwiches once they hit the heat.
That’s it! No fancy panini presses needed for these Grilled Cheese Recipes Meal Prep That Actually Tastes Great.
Storage and Keeping Your Prep Fresh
So you’ve built these gorgeous, flavor-packed sandwiches, and you’re feeling like a meal prep genius. Awesome! Now, the million-dollar question: how do we keep them from turning into sad, squished disks in the fridge? For this specific recipe, I’ve found that success hinges on timing. These Caramelized Onion and Gruyere sandwiches are happiest when assembled and refrigerated for no more than 24 hours before grilling. Any longer than that and even the best bread starts absorbing moisture from the fridge air.
If you are doing a slightly larger batch, separating is sometimes the absolute best choice, even if it feels like an extra step. Think of it as an assembly kit for lunchtime! You want that amazing crust we worked so hard for, and moisture is the enemy of crispness.
Here’s my system for keeping things fresh:
- The Ideal Assembly: If you must assemble them ahead, wrap each individual sandwich tightly, first in plastic wrap, and then slip that into a sealed, reusable container or large zip-top bag. This double wrapping keeps the air out.
- The Separation Method: For real maximum crispness, store the cooled, caramelized onions in one small container, and the layered, un-grilled cheese/bread stack in another. When lunchtime rolls around, it’s a super quick assembly job, and you grill from a chilled state.
- Freezer Note: I talked about freezing in the FAQ section, but just a reminder: if you are freezing, ALWAYS freeze them *before* grilling. Once grilled, the texture just doesn’t reheat well from frozen.
When it comes time to reheat, remember our rule: skillet or oven only! Never the microwave if you want that satisfying crunch back. For more great ideas on making a successful lunch prep plan, check out my guide on simple weekly lunch meal prep planning!
Frequently Asked Questions About Meal Prepping Grilled Cheese
I get so many questions about these sandwiches once people start trying to fit them into their busy schedules! Meal prepping grilled cheese is different than prepping a salad, I know, but once you nail the technique, it all becomes super intuitive. Here are the things I hear most often when folks are trying to make sure their quick lunch is still perfectly melty halfway through the week.
Can I freeze these sandwiches for later?
Yes, you absolutely can, but you have to freeze them before you grill them! Once the cheese is melted and the bread is crispy, freezing and reheating just ruins that texture, transforming it into something spongy. Assemble the sandwiches—bread, cheese, onions, everything layered—wrap each one tight in plastic wrap, and pop them in a freezer bag. They last great for about a month straight. When it’s time, thaw overnight in the fridge and then grill them straight from the fridge using the low-and-slow skillet method we talked about.
What is the best bread for a crispy grilled cheese?
This is crucial for meal prep success! You need something sturdy that won’t dissolve the minute it gets chilly in the fridge. Forget those flimsy supermarket white slices; they soak up everything. For the crispiest result, especially when you need a quick reheat in the skillet, you want a sturdy sourdough or a thick, rustic artisan loaf. They hold their shape and crisp back up beautifully when you bring the heat back slowly. That crunch is non-negotiable for me!
How long do the caramelized onions last in the fridge?
The beautiful thing about properly caramelized onions—cooked slow with sugar and fat—is they are basically preserved a bit! You can easily keep these onions stored airtight in the fridge for up to five days. That means you can make one big batch early in the week and use them for several rounds of sandwiches. They actually deepen in flavor the next day, so don’t feel like you have to use them right away!
Do I have to use mayonnaise on the outside?
Look, I get it; some people just hate mayo. But honestly, for meal prep, mayonnaise is a game-changer because it browns more evenly at a lower temperature than butter does, which is perfect for ensuring your cheese gets melty before the outside burns. If you absolutely can’t, use clarified butter (ghee). It has a higher smoke point. But if you’re assembling ahead and reheating, mayo truly helps maintain that perfect golden color against the chill.
Share Your Success with These Sandwiches
Whew! Now you have absolutely everything you need to turn a simple lunch into an incredible, savory, and totally convenient meal prep session. That rich Gruyere, the sweet, slow-cooked onions—it all comes together for such a satisfying bite, even hours later!
I really, genuinely want to hear what you think after you try this! Did you stick with the classic onion and Gruyere, or did you sneak in some apple like I suggested? Did the mayo trick work its magic on your crust?
Please take a moment to hop down to the comments below and give this recipe a star rating so other busy folks know it’s worth making. If you made any wild, successful modifications, please share them! Connecting with all of you passionate cooks is my favorite part of this whole process. If you have any specific questions about technique, feel free to drop them in the contact form too—I love talking shop! You can reach out anytime right here.
Caramelized Onion and Gruyere Grilled Cheese
Ingredients
Equipment
Method
- Add 1 1/2 Tbsp butter and olive oil to a skillet and heat over medium-low heat.
- Add diced onions, salt, pepper, fresh thyme, and 1 tsp of fresh rosemary to the hot skillet. Sauté, stirring often, until onions are soft and starting to brown, about 10 minutes.
- Stir brown sugar into the onions and cook another minute.
- Transfer onions to a plate.
- Spread one side of two pieces of bread with a little bit of mayonnaise.
- To the same skillet, add remaining butter and rosemary, and heat over medium heat. Swirl to coat the bottom of the skillet with the melted butter.
- Add both pieces of bread, mayonnaise side down, and cook until bread is golden brown and crunchy, about 2 to 3 minutes.
- As soon as you add the bread to the skillet, add a bit of cheese to the top of each piece of bread. Once the cheese starts to melt a little, sprinkle a couple tablespoons of the caramelized onions over the top of one of the pieces of bread.
- When the bread is golden brown, sandwich the pieces of bread together and cook on low until cheese is fully melted.
- Transfer to a plate. Repeat with remaining slices of bread and ingredients.
- Slice and enjoy!
Notes
Tried this recipe?
Let us know how it was!
Gluten-Free Chef & Latin Cuisine Innovation Specialist
My youngest son’s celiac diagnosis at four changed everything. Suddenly, all those traditional Brazilian and Portuguese recipes from my avó needed to be completely reimagined without losing their soul.
After graduating from Johnson & Wales and working Miami’s Latin fusion scene, my son’s diagnosis became my calling. How do you make gluten-free empanadas that taste like childhood? Over eight years, I’ve developed 320+ gluten-free recipes celebrating authentic Latin flavors using cassava flour and plantain alternatives.
My gluten-free empanada recipe won “Best Appetizer” at the 2023 Miami Gluten-Free Food Festival. I ran “Sabores Sin Gluten,” a catering business serving Miami’s Latino community—quinceañeras, family gatherings, all the celebrations that matter.
Food is culture, and everyone deserves to experience the joy of sharing traditional family meals, regardless of dietary restrictions.