
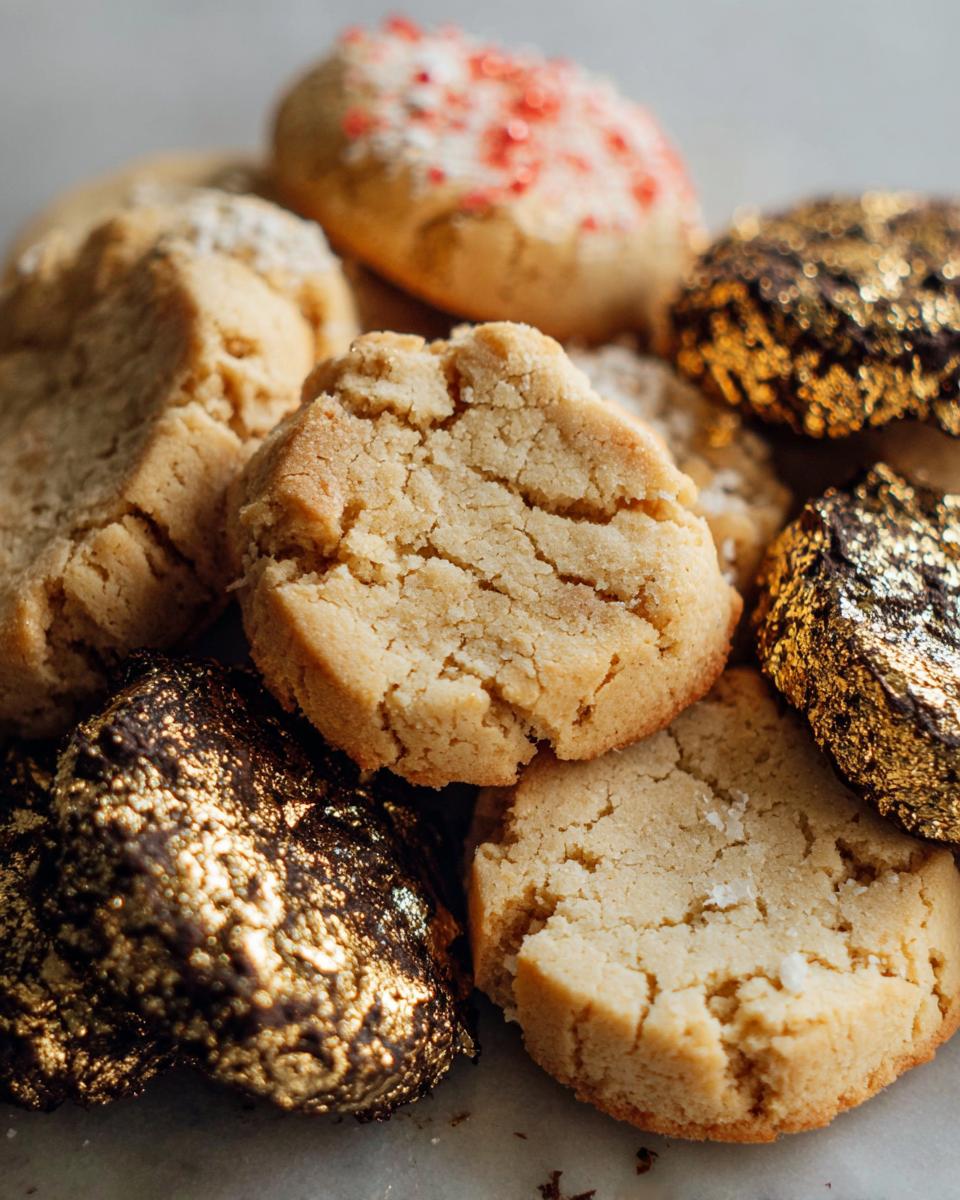
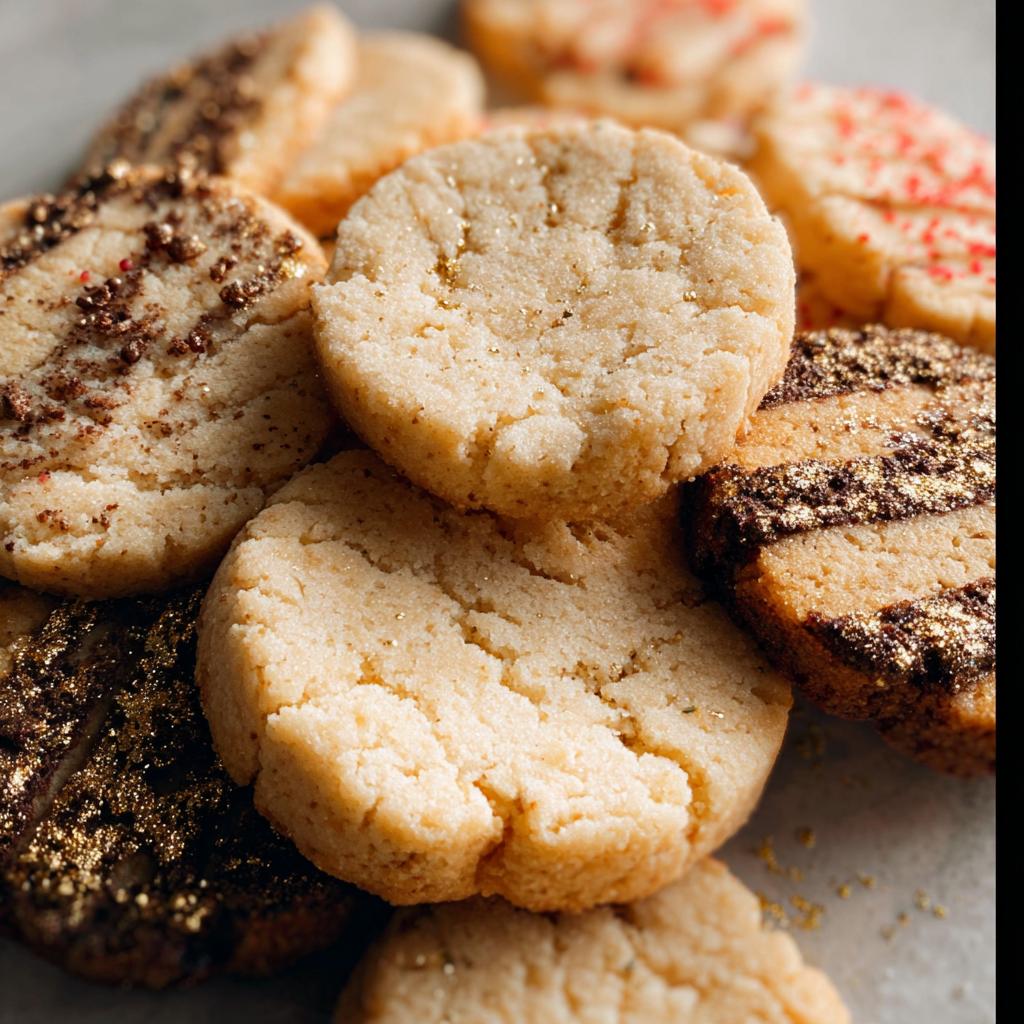
Oh, honey, if you think shortbread cookies are just simple, buttery rounds, you are missing out! I always look for ways to take those classic, melt-in-your-mouth treats and give them a little sparkle. That’s exactly what happened when I created these incredible Gold-Dusted Shortbread cookies. I inherited my Nonna’s recipe, remember how she always made sure whatever she baked sparkled for family gatherings? Well, after I adapted her recipe to be gluten-free, I added edible gold dust, and wow! Suddenly, they weren’t just cookies; they were little pieces of magic that bridged the gap between our past and present.
This recipe is unique because you get so many flavor options—vanilla, chai, even chocolate cherry—all from one core dough preparation. It lets you celebrate tradition while accommodating dietary needs. As a Gluten-Free Culinary Storyteller, I promise you, these elegant desserts are totally worth the little bit of effort. You can read more about my baking journey here!
Why You Will Love These Gold-Dusted Shortbread Cookies
Honestly, these buttery cookies are perfect for anyone who loves baking but craves that extra *oomph*. Why stick to one shape when you can have five amazing flavors? Trust me, they stand out on any platter.
- Incredible flavor variety packed into a simple base dough.
- They have that gorgeous, elegant dessert look thanks to that shimmer.
- Perfect for making ahead of time—the flavor deepens overnight!
- That perfect, delicate crumb that just melts the second it hits your tongue.
Essential Equipment for Perfect Gold-Dusted Shortbread
You don’t need a professional kitchen for these, but you do need a few trusty tools to get that smooth dough. Having these handy makes the whole process so much cleaner. Trust me on this one!
- Hand mixer or Stand Mixer (with that paddle attachment!)
- Rubber spatula for scraping down the sides.
- A couple of baking sheets ready to go.
- Plastic wrap—we need tight cylinders, remember?
- A small dish for mixing those lovely coating spices.
- A cooling rack to let those buttery cookies rest properly.
Ingredients for Your Gold-Dusted Shortbread Varieties
Okay, get ready because this is where the magic starts—with the base doughs! Since we are making five different flavors, it helps to organize everything into two main camps: the classic vanilla and the rich chocolate. You’ll need the right texture for those buttery cookies to slice cleanly later, so make sure your butter is perfectly room temperature, not soft soup!

I’ve organized everything below for you sweet bakers. You can find more of my essential tips for gluten-free baking techniques here!
Vanilla Dough Base Ingredients
This is the foundation for our lighter flavors. You’ll need:
- 1 cup unsalted butter (room temp, please!)
- 1/3 cup light brown sugar (make sure it’s packed tight)
- 1/2 cup granulated sugar
- 1 teaspoon vanilla bean paste (or 2 tsp vanilla extract)
- 1/4 teaspoon salt
- 2 1/4 cups all purpose flour
Flavor Variation Ingredients (Chai Spiced and Dark Chocolate Cherry)
Once the base is mixed, split it up and add these goodies:
For Chai Spiced:
- 1/2 tsp cinnamon, 1/4 tsp cardamom, 1/4 tsp ginger, and 1/8 tsp allspice
- 3 tbsp sparkling sugar and 3 tbsp granulated sugar (for mixing into the dough swirl)
- 2 tsp cinnamon (for coating the log)
For Dark Chocolate Cherry:
- 2 oz dark chocolate, chopped
- 1/2 cup dried cherries, roughly chopped
- 1/2 cup raw sugar (for coating the log)
Chocolate Dough Base Ingredients
Time for the rich chocolate dough. Make sure your cocoa powder is unsweetened!
- 1 cup unsalted butter (room temp)
- 3/4 cup granulated sugar
- 1 teaspoon vanilla bean paste
- 1/4 teaspoon salt
- 1 3/4 cup all purpose flour
- 1/2 cup unsweetened dark cocoa powder
Flavor Variation Ingredients (Chocolate Hazelnut and Chocolate Peppermint)
These additions make the chocolate cookies special. Remember, the peppermint version is the one we add the final gold dust to!
For Chocolate Hazelnut:
- 1/2 cup hazelnuts, roughly chopped
- 1/2 cup hazelnuts, finely chopped (for coating)
For Chocolate Peppermint (The Gold-Dusted Star!):
- 1/2 teaspoon peppermint extract
- 2 oz dark chocolate, chopped
- 1/2 cup white melting chocolate (for dipping)
- 2 tsp oil (to thin the white chocolate)
- 3 crushed candy canes (for sprinkling after the gold layer)
Step-by-Step Instructions for Gold-Dusted Shortbread
Now we get to the fun part! These are slice-and-bake cookies, which means they are amazing for making ahead, but the key to perfect, non-spreading shortbread cookies is making sure the dough is nicely firm before it hits the heat. We are going to tackle the vanilla dough first, then move onto the chocolate base! Learning the proper technique for handling these logs is essential, which is why I always refer to great bakers like the folks over at Butternut Bakery for comparison.
Preparing the Vanilla Dough and Flavor Swirls
First things first, use your mixer to cream that beautiful room-temp butter with both sugars until it’s light and fluffy—it should look pale yellow, almost cloud-like. Mix in your vanilla and salt until just combined.
Now, work in the flour by hand until everything just comes together. Don’t overmix; we want tender, not tough! Divide this vanilla dough into two portions—one should be a little bigger for the chai version.
For the chai, gently fold in the spices and the mixing sugars. For the dark chocolate cherry style, fold in the chopped chocolate and cherries. Remember, we are just swirling them in, not blending them completely smooth!
Forming and Chilling the Gold-Dusted Shortbread Logs
Take each flavored dough portion and place it on its own sheet of plastic wrap. Really squish it down and roll it tight into a log about 8 or 9 inches long. You want it nice and dense so it holds its shape when we slice it later. Wrap it up snug! Pop these logs immediately into the fridge. They need AT LEAST two hours, but honestly, chilling them overnight is even better for getting those clean, crisp edges on your Gold-Dusted Shortbread.
Mixing the Chocolate Dough and Flavor Add-ins
While those are chilling, let’s make the rich chocolate version. Rinse out your bowl—we need a clean start! Cream the butter and sugar for the chocolate base until fluffy. Mix in your salt and vanilla, then fold in the flour and that dark cocoa powder until *just* combined. Seriously, stop mixing as soon as the streaks disappear.
Divide this chocolate dough in half. Fold the roughly chopped hazelnuts into one portion. Fold the chopped dark chocolate and that peppermint extract into the other portion. Then, wrap these two chocolate logs tightly and send them to the fridge to chill alongside the vanilla ones.
Slicing, Coating, and Baking Your Gold-Dusted Shortbread
When the dough is rock solid, get your oven heating up to 350F. Before you slice, unwrap the logs and roll them gently in their coatings: raw sugar for the cherry, the cinnamon sugar mix for the chai, and hazelnuts for the hazelnut cookie. The peppermint log goes naked for now!
Slice everything into about 12 cookies per log, place them on parchment-lined baking sheets about 2 inches apart, and pop any remaining dough back into the chiller. Bake for about 15 to 18 minutes. You’re looking for the edges to just barely turn a pale golden brown—you don’t want them dark! Cool completely before you dress up those glorious peppermint ones with that white chocolate and the edible gold finish.
Tips for Achieving Perfect Gold-Dusted Shortbread Texture
Listen, achieving that delicate, yet sturdy, texture in shortbread cookies is all about respecting the butter. If your butter is too warm—think greasy and soft—the cookies will spread out like puddles when they bake. You want it cool enough to hold its shape but soft enough that you can easily press a finger into it.

Also, slow down when you add the flour! That’s truly the number one reason for tough cookies. Once that flour goes in, mix it only until you see the last few white streaks disappear. We are binding the fat and flour, not developing gluten when we’re making these buttery cookies.
And finally, remember the chill time mentioned earlier? It’s non-negotiable! If you take the logs out and they feel even slightly pliable, pop them back in for 20 more minutes. Slicing that rock-hard, very cold dough is what keeps the edges sharp and prevents spreading. You can always find more tips on preventing spread in my gluten-free baking guides!
Creative Gold-Dusted Shortbread Decoration Techniques
So, we have our lovely, cooled peppermint cookies, half-dipped in that white chocolate drizzle—now for the main event! This is where you transform a beautiful cookie into something truly stunning using edible gold dust. It sounds fancy, but honestly, it’s so easy! If you want a subtle hint of luxury, just take a clean, soft, food-safe brush and lightly tap it over the set white chocolate. A little goes a long way!
But if you want that real show-stopper look, you need a bit more technique. I mix a tiny amount of the edible gold powder with just one drop of clear, high-proof alcohol—vodka works perfectly because it evaporates fast! This turns the gold into a potent paint. Use a fine brush to paint bands or speckles directly onto the set chocolate. It dries instantly, leaving you with truly gorgeous Gold-Dusted Shortbread that looks like it came from a royal bakery!
Make Ahead and Storage for Your Buttery Cookies
One of my favorite things about these buttery cookies is how much time they save when you need a quick dessert! You don’t have to bake everything at once, thank goodness. The best part is wrapping the dough logs tightly, exactly as described, and popping them right into the freezer for up to a month.
If you freeze the dough, remember to let it thaw slightly before slicing, but keep it cold! Baked cookies store beautifully in an airtight container at room temperature for about a week. If you accidentally make too much dough, don’t toss it—just freeze it! It’s all right there on the notes for easy reference for next time.
Gold-Dusted Shortbread Gift Ideas and Presentation
These elegant dessert cookies are honestly my go-to gift, year-round! Because we have so many different flavor profiles, you can create stunning themed boxes. Mix the rich chocolate peppermint with the spicy chai for a festive tin, or keep it classic vanilla for a simple thank-you gift.

I love wrapping them individually in small cellophane bags and tying them with a simple velvet ribbon. For the best presentation, place them in nice tins lined with tissue paper. They truly look expensive! Check out some of my favorite holiday wrapping tips over on my occasions page!
Frequently Asked Questions About Gold-Dusted Shortbread
I know when you’re trying out a fancy recipe like this, you always have a few lingering questions. Don’t worry, that’s what I’m here for! Whether it’s about the flour or that gorgeous shimmer, here are the things folks ask me the most. If you have other urgent thoughts, feel free to reach out through my contact page!
Can I use regular flour for these Shortbread Cookies?
That’s a great question! Since I developed this recipe specifically as a gluten-free version, using regular all-purpose flour will definitely change the texture—it won’t be the same delicate, buttery cookie you expect. If you absolutely need to swap out the gluten-free blend I recommend, you must use a high-quality 1:1 gluten-free flour blend that contains xanthan gum. For all my deep dives into flour safety, check out my baking section.
What is the best way to apply the Edible Gold?
The Edible Gold application is key to that elegant dessert look! The absolute cleanest way is to use a very soft, dry, food-grade paintbrush. Don’t paint the gold directly onto the dry cookie. Instead, I melt a little white chocolate, let it cool just until it’s thick but still sticky, and then I brush the gold over that tacky spot. It secures beautifully and gives you that soft, airy shimmer instead of thick clumps!
How do I keep my Buttery Cookies from spreading while baking?
Spreading is the arch-nemesis of a perfect shortbread cookie! The single most important tip here is chilling—and I mean *really* chilling. You need those dough logs rock hard before you slice them, and those slices need to be cold right up until they enter the 350F oven. If you even hesitate for a second when moving the sliced dough to the pan, put the whole sheet back in the fridge for 15 minutes first. Cold dough equals perfect shape!
Nutritional Estimates for These Elegant Dessert Cookies
I always get asked about the numbers, because while these are absolutely an elegant dessert, they are still treats! You know how it is—we want to enjoy the richness of those buttery cookies without stressing too much.
Because we made five different varieties here, plus the final chocolate dipping step, the exact nutritional profile shifts quite a bit between the chai spiced versus the dark chocolate cherry, for example. So, I can’t give you one single, perfect answer here. Things like the exact brand of gluten-free flour or the type of dark chocolate you use make a difference!
Here is a general breakdown per cookie serving to give you an idea—but always take this with a grain of salt, or perhaps, a dusting of gold!
- Estimated Calories: Varies significantly by flavor profile.
- Estimated Fat Content: Higher due to the high butter content (that’s what makes them!).
- Estimated Carbohydrates: Influenced heavily by the type of sugar used.
- Estimated Protein: Generally lower, typical for a classic shortbread recipe.
Disclaimer: Please consider these figures estimates only. If you are tracking macros very closely, I highly recommend plugging the specific ingredients you use into your preferred tracking app for the most accurate data. Enjoying tradition means savoring every bite, not counting every carb!
Share Your Culinary Creations
Well, that’s it—you’ve got five incredible, shimmering shortbread creations ready to go! But my favorite part about sharing recipes, especially one as special as this Gold-Dusted Shortbread, is hearing what you think. Baking is meant to be shared, even if it’s just digitally!
I truly want to know which flavor combination won your heart. Did you stick to the classic vanilla, or did the peppermint-gold explosion steal the show? The best way to let me know is by dropping a star rating right down below the recipe card. That honest feedback helps other bakers know it’s worth trying!
And seriously, if you’ve managed to get that perfect shimmer on your buttery cookies, you simply *have* to show it off! Tag me when you post photos on social media. Seeing your gorgeous interpretations—maybe even packaged up as gifts—is the highlight of my week! I am always pinning my favorite reader creations over on my Pinterest trends board, so be sure to tag me or use the hashtag! Happy sharing!
Gold-Dusted Shortbread
Ingredients
Equipment
Method
- For the Vanilla Dough Base: In a large mixing bowl, cream together the butter, brown sugar, and granulated sugar until pale and fluffy using a hand or stand mixer with the paddle attachment.
- Mix in the vanilla and salt, then the flour. Switch to a rubber spatula and mix by hand to incorporate all the flour.
- For the Chai Spiced Cinnamon Sugar: Split the dough into two portions, with one slightly larger for the chai spiced cookies.
- In a small dish, combine the cinnamon, cardamom, ginger, and allspice. Add this mixture to the larger dough portion and fold gently a few times to swirl the spices. Do not fully mix.
- For the Dark Chocolate Cherry: To the smaller dough portion, add the chopped chocolate and cherries. Mix to combine.
- Lay out two sheets of plastic wrap. Place each dough portion in the center of a sheet and form into logs about 8-9 inches long. Wrap tightly and chill for at least 2 hours or overnight.
- For the Chocolate Dough Base: Scrape the mixing bowl clean. Cream together the butter and sugar until pale and fluffy.
- Mix in the salt and vanilla, followed by the flour and cocoa powder. Use a rubber spatula to mix by hand to ensure all dry ingredients are incorporated.
- For the Chocolate Hazelnut: Split the dough in half and add one half to a separate bowl. Mix in the roughly chopped hazelnuts.
- For the Chocolate Peppermint: To the dough remaining in the original bowl, add the peppermint extract and chopped dark chocolate. Mix well.
- As with the vanilla dough, form each chocolate dough portion into 8-9 inch logs on plastic wrap. Wrap tightly and chill alongside the vanilla dough for at least 2 hours or overnight.
- Coating & Baking: Once the dough logs are firm, roll them in their respective coatings. Roll the dark chocolate cherry dough in raw sugar. Repeat for the chai spiced cookies with the cinnamon sugar mixture, and the hazelnut cookies with the finely chopped hazelnuts. The peppermint cookies are left plain.
- Slice the ends off each log and then slice each log into approximately 12 cookies. Preheat your oven to 350F and chill the sliced cookies in the refrigerator while the oven heats.
- Line a baking sheet with parchment paper. Place cookies on the sheet, about 2 inches apart. Keep remaining dough chilled. Bake for 15-18 minutes, or until the edges are pale golden brown and the tops are matte.
- Transfer cookies to a cooling rack and bake the remaining dough. Once cooled, dunk half of each peppermint cookie into melted white chocolate and sprinkle with crushed candy canes. Refrigerate for 15 minutes to set.
Notes
Tried this recipe?
Let us know how it was!
Gluten-Free Culinary Storyteller & Recipe Heritage Specialist
Getting diagnosed with non-celiac gluten sensitivity in my late twenties felt like losing my Italian identity. Growing up in nonna’s Brooklyn kitchen, learning traditional techniques that suddenly became off-limits—I decided to fight for those family food traditions instead of giving up.
With my food journalism background and European baking training, I became obsessed with recreating authentic flavors in gluten-free formats. I’ve adapted 400+ traditional recipes from various cultures, with my gnocchi recipe winning “Recipe of the Year” from the National Gluten-Free Living Awards in 2022.
I collaborate with the Italian-American Cultural Center to document traditional family recipes and volunteer with the Westchester Celiac Support Group, teaching monthly pasta-making classes.
Food is the heart of family storytelling. No one should sacrifice their cultural heritage due to dietary restrictions.