Oh, the mornings, right? It feels like I spend half my day just trying to wrangle kids out the door, and sometimes I look at the clock and realize we haven’t even had breakfast yet! As a pediatric dietitian, that panic is real—I need to make sure they get good fuel, but who has time to cook eggs and sausage from scratch?
One disastrously hectic morning, after I’d spent Sunday doing a big meal prep session, I grabbed one of those things I’d tucked away in the freezer. I tossed one of my Effortless & Tasty Freezer Breakfast Burritos into the microwave. Seriously, minutes later, my kids were happily munching on something genuinely good for them. That was the turning point! These burritos aren’t just food; they are the secret weapon against morning chaos, proving healthy eating for busy families doesn’t need to be complicated at all.
Why You Need Effortless & Tasty Freezer Breakfast Burritos in Your Life
Look, my life is built around making things efficient so I can focus on my patients and my family without feeling stressed out all the time. That’s why these burritos are total game-changers for busy people like us. You’re looking for something quick, something that tastes good, and something that won’t derail your health goals, right? I got you covered.
- They are ready faster than microwaving oatmeal.
- They are perfectly portioned for grab-and-go eating.
- They use whole, recognizable ingredients we all love.
Check them out in my main collection of make-ahead breakfast recipes if you need more ideas!
Streamlined Mornings with Effortless & Tasty Freezer Breakfast Burritos
Seriously, when you can pull something from the freezer and have it ready in under two minutes, your morning instantly improves. No scrambling to find eggs or defrost random things. You just grab one, heat it up, and bam! You’ve bought yourself ten extra minutes of peace. That saved time is priceless when you’re juggling school bags and work calls.
Nutritious Start, Zero Compromise
As a dietitian, I hate the idea of pushing breakfast aside for sugary cereals just because they were easy. These burritos balance out protein from the sausage and eggs, carbs from the potato, and a little fat. We load them up with veggies, too, so you know your kids (and you!) are getting something substantial to power through the morning rush without feeling heavy or sluggish later.
Gathering Ingredients for Effortless & Tasty Freezer Breakfast Burritos
Okay, let’s talk about what goes into this magic bundle! Getting the right components is half the battle, but honestly, most of these are stuff you probably have on hand already. We’re making ten perfect burritos, so make sure you have enough of everything. You can always tweak the filling amounts a little if you want more eggs or more sausage, but stick close to the measurements the first time around so they freeze and reheat nicely.
If you’re looking for more great make-ahead inspiration, you should peek at my list of healthy meal prep recipes for when you want to tackle big batches!
For the Burrito Filling Components
We need a few things to get that fantastic texture and flavor going:
- About 1/3 cup of oil—I usually grab avocado oil, but whatever you have works!
- A whole 20-ounce package of frozen hash browns. You cook these until they’re beautifully crispy, don’t skimp on that step!
- One pound of ground pork sausage, but if you’re trying to go leaner, I included a fantastic seasoning mix in the notes to turn plain ground turkey into delicious sausage substitute.
- One bell pepper and one small onion, both diced up small to sneak in those veggies.
- Six large eggs whisked with two tablespoons of water—remember, we want them soft scrambled, not rubbery!
- About one and a half cups of any shredded cheese you love. Cheddar, Monterey Jack, whatever makes your world go ‘round.
- Don’t forget salt and pepper, obviously!
Gluten-Free Tortilla Note & Substitutions
Now, this is important, especially for my readers who have to watch for gluten! The recipe actually calls for standard flour tortillas because they roll up and freeze the best structurally. However, because I know so many of you need to feed gluten-free kids, you *must* swap these out for certified gluten-free burrito-sized tortillas. They can be a bit trickier to seal, so be extra gentle when folding them up!
Equipment Needed for Effortless & Tasty Freezer Breakfast Burritos
You really don’t need much specialized gear for these, which is part of why they’re so low fuss! I promise, if you have a few basics, you’re good to go. I usually just grab the biggest skillet I own because we’re cooking a lot of stuff.
Here’s what you’ll want handy:
- An extra large skillet with high sides—trust me, you need the room!
- Your trusty wooden spoon for breaking up meat.
- And a meat chopper if you have one; it makes quick work of the sausage!
Step-by-Step Instructions for Effortless & Tasty Freezer Breakfast Burritos
Okay, time to put on an apron and get cooking! Since we’re making ten burritos, you’ll definitely need a big skillet, so pull out your extra-large one. I always make sure my kids are doing their homework nearby during this part—it keeps them busy, and they get excited about seeing their breakfast come together! We are going to cook everything in batches, so have a few plates ready to hold the cooked components.
If you are freezing them, remember we want the filling nicely contained and not moist at all, so pay close attention to the texture of the potatoes and eggs. If you skip the initial crisping steps, these will get soggy fast in the freezer!
Cooking the Hash Browns and Vegetables
Get your oil heating over medium-high heat. Toss in those frozen hash browns—don’t stir them right away! This is my little trick: let them sit untouched for a few minutes until you peek underneath and see a nice golden crust forming. Season them up a bit right then. Once they are crispy on the bottom, give them a flip and cook until the other side is done, then scoop them out onto a plate. You can check out more ideas for delicious make-ahead meals over here: my breakfast recipes.
Wipe the pan down if it looks too greasy, add a tiny bit more oil, and throw in your diced peppers and onions. Cook those just until they start to get soft and sweet—maybe three or four minutes. Don’t let them burn! Remove those veggies too and place them with the hash browns. We want distinct layers, not a mushy mess later.
Preparing the Sausage and Scrambled Eggs
Back into the same pan goes the sausage. I stand right over it with my wooden spoon or meat chopper, breaking that meat down into tiny little crumbles as it browns. Once it’s all cooked through, pull it out and set it aside.
Now for the eggs! Whisk your eggs with the water in a bowl, seasoning them well. Cook these eggs low and slow so they set up nice and soft. When I say soft scrambled, I mean just barely set—they should still look a little shiny. If you cook them until they are firm, they will get dry when they reheat later. Nobody wants dry egg bits in their freezer burrito!
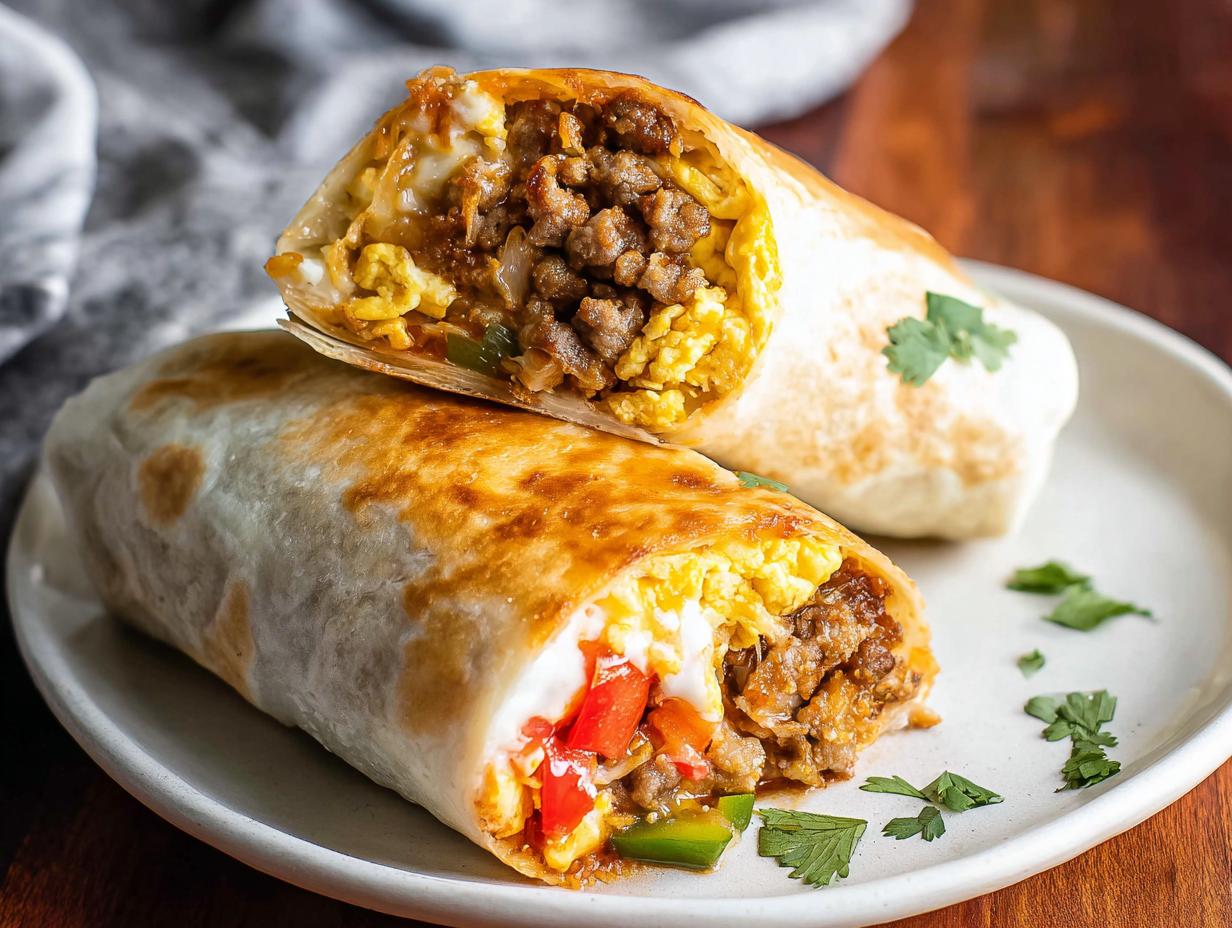
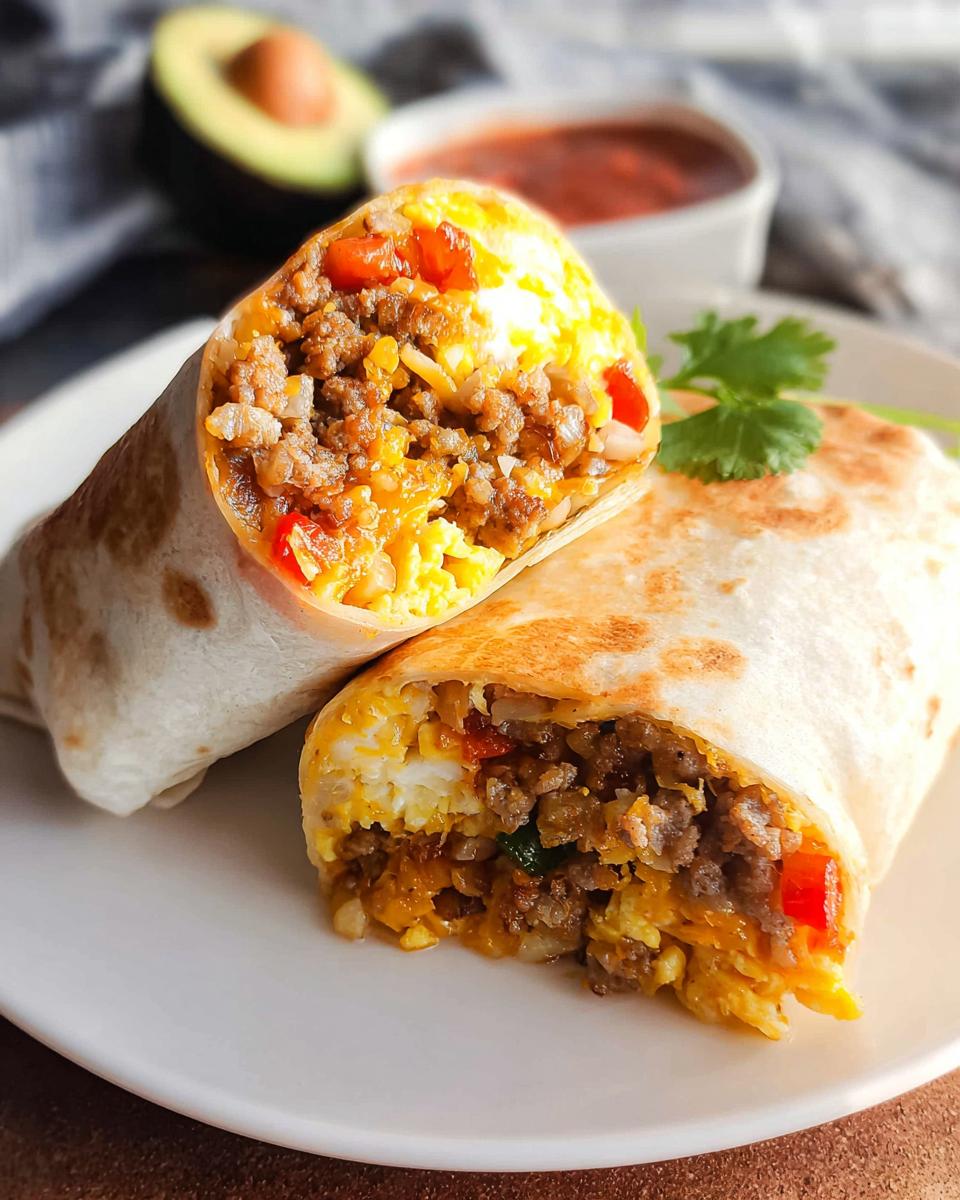
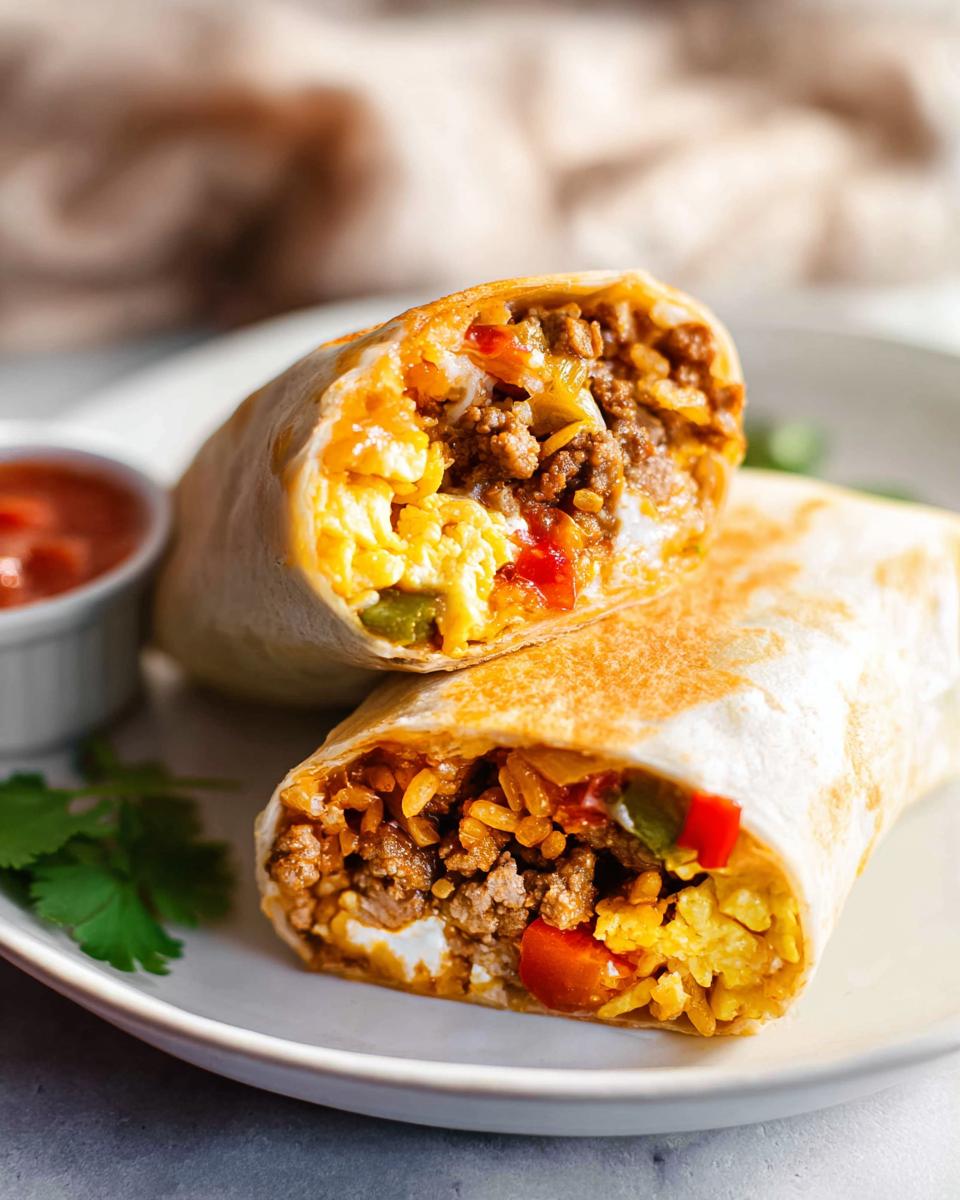
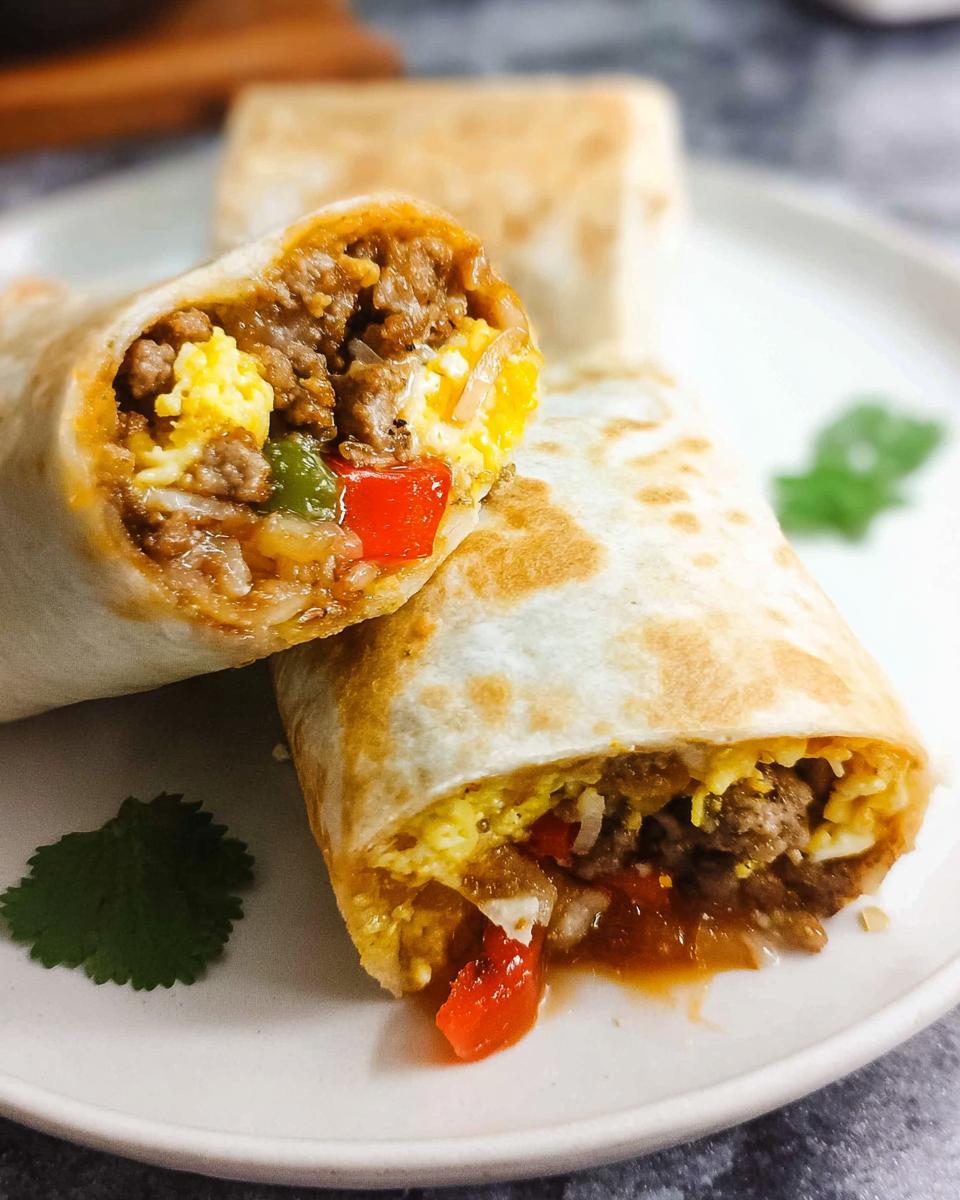
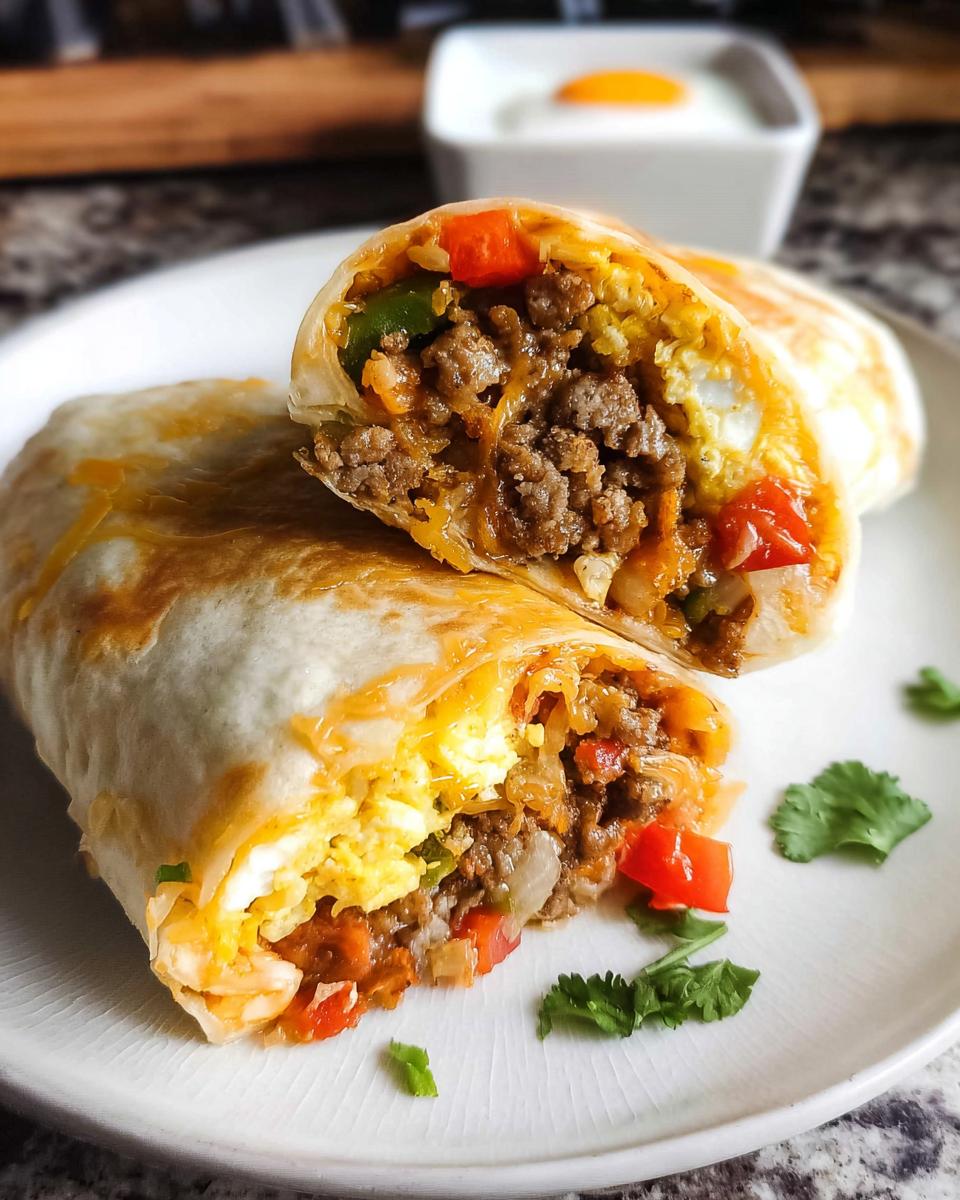
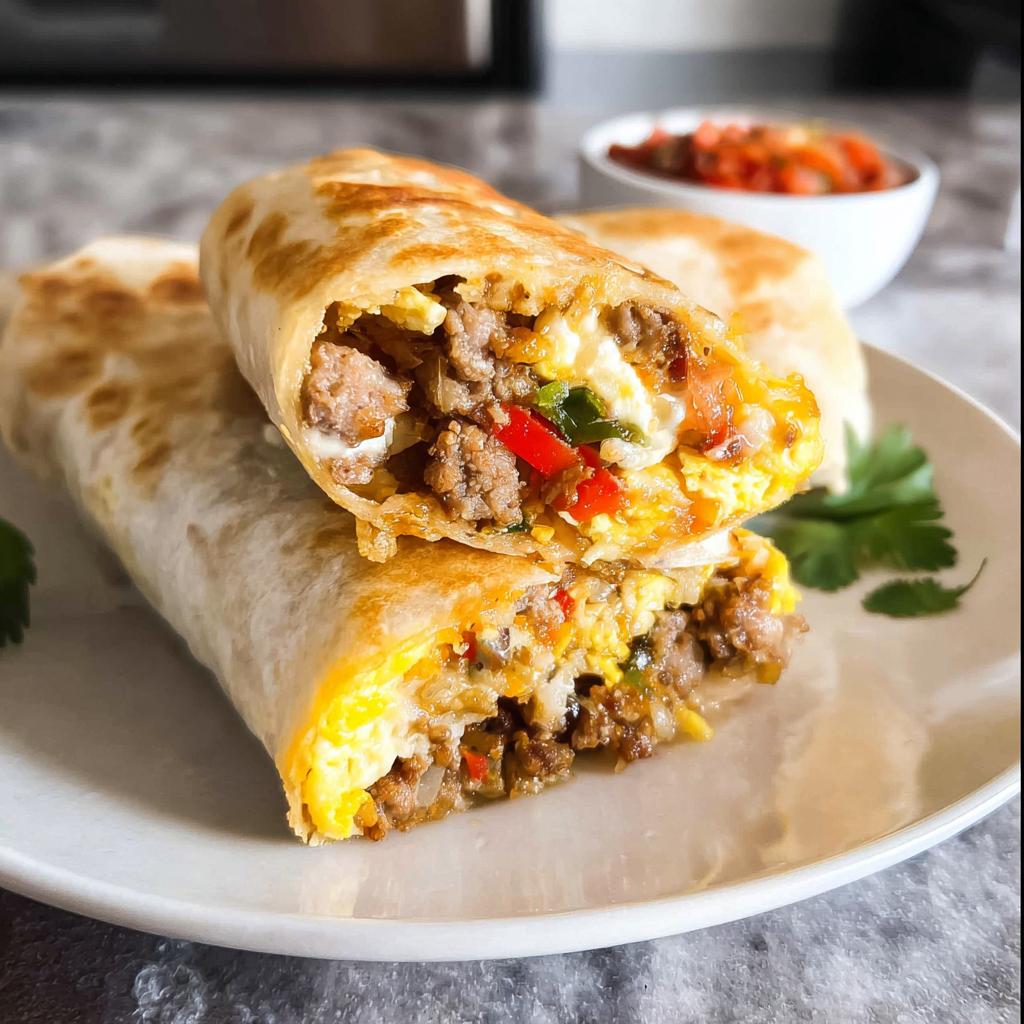
Assembling and Rolling Your Effortless & Tasty Freezer Breakfast Burritos
This is the fun part! Lay out all ten of your burrito-sized tortillas. Here’s the trick for binding it all together: sprinkle a decent layer of cheese right in the center of the tortilla first. That melted cheese acts like glue when it heats up just a bit!
Next, layer on a scoop of the crispy hash browns, then some sausage, then some veggies, and finally, top it with a spoonful of those soft scrambled eggs. If you’re freezing them, leave lettuce, sour cream, or salsa out! But if you’re having them right now, go ahead and add your favorite hot sauce! Fold those sides in tight, roll it up firmly—think of it like wrapping a birthday present—and repeat the whole process! If you’re serving right away, you absolutely must toast them in a hot, greased skillet until they are golden brown and crisp on all sides. That final crisping makes all the difference!
Expert Tips for Perfect Effortless & Tasty Freezer Breakfast Burritos
Creating a breakfast burrito that tastes just as amazing on Tuesday morning as it did on Sunday prep day takes a little know-how. My biggest fear is that crispy hash brown turning into mush, so I have a couple of non-negotiable steps I always follow. These little tricks keep the texture intact even after weeks in the freezer!
The Secret to Non-Soggy Hash Browns
Listen, the hash browns are the biggest source of potential sogginess. You have to cook them until they are truly golden and slightly dry in the pan—I mean, crisp! Don’t rely on just heating them through. Once they are cooked, let them sit on the plate for a minute or two before you start assembling. If you let that steam escape before they go into the tortilla, they stay perfectly crispier in the wrap!
Making the Turkey Sausage Alternative
If you’re skipping the pork sausage, which I totally understand sometimes, the turkey sausage option is incredible, but you have to season it right. Don’t just use plain turkey! Remember that mix I detailed in the notes? Maple syrup, sage, a pinch of nutmeg—that flavoring is what makes it taste like actual sausage instead of just ground meat. Mix that seasoning vigorously into the raw turkey before browning for the best flavor payoff!
For tons more ways to streamline your cooking week, you absolutely have to check out my healthy meal prep recipes collection. It’s a lifesaver!
Freezing and Storing Your Effortless & Tasty Freezer Breakfast Burritos
This is where the magic of meal prep really pays off! Once you’ve rolled all ten of your burritos tightly, you need to protect them from freezer burn, which is the enemy of any good make-ahead meal. I grab plastic wrap first—you want to wrap each one completely on its own first. This tight layer helps keep moisture locked in.
After plastic-wrapping them individually, pop them into a large, sturdy freezer-safe bag. Make sure you squeeze out as much air as you can before sealing it up tight. You can easily keep these perfectly ready to go for up to two whole months! It’s like having a grab-and-go breakfast menu waiting for you whenever life gets crazy. For more tips on making batches last, check out my favorites in this make-ahead resource.
Reheating Instructions for Effortless & Tasty Freezer Breakfast Burritos
So, it’s 7:15 AM, you’re already late, and you grab one rock-solid frozen burrito. Don’t panic! We have a couple of ways to get this thing warm and delicious fast. The absolute best way, hands down, is the two-step method: microwave first, skillet second. The microwave thaws and heats the interior, but the skillet? That’s key for texture!
If you have a tiny bit more time, you can warm them in the oven at 350 degrees until they feel warm all the way through. But honestly, I usually give them about a minute in the microwave to loosen up, and then I toast them in a dry, hot pan until the outside is golden brown and crunchy. You won’t believe the difference that final crisping makes! For more ideas on preparing food ahead of time, check out my batch cooking tips.
Frequently Asked Questions About Effortless & Tasty Freezer Breakfast Burritos
I know that when you’re diving into a new meal prep strategy, your mind tends to race with all the little ‘what ifs.’ It’s totally normal! Luckily, because I’ve made hundreds of these, I’ve ironed out the kinks. Most people ask me about ingredient swapping or the reheating process, so I put my top answers right here for you.
If you’re looking for more quick and easy recipes for your weekly rotation, you have to check out my breakfast inspiration page!
Can I make these vegetarian or vegan?
Absolutely! It’s easy to adapt these for vegetarian options. Just skip the sausage and double up on the veggies or throw in a can of rinsed black beans—that’s a great source of fiber, too. If you want to go fully vegan, swap out the cheese for your favorite vegan shredded blend, and for the eggs, there are amazing liquid egg replacers now that scramble up beautifully in the pan.
What is the best way to reheat from frozen solid?
If you wake up, realize you forgot to thaw your burrito, and need it in five minutes, here’s the drill: unwrap it, wrap it in a slightly damp paper towel, and microwave it for a solid minute and a half to two minutes—maybe longer if your microwave isn’t super powerful. Once it’s soft, *please* don’t eat it like that! Toss it into a hot, dry skillet for 30-60 seconds per side. That final crisping step resurrects any slightly steamed texture and makes it taste fresh-cooked again!
Nutritional Snapshot of Effortless & Tasty Freezer Breakfast Burritos
When I plan our family meals, I always keep an eye on these basic numbers. Per burrito, you’re looking at roughly 446 calories, which keeps us full until lunch! We get about 18 grams of protein and 30 grams of fat. Remember, these numbers are estimates, so if you use extra-sharp cheddar or whole-wheat tortillas instead of GF ones, things will shift a little!
For more ideas on making healthy choices work for your busy week, check out my healthy meals section.
Effortless & Tasty Freezer Breakfast Burritos
Ingredients
Equipment
Method
- Add oil to an extra large skillet with high sides over medium-high heat. When hot, add hashbrowns and cook for several minutes without moving them until the bottom is golden and crisp. Season with salt and pepper. Flip and cook until the other side is crisp. Set the hashbrowns aside for assembly.
- Add a little more oil to the pan. Add diced bell peppers and onion and cook for a few minutes until tender. Remove the vegetables and set them aside.
- Add ground sausage to the same pan. Cook, breaking it into small pieces with a meat chopper or wooden spoon, until browned and cooked through. Remove the sausage and set it aside.
- Meanwhile, add eggs and water to a bowl and whisk well with a fork. Season with salt and pepper. Cook, stirring with a wooden spoon until they are soft scrambled. Do not overcook them.
- Place a tortilla on the counter in front of you. Sprinkle a large handful of shredded cheese on it. Add a spoonful of hashbrowns, sausage, vegetables, and eggs. If you are not freezing them, add hot sauce, salsa, sour cream, and avocado inside the burritos now. Fold the tortilla tightly into a burrito shape. If serving immediately, toast the burritos in a hot, greased skillet until the tortilla is golden and crisp on all sides. Serve right away.
Nutrition
Notes
Tried this recipe?
Let us know how it was!
Gluten-Free Culinary Storyteller & Recipe Heritage Specialist
Getting diagnosed with non-celiac gluten sensitivity in my late twenties felt like losing my Italian identity. Growing up in nonna’s Brooklyn kitchen, learning traditional techniques that suddenly became off-limits—I decided to fight for those family food traditions instead of giving up.
With my food journalism background and European baking training, I became obsessed with recreating authentic flavors in gluten-free formats. I’ve adapted 400+ traditional recipes from various cultures, with my gnocchi recipe winning “Recipe of the Year” from the National Gluten-Free Living Awards in 2022.
I collaborate with the Italian-American Cultural Center to document traditional family recipes and volunteer with the Westchester Celiac Support Group, teaching monthly pasta-making classes.
Food is the heart of family storytelling. No one should sacrifice their cultural heritage due to dietary restrictions.