Oh, there is nothing in this world that beats gathering around a table, reaching in together, and tearing off a piece of warm, glorious bread, is there? That communal moment is what cooking is all about for me. I’ve worked for years to perfect this recipe for Cheesy Pull-Apart Bread so that everyone—truly everyone—can join in that joyous tearing and dipping experience.
You see, after my youngest son got that celiac diagnosis, I nearly gave up on recreating some of our classic favorites. Traditional recipes suddenly felt locked away. But I refused to let food become a barrier! After what felt like a thousand kitchen experiments, I finally nailed the gluten-free flour ratio to get that perfect, unbelievably soft dough and that erupting, gooey cheese center.
The first time I brought this bread out to a family dinner, it vanished in minutes! That moment proved to me that good food connects us, no matter what the dietary needs are. Trust me, this creation is pure comfort and pure nostalgia baked right inside a loaf.
For more about my journey and why these recreated classics mean the world to me, you can read a little more about my philosophy right here.
Why This Cheesy Pull-Apart Bread is Your Next Party Favorite
Seriously, once you set this down, it disappears. Forget fussy plating; this is all about getting everyone involved! Making Cheesy Pull-Apart Bread doesn’t just give you a side dish; it creates a focal point for fun. It’s guaranteed to be the first thing people reach for at any gathering.
Key Benefits for Your Table
- Unbeatable, stretchy, gooey cheese effect—that’s the main draw!
- Perfectly portioned for grabbing—it’s the ultimate Shareable Appetizer.
- The soft, yeasted dough means it bakes up beautifully every time.
- It doubles as an incredible, flavorful side dish for weeknight meals, too.
Gathering Ingredients for Perfect Cheesy Pull-Apart Bread
Getting the right ingredients together is half the battle won, trust me! Because we are aiming for that magnificent, soft texture and that intense cheesy pull, precision matters here. Don’t rush this part—having everything measured and ready means the dough comes together like a dream. Here’s exactly what you need:
Dough Ingredients
- 2 1/4 cups all-purpose flour
- 2 tablespoons granulated sugar
- 2 teaspoons instant yeast
- 1 1/2 teaspoons kosher salt
- 3/4 cup whole milk, warmed (105°F to 115°F)—this temperature is vital for waking up the yeast!
- 3 tablespoons unsalted butter, softened
Garlic Butter Filling Ingredients
This is the flavor bomb, so make sure that garlic is fresh! We want maximum aroma when we pull this apart later.
- 1/2 cup unsalted butter, softened
- 1 tablespoon garlic, minced
- 1 tablespoon parsley, chopped (plus extra for garnish later)
- 1/2 teaspoon kosher salt
Cheese and Topping Components
I love this specific mix of cheeses because they melt differently, giving us maximum stretch and flavor depth.
- 1 cup mozzarella cheese, shredded
- 1/2 cup sharp cheddar cheese, shredded
- 1 tablespoon unsalted butter, melted (for brushing at the end)
- Kosher salt for garnish
Essential Equipment for Making Cheesy Pull-Apart Bread
You don’t need a giant commercial kitchen for this, but you do need a few key players to make the dough handling smooth. Because we are dealing with a soft dough that needs to rise twice, the stand mixer is definitely your best friend here. Trust me, your arms will thank you!
Make sure you have these pieces ready before you start mixing:
- A stand mixer, naturally, fitted with that glorious dough hook attachment.
- A good medium bowl for the first rise.
- Your trusty 8 ½ x 4 ½-inch loaf pan—this shape makes the stacking look so neat!
- A sheet pan lined with parchment paper. This catches any little bits that might sneak out during assembly.
- A wire rack for cooling down once it comes out of the oven.
Step-by-Step Instructions for Your Cheesy Pull-Apart Bread
Alright, let’s get our hands in this beautiful dough! This is where the magic of the Cheesy Pull-Apart Bread truly happens. Don’t be intimidated by the rising times; that’s mostly hands-off, relaxing time for you. Remember, every soft, warm bite is worth the wait.
Mixing and First Rise of the Dough
First things first: get your stand mixer ready. Toss the flour, sugar, yeast, and salt right into that bowl. Then, slowly drizzle in your warm milk and the softened butter while the mixer is on that lowest speed. You don’t want a flour explosion! Once it looks shaggy, crank it up to medium and let that dough hook work for about 5 to 6 minutes. You want it smooth and springy—elastic, that’s the word.
Once it’s kneaded, pop that ball of dough into a greased bowl. Cover it up tight, and let it sit in a nice warm spot for about 1 hour and 30 minutes. It needs to double in size; this development time is key for that soft texture later.
Preparing the Gooey Cheese Filling
While that yeast is waking up, we make the flavor paste! In a little bowl, just mash together that softened butter, your minced garlic, the fresh parsley, and that bit of salt until it’s all nicely combined. That’s your garlic butter done!
In a totally separate bowl—and this is important—toss your mozzarella and cheddar together. We need those two cheese piles separate so we can layer correctly later on. It’s all about organization for a perfect stack!

Assembling and Second Rise of the Pull Apart Bread
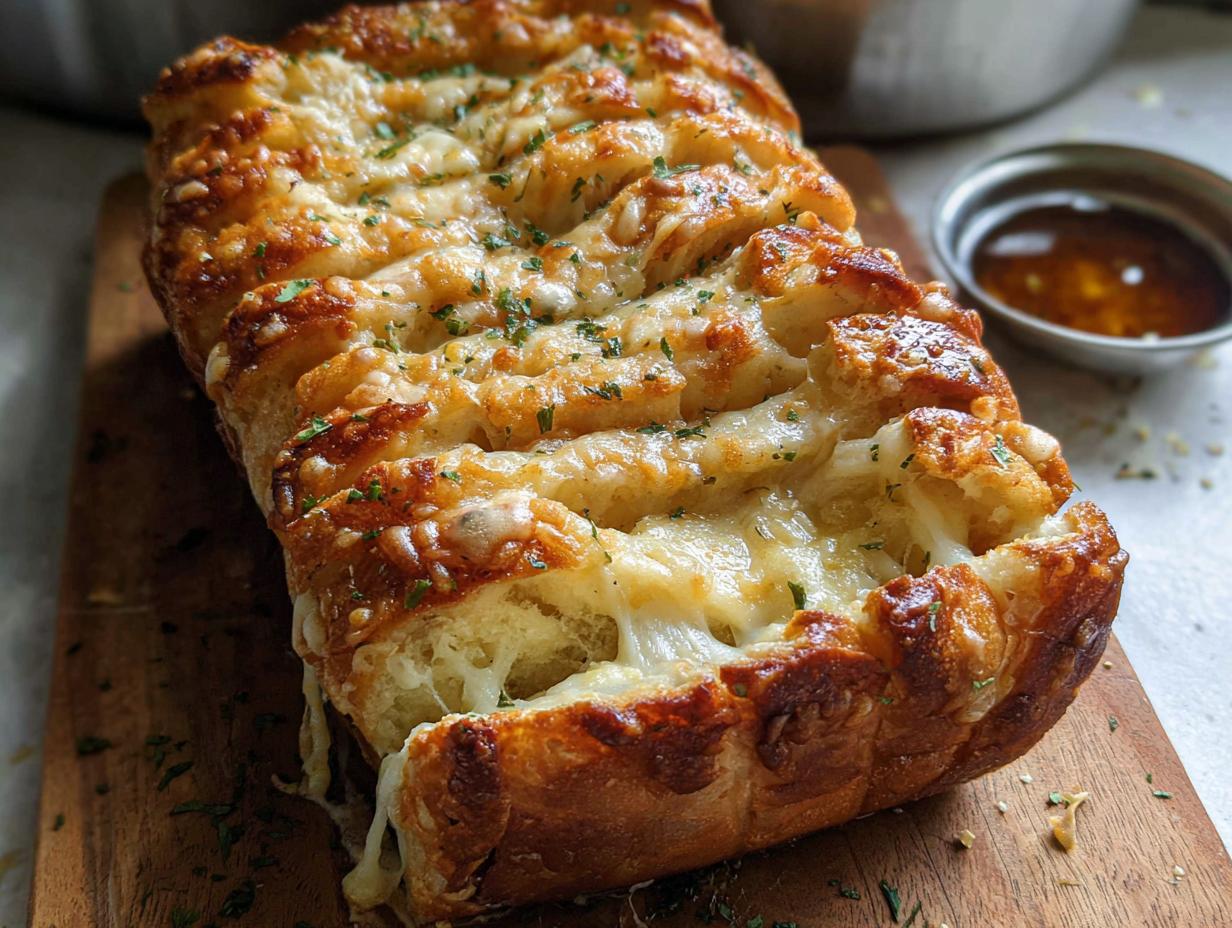
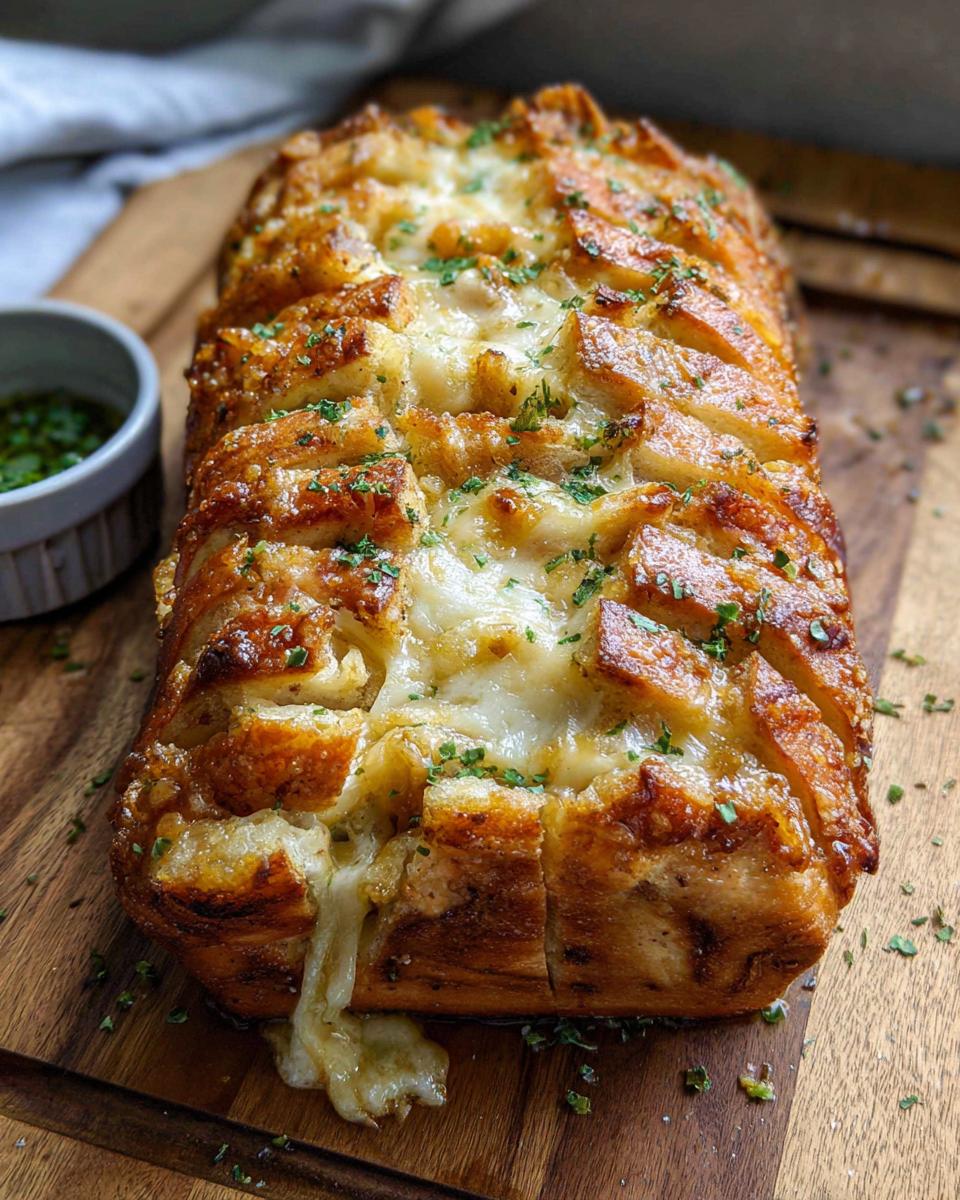
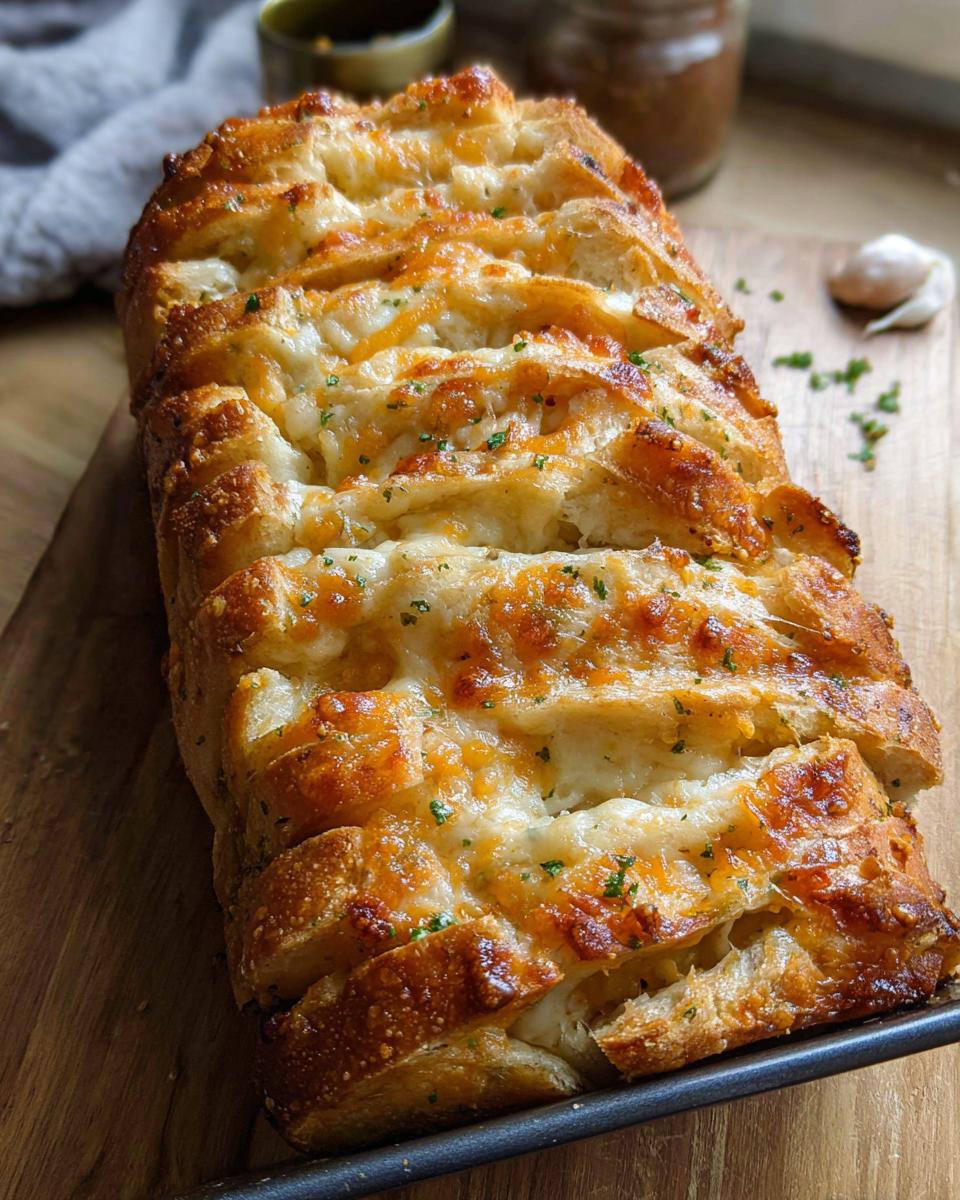
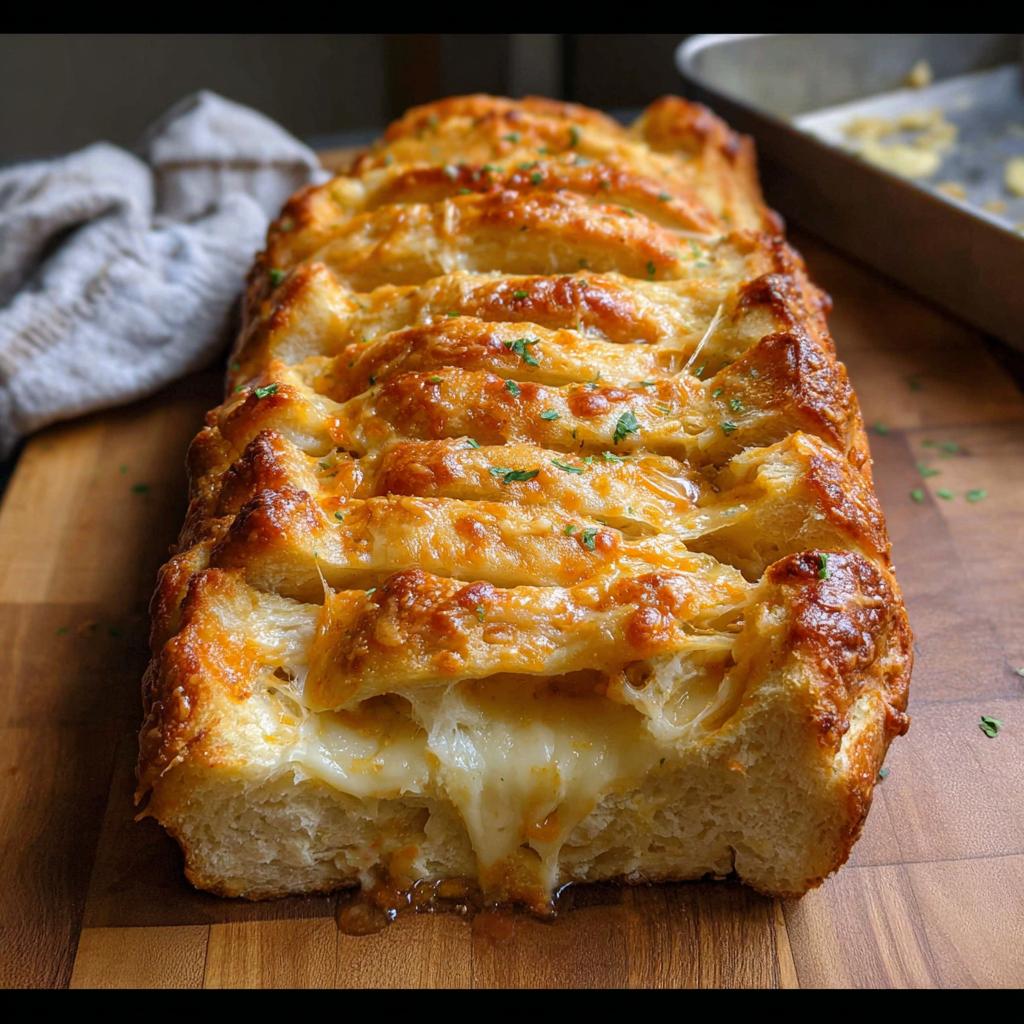
Once the dough has puffed up, punch it down gently and divide it right into 12 equal little pieces. Flatten each one into a rough 4-inch circle. Now, take your garlic butter and smear a little bit onto each dough round. Then make it rain cheese on top of the butter!
Next up: the stack! Make two stacks of six cheesy discs each. Carefully lay those stacks horizontally, one right next to the other, inside your sprayed loaf pan. You can gently nudge them apart so they aren’t totally squished. Cover the pan and let this baby hang out for its second rise—about 45 minutes this time, until it looks ready to burst. While this is happening, go ahead and set your oven to 325°F.
Baking and Finishing Touches
Pop that loaf into the 325°F oven and let it bake for about 45 to 50 minutes. If you notice the top getting too dark too quickly, don’t panic! Just loosely tent a piece of aluminum foil over it. We are looking for that deep golden brown.

When it’s done, pull it out and put the whole pan on a wire rack to cool just slightly. This is my favorite part: immediately brush that top generously with the melted butter, sprinkle a little extra salt on top, and scatter fresh parsley everywhere for color. It’s ready to tear!
For more tips on getting incredible results with gluten-free baking, check out my guides on baking theory here. And if you want to see how others have tackled this classic, this recipe was inspired by an amazing baker over at I Am Homesteader.
Tips for Success with Your Cheesy Pull-Apart Bread
Listen, bread baking can sometimes feel like the Wild West, especially when you’re working without gluten. But I promise, a few small checks taken during this process will guarantee you that perfect, soft bake and that stunning cheese pull every single time. Don’t skip the steps where the dough tells you what it needs!
When kneading, if the dough feels stiff or crumbly, it’s begging for milk—add it slowly, just a tablespoon at a time until it cleans the sides of your mixer bowl. Too much dough clinging is sad dough!
For that gorgeous ooze, make sure your shredded cheeses aren’t sitting out for too long before layering, or the butter coating won’t stick as well. And please, make sure you grease and flour that loaf pan generously—nothing ruins the mood faster than a beautiful loaf that refuses to come out!
If you’re looking for more inspiration on comforting dinner recipes that feel just as heartwarming, I’ve gathered some amazing ideas over here.
Serving Suggestions for This Shareable Appetizer
Honestly, this Cheesy Pull-Apart Bread rarely makes it past the appetizer stage in my house! But if you manage to save some, it’s a wonderful side dish for virtually anything.
Imagine this alongside a big, bright salad or a hearty bowl of chili. It’s fantastic cut up and served next to spaghetti to soak up extra sauce, too. It is the absolute king of the game-day table, obviously, because who needs a fork when you have this glorious, gooey cheese ready to go?
For more ideas on how to pair bread like this with warming evening meals, have a look at some of my favorite recipes for dinner right here.
Storage and Reheating Instructions for Leftover Cheesy Pull-Apart Bread
Now, just between you and me, this bread is rarely left over, but accidents happen, right? If you do have some remaining, you want to keep that soft texture locked in. Store the bread in an airtight container.
If you’re eating it within a day, room temperature is fine. But for longer storage, the fridge works best. The key is reheating! Wrap a piece loosely in foil and warm it in a 300°F oven for about 10 minutes. That heat melts the cheese right back to that glorious, gooey state we love!
Frequently Asked Questions About Cheesy Pull-Apart Bread
I get so many great questions after people try this recipe! It’s natural when you’re playing with dough and cheese—you want perfect results for that first experience. Don’t worry if something seems tricky; we can work through it right here. Let’s tackle some of the most common things folks ask about making the ultimate Cheese Bread.
Can I make this Cheesy Pull-Apart Bread ahead of time?
You definitely can! This is a fantastic make-ahead concept, which is great when you’re hosting. I suggest assembling the whole thing, including the layering of the butter and cheese between the dough discs, putting it all into the loaf pan, and covering it. Once assembled, chill it in the fridge for up to 12 hours. Just remember, if you bake it straight from the fridge, you’ll need a longer second rise—maybe around 50 minutes instead of 45—or you might need to add 5 to 10 minutes onto the baking time to make sure that center gets hot enough.
What is the best cheese combination for Gooey Cheese in this Pull Apart Bread?
The blend we use—mozzarella for the stretch and sharp cheddar for that wonderful tangy flavor—is the powerhouse duo for the Gooey Cheese effect. Mozzarella melts beautifully and pulls for miles, while the cheddar cuts through the richness of the garlic butter. If you want to mix it up, try swapping the cheddar for Gruyère! Gruyère has wonderful nutty notes that pair surprisingly well with the garlic, and it melts just as smoothly as the cheddar.
How do I ensure the center of the Cheese Bread is fully cooked?
Getting that center baked thoroughly without burning the outside is the main balancing act! Since we are baking these loaves at a slightly lower temperature (325°F), it gives the heat more time to penetrate. If you notice the top is perfectly golden brown after about 35 minutes but you’re nervous about the middle, that’s when you grab that aluminum foil and loosely tent it over the top. That protects the crust while the inside finishes cooking the last 10 minutes. If you have a digital thermometer, aim for an internal temperature of 200°F in the very center when it’s done.
If you’ve got more questions tumbling around in that kitchen brain of yours, please don’t hesitate to reach out to me directly over on my contact page. I love hearing from everyone!
Share Your Perfect Cheesy Pull-Apart Bread Experience
Now it’s your turn, friend! I’ve shared every trick I know—from how to get that dough elastic to the exact moment to pull that foil off the top—to make sure your Cheesy Pull-Apart Bread is a smashing success. But the best part of cooking is seeing what you all create in your own kitchens!
Did you serve this at a big gathering? Did your family manage to save any for leftovers (I seriously doubt it!), or did it disappear into happy silence while everyone was busy pulling?
Don’t be shy! Come back here and leave a star rating for this recipe; it helps other home cooks feel confident trying it out. Tell me in the comments below how the garlic butter smelled while it was baking! I absolutely love seeing photos—if you snapped a picture of that glorious cheese pull, please tag me or share it on social media. You can find all my other favorite recipes and baking adventures right over here!
Cheesy Pull-Apart Bread
Ingredients
Equipment
Method
- In the bowl of a stand mixer fitted with a dough hook, combine flour, sugar, yeast, and salt.
- With the mixer on low speed, mix in the warm milk and butter until just combined. Knead on medium speed for 5-6 minutes, or until smooth and elastic. If the dough is too dry, add more milk, 1 tablespoon at a time. Or, add more flour if too wet until the dough reaches the desired consistency.
- Transfer dough to a greased medium bowl. Cover with plastic wrap and let rise in a warm spot until doubled in size, about 1 hour and 30 minutes.
- While the dough rises, combine softened butter, minced garlic, chopped parsley, and salt in a small bowl. Set aside.
- In a separate bowl, combine mozzarella and cheddar cheese. Set aside.
- Spray an 8 ½ x 4 ½-inch loaf pan with nonstick cooking spray. Set out a sheet pan lined with parchment paper. Set aside.
- Punch down the risen dough and transfer to a clean surface. Divide the dough into 12 equal pieces.
- Flatten each piece into a 4-inch round disc and place onto the lined baking sheet.
- To each round disc of dough, spread the garlic butter mixture. Then, top each with an equal amount of the shredded cheese mixture.
- Create 2 stacks of 6 discs of dough. Carefully place the dough stacks horizontally into the prepared loaf pan. Gently separate the pieces slightly. Cover the pan and let rise again until almost doubled in size, about 45 minutes.
- While the dough rises for the second time, preheat the oven to 325°F.
- Bake the loaf for 45-50 minutes, or until golden brown. Cover the pan loosely with aluminum foil if the top starts to brown too quickly.
- Transfer the loaf pan to a wire rack and let cool slightly. Brush with melted butter, sprinkle with salt, and garnish with parsley before serving.
Notes
Tried this recipe?
Let us know how it was!
Gluten-Free Chef & Latin Cuisine Innovation Specialist
My youngest son’s celiac diagnosis at four changed everything. Suddenly, all those traditional Brazilian and Portuguese recipes from my avó needed to be completely reimagined without losing their soul.
After graduating from Johnson & Wales and working Miami’s Latin fusion scene, my son’s diagnosis became my calling. How do you make gluten-free empanadas that taste like childhood? Over eight years, I’ve developed 320+ gluten-free recipes celebrating authentic Latin flavors using cassava flour and plantain alternatives.
My gluten-free empanada recipe won “Best Appetizer” at the 2023 Miami Gluten-Free Food Festival. I ran “Sabores Sin Gluten,” a catering business serving Miami’s Latino community—quinceañeras, family gatherings, all the celebrations that matter.
Food is culture, and everyone deserves to experience the joy of sharing traditional family meals, regardless of dietary restrictions.