Halloween night is all about spooky fun and treats, right? But sometimes, finding that perfect, kid-approved snack that you *also* feel good about serving can feel like a scavenger hunt. That was me, years ago, looking for something special for my son’s preschool Halloween party. I wanted something festive, something yummy, and importantly, something gluten-free because I knew so many of his little friends had trouble with regular dough. After a bit of experimenting, born out of necessity, I landed on these amazing Cheesy Garlic Mummy Dogs (Mozzarella Wraps)! Using mozzarella cheese strips instead of traditional dough was a game-changer. They turned out to be a massive hit, proving that holiday treats don’t have to mean compromising on dietary needs. As a Gluten-Free Nutritionist & Family Meal Planning Expert, it’s moments like these, when simple ingredients transform into pure joy, that really make my heart happy.
**Why You’ll Love These Spooky Mummy Snacks**
Seriously, these mummy dogs are a total lifesaver for any Halloween celebration! Here’s why they’re the MVP of your spooky spread:
- So Easy, So Quick: You won’t believe how fast these come together, leaving you more time for costumes and candy.
- Kid-Approved Flavor: That gooey, cheesy hug around the hot dog? Pure magic for little (and big!) taste buds. Plus, that hint of garlic is just *chef’s kiss*.
- Festive Fun Guaranteed: They look adorable and are guaranteed to be the star of your Halloween party spread.
- Gluten-Free Friendly: Everyone can join in on the fun with these delicious, naturally gluten-free wraps!
absolutely! here’s the HTML for that section:
`
Gather Your Ingredients for Cheesy Garlic Mummy Dogs (Mozzarella Wraps)
Alright, let’s get our spooky ingredients together! Making these Cheesy Garlic Mummy Dogs (Mozzarella Wraps) is a breeze, and you probably have most things already. Here’s what you’ll need:
For the Mummy Dogs:
- 8 ounces of your favorite dough (crescent rolls are super easy, but puff pastry or even a homemade enriched dough works wonderfully!)
- 6 good quality beef franks (I find the Wagyu ones have a lovely richness!)
- 6 slices of cheese – Provolone, Sharp Cheddar, or Muenster are my top picks for melting dreams.
- A little vegetable oil, just for the skillet
For Garnish (The Fun Part!):
- A sprinkle of “The Usual” seasoning for that garlicky goodness
- Yellow mustard, the classic choice for those cute mummy eyes!
That’s it! Simple, right? Now, let’s get them all wrapped up and ready for their spooky debut!
`
Step-by-Step Guide to Making Cheesy Garlic Mummy Dogs (Mozzarella Wraps)
Alright, time to get those little monsters ready for the grill! Making these Cheesy Garlic Mummy Dogs (Mozzarella Wraps) is super straightforward and honestly, really fun. You’ll be amazed at how quickly they come together, perfect for a last-minute Halloween party treat!
Preparing the Dough and Cheese
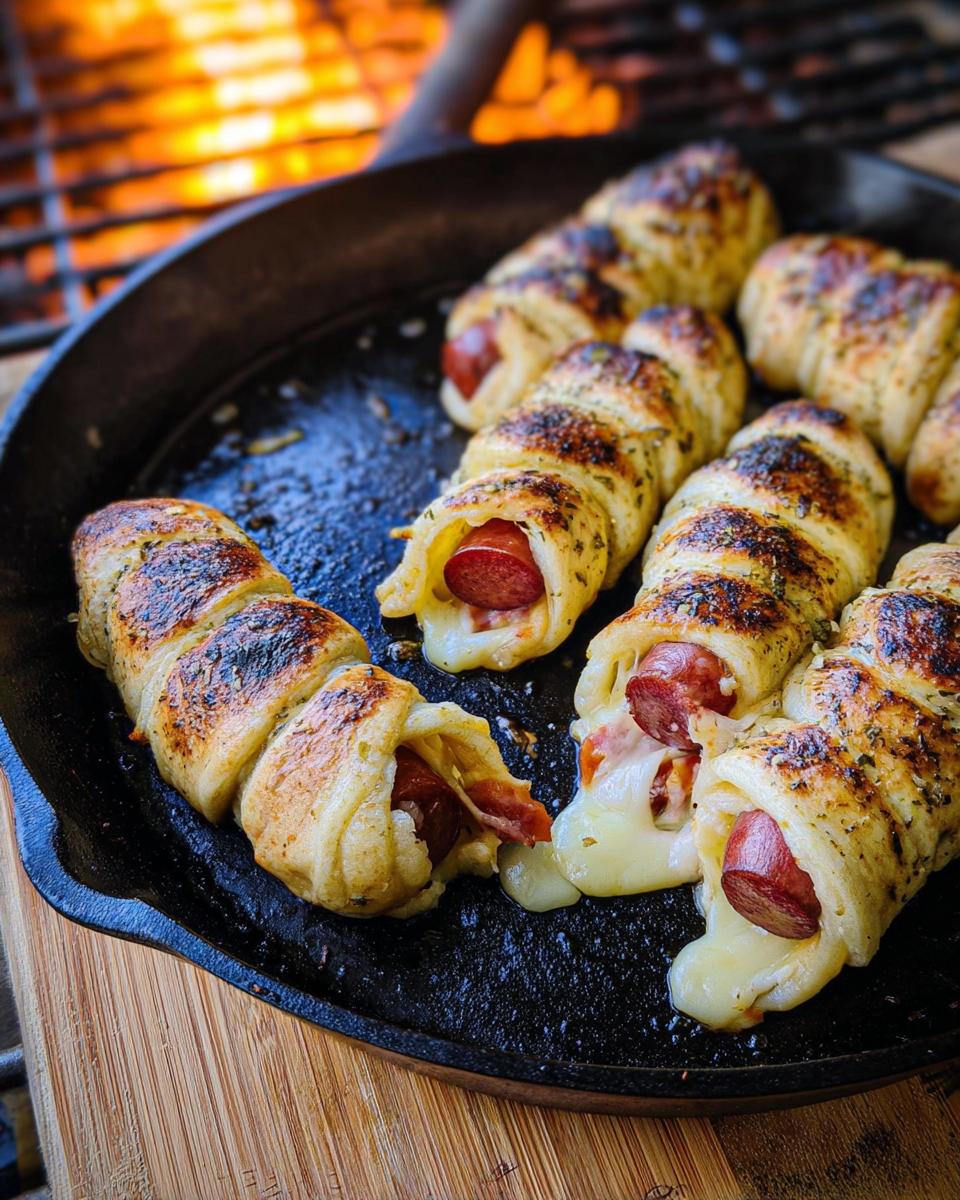
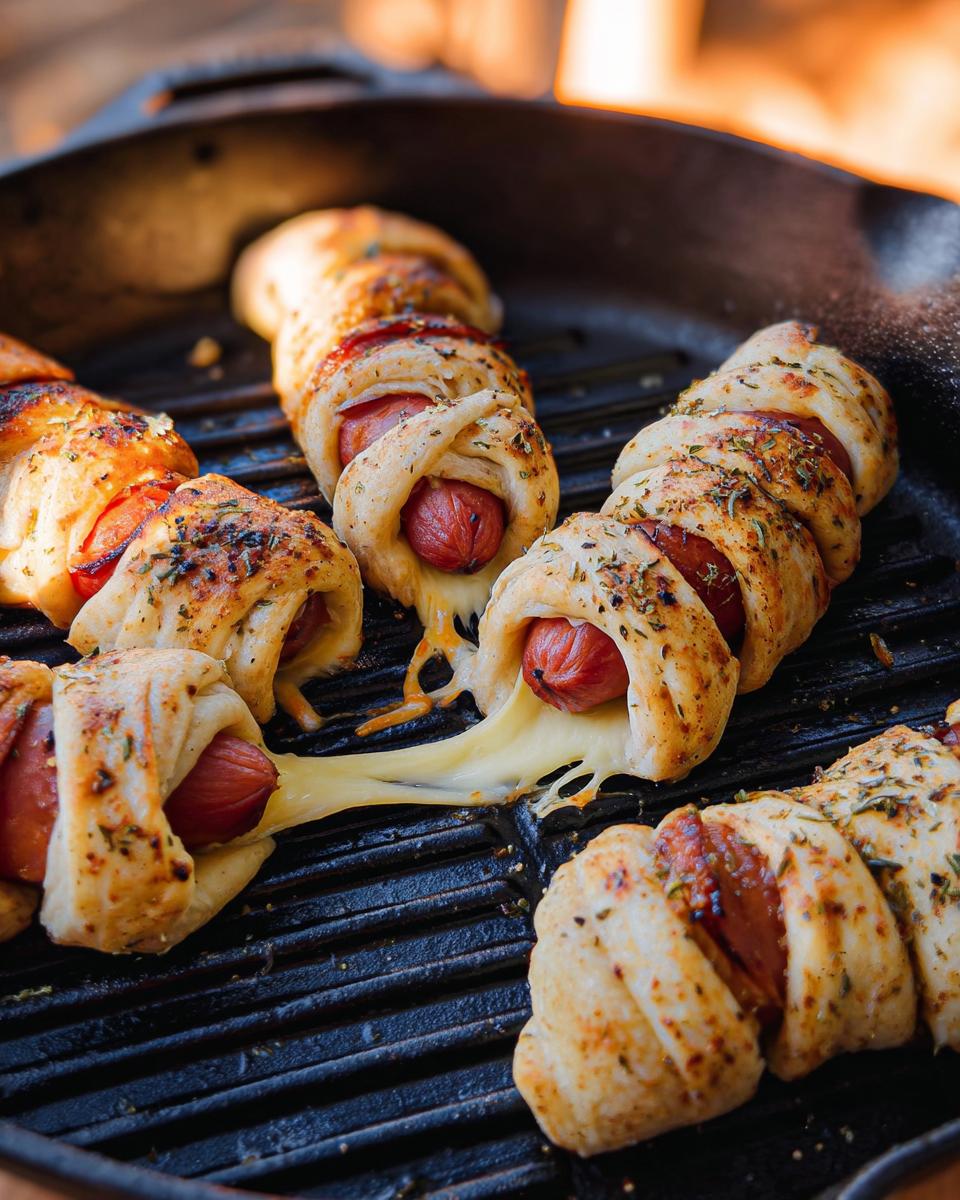
First things first, get your dough ready. If you’re using crescent rolls, just unroll them and pinch those seams together tightly – we don’t want any dough escaping! If you’re using puff pastry or another dough, just roll it out nice and thin, about a quarter-inch thick should do the trick. Then, grab your knife or pizza cutter and slice that dough into skinny strips. Think about a quarter-inch wide, perfect for wrapping! If you’re looking for more dough ideas, check out traditional crescent mummy dogs; it gives you a good sense of wrapping technique.
Grilling Your Cheesy Garlic Mummy Dogs (Mozzarella Wraps)
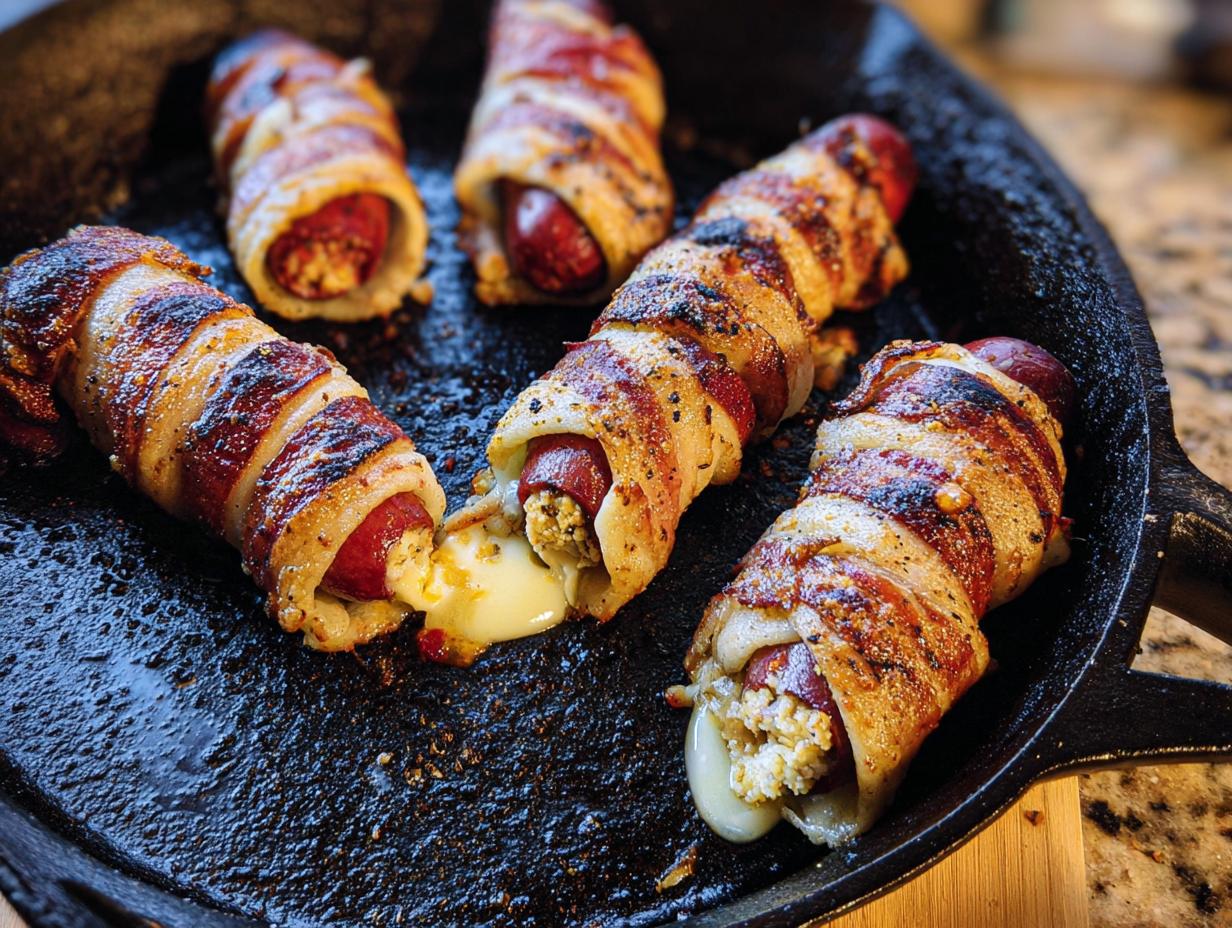
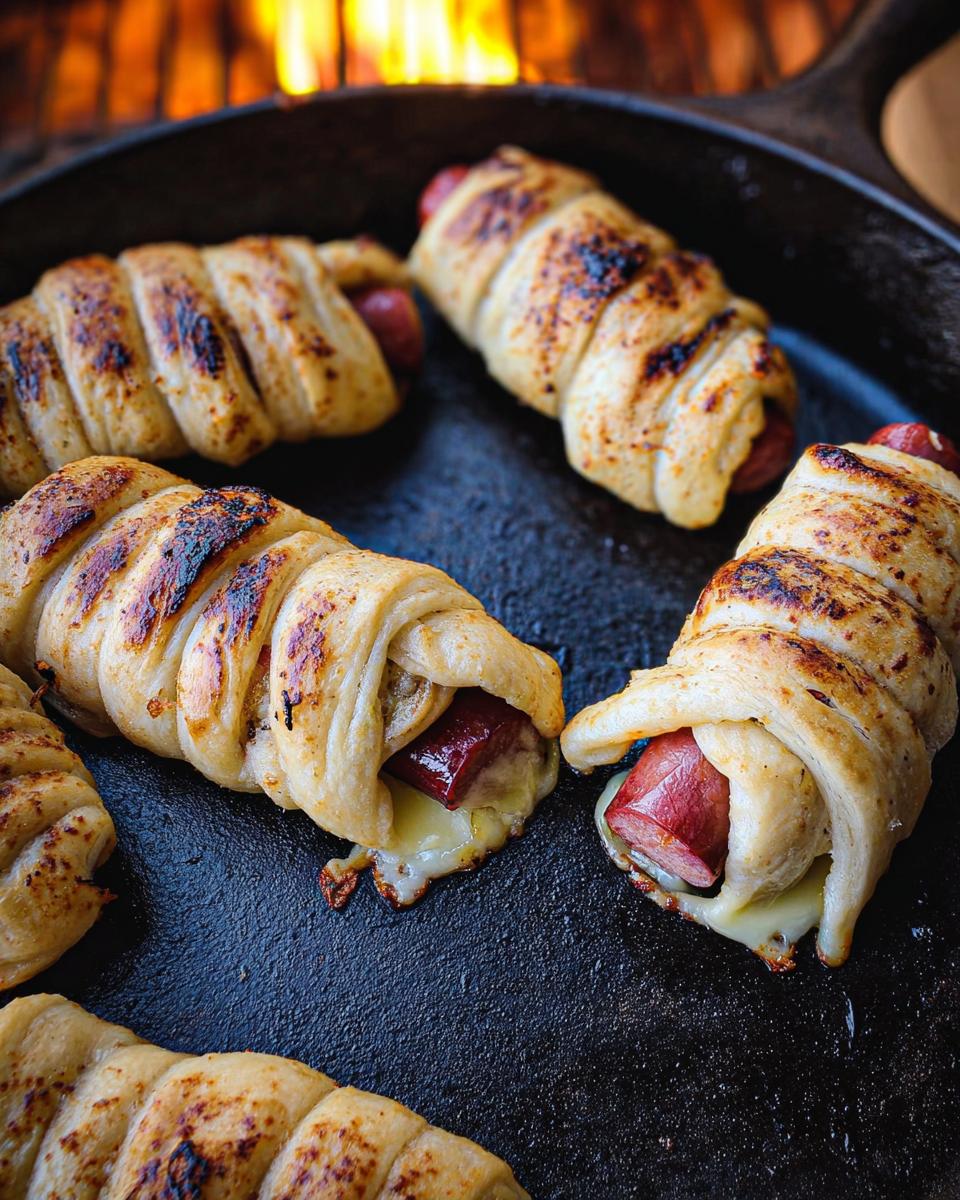
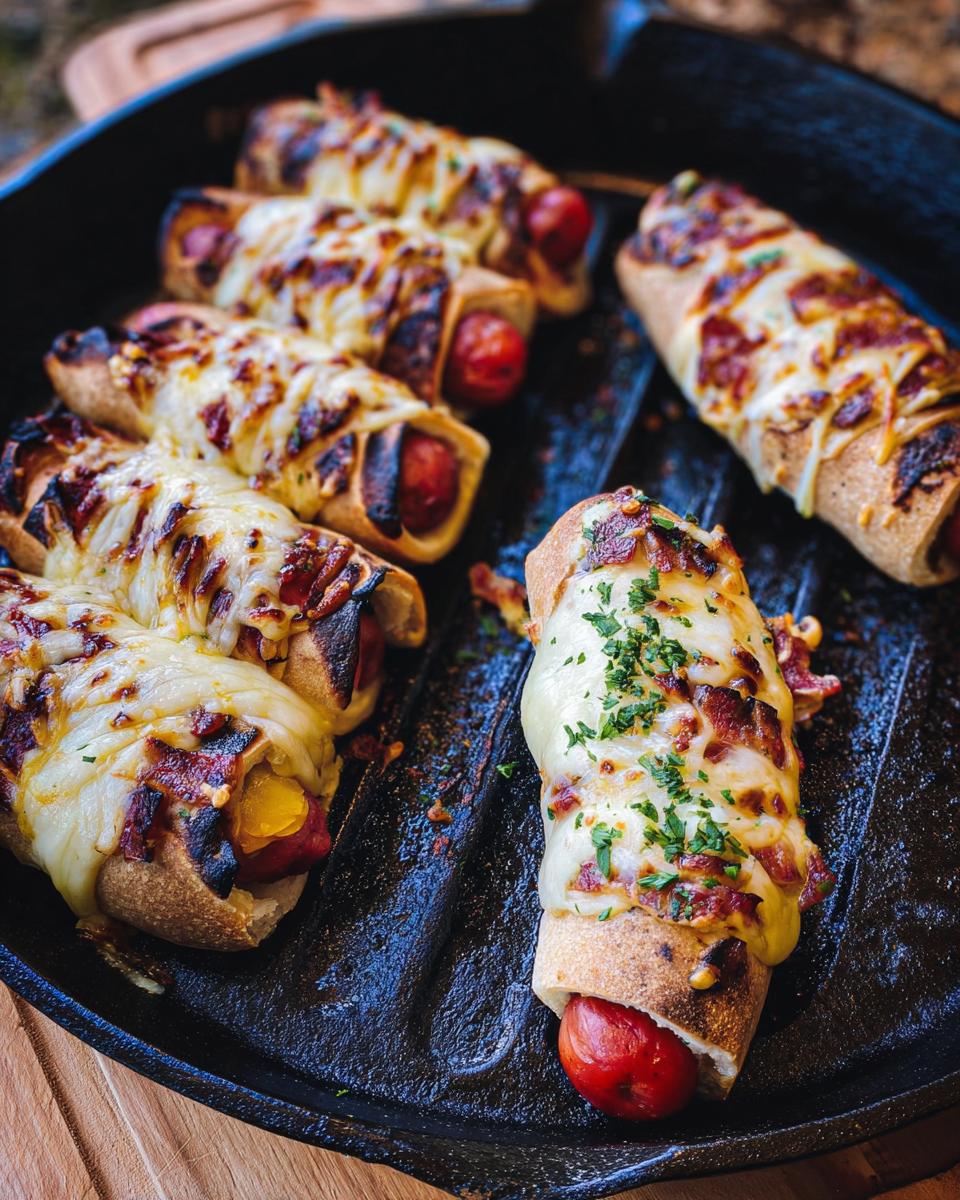
Now for the magic! Get your charcoal grill going for two-zone cooking – medium-high heat on one side, cooler on the other. While it’s heating up, wrap your cheese slice around each yummy beef frank. Don’t wrap it too thick, just enough for that gooey center. Then, start wrapping those thin dough strips around the cheese-covered dogs, crisscrossing them to make that classic mummy look. Just leave a little gap at the top for their face, so you know where to put the eyes later! I like to place them in a lightly greased cast iron skillet before they hit the grill. Sprinkle them with “The Usual” for that extra garlicky punch. Once your coals are glowing, carefully place the skillet over the hottest part of the grill. Close the lid and let them cook for about 15-20 minutes. Rotate the skillet every so often to make sure they get nice and golden brown all over. If the bottoms start to crisp up too fast, just slide the skillet over to the cooler side. You’re looking for that perfect golden color and for the dough to look cooked through.
Finishing and Garnishing Your Mummy Dogs
Once they’re looking perfectly spooky and cooked, carefully take the skillet off the grill. Let them cool down for just about 5 to 10 minutes – they’ll be super hot! Then, grab your yellow mustard and, using a toothpick, draw those adorable little mummy eyes on the tops. It’s the cutest finishing touch!
Tips for Perfect Cheesy Garlic Mummy Dogs (Mozzarella Wraps)
Alright, let’s make sure your Cheesy Garlic Mummy Dogs (Mozzarella Wraps) are absolutely perfect! It’s all about a few little tricks that make a big difference.
When it comes to dough, feel free to get creative! Puff pastry gives you an extra flaky, buttery bite, while a homemade enriched dough will be a bit softer and chewier—just make sure it’s rolled thin. For that cheesy goodness, Provolone is fantastic because it melts so well and has a mild flavor, but don’t be afraid to use a sharp cheddar for a bolder taste, or Muenster for a super gooey center.
Grilling can be tricky, so watch those mummy dogs closely. If they’re browning too fast on the bottom, move them to a cooler part of the grill. And for the best mummy wrap look, aim for even strips of dough and don’t wrap them too tightly, so they puff up nicely. You can even get inspired by other cheesy garlic flavors, like this cheesy garlic bread recipe for flavor ideas!
Ingredient Notes and Substitutions
Let’s talk ingredients real quick, because even simple things can make a big difference in how your hot dogs turn out!
For the dough, while crescent rolls are super convenient and give a nice, flaky crust, you can totally swap them out. If you need gluten-free, look for a certified gluten-free crescent dough or even use some gluten-free puff pastry. Just make sure you roll it out nice and thin so it cooks through evenly.
The cheese is key, too! Provolone is my go-to because it melts like a dream and has a mellow, yummy flavor that doesn’t overpower the hot dog. But honestly, a good sharp cheddar adds a nice tangy kick, and Muenster gives you that ultimate gooey stretch. Whichever you choose, make sure it’s sliced thin so it wraps easily around the hot dog.
Frequently Asked Questions about Cheesy Garlic Mummy Dogs (Mozzarella Wraps)
Got questions about making these fun and festive delights? Let’s get them answered so your Halloween goes off without a hitch! We’ve got tons of great gluten-free ideas over on our recipe page too!
Can I make these Cheesy Garlic Mummy Dogs (Mozzarella Wraps) ahead of time?
You sure can! For the best results, you can assemble them and then pop them in the fridge, wrapped tightly, for up to 8 hours before baking or grilling. Just add a few extra minutes to the cooking time if they’re going straight from the fridge to the heat.
What kind of cheese works best for the mummy wraps?
My favorite cheeses for these are Provolone, Sharp Cheddar, or Muenster because they melt beautifully and have a great flavor. They’re pliable enough to wrap without breaking, which is key when you’re creating those mummy bandages!
Are there alternative cooking methods besides grilling?
Absolutely! If grilling isn’t an option, you can totally bake these Cheesy Garlic Mummy Dogs. Just place them on a baking sheet lined with parchment paper and bake at 400°F (200°C) for about 15-20 minutes, or until golden brown. An air fryer works great too – just set it to 375°F (190°C) for 8-10 minutes, checking halfway through!
Estimated Nutritional Information
Keep in mind these are just estimates, because everyone’s delicious mummy dogs will turn out a little differently based on the dough, cheese, and hot dogs you pick! But generally, you can expect around 250-300 calories per mummy dog. This includes about 15-20g of fat, 10-15g of protein, and 15-20g of carbohydrates. So tasty and satisfying!
Share Your Cheesy Garlic Mummy Dog Creations!
Did you make these adorable Cheesy Garlic Mummy Dogs (Mozzarella Wraps)? I’d absolutely LOVE to see them! Please leave a comment below and let me know how they turned out, or even better, rate the recipe! If you snapped a pic, tag me on social media – I live for seeing your spooky creations come to life! You can also reach out through my contact page. Happy haunting and happy cooking!

Cheesy Garlic Mummy Dogs (Mozzarella Wraps)
Ingredients
Equipment
Method
- Prepare your dough: Unwrap crescent rolls and press seams to seal, or roll out other doughs to 1/4-inch thickness. Slice the dough into thin strips, about 1/4-inch wide.
- Assemble the mummy dogs: Wrap a slice of cheese around each hot dog. Then, wrap the dough strips around the cheese-covered hot dog, leaving a small space at the top for the mummy’s face. You can refrigerate these for up to 8 hours or bake immediately.
- Prepare your grill: Set up a charcoal grill for two-zone cooking with a medium-high fire. While the grill heats, place the assembled mummy dogs in a greased cast iron skillet and sprinkle the tops with The Usual.
- Cook the mummy dogs: Once the coals are glowing red, place the skillet with the mummy dogs over direct heat on the grill. Close the grill lid, vent for smoking, and cook for 15 to 20 minutes. Rotate the skillet as needed for even cooking until the bottoms are crispy and browned, and the tops are set. If the bottoms brown too quickly, move the skillet to indirect heat.
- Cool and garnish: Remove the skillet from the heat and let the mummy dogs cool for 5 to 10 minutes. Before serving, use a toothpick to draw eyes on the mummy dogs with yellow mustard.
Notes
Tried this recipe?
Let us know how it was!
Gluten-Free Nutritionist & Family Meal Planning Expert
Working as a pediatric dietitian at Children’s Hospital of Denver, I kept meeting families overwhelmed by managing their children’s celiac disease. Parents stressed, kids frustrated, everyone eating bland boxed “gluten-free” products.
That’s when I realized my calling: creating practical, balanced gluten-free solutions for real families with busy schedules. I’ve developed 375+ family-friendly recipes focusing on lunch boxes, after-school snacks, and make-ahead dinners that actually work.
My meal planning system was featured in Parents Magazine, and I presented research at the Rocky Mountain Pediatric Nutrition Conference. My evidence-based approach ensures recipes meet both taste and health standards—families need solutions that work in the real world, not just perfect test kitchens.