Who says you need to spend an entire Saturday baking to make something truly spectacular? I swear, sometimes the best desserts come from a box, but we just need a little magic dust to make them shout! That’s exactly what this Box Mix Glow-Up: Fancy Finishes technique is all about—getting impressive results with genuinely minimal effort.
I remember the first time I tried to jazz up a boxed gluten-free cake mix for my daughter’s birthday. As a pediatric dietitian, I often encountered families struggling with bland gluten-free options. So, I decided to experiment in the kitchen. With some extra vanilla extract, a handful of chocolate chips, and a dash of sprinkles on top, that boxed cake turned into a showstopper.
When my daughter took a bite and her eyes lit up, I realized that with just a few fancy finishes, our everyday meals could become special occasions. That moment solidified my passion for transforming simple ingredients into creations that delight kids and parents alike. Come see how we turn that humble box into something incredible!
Why You’ll Love This Box Mix Glow-Up: Fancy Finishes
Honestly, what’s not to love about making a standard dessert look like you slaved over it for days? This recipe is your secret weapon for weeknight wins or last-minute celebrations. It’s all about that Easy Elevation without the burnout!
- It’s shockingly fast! You get maximum impact with minimum hands-on time since we are starting with a pre-made base.
- Flavor transformation is real—that peanut butter soak makes the cake taste richer and taste anything but ‘box-made.’
- The chilling process isn’t extra work; it actually sets the layers so they cut perfectly clean every time.
- Presentation wins! You instantly upgrade your dessert game, making it look totally party-ready with zero advanced decorating skills required.
- It’s incredibly versatile. You can swap out the vanilla extract or change the toppings based on what your family loves most this week.
- It builds confidence! Seriously, watching faces light up when they realize this decadent treat started from a box is the best feeling.
Essential Ingredients for Your Box Mix Glow-Up: Fancy Finishes
Okay, this is where the magic really starts to happen! I want to be clear: I’m a huge fan of a high-quality box mix—it saves so much time. But the difference between a good cake and a show-stopping dessert? That comes down to what *we* add. Don’t worry about stocking up on weird items; most of what we need is simple stuff that really amps up the flavor profile. We are jazzing up the basics here!
If you are experimenting with gluten-free baking, this is a fantastic framework because the additions—especially that soak—make the crumb taste so rich you forget what you started with. Head over to my gluten-free baking section if you need GF brand suggestions!
For the Cake Base
We start simple, just like the box says, but we sneak in an extra layer of vanilla so your house smells amazing while it bakes. Grab one package of your favorite chocolate cake mix. To the dry mix, you’ll want to stir in one teaspoon of vanilla extract and just a tiny dash of salt. Trust me on the salt; it balances out all that sweetness that comes next!
The Peanut Butter Soak Mixture
This is non-negotiable for moisture and flavor. You need two cans—yes, two!—of sweetened condensed milk. Then, whisk in about two-thirds of a cup of creamy peanut butter until it’s smooth. This mixture gets poured right into the cake after baking, and it’s what transforms the plain sponge into something unbelievably decadent. It’s rich, it’s creamy, and it soaks deep!
Creating the Spreadable Frosting
For the top layer, we use the rest of that amazing peanut butter soak mixture. You’ll want about one teaspoon of vanilla extract going into that reserved portion. Then, here’s the key: you mix in confectioners’ sugar gradually. You keep adding it until you reach the perfect spreading consistency. It needs to be thick enough to hold its shape when you swipe it on, not runny or sloppy. Perfect for a smooth, beautiful top layer!
Optional Toppings for Final Fancy Finishes
These are purely for visual appeal and that extra textural crunch, which is vital for great dessert presentation ideas. If you want that “wow” factor right out of the gate, grab some chopped peanut butter-filled sandwich cookies or crush up a few peanut butter cups. These toppings seal the deal and scream, “I made this extra special!”—even though the heavy lifting was done by the mix!
Step-by-Step Instructions for Box Mix Glow-Up: Fancy Finishes
Okay, let’s get this show on the road! Turning that box mix into something truly impressive is all about timing with these soak and chilling steps. Don’t rush the cool-down period—that’s crucial for letting everything absorb properly. Once it’s baked, you just focus on getting that creamy peanut butter mixture in there exactly right. For more great baking tips, check out my general recipes section!
Baking the Base and Preparing the Syrup Soak
First things first, preheat your oven to 350°F (175°C). Mix up your cake according to the package, but remember to stir in that extra teaspoon of vanilla and the dash of salt we talked about! Pour it into your 13×9-inch pan and bake until done, just like the box says. This is the only time you stick strictly to the box instructions! Once it’s completely cooled down—and I mean *completely* cool, no warm spots remaining—it’s time for the main event.
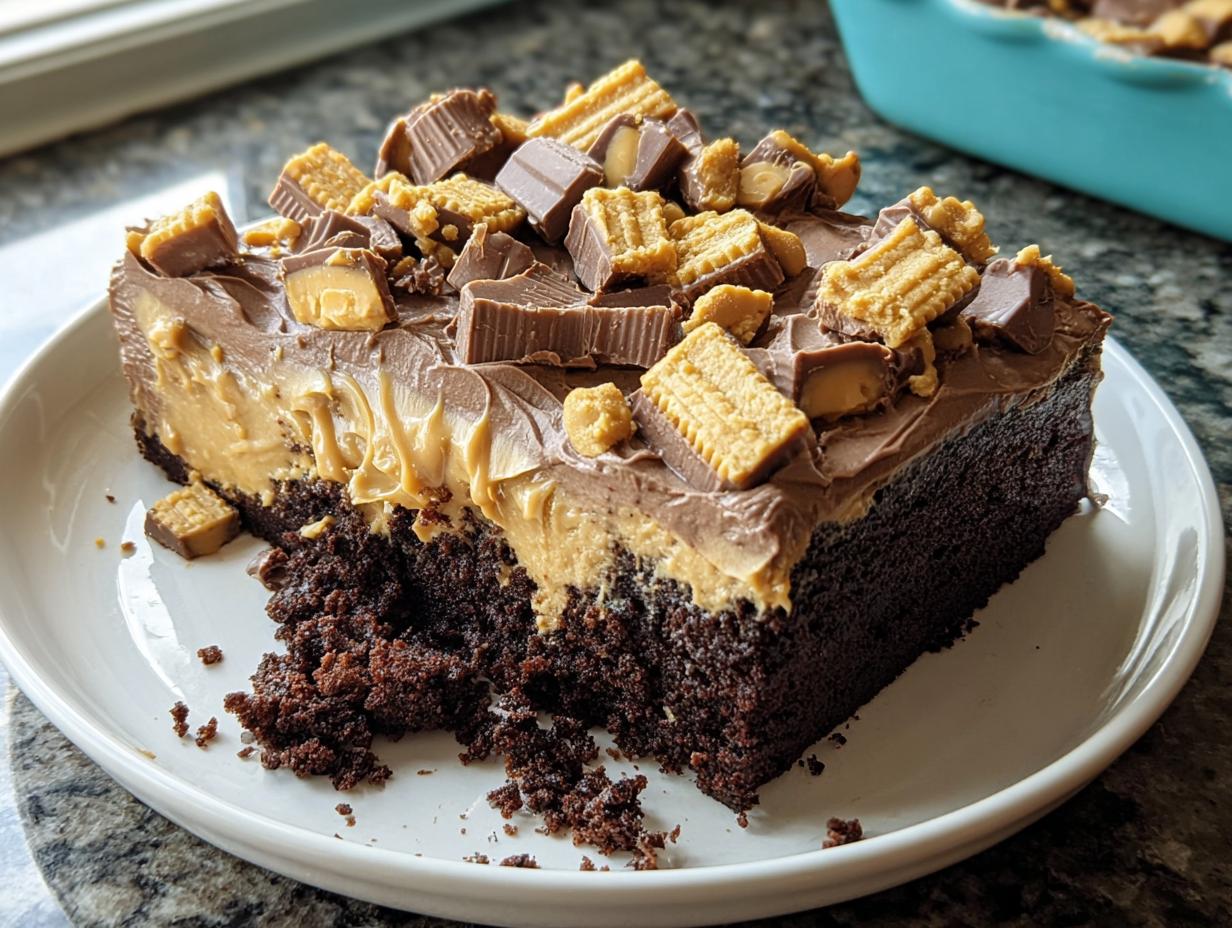
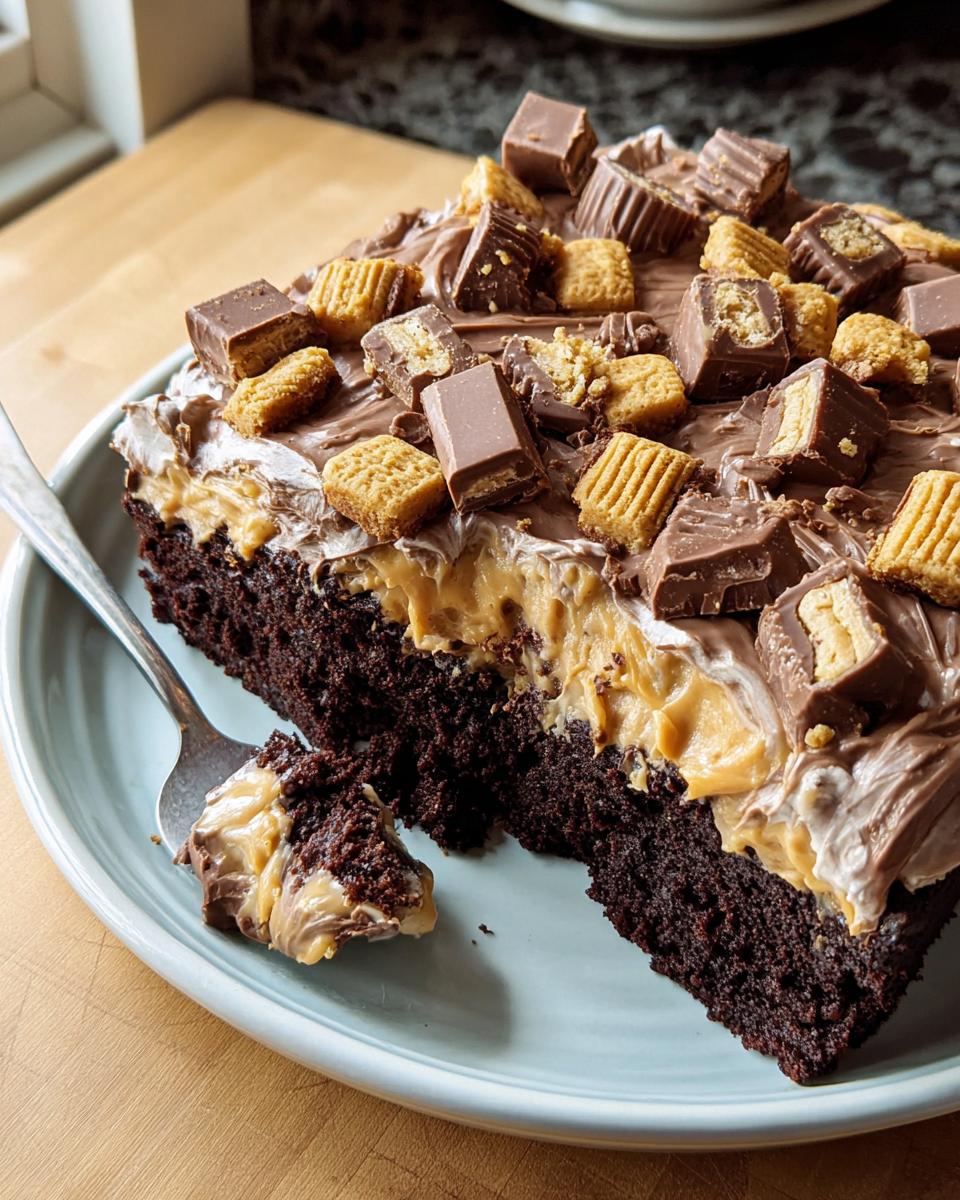
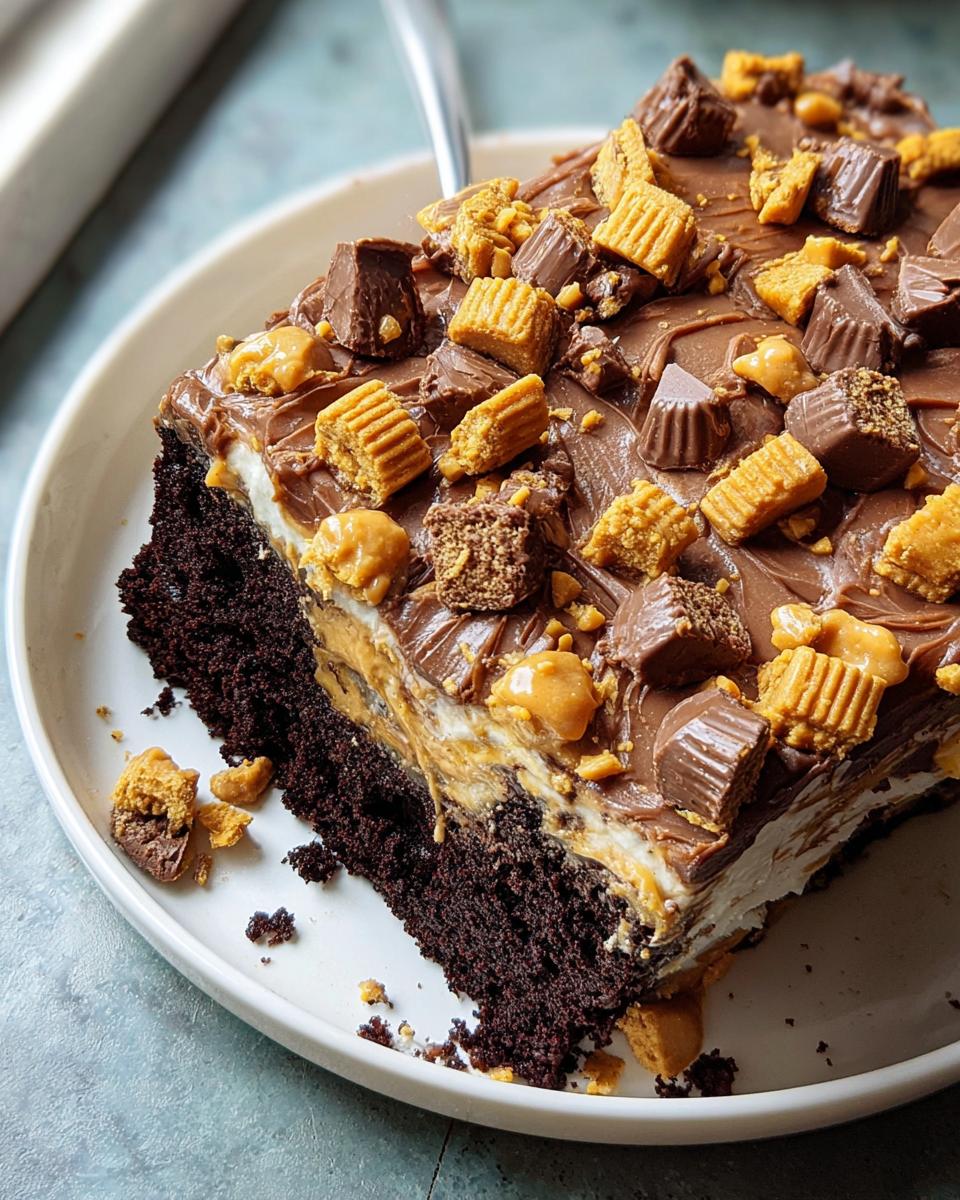
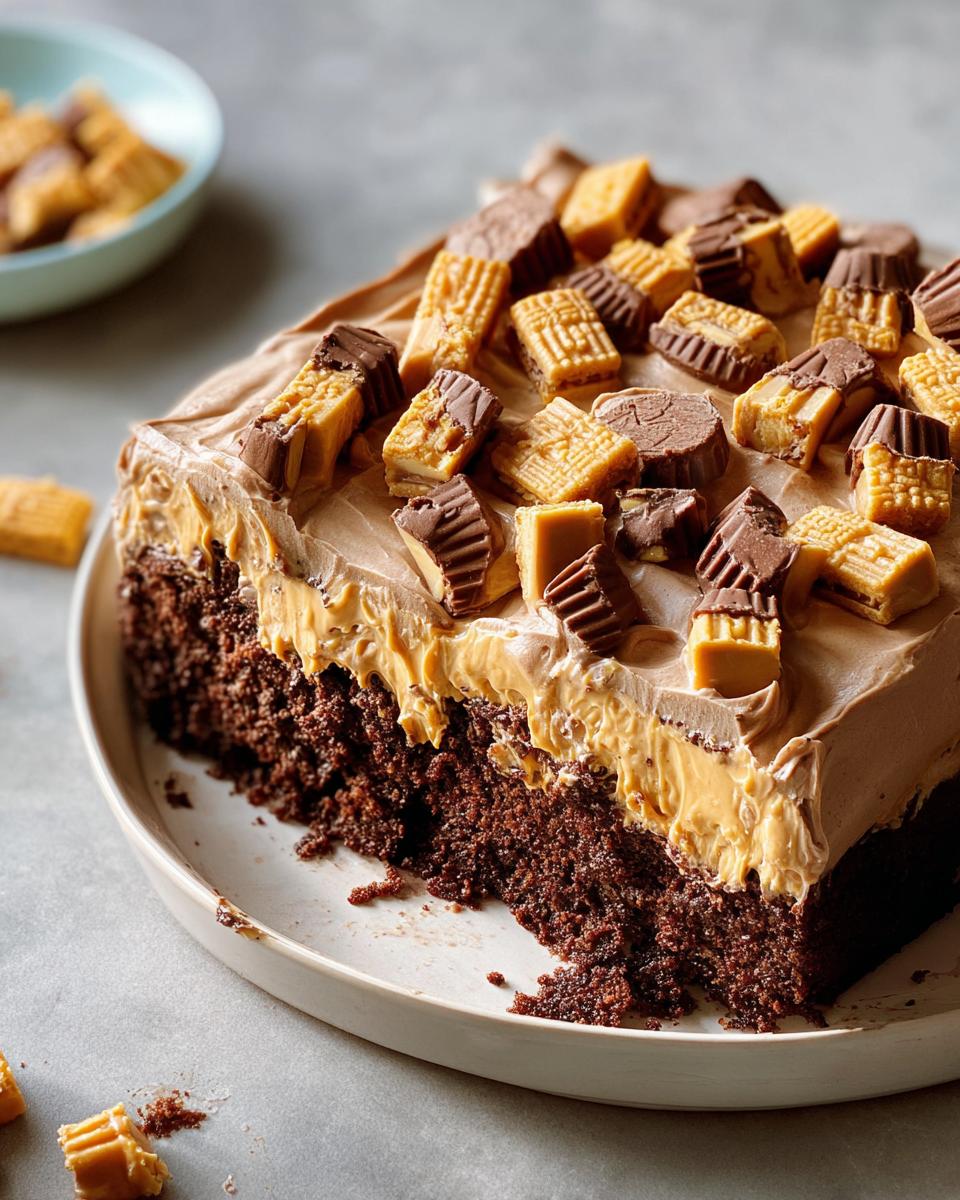
Grab a wooden spoon handle and poke holes all over the top of that cooled cake, making sure they go down deep. Seriously push into it! Then, slowly pour about 2 cups of that luscious peanut butter mixture right over the top. Watch it disappear into those holes; that’s our unofficial Syrup Soak happening right there! If you need even more ideas on quick cake hacks, take a peek at these classic cake mix recipes!
Chilling and Frosting Preparation
Now for the toughest part: waiting! You need to cover that cake and the rest of the peanut butter mixture and get it into the fridge for a solid 2 to 3 hours. That chilling time is what sets the structure and lets the flavors really meld together—it’s essential for this Box Mix Upgrade. While that’s happening, you can make your top frosting. Mix the remaining vanilla extract into your reserved peanut butter soak, and then start beating in the confectioners’ sugar, a little bit at a time, until you get that perfect, thick, spreadable consistency.
Applying the Final Fancy Finishes
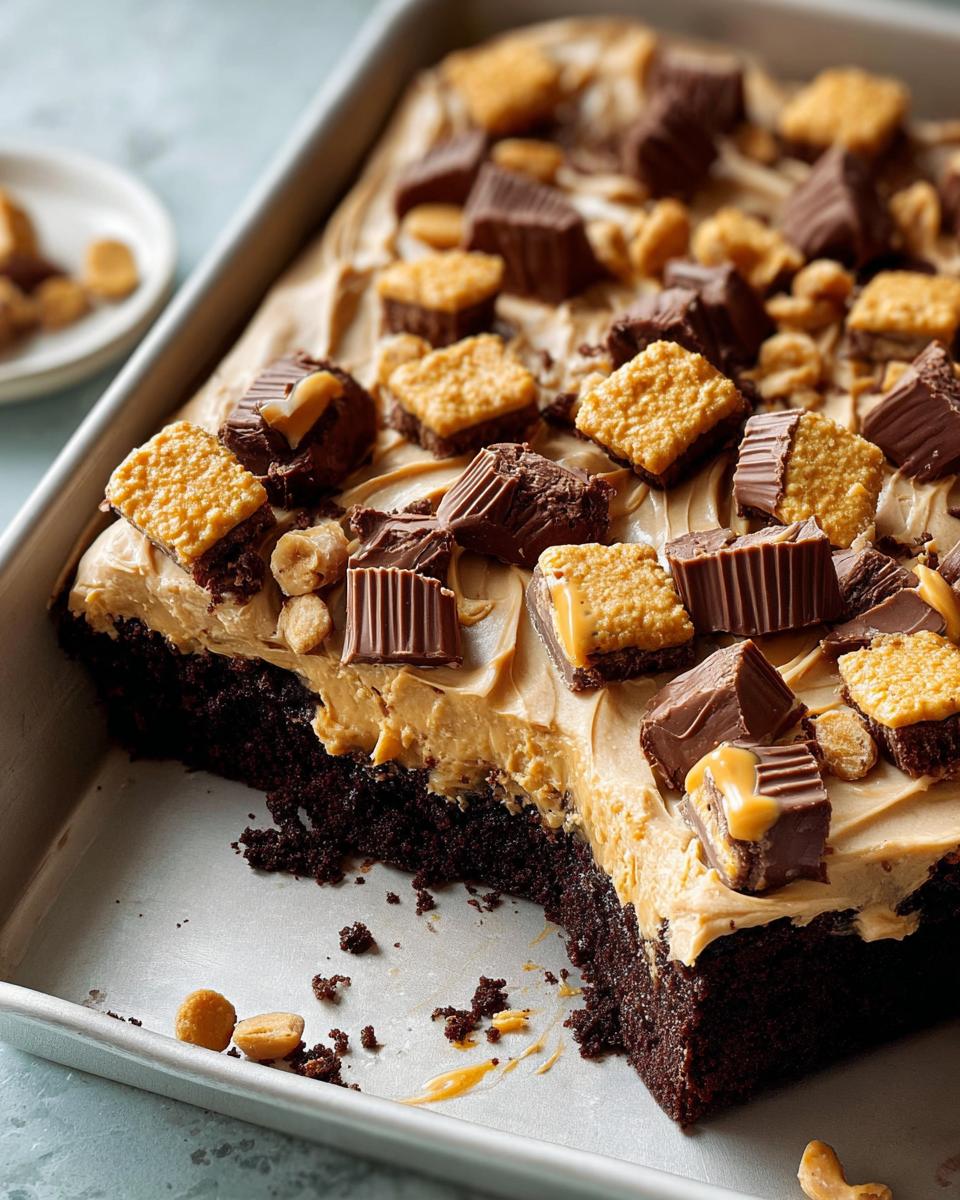
Pull that chilled, soaked cake out, and give it a thin, even layer of your homemade frosting. Make it look smooth and professional! This is where you turn it into a Party-Ready Cake. Go wild with those optional toppings we discussed—sprinkle those crushed cookies or arrange those peanut butter cups on top. A little decoration goes a really long way in making this dessert look like a masterpiece!
Expert Tips for Box Mix Glow-Up: Fancy Finishes Success
Even with a simple recipe like this, a few solid Baking Tips And Tricks can push it into the stratosphere. My number one piece of advice? Don’t skip the chilling time! That 3-hour chill isn’t just for structure; it lets that peanut butter soak work its magic deep into the cake layers, concentrating that deep chocolate and peanut butter flavor. For more baking wisdom, you can always check out what I’m up to over in my muffins and cupcakes section!
When I make this for my gluten-free family, I always swap out the powdered sugar for a powdered alternative, like a finely ground almond flour/sugar mix, just to keep the carb count a bit lower for my daughter. It spreads a little differently, so I use a hotter spatula to smooth it out. Don’t be afraid to taste-test your frosting right before you spread it—if it seems too dense, a tiny splash of milk or water can get it back to that perfect texture in a snap!
Also, if you’re using a dark cake pan, you might find your edges bake faster. Keep an eye on those corners toward the end of the baking time!
Creative Cake Decorating and Dessert Presentation Ideas for Box Mix Glow-Up: Fancy Finishes
Okay, so the cake is soaked, chilled, and frosted. Now, let’s talk about making it look like it belongs on a magazine cover! This is where the “Fancy Finishes” really shine, and you don’t need to be a pastry chef to nail these Dessert Presentation Ideas. It’s all about texture and height!
I always think of presentation in three layers: the sides, the top center, and the border. You can totally customize this design based on what candies or treats you have on hand. If you need some major inspiration for making simple things look amazing, definitely check out my collection of festive candy inspiration online!
Creating Texture on the Sides
Since this cake is so rich and fudgy, the sides can sometimes look a little plain after you frost them. Here’s a super simple fix: Take your chopped peanut butter sandwich cookies or even some toasted, chopped peanuts and gently press them onto the sides of the cake. Use a tall glass or a metal bench scraper, hold it lightly against the side, and gently roll the cake (or just press the crumbs against the side) until you get an even coating.
It adds such a satisfying crunch when you serve it, and it makes the whole thing look professionally done! Keep the frosting lighter on the sides so the crumbs stick easily.
The Drip Effect for Extra Decadence
If you want next-level visual appeal, you have to try a simple drip. This isn’t hard, I promise! For a chocolate cake like this, you can microwave a few chocolate chips with a teaspoon of coconut oil until it’s perfectly smooth and pourable. Let it cool down for just a minute or two until it’s slightly thicker than water.
Use a small spoon or even a plastic squeeze bottle to drizzle the mixture right around the top edge of the cake. Let gravity do the work! If you let the drips fall naturally, some will run down the sides beautifully, and others will pool attractively on top. It instantly elevates the whole look.
Centerpiece Topping Arrangement
Instead of just sprinkling your topping evenly across the top, try arranging it strategically. For instance, if you’re using those whole peanut butter cups, try grouping them in clusters of three rather than spacing them out one by one. Or, if you used cookie crumbs on the sides, create a clean, defined border of smooth frosting in the center, and then pile a small mound of colorful sprinkles or crushed nuts right in the middle.
Little touches like creating a contrast between smooth frosting and crunchy texture make your Creative Cake Decorating look planned out. Remember, presentation is just as important as flavor when you’re aiming for a party-ready dessert!
Ingredient Notes and Substitutions for Box Mix Glow-Up: Fancy Finishes
I always get questions about tweaking recipes, especially when dealing with allergies or just wanting to use what’s already in the pantry! This recipe is designed around peanut butter and condensed milk because when they combine, they create that incredible, set-up texture after chilling. But hey, we are all about being resourceful here, so let’s talk about swaps!
If you have a peanut allergy in the house, don’t panic—we can totally manage this. The goal is to use a rich, creamy butter substitute that also pairs well with chocolate cake. We want that density that the peanut butter provides in the soak.
Swapping Out Peanut Butter
For a direct substitution in that rich soak and frosting layer, try using creamy almond butter or sunflower seed butter. They give you a similar fat profile similar to peanut butter, which helps that mixture set up nicely when chilled. Just grab the creamy version so you don’t end up with crunchy chunks unless that’s what you want!
Now, if you want a complete flavor change that moves away from the nutty profile entirely, you can skip both the peanut butter and the confectioners’ sugar in the frosting. Instead, I highly recommend making a simple, thick chocolate ganache to pour and spread. Mix equal parts of good quality semi-sweet chocolate chips and heavy cream. Heat the cream until it’s just simmering, pour it over the chocolate, let it sit for five minutes, and then whisk until smooth. That makes a fantastic, elegant replacement for the peanut butter soak!
What About Adjusting the Sweetened Condensed Milk?
This one is tough, guys. Sweetened condensed milk (SCM) is crucial here because it’s already deeply concentrated and sweet, which helps the filling set. If you absolutely cannot use SCM, you’ll have to redesign the filling structure for this Box Mix Glow-Up: Fancy Finishes. You might look into making a very thick buttercream frosting using butter, powdered sugar, and some regular milk or cream cheese, but honestly, you’ll lose the unique ‘fudgy soak’ texture this recipe is known for.
I always suggest making the cake as written first if you are new to this, because that soak is what makes it truly special. If you must substitute, using a canned evaporated milk mixed with extra sugar might work in a pinch for the soak, but you’ll need way more chilling time to get it firm enough to frost!
Cake Mix Flavor Variations
Another fun swap! Since we are using vanilla in the batter and the filling is peanut butter based, this works beautifully with almost any rich cake mix. If you use a yellow cake mix, the final result is a lighter, almost peanut butter cup-inspired flavor bomb, which is lovely for spring and summer parties. If you use a spice cake mix, wow—that just doubles down on the rich warmth!
And hey, if you are making this gluten-free like I often have to, stick to reputable brands. I find brands like King Arthur or Bob’s Red Mill usually behave the most predictably when you start adding things like my extra vanilla or these rich soaks. Stick to the instructions for the mix, and then add our little touches!
Storage & Reheating Instructions for Your Party-Ready Cake
One of the best things about preparing this decadent treat ahead of time is that it holds up beautifully! Because we have that wonderful, heavy peanut butter soak and frosting made with sweetened condensed milk, this cake actually benefits from being stored correctly. This recipe truly is perfect for making ahead, ensuring you have a stunning, Party-Ready Cake sitting in the fridge just waiting for dessert time.
Since we introduced ingredients that aren’t standard in shelf-stable frosting, refrigeration is definitely the way to go. I always think keeping things cool maintains that perfect, fudgy texture beneath the frosting, too.
Keeping It Fresh in the Fridge
You absolutely must keep this cake covered once it’s fully frosted. Use airtight plastic wrap or a good cake carrier to prevent the frosting from drying out or picking up any funky fridge smells. In the refrigerator, this cake stays fantastic for about 4 to 5 days. You might notice the soak starts to penetrate even deeper the longer it sits—like a good fudge brownie!
Serving Temperature: Chilled vs. Room Temperature
This is a bit of a personal preference, but I have a strong leaning here! Because the filling sets up quite firmly in the fridge, if you slice it straight out of the cold, it can be a little stiff. For the absolute best texture and flavor release—especially with that rich chocolate base—pull the cake out of the refrigerator about 30 minutes before you plan to serve it.
Giving it that half-hour rest lets the frosting soften just slightly so it spreads smoothly on the fork, and it really brings out the flavor of the peanut butter mixture. It won’t get soft or messy, it just becomes gloriously tender, making every slice perfect.
Making Ahead for Big Events
Need to bake it days in advance of a party? Go for it! You can bake the cake base up to two days ahead and keep it tightly wrapped on the counter as long as it’s completely cool. But honestly, I prefer to do the entire process—soak, chill, and frost—the day before the event. That way, on party day, all you have to do is pull it out 30 minutes before serving. Easy entertaining at its finest!
For more tips on prepping desserts ahead of time without sacrificing quality, take a look at some of my favorite homemade dessert recipes and inspiration!
Frequently Asked Questions About Box Mix Glow-Up: Fancy Finishes
I know you might have a few sneaky questions popping up while you’re planning your baking session. That’s totally normal when you’re trying to achieve that stunning Easy Elevation effect! Here are the things I get asked most often about transforming that simple box cake.
Can I boost the flavor by using a different box cake mix?
Absolutely! While this recipe is written around a chocolate base, feel free to try a yellow or even a devil’s food mix. The peanut butter soak is so rich that it pairs wonderfully with almost any chocolate variation. If you use a yellow cake, you get a flavour profile that tastes exactly like a giant peanut butter cup—it’s fantastic! Just remember that the color of the final cake or frosting might shift slightly.
Doesn’t pouring that mixture into the cake make it soggy?
That’s the million-dollar question, and no, trust me! This is the beauty of the Box Mix Upgrade technique. Because we use sweetened condensed milk, the mixture is super thick and sticky, not thin like simple syrup. When you poke those deep holes and pour it in, it settles in, moistening the crumb but never turning it mushy. The 3-hour chill time is essential here because it lets that thick mixture firm up inside the cake!
How important is the 3-hour chilling time mentioned in the instructions?
If you want clean slices and a frosting layer that doesn’t slide right off, the chilling time is very important! That chilling period doesn’t just cool the cake down; it actually allows the peanut butter filling to stabilize and bond with the cake structure. If you skip it, the cake will be messy to frost, and the filling might ooze out when you try to cut a square. Don’t risk it—let it chill until it’s firm!
I don’t have peanut butter cups. What’s another easy topping idea?
You don’t need the fancy stuff to make it look great! If you skip the peanut butter cups, you can still achieve amazing presentation. Try a simple drizzle of melted caramel sauce or even a homemade chocolate ganache for that glossy look. For texture, finely chopped salted peanuts or maybe even some crushed waffle cones work wonderfully and add a great crunch. The key is texture contrast!
If you have any other tips or tricks you’ve tried with this recipe, please reach out! I love hearing how you personalize these simple desserts. You can send me a note anytime over on my contact page!
Nutritional Estimates for This Box Mix Glow-Up: Fancy Finishes
Now, I know that when we’re talking about transforming a cake mix with peanut butter and condensed milk, we aren’t exactly aiming for a health food! But I always like to give you an idea of what you’re working with when you make this delicious treat. Remember, these figures are just estimates!
Because we start with a standard box cake mix—and the heavy hitters here are the sweetened condensed milk and whatever toppings you choose—the final numbers can swing quite a bit based on your specific brand choices. If you are using a gluten-free mix or swapping peanut butter for almond butter, things shift, so take these numbers as a helpful guide rather than a strict declaration!
Based on 12 generous servings of the base recipe (without added heavy toppings like extra cups), here is what we are generally looking at per piece:
- Calories: 360
- Fat: 16 grams
- Saturated Fat: 4 grams
- Cholesterol: 41 mg
- Sodium: 312 mg
- Carbohydrates: 49 grams (That’s because of all that delicious sugar!)
- Sugar: 40 grams
- Fiber: 1 gram
- Protein: 7 grams
See? It’s definitely a richer dessert, but worth every single bite when you’re celebrating something special or just need a Friday night win! A little bit of this decadence goes a long way, especially when it looks as fabulous as it tastes.
Share Your Box Mix Glow-Up: Fancy Finishes Creations
I truly hope this method gives you the confidence to look at that humble box mix sitting in your pantry and see the potential for greatness! I’ve shared all my secrets for getting that perfect soak and that beautiful, easy frosting, but now I want to see what you come up with!
Baking should always be fun and adaptable, especially when we are focusing on Fancy Finishes. Did you try adding lemon zest to the frosting? Maybe you swapped the peanut butter for cookie butter? Did you use edible glitter for an extra sparkle? I want to hear about every single one of your glorious modifications!
Rate This Box Mix Glow-Up!
If you made this recipe and it brought a little extra joy to your table, please take a second to leave a rating down in the comments section. Your feedback helps other busy families know that this transformation is absolutely worth the quick effort. A simple five-star rating really makes a difference in sharing these tips!
Show Off Your Fancy Finishes!
Seriously, pictures tell the best story! Tag me on social media when you share photos of your finished cake. Use the hashtag so I can find it easily. Seeing how you apply these techniques—whether you keep it simple or go totally over-the-top with decorations—is the best part of my day. I’m always looking for new inspiration for my next batch, too!
You can find me and all my latest family meal adventures over on my site’s trend section here: Pinterest Trends and Inspirations. Come join the community!
What’s Your Go-To Elevation Trick?
Beyond the recipe I shared, what’s *your* secret ingredient when you need to quickly elevate a store-bought dessert? Do you always add espresso powder? Do you bake it in fun shapes? Drop your best tips in the comments below! We are all in this together, making quick meals feel memorable.
I can’t wait to see your beautiful, upgraded desserts!

Box Mix Glow-Up: Fancy Finishes
Ingredients
Equipment
Method
- Preheat your oven to 350°F (175°C). Prepare the cake mix according to the package directions. Add 1 teaspoon of vanilla extract and a dash of salt to the batter before mixing. Pour the batter into a greased 13×9-inch baking pan. Bake and cool the cake completely as directed on the package.
- In a mixing bowl, whisk together the peanut butter and sweetened condensed milk until well blended. Using the handle of a wooden spoon, poke holes in the cooled cake about 2 inches apart. Slowly pour 2 cups of the peanut butter mixture over the cake, ensuring each hole is filled.
- Cover the cake and the remaining peanut butter mixture, and refrigerate for 2-3 hours, or until the cake is cold.
- In a separate bowl, combine the remaining 1 teaspoon of vanilla extract with the reserved peanut butter mixture. Gradually beat in enough confectioners’ sugar until the frosting reaches a spreadable consistency. Spread this frosting evenly over the chilled cake.
- Decorate the cake with your desired toppings, such as chopped peanut butter-filled sandwich cookies or peanut butter cups. Refrigerate any leftovers.
Nutrition
Notes
Tried this recipe?
Let us know how it was!
Gluten-Free Nutritionist & Family Meal Planning Expert
Working as a pediatric dietitian at Children’s Hospital of Denver, I kept meeting families overwhelmed by managing their children’s celiac disease. Parents stressed, kids frustrated, everyone eating bland boxed “gluten-free” products.
That’s when I realized my calling: creating practical, balanced gluten-free solutions for real families with busy schedules. I’ve developed 375+ family-friendly recipes focusing on lunch boxes, after-school snacks, and make-ahead dinners that actually work.
My meal planning system was featured in Parents Magazine, and I presented research at the Rocky Mountain Pediatric Nutrition Conference. My evidence-based approach ensures recipes meet both taste and health standards—families need solutions that work in the real world, not just perfect test kitchens.