Oh friends, when I think about true indulgence, my mind immediately goes to that deep, dark, melt-in-your-mouth experience only a perfect chocolate cake can give you. Forget dry, crumbly imitations! I worked tirelessly to crack the code on making a truly show-stopping, ridiculously rich Dark Chocolate Truffle Cake that everyone—and I mean *everyone*—can enjoy.
I first encountered the magic of a Dark Chocolate Truffle Cake during a family celebration. My son was still discovering the joys of dessert, but his celiac diagnosis posed a huge challenge for traditional treats. I decided to reinvent a classic truffle cake, and as the rich aroma filled my kitchen, I was reminded of my avó’s kitchen filled with love and laughter. That rich, moist flavor? It transports me right back there!
That day, when we finally tasted the cake together—it melted in our mouths just like a perfect truffle should—I reaffirmed my belief that gluten-free desserts can truly celebrate the essence of tradition while making everyone feel included at the table. This recipe is pure celebration, packed into layers! You can read a little more about my philosophy on baking over at my about page, because making everyone feel welcome at dessert is my whole mission.
Why This Dark Chocolate Truffle Cake is a Showstopper (Experience & Trust)
Listen, when you present this cake, people gasp. It’s that good. This isn’t just a cake; it’s a centerpiece, a real Showstopper! What makes it so special, especially since it’s gluten-free, is the focus on deep, undeniable flavor. We achieve that incredibly Rich Chocolate experience because we don’t cheat on the cocoa powder.
Seriously, promise me you’ll grab the best unsweetened cocoa you can find—the stuff that looks darker than midnight! That quality difference makes the whole structure richer and keeps the crumb unbelievably moist, even without wheat flour. Finding great gluten-free recipes that deliver this level of indulgence is tough, but I promise you, this one works, every single time. You can check out some of my other favorite gluten-free baking secrets right here if you’re curious!
Essential Ingredients for Your Dark Chocolate Truffle Cake
Alright, let’s talk about what makes this cake sing! Creating this masterpiece means we need quality components, but don’t panic; I’ve listed everything clearly. This recipe is exactly what you need to serve up about 12 generous slices, perfect for any big Special Occasion you can dream up. The true depth of flavor comes from treating the cocoa and coffee just right—it really wakes up that chocolate!
For the Moist Chocolate Cake Layers
For the layers, we are bringing together standard ingredients, but the ratio is what matters. Remember how I mentioned the cocoa has to be natural, not Dutch processed? That’s key for texture!
- 1 cup granulated sugar (200 grams)
- 1 cup brown sugar (213 grams)
- 1.75 cups unbleached all-purpose flour (210 grams)
- 1 cup unsweetened natural cocoa powder (84 grams, do NOT use Dutch process!)
- 1.5 teaspoons salt (9 grams)
- 1.5 teaspoons baking powder (6 grams)
- 1.5 teaspoons baking soda (4.5 grams)
- 2 large eggs
- 1 large egg yolk
- 0.5 cup vegetable oil (100 grams)
- 1 cup unsweetened, plain, full-fat Greek yogurt (230 grams)
- 2 teaspoons pure vanilla extract (9.3 grams)
- 1 cup hot strong-brewed coffee (227 grams) – This wakes up the cocoa!
For Frosting and Decoration of the Dark Chocolate Truffle Cake
These parts truly turn it into a truffle cake experience. The buttercream is rich, and the ganache seals the deal. For the truffles, check out the notes section later—you can use store-bought if you’re short on time!
- 4 cups Milk Chocolate Buttercream
- 1 cup Dark Chocolate Ganache
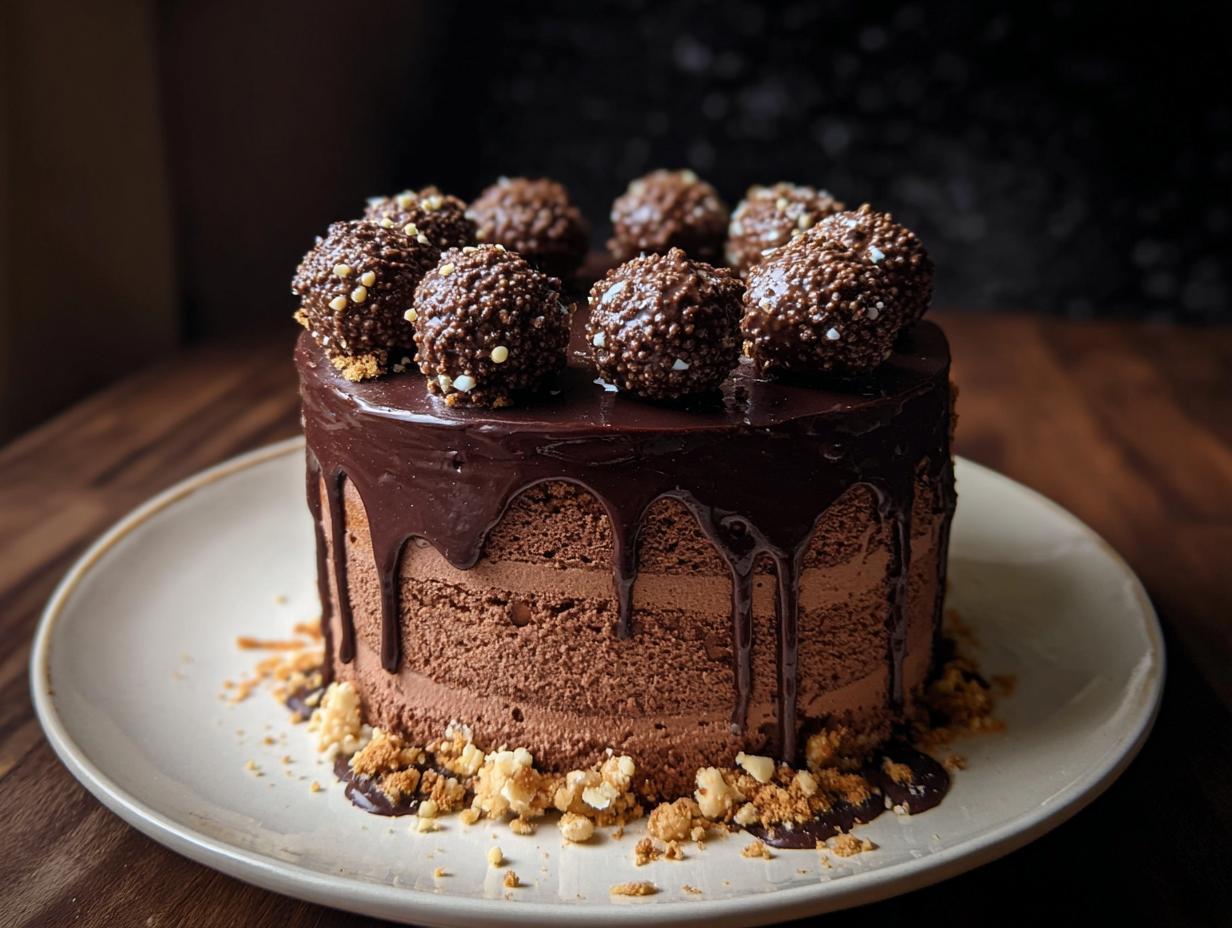
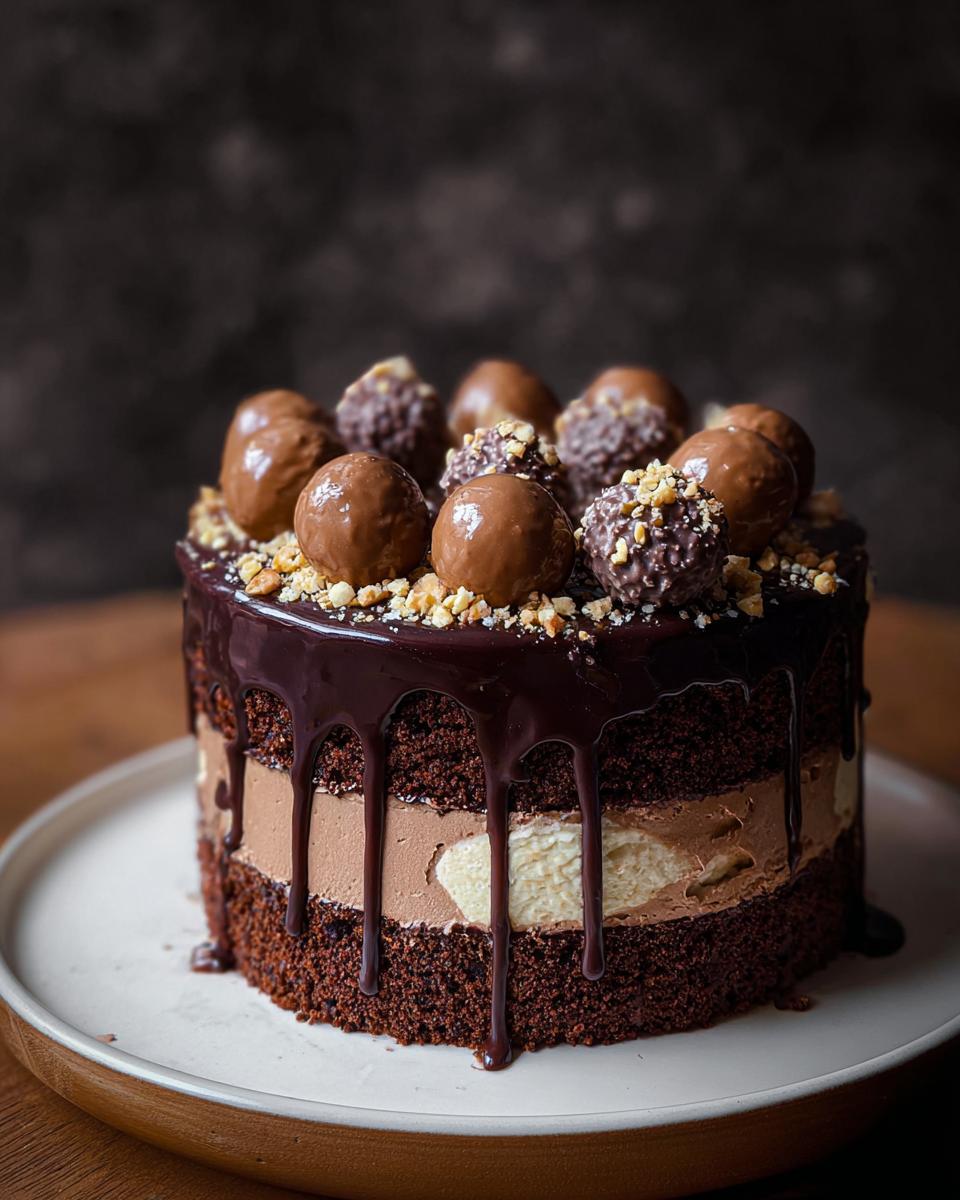
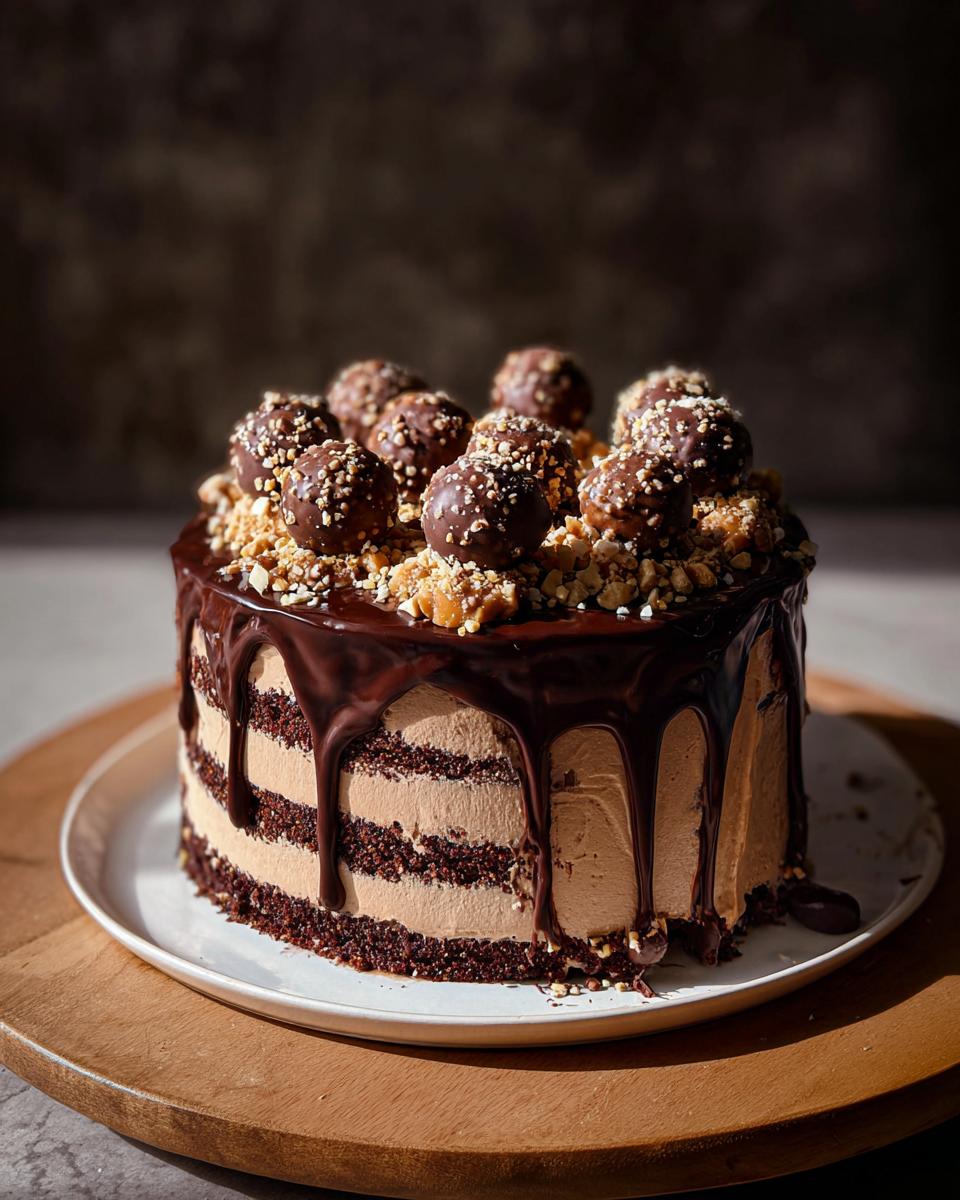
- 1 cup chocolate truffles (for decoration)
- 0.5 cup ground nuts (for decoration)
Step-by-Step Instructions for the Perfect Dark Chocolate Truffle Cake
Okay, this is where the magic happens! Getting a Rich Chocolate cake this decadent while keeping it gluten-free takes a little focus, but I promise, the steps are straightforward. The key here is temperature control, especially with that hot coffee going in at the end. You want those two 8-inch pans perfectly prepped so nothing sticks—that is non-negotiable for a smooth final product! That’s why finding foolproof techniques is so important, and you can grab more helpful tips from my recipes hub!
Seriously, promise me you’ll grab the best unsweetened cocoa you can find—the stuff that looks darker than midnight! That quality difference makes the whole structure richer and keeps the crumb unbelievably moist, even without wheat flour. Finding great gluten-free recipes that deliver this level of indulgence is tough, but I promise you, this one works, every single time. If you want to see where I got some inspiration for these rich layers, you can pop over to check out this wonderful recipe idea.
Baking the Rich Chocolate Cake Layers
First things first: crank that oven up to 325 degrees F (163 degrees C). Go ahead and properly prep your pans! I mean grease, line with parchment, and then flour them. Don’t skip any of those three actions; we’ve invested too much in these ingredients to have sticking drama!
In your biggest bowl, stir your dry sugar, brown sugar, flour, cocoa, salt, baking powder, and baking soda until they look uniform. Then, dump in the eggs, yolk, oil, yogurt, and vanilla. Beat it low, then bump it up to medium for two full minutes—scrape the sides halfway through so every bit integrates!
Now for my favorite trick: reduce the speed way down and slowly stream in that hot, strong coffee. It will look super thin—don’t worry! That’s how we bloom the cocoa. Pour evenly into your prepared pans and bake for 55 to 65 minutes. Test it with a toothpick; you want moist crumbs clinging, not raw batter. Let them rest in the pans for just five minutes before flipping them out onto a wire rack to cool completely. We need them cold before we start stacking this showstopper!
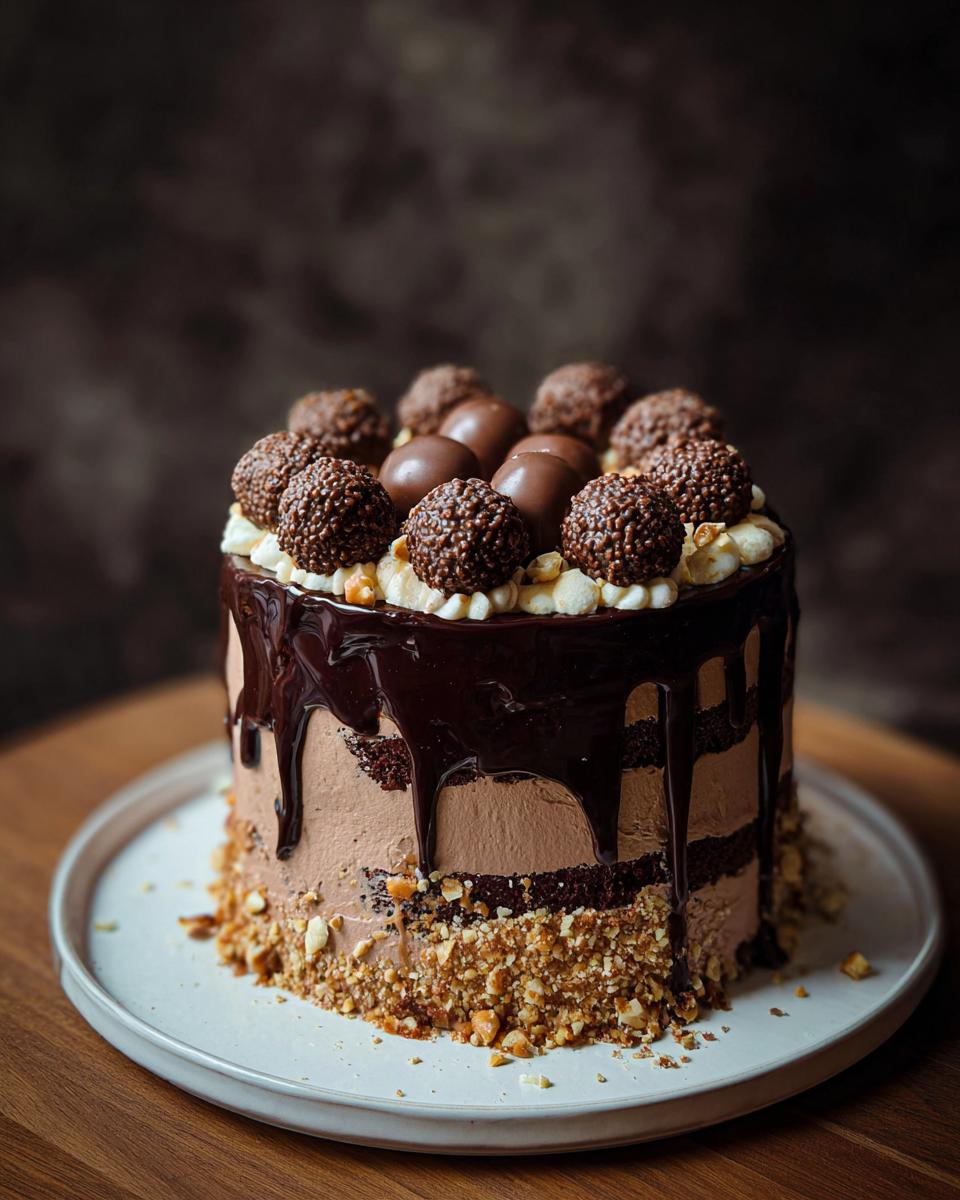
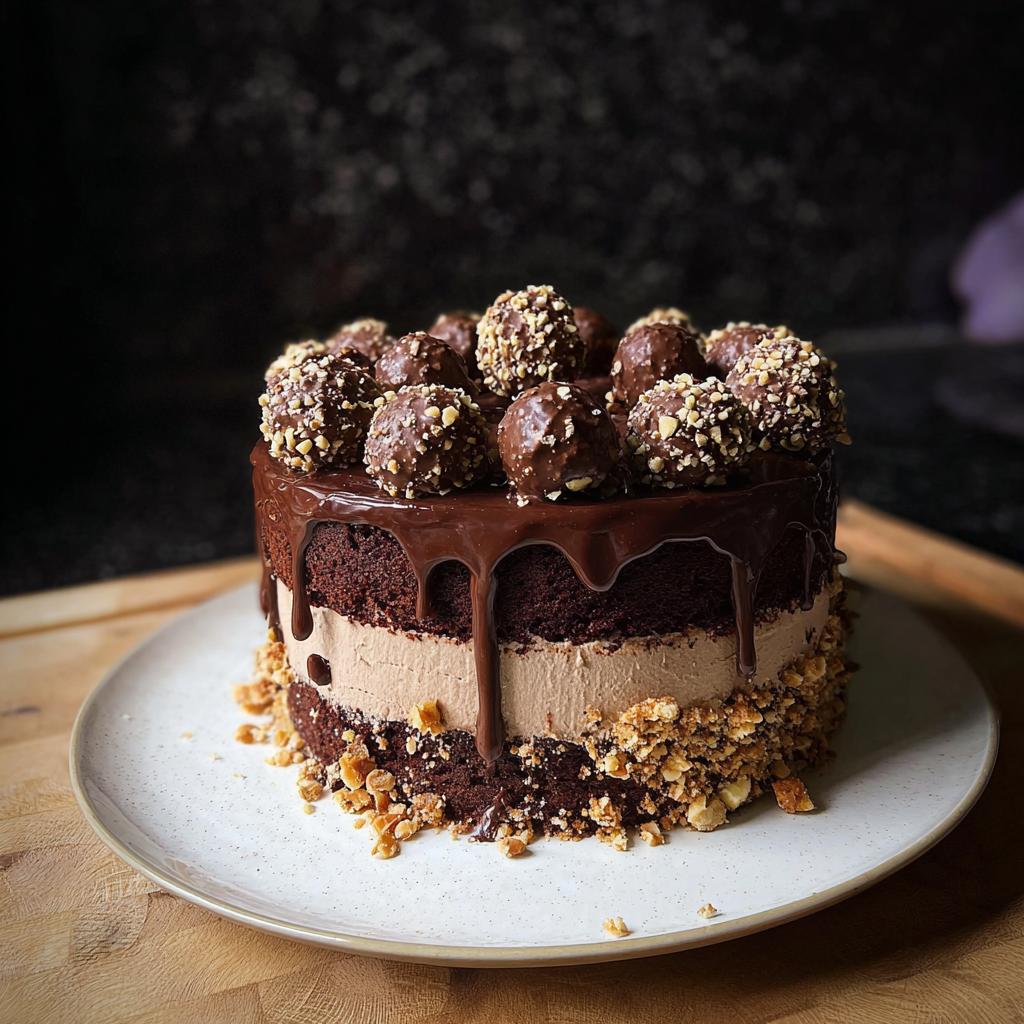
Assembling Your Special Occasion Dark Chocolate Truffle Cake
Once those layers are completely cool—and I mean *completely* cool, otherwise your buttercream melts into a mess—it’s time to build this thing. Place one layer right-side up on your serving platter or cake board. Slather a generous layer of that Milk Chocolate Buttercream on top. Place the second layer upside down on the frosting for the flattest top possible, and then cover the whole thing—top and sides—with the rest of the buttercream.
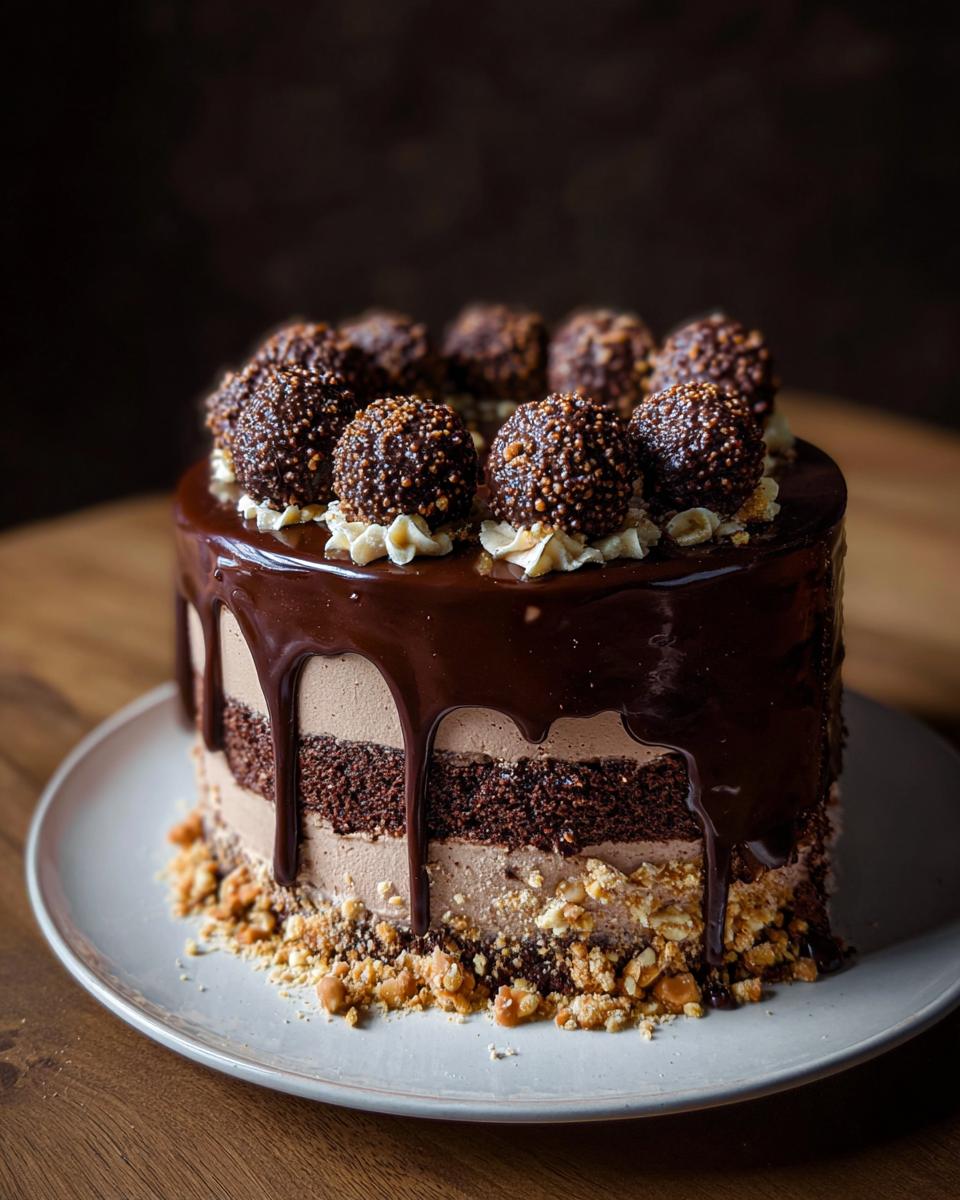
Here’s where we pause for this Special Occasion cake: put it in the fridge for a full hour to let the buttercream firm up. This chilling time is essential before you pour the ganache, preventing it from just sinking into the frosting! While it chills, make sure your ganache is the right consistency—pourable like pancake batter. Adjust it if needed! Once chilled, pour that beautiful Dark Chocolate Ganache over the top, letting it drip naturally down the sides. Finally, press your ground nuts onto the very bottom edge and nestle those lovely chocolate truffles right on top. Back into the fridge until you are ready to wow your guests!
Ingredient Notes and Substitutions for Your Dark Chocolate Truffle Cake
I always get questions about the specific ingredients I use, and honestly, these little details are what stop a good cake from becoming a truly magnificent one, especially when we’re aiming for that deep flavor in this Dark Chocolate Truffle Cake. A lot of bakers skip ahead, but trust me, paying attention to the notes guarantees success!
Since these cakes are so rich, the quality of your chocolate components really shines through. It matters a lot more here than in a standard vanilla cake!
Dealing with the Cocoa Powder and Nuts
Let’s start with the cocoa powder again because it’s so important. I specify natural cocoa, not the Dutch-processed kind, because the natural cocoa has a higher acidity that reacts perfectly with the baking soda and the coffee we use, giving us the best lift and color for our gluten-free layers. Don’t substitute that unless you completely rework the leaveners—which I don’t recommend!
When it comes to those ground nuts you sprinkle around the bottom edge? You’ll use a food processor for that, but PLEASE watch them closely! It takes maybe five seconds longer than you think to go from perfect ground nuts to hot, oily nut butter. Pulse, pulse, pulse! You want that dusty, crumbly texture to give a nice contrast to the smooth frosting, not a paste.
Sourcing or Making Your Chocolate Truffles
The signature topper is, of course, the truffles themselves. If you’re feeling ambitious and want to make them from scratch, you start with a firm batch of leftover ganache, chill it hard, roll it into little balls, and then maybe dust them with a little extra cocoa. It’s fun, tactile work!
However, if this is a busy week and you’re just putting this Holiday Dessert together on a deadline, use store-bought truffles! There are some fantastic artisanal ones out there now. Just make sure they are roughly the same size so the final presentation looks intentional. Nobody is judging when the cake tastes this good!
Tips for Success When Making a Holiday Dessert Dark Chocolate Truffle Cake
I want your experience making this Dark Chocolate Truffle Cake as stress-free as possible, especially if you’re tackling it for a big ‘Holiday Dessert’ gathering. When you have this many components—cake, buttercream, ganache—you need a little structure. Follow these foolproof tips and you’ll look like a pastry genius!
Temperature Control is Everything (Coffee & Ganache)
I mentioned the hot coffee activating the cocoa when baking, but let’s re-emphasize: the coffee needs to be hot, almost steaming. This ensures the best chemical reaction in the batter, giving you those deep, dark cake layers. Don’t let it sit around cooling!
On the flip side, your ganache needs patience. It must be cool enough to be thick—like pancake batter on a griddle—but still perfectly pourable. If it’s too hot when you pour it, it will soak into your buttercream layers and make a watery mess. If it’s too cold, it will just sit in a thick, unusable blob on top. Give it 10 or 15 minutes on the counter to settle if you’re worried about its texture before you drizzle!
Perfect Pan Preparation Means Easy Release
We talked about it before, but this is worth repeating, especially if you are working against a holiday timeline and don’t have time for cake rescue missions. Those two 8-inch pans need triple protection! I use shortening, then line that bottom with parchment paper cut to fit, and *then* flour the whole thing. This layering system means that when you flip those dense, Rich Chocolate layers out, they slide right off, ready for cooling.
If you skip this, I guarantee you will lose a chunk of cake, and nobody wants to patch up a masterpiece before company arrives! Getting the pan right is 80% of the battle for a perfect side profile.
Achieving Silky Smooth Buttercream
If you look back at the assembly instructions, you see we are chilling the cake for a full hour before the ganache goes on. This step is crucial for making your frosting look professional. Why? Because the buttercream underneath needs to be rock solid!
If the buttercream is soft when you pour the liquid ganache over it, the ganache melts the butter, and the whole cake looks smeared and sloppy. Chilling locks in that smooth, perfectly applied layer of buttercream, giving the ganache a clean barrier to drip beautifully down the sides. We want drips that stop at the bottom edge, not ones that slide all the way down and pool on the board!
It’s all about managing temperatures, my friends. You can check out more tips for making every occasion special in my Holidays category!
Storage and Serving Suggestions for Dark Chocolate Truffle Cake
So, you’ve made this spectacular Dark Chocolate Truffle Cake, and now the big question: how do you keep the masterpiece looking and tasting as amazing as it does right now? Trust me, you want to handle this beauty with care!
Because this cake is so rich and loaded with creamy fillings, it loves the cold hug of the refrigerator. You can keep any leftovers stored in an airtight container in the fridge for up to five whole days! Can you hide it that long? I never can!
The Chilling Rule and Room Temperature Indulgence
I mentioned the chilling time before serving, and that’s because the ganache and buttercream are happiest when firm. For serving, you want to take the cake out about an hour before you plan to slice it. That little bit of time gives the buttercream a chance to soften just slightly, so it’s not hard as a rock, allowing you to really get that melt-in-your-mouth sensation that makes this cake so special.
If you’re leaving it out just for a short serving period, say for a party, the cake is fine at room temperature for about four hours. After that, I really push to get the remaining slices back into the fridge to keep that Ganache firm. It’s so satisfying when the slice stands up perfectly on the plate!
Serving Suggestions to Elevate Your Dessert
While this Chocolate Truffle Cake is definitely rich enough to stand completely on its own—and honestly, it needs no company—sometimes a tiny contrast really brings out the dark chocolate flavor. Think bright, fresh flavors!
I love setting a slice next to a few fresh raspberries or maybe even a tiny spoonful of lightly sweetened whipped cream. The slight tartness cuts right through that deep chocolate richness beautifully. If you are enjoying this as a final Holiday Dessert offering, a strong espresso or a cup of dark roast coffee is the perfect pairing. It just enhances that deep cocoa note we worked so hard to achieve in the layers. You can find some fun related ideas in my festive treat inspiration here!
What About Reheating This Rich Chocolate Cake?
Reheating is rarely necessary here because we want the cake cool or barely room temperature. If you absolutely must bring a slice to room temperature faster than an hour, you can microwave a single slice for just 5 to 8 seconds—but seriously, be careful! Microwaving this much chocolate tends to make the ganache oily and the cake layers spongy. If you’ve stored it in the fridge, patience is your best friend. Just let it sit on the counter for about 45 minutes for perfect serving texture.
Frequently Asked Questions About This Chocolate Truffle Cake
I know we covered a lot of ground to get this Dark Chocolate Truffle Cake perfect, but sometimes you just have a quick question burning in your mind when you’re standing in the kitchen! Bakers are always curious about substitutions, especially when dealing with gluten-free recipes. Here are a few of the most common things I get asked about this very rich chocolate beauty!
Can I skip the hot coffee in the cake batter?
Oh, I really, really wish you wouldn’t! If you have to skip it—maybe you’re out of coffee or avoiding caffeine—you must use boiling hot water instead. The coffee doesn’t make the cake taste like a mocha, I promise! What it does is chemically bloom the natural cocoa powder, making the chocolate flavor unbelievably deep and setting the stage for that Rich Chocolate experience. Without that heat, the cocoa won’t fully integrate, and the cake won’t be as dark or moist.
How do I get those beautiful, professional-looking ganache drips?
This relies entirely on the temperature of both the cake and the ganache! Remember how I insisted on chilling the cake for a full hour after the buttercream layer? That needs to be firm. For the ganache, you want it to be pourable, like a thin pancake batter. If you pour hot ganache onto a cold, firm cake, it will set quickly into those gorgeous, stopping drips as it slides down. If it’s too thick, use a spoon to gently encourage it over the edge. If it’s too thin, chill it for 15 minutes and whisk gently before pouring.
Can I adapt this recipe for a different ‘Special Occasion’ pan, like a sheet cake?
You absolutely can! This batter makes a great sheet cake for a crowd. I generally suggest using a 9×13 inch pan. Since the batter won’t be as deep, you’ll need to reduce the baking time, maybe starting to check around 40 minutes. However, be warned: it won’t have the elegant height of the layered cake. If you go the sheet cake route, I recommend spreading the buttercream right up to the edges and skipping the dramatic ganache drip in favor of a thick layer of buttercream and some crushed nuts around the perimeter. It’s still delicious, just a different presentation style for your Holiday Dessert!
Can this be made vegan or dairy-free?
It takes some swapping, but yes, you can adjust this! For the Greek yogurt, you could substitute an equal amount of thick, unsweetened, full-fat coconut yogurt or vegan sour cream. For the milk chocolate buttercream and the ganache, you will need to find high-quality vegan chocolate bars and use a plant-based butter alternative. Because this is such a decadent, Showstopper recipe where dairy plays a big part in the richness, using high-quality vegan substitutes is key. Let me know if you experiment with vegan versions—I’d love to hear about it when you reach out on my contact page!
Equipment Needed to Create Your Dark Chocolate Truffle Cake
You don’t need a full professional bakery setup to make this incredible Dark Chocolate Truffle Cake, but gathering your tools ahead of time makes the assembly process so much smoother. Since this cake has layers, frosting, and that beautiful pourable ganache, we need a few key pieces of equipment to manage all those textures!
When you look at the list below, you’ll see we rely on tools that most home bakers already have. If you’re looking for more tips on basic baking gear, you can check out my favorites in the muffins and cupcakes section!
- Two 8-inch round cake pans: Essential for getting those even, glorious layers baked perfectly.
- Parchment paper: Our non-stick insurance policy! Cut circles to fit the bottom of your pans.
- Electric mixer: Needed to whip the buttercream until it’s light and fluffy for that smooth spread.
- Spatula: For scraping down the sides of the bowl while mixing up that rich batter.
- Wire cooling racks: Crucial for letting the cakes cool completely without getting soggy bottoms.
- Cake board or serving platter: You need a sturdy base to assemble and present this heavy, decadent cake.
- Icing spatula: The best tool for smoothly covering the outside of the cake in buttercream.
- Food processor: Required if you decide to grind your nuts for that textured border decoration.
- Double boiler: Needed if you are making the ganache entirely from scratch to melt the chocolate slowly and safely.
Nutritional Estimate for This Decadent Dessert
Now, I know some folks are tracking every little bit, and if you are, that’s totally fine! But I have to be upfront: since this Dark Chocolate Truffle Cake recipe is so special and uses ingredients that vary wildly (especially if you’re making your frostings homemade versus store-bought), getting an *exact* tally is really tough for me to promise.
This nutritional breakdown is just an estimate, an educated guess based on standard ingredient brands for a slice serving 12 people. If you use high-fat butter substitutes or different types of chocolate for that yummy ganache, your numbers will definitely shift. If you want the complete nitty-gritty on tracking, you can always check out my policy page, but for now, treat these figures as a fun ballpark figure rather than gospel!
We focused on taste, not calorie counting, when developing this Showstopper, so enjoy the indulgence!
- Calories: null
- Carbohydrates: null
- Protein: null
- Fat: null
- Saturated Fat: null
- Cholesterol: null
- Sodium: null
- Potassium: null
- Fiber: null
- Sugar: null
- Vitamin A: null
- Vitamin C: null
- Calcium: null
- Iron: null
Dark Chocolate Truffle Cake
Ingredients
Equipment
Method
- Preheat your oven to 325 degrees F (163 degrees C). Prepare two 8-inch round cake pans by coating them with vegetable shortening or butter, lining the bottoms with parchment paper, and coating the paper. Flour the inside of the pans, shake out the excess, and set aside.
- In a large bowl, combine granulated sugar, brown sugar, flour, cocoa powder, salt, baking powder, and baking soda. Stir to mix.
- Add eggs, egg yolk, vegetable oil, yogurt, and vanilla to the dry ingredients. Beat on low speed with an electric mixer until blended, then increase to medium speed and beat for 2 minutes, scraping down the sides as needed.
- Reduce mixer speed to low. While mixing, pour in the hot coffee until blended. Stop the mixer, scrape down the sides, and stir to ensure the batter is well combined.
- Divide the batter evenly between the two prepared cake pans.
- Bake for 55-65 minutes, or until the cake tops are set and pulling away from the sides. Insert a toothpick into the center; it should come out with moist crumbs, not raw batter. Remove cakes from the oven and place on wire cooling racks.
- Let the cakes cool in their pans for 5 minutes. Invert the cakes onto wire cooling racks to cool completely before frosting.
- To assemble, place one cake layer right side up on a cake board. Spread a generous amount of milk chocolate buttercream over the top. Place the second cake layer upside down on top of the buttercream. Cover the entire cake with a thick layer of buttercream, smoothing the top.
- Press ground nuts around the bottom edge of the cake.
- Refrigerate the cake for 1 hour to firm up the buttercream. Prepare the ganache and truffles while the cake chills.
- Ensure the ganache has a pourable, pancake batter consistency. Adjust thickness by chilling briefly if too runny or microwaving for short intervals if too thick.
- Pour the ganache over the top of the cake, allowing it to drip down the sides.
- Decorate the top of the cake with chocolate truffles.
- Refrigerate until ready to serve. The cake can be stored at room temperature for up to 4 hours, or refrigerated for up to 5 days. It is best enjoyed within 48 hours.
Notes
Tried this recipe?
Let us know how it was!
Gluten-Free Chef & Latin Cuisine Innovation Specialist
My youngest son’s celiac diagnosis at four changed everything. Suddenly, all those traditional Brazilian and Portuguese recipes from my avó needed to be completely reimagined without losing their soul.
After graduating from Johnson & Wales and working Miami’s Latin fusion scene, my son’s diagnosis became my calling. How do you make gluten-free empanadas that taste like childhood? Over eight years, I’ve developed 320+ gluten-free recipes celebrating authentic Latin flavors using cassava flour and plantain alternatives.
My gluten-free empanada recipe won “Best Appetizer” at the 2023 Miami Gluten-Free Food Festival. I ran “Sabores Sin Gluten,” a catering business serving Miami’s Latino community—quinceañeras, family gatherings, all the celebrations that matter.
Food is culture, and everyone deserves to experience the joy of sharing traditional family meals, regardless of dietary restrictions.