Oh, honey, when life throws you a milestone—an anniversary, a big birthday, or even just a really fabulous Tuesday—you deserve a cake that sparkles! That’s exactly how I felt when I set out to create the most elegant dessert possible: my show-stopping Champagne Layer Cake with Buttercream. I was determined that my best friend’s wedding anniversary would feature a gluten-free masterpiece that didn’t compromise on that bubbly, sophisticated flavor. My kitchen turned into such a festive haven while whipping up that airy Italian Meringue Buttercream and folding in the fizz. Seeing their faces when I presented that towering, perfect cake? Priceless. It really showed me that we can absolutely savor the sweetest moments, dietary needs notwithstanding. You can read a little more about my baking philosophy over on my About Page, but today is all about the bubbles!
If you love the idea of a truly special Party Cake that feels like pure luxury but is totally manageable at home, you are in the right place. Come on in, dust off your mixer, and let’s bake something that truly celebrates!
Why This Champagne Layer Cake with Buttercream Is Your Next Celebration Dessert
Seriously, this isn’t just any cake; it’s an experience waiting to happen! If you’re looking for a reason to pull out your fanciest dishware, this is it. The flavor profile is subtle, elegant, and tastes exactly like a happy occasion should taste.
Here’s why you absolutely need this on your baking schedule:
- It provides that sophisticated flavor that people rave about—bubbly, light, and perfectly balanced with the strawberry hits in the frosting.
- It’s truly designed to be the star of any event, whether it’s a big anniversary or just a weekend where you feel fancy! Check out more ideas for great occasions over here.
- It’s adaptable! We are baking it to be spectacular, but if you need it to be gluten-free, you already have the secret weapon right here.
Trust me, when you serve this Champagne Layer Cake with Buttercream, everyone will think you hired a professional baker. But we know the secret is just a little bit of love!
Gathering Ingredients for Your Champagne Layer Cake with Buttercream
Okay, baking is chemistry, right? And with chemistry, you can’t just wing it! For this delicate Champagne Layer Cake with Buttercream to turn out light and perfectly emulsified—not curdled or flat—we need everything at room temperature. Seriously, pull out your butter and your buttermilk a couple of hours ahead of time. When things are relaxed temperature-wise, they fold together like they were made for each other!
If you want to dive deep into the world of gluten-free flour swaps, check out my guide to gluten-free baking excellence! Now, let’s see what we need for this celebration.
Ingredients for the Champagne Cake Layers
We are using a mix of things here to keep it airy, so pay close attention to what needs to be whipped and what needs to be left alone!
- 4 large eggs, separated (plus 4 additional large egg whites, at room temperature!)
- 1.5 cups butter, at room temperature (that’s 12 ounces or 340 grams, friends!)
- 2.5 cups sugar (550 grams)
- 3 cups cake flour (390 grams)
- 2 teaspoons baking powder
- 0.25 teaspoon baking soda
- 1 teaspoon table salt (or 1.5 teaspoon/9g kosher salt)
- 0.5 cup champagne, at room temperature (this is key!)
- 0.5 cup buttermilk, at room temperature (4 ounces/114 grams)
- 1 teaspoon pure vanilla extract
Ingredients for the Strawberry and Champagne Italian Meringue Buttercream
This is where the flavor really pops! Remember, we use a little extra if we want that dramatic two-tone look on the exterior. Also, we have to reduce the champagne first, so save that step for when the cake is baking!
- 1 or 1.5 batches Italian Meringue Buttercream (if you don’t add the pink buttercream swirls on the top of the cake, 1 recipe will suffice)
- 1 cup champagne (8 ounces)
- 0.33 cup sliced fresh strawberries (90 grams), stems removed, pureed in a blender to measure about ⅓ cup for that perfect pink color!
Step-by-Step Baking Instructions for the Champagne Layer Cake with Buttercream
This is the fun part, but it’s also where we need to pay attention to detail, especially when whipping up something this delicate. For the best results in your Champagne Layer Cake with Buttercream, we have to follow the sequence Grandma taught me—it prevents so many baking headaches down the road!
We’ll tackle the cake first, then move onto prepping that dreamy frosting while the layers cool off. If you want to check out my favorite baking tools portfolio before you start, you can see what I use right here.
Preparing the Cake Batter for Your Champagne Layer Cake with Buttercream
First things first: Get that oven hummin’ at 350 degrees F (176 C)! Remember to prep your pans—grease, flour, and those essential parchment rounds—because we don’t want any sticking drama later.
We need stiff peaks from our egg whites, so get those in the mixer first. Once they’re glorious and set, scoop ’em out gently and dry that bowl off. Now, cream that lovely room-temperature butter and sugar until it’s fluffy—about six full minutes. Add those four egg yolks in batches, scraping the bowl down between each addition so everything gets acquainted.
Next, we alternate! Mix your dry stuff (flour combo) and your liquids (champagne, buttermilk, vanilla) four times, always starting and ending with the dry ingredients, keeping that mixer speed low! This keeps the batter smooth. The absolute most crucial part? Gently folding in those glorious, stiff egg whites with a spatula. Don’t stir! Just fold until you see no white streaks left. This is creating the lift for our cake!
Baking and Cooling the Cake Layers
Divide that amazing batter evenly among the prepared pans. How long they bake depends on how many layers you aim for! If you’re doing three beautiful layers, plan on about 30 to 40 minutes. If you went for four thinner layers, they’ll be done closer to 25 or 30 minutes.
How do you know they’re done? They should look golden, and they’ll shrink away from the pan edges just a hair. A toothpick test is mandatory, of course, but we’re looking for moist crumbs, not wet batter!
Let them rest in the pans for exactly five minutes before you flip them out onto your wire racks to cool completely. If you decide to wait until tomorrow to frost them—and I often do!—wrap those cooled layers tightly in plastic wrap. They stay lovely at room temp for a day or freeze beautifully for up to two months!
Making the Champagne Buttercream Frosting
While the cakes are chilling out, let’s make magic with your Champagne Buttercream! Take one cup of champagne and boil it down in a small saucepan until you only have half a cup left. This reduces the liquid so your Champagne Layer Cake with Buttercream doesn’t swim! Let that reduction cool completely before you touch it.
Once it’s cool, beat that champagne reduction slowly into your prepared Italian Meringue Buttercream. Remember, that recipe makes a big batch, so scoop about two-thirds of it into a separate bowl—that’s your beautiful, subtle champagne layer. Into the remaining one-third, beat in that gorgeous strawberry puree until you have a lovely pink frosting.
Now you have two perfect frostings ready to assemble! If you want to see the source inspiration for reducing the champagne, you’ll find great tips here.
Tips for Perfecting Your Champagne Layer Cake with Buttercream
Look, I know this recipe seems fancy, and sometimes fancy means fussy, but I’ve got a few tricks up my sleeve from batches that almost went sideways! The biggest one is that egg yolk incorporation step. If you add those yolks too fast after creaming the butter and sugar, bam! Your mixture can curdle and look a little grainy. I learned this the hard way when I was rushing for my friend’s anniversary—that’s when I started just stopping the mixer, scraping down the sides religiously, and adding those yolks 20 seconds at a time. It saved the whole batch!
Another thing for your Champagne Layer Cake with Buttercream? Don’t overmix once those dry ingredients meet the wet stuff! Mix until *just* combined. You’ll see the streaks, and that’s totally fine because you are folding in those beautiful whipped whites next. If you beat them in, all that beautiful air we whipped up escapes, and your cake goes from delicate to dense faster than reality sets in!
When you are whisking your dry ingredients, make sure you’re using cake flour; it makes such a difference in the final texture. If you want to see some of my other favorite texture hacks for cakes, check out my posts on cupcakes and other small bakes—the principles are the same!
Decoration Ideas for Your Celebration Dessert
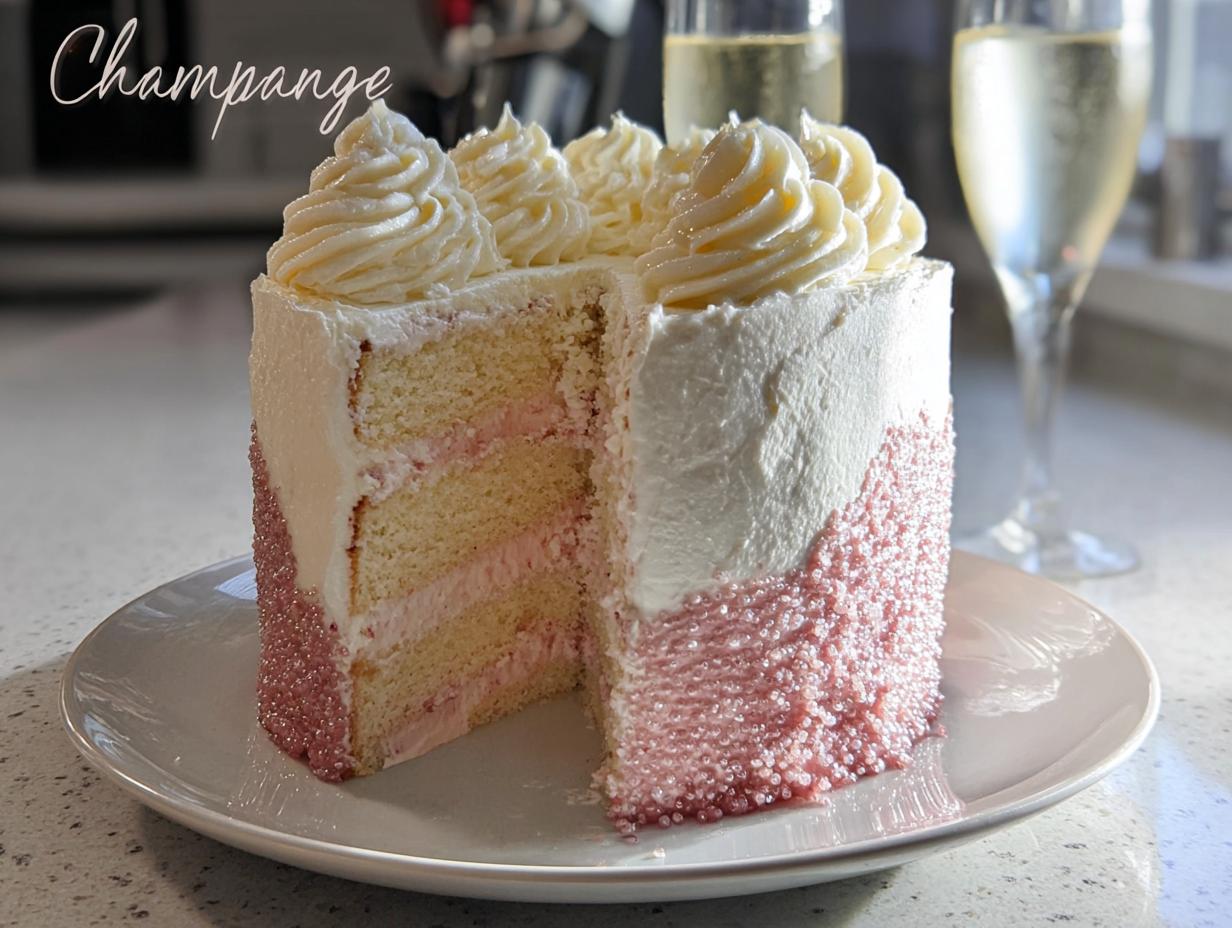
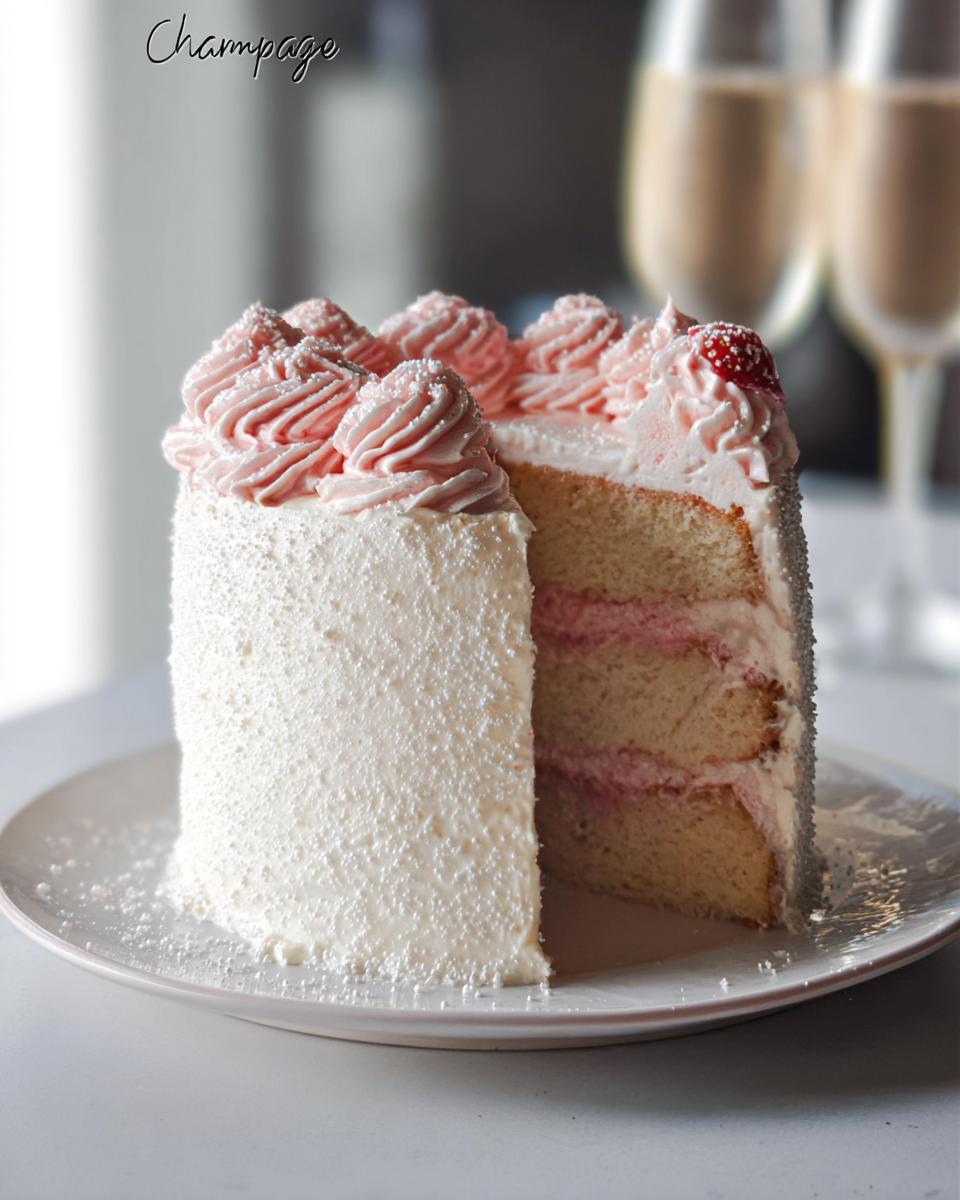
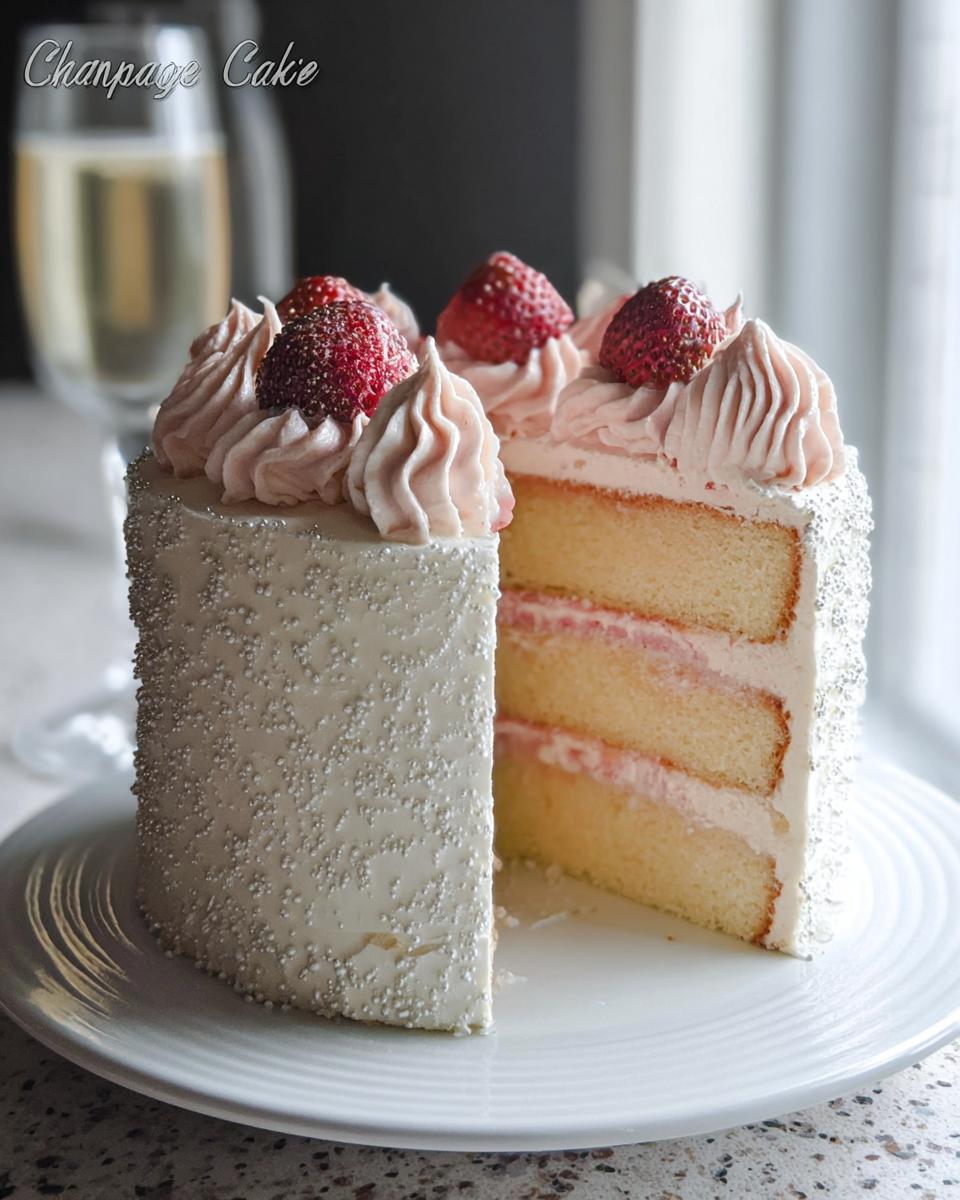
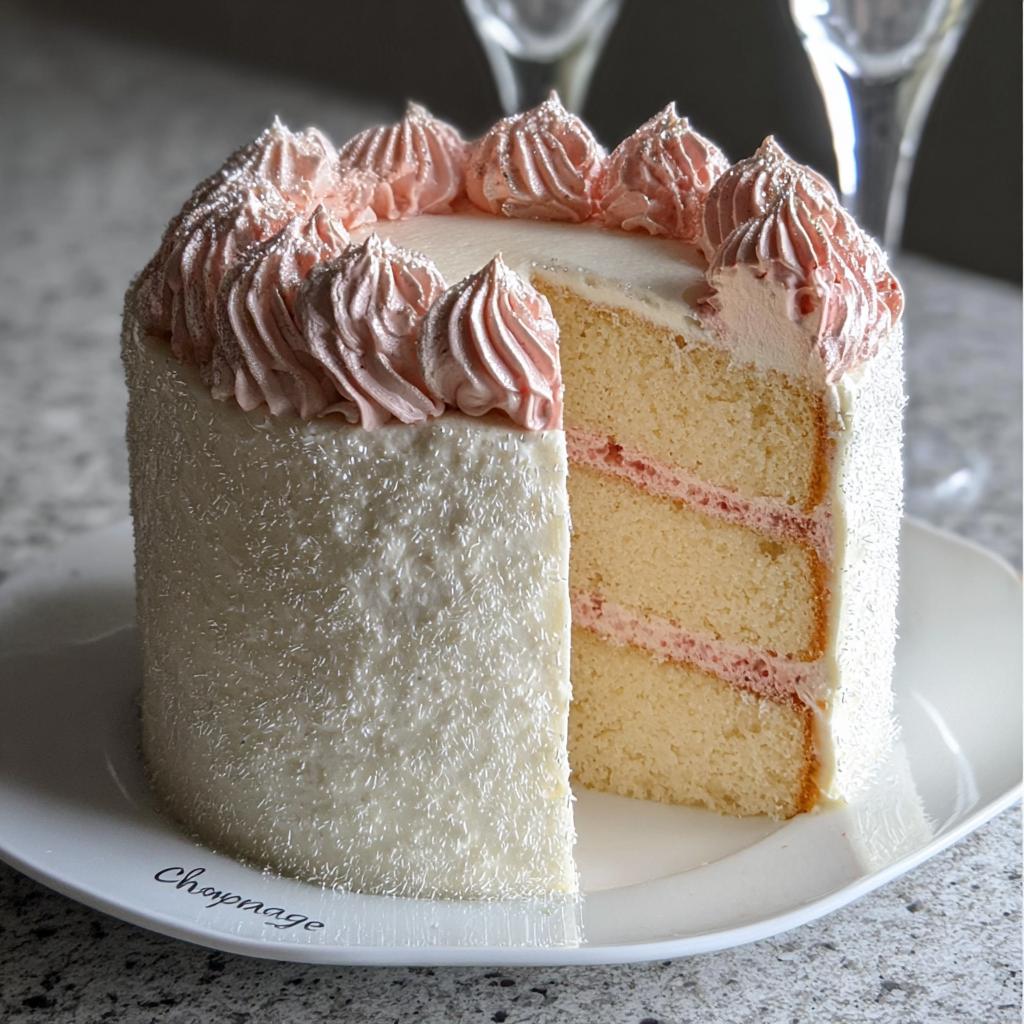
Now that we have this magnificent, perfectly flavored Champagne Layer Cake with Buttercream cooled and ready to go, it’s time to make it look as fabulous as it tastes! Honestly, this cake requires very little fuss because the flavor is already so elegant, but a little sparkle never hurt anyone, right?
When creating this cake for my friend’s anniversary, I really wanted that luxury look without spending all day piping perfect rosettes. Here are the tricks I use to make this a real showstopper every single time:
The Essential Crumb Coat
Before we get to any fancy stuff, you absolutely must crumb coat. This is non-negotiable, especially with a delicate layer cake like this! Take a very thin layer of whatever buttercream you choose—I usually just use the plain champagne one for this step—and spread it all over the sides and top of the cake. It traps all those tiny crumbs so your final coat is flawless. Pop the cake into the fridge for about 20 minutes until that first thin layer is firm to the touch. Seriously, this is the secret to a smooth finish that competitors envy!
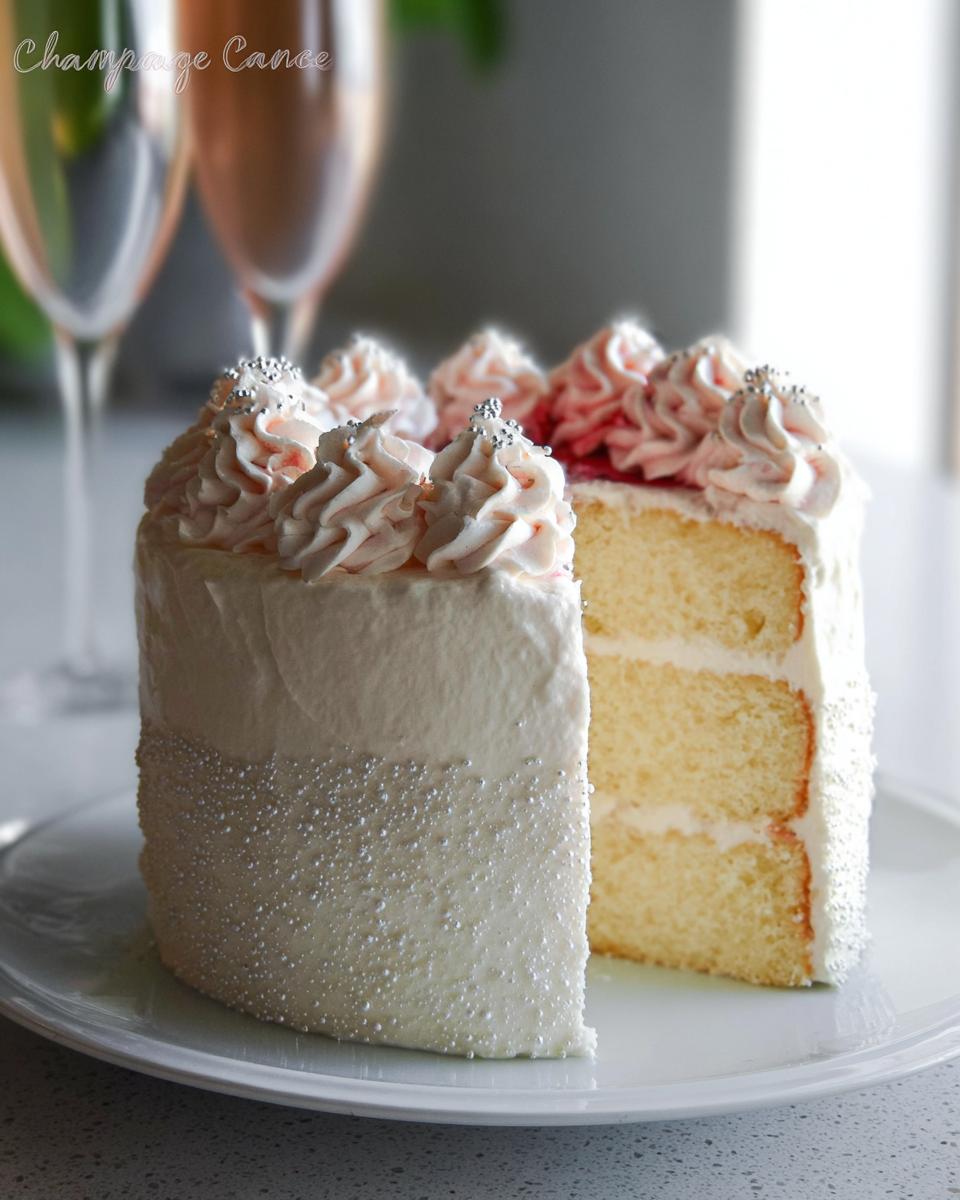
Playing with Two-Toned Buttercream
Since we made a lovely strawberry batch and a beautiful plain batch (or maybe you added a splash of pink food coloring to yours!), let’s use both! For a dramatic but easy look, frost the entire cake with the white champagne buttercream first, smoothing it out as best you can.
Then, take dollops of the strawberry buttercream and carefully press them onto the top edge of the cake. Using an offset spatula, gently swirl the pink dollops into the white base layer. It creates this gorgeous, subtle marbled effect that looks incredibly expensive, but it only took you two extra minutes.
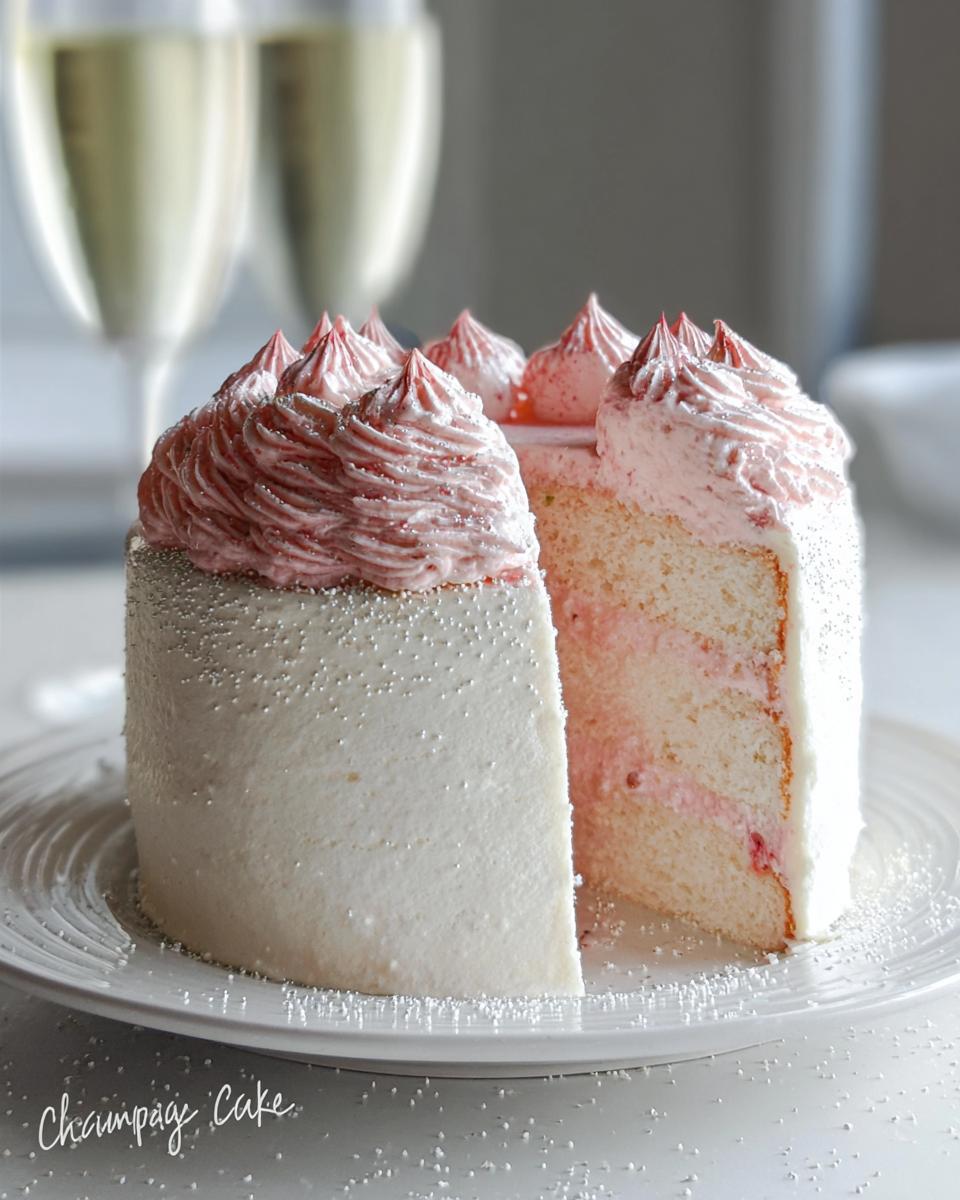
Finishing Touches That Sparkle
This is where we lean into the “Champagne Layer Cake” theme! Because this is a Celebration Dessert, it needs that glitter of joy. Don’t be shy with edible gold or silver dust! You can lightly brush it onto the edges of the layers peeking out between the frosting, or just dust the very top.
Sometimes, I love the look of simplicity, so I just place a few fresh strawberries on top, maybe dusted with powdered sugar to look like snow. Other times, I go all out with edible pearl sprinkles, especially since these party cakes look amazing on Pinterest! Whatever you choose, remember that presentation is a huge part of sharing the joy!
Storage and Make-Ahead Tips for the Champagne Layer Cake with Buttercream
Planning a big event means you can’t spend the whole day before the party wrestling with cake layers, right? I totally get it! The beauty of this Champagne Layer Cake with Buttercream is that it’s actually a fantastic make-ahead dessert. We want to enjoy the party, not stress over the sponge!
Remember those layers we cooled completely? If you wrap them up double-tight in plastic wrap, they are happy campers sitting on your counter for a full day. If you’re making this ahead of a holiday like Christmas or New Year’s, you can tuck them into the freezer! Just wrap them well—I mean really well, maybe even throw them into a large Ziploc bag to protect against freezer burn—and they last up to two months. When you’re ready to use them, just let them thaw overnight in the fridge.
Once the cake is fully assembled with that delicious Champagne Buttercream, it’s slightly more delicate, but still sturdy! You can keep the assembled Champagne Layer Cake with Buttercream at cool room temperature for about 24 hours if your kitchen isn’t too warm. If you need it to last longer than that, or if your house is just toasty, the fridge is your friend.
When chilling a frosted cake, make sure you cover it loosely with a cake dome or even tent it lightly with foil so the buttercream doesn’t weep or stick to the wrap. It will taste great for up to three days this way! When it’s time to serve, pull it out of the fridge about an hour before slicing. Letting it come up slightly closer to room temperature really wakes up the flavor of the cake and softens the buttercream just enough. If you’re diving into holiday baking soon, check out my favorite holiday recipes here for more planning tips!
Frequently Asked Questions About This Champagne Cake
I totally get it—when you’re pouring time into something special like a Champagne Layer Cake with Buttercream, you want to nail every step! Here are a few things people usually ask me that I hope clear up any last-minute worries before you dive into making this fabulous Party Cake.
Can I substitute the buttermilk in this Champagne Layer Cake with Buttercream?
Oh, sometimes you just run out of buttermilk, don’t you? Yes, you absolutely can swap it out! If you don’t have any on hand, just take regular milk—any kind works fine—and stir in one tablespoon of white vinegar or fresh lemon juice. Let that mixture sit for about five to ten minutes until it looks slightly curdled. That’s your quick homemade buttermilk substitute! It might make the cake batter just a touch thicker than usual, but it keeps that critical acidic balance needed for the baking soda to work its magic. It’s a total lifesaver!
How important is the champagne reduction for the Champagne Buttercream?
This step is super, super important for making that Italian Meringue Champagne Buttercream stable! If you tried to beat unreduced champagne straight into the meringue, you’d end up with liquid soup, not frosting. Boiling the champagne down removes most of the water content, leaving behind the concentrated flavor and bubbles. This means you get all that lovely bubbly taste without ruining the consistency of your frosting. Don’t skip that step, or your beautiful layers will end up sliding right off!
Can this be made into cupcakes instead of a Layer Cake?
Yes, please! Cupcakes are just mini explosions of celebration, and this recipe works perfectly for them. You’ll fill your cupcake liners about two-thirds full, just like you would with any standard cupcake. Since they’re smaller, you’ll need to adjust the baking time down significantly—check them around the 18 to 20-minute mark. They bake much faster than those big, thick layers, so watch them closely! You can pipe that two-toned frosting right on top for adorable little bops of perfection!
If you run into any other sticky situations while baking, feel free to reach out on my Contact Page—I’m always happy to help a fellow baker!
Nutritional Estimates for Your Champagne Layer Cake with Buttercream
Now, I’m going to be real with you—when you’re making a rich, bubbly dessert like this, it’s not exactly a piece of celery! Since we are using all that beautiful butter, sugar, and eggs in this Champagne Layer Cake with Buttercream, the numbers can climb quickly. Based on standard measurements for 12 servings, you’re looking at roughly 650 calories, 35g fat, 70g carbs, and 6g protein per slice.
Remember, these numbers are just approximations, folks! This wildly depends on the brand of butter you use and if you opt for the gluten-free flour blend. This is a treat, not an everyday staple, so let’s enjoy every glorious bite!
Share Your Celebration Dessert Success
Whew! I am so proud of you for tackling this magnificent Champagne Layer Cake with Buttercream! Honestly, seeing your bakes come to life brings me so much joy. This cake is truly a work of art, and I want to see how you made it shine for your special moments!
Whether you kept it simple or went completely wild with edible glitter and fancy swirls, please, please let me know how it tasted! Did the Champagne Buttercream set up perfectly for you? Drop a star rating right below the recipe card so other bakers know what an absolute showstopper this Celebration Dessert is. And once you’ve sliced into that beautiful tender crumb, snap a picture!
Tag me on social media when you share photos of your gorgeous creation. I love nothing more than seeing these family heirlooms popping up for big events! You can find my latest inspiration and trends for festive bakes right here. Go celebrate life with a slice of bubbly goodness!
Champagne Layer Cake with Buttercream
Ingredients
Equipment
Method
- Preheat your oven to 350 degrees F (176 degrees C). Grease and flour three or four 8 or 9-inch round cake pans. Line the bottoms with parchment paper rounds, also greased.
- Separate the 4 whole eggs. Place the yolks in a small bowl. Put the egg whites in the bowl of a standing mixer fitted with the whisk attachment, along with the 4 additional egg whites. Beat the egg whites until stiff peaks form.
- Scrape the beaten egg whites into a separate bowl. Rinse and dry the standing mixer bowl. Fit the mixer with the paddle attachment.
- Cream the butter and sugar until light and fluffy, about 6 minutes. Scrape down the sides of the bowl as needed.
- Add two egg yolks and beat until incorporated, about 20 seconds. Scrape down the sides. Add the remaining two egg yolks, beat until incorporated, about 20 seconds, and scrape down the sides again.
- In a separate bowl, whisk together the cake flour, baking powder, baking soda, and salt.
- In a large measuring cup, stir together the champagne, buttermilk, and vanilla extract.
- With the mixer on low speed, add the dry ingredients alternately with the liquid ingredients in 4 additions, beginning and ending with the dry ingredients. Mix just until incorporated after each addition. Scrape down the sides of the bowl as necessary.
- Gently fold the beaten egg whites into the batter with a rubber spatula until just incorporated.
- Pour the batter into the prepared pans. Bake for 30-40 minutes for 3 layers, or 25-30 minutes for 4 layers. The cakes are done when golden brown, pulling away from the sides, and a toothpick inserted into the center comes out with moist crumbs.
- Let the cakes cool in the pans on wire racks for 5 minutes, then invert them onto the racks to cool completely. Wrap tightly in plastic wrap if not frosting immediately. Layers can be stored at room temperature for 1 day or frozen for up to 2 months.
- For the buttercream: Pour 1 cup of champagne into a small saucepan and boil until reduced to ½ cup. Let cool completely.
- Slowly beat the cooled champagne reduction into a prepared batch of Italian Meringue Buttercream.
- Remove about two-thirds of the buttercream. Add the pureed strawberries to the remaining buttercream and beat until fully incorporated.
Notes
Tried this recipe?
Let us know how it was!
Gluten-Free Culinary Storyteller & Recipe Heritage Specialist
Getting diagnosed with non-celiac gluten sensitivity in my late twenties felt like losing my Italian identity. Growing up in nonna’s Brooklyn kitchen, learning traditional techniques that suddenly became off-limits—I decided to fight for those family food traditions instead of giving up.
With my food journalism background and European baking training, I became obsessed with recreating authentic flavors in gluten-free formats. I’ve adapted 400+ traditional recipes from various cultures, with my gnocchi recipe winning “Recipe of the Year” from the National Gluten-Free Living Awards in 2022.
I collaborate with the Italian-American Cultural Center to document traditional family recipes and volunteer with the Westchester Celiac Support Group, teaching monthly pasta-making classes.
Food is the heart of family storytelling. No one should sacrifice their cultural heritage due to dietary restrictions.