
Oh, there is nothing better than the smell of something sweet filling your kitchen, knowing you’ve made enough that *everyone* can have a piece! That warm feeling just can’t be beaten. When I plan parties or big family get-togethers, I always turn to sheet pan desserts because honestly, who has time for endless batches?
These incredible Bar Cookies for a Crowd are my secret weapon for stress-free gatherings. I remember my first massive family bash after my youngest son was diagnosed with celiac disease. The familiar comfort of traditional sweets was missing, and I kept thinking of my avó’s recipes. I absolutely had to create something delicious we all could share. That drive is exactly how these rich, easy bars came to be. Marco Santos, that’s me, usually specializes in gluten-free innovation, and trust me, these bars capture that joy and togetherness we all crave, limitations or not. Seeing everyone gather around for a bite? That’s the real magic right there.
Why These Bar Cookies for a Crowd Are Your New Go-To Recipe
When you’re baking for a big group, you need reliable recipes, and these are simply the champions of consistency! They’re such an Easy Dessert because you only have one pan to worry about. No cooling racks full of tiny cookies, no endless scooping—just one glorious bake yielding 24 amazing bites.
They are truly Crowd Friendly because they hold up so well! You can bake them the day before, no problem. They are sturdy enough to transport easily and they just disappear at parties. Seriously, you’ll never bring home leftovers.
- Super easy to scale up if you decide to use a half sheet pan instead of the 8” pan.
- Cleanup is an absolute breeze thanks to that lined parchment sling.
- The rich, buttery base means you don’t need any fancy frosting to make them taste decadent.
Essential Ingredients for Perfect Bar Cookies for a Crowd
When you are making something for a crowd, you can’t skimp on flavor or quality—it just won’t have the same impact! Because these Bar Cookies for a Crowd rely so heavily on just a few core tastes, using the best ingredients really shines through.
The secret starts with *brown butter*, so make sure you have enough quality unsalted butter ready to go. Don’t worry about measuring precisely after browning; just follow the weight in the ingredient list below. Trust me, that nutty depth is essential!
For the Cookie Bars
- 150 g Unsalted butter (must be cold to start)
- 100 g Light or dark brown sugar
- 60 g Granulated sugar
- 1 large Egg (about 50g)
- 1/2 tsp Vanilla bean paste or vanilla extract
- 150 g All-purpose flour
- 1/4 tsp Baking powder
- 1 tsp Salt
- 220 g Dark chocolate (chopped, not chips!)
Equipment Needed for Large Batch Bar Cookies for a Crowd
Getting your tools ready is half the battle won when managing a large batch. Since these are essentially a Sheet Pan Cookie in a smaller format, organization really helps speed things up.
You don’t need anything complicated, but having the right size setup is key for that perfect texture. Here’s what you’ll need set out before you even think about melting butter:
- An 8-inch (20cm) non-stick baking pan (make sure it’s one you love!)
- A small saucepan for browning the star—the butter.
- A medium bowl for mixing everything up.
- You’ll need a whisk for whipping the sugar and your trusty rubber spatula.
- An offset spatula for smoothing the dough is a game-changer.
- A wire rack for cooling down your masterpiece.
- Finally, a sharp knife for cutting those perfect squares later on!
Step-by-Step Instructions: Making Bar Cookies for a Crowd
Okay, now for the fun part! Taking these simple ingredients and turning them into spectacular treats for your guests. Don’t let the brown butter scare you; it’s the absolute quickest way to make these Bar Cookies for a Crowd taste like they took hours of effort. Just follow my lead!
Preparing the Pan and Oven
First things first: get that oven heated up to 350°F (180°C). This gives it plenty of time to get nice and even. Now, for the pan prep—this is where we build in that easy cleanup. You need an 8-inch pan ready to go. Grease it well, then line it with parchment paper, making sure you leave a good overhang on two sides. That excess paper is your sling, and it’s your best friend for getting these out cleanly later. Trust me on this trick!
Creating the Brown Butter Base
We need to melt that cold butter in a saucepan over medium heat. Watch it closely! It will foam up, then quiet down, and you’ll start smelling something amazing—that nutty aroma means it’s turning golden brown. That’s brown butter magic! Once it’s perfect, measure out 110g of this liquid gold into your mixing bowl. Let it rest for about 15 to 20 minutes. If it’s too hot when you add the egg, you’ll end up scrambling it, and nobody wants a scrambled cookie bar!
Mixing the Dough and Baking
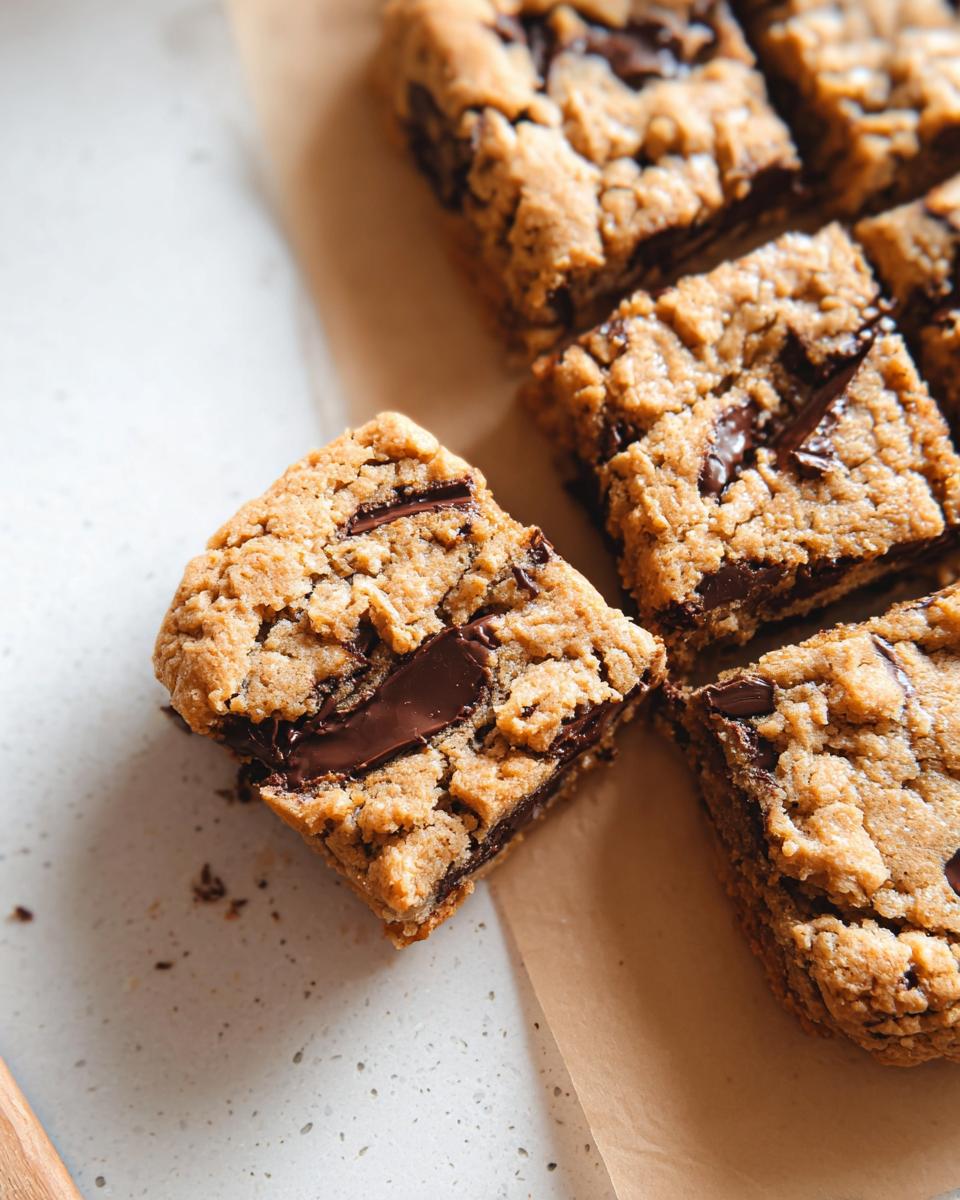
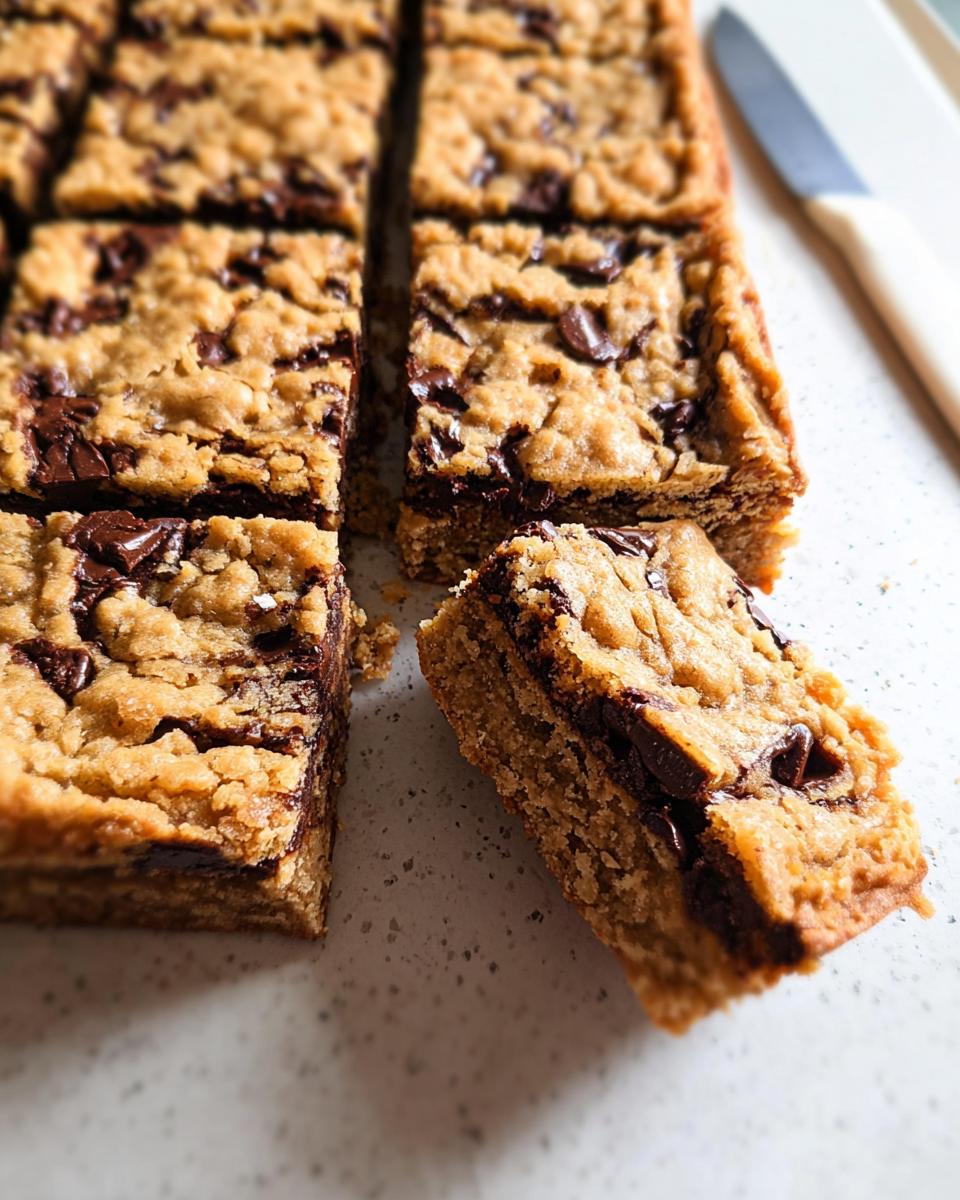
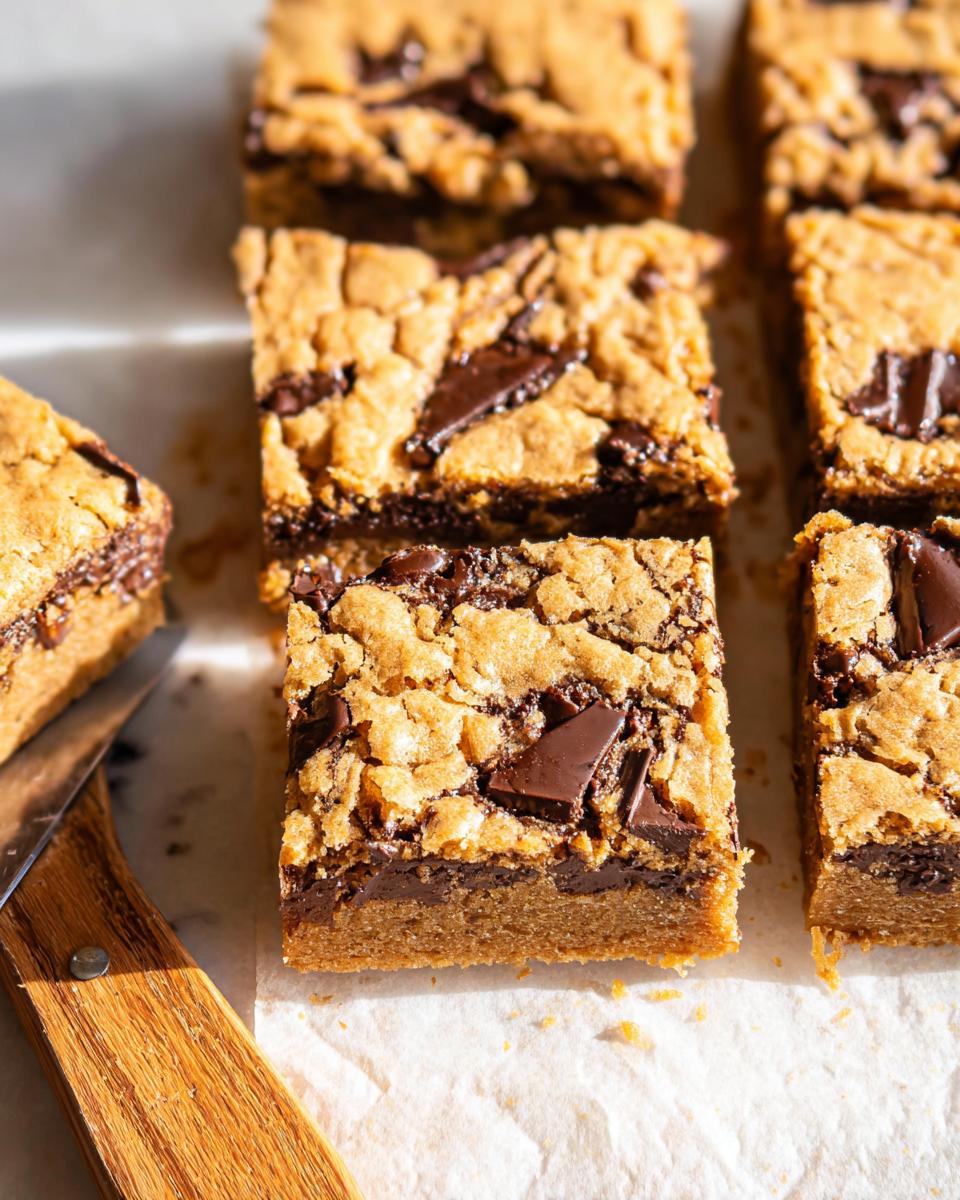
Once that butter is just warm, whisk in both sugars until they combine. Then, whisk in the egg and vanilla until the mixture looks a bit lighter and starts thickening up—that builds structure! Gently fold in the flour, baking powder, and salt using your rubber spatula. Stop mixing when you only see a few streaks of flour left. Now, fold in your chopped dark chocolate. Press that gorgeous dough evenly into your prepared pan, maybe sprinkle a few extra chunks on top for looks, and slide it into the oven for about 20 to 22 minutes. You’re looking for golden edges and a set top.

Cooling and Cutting Your Cookie Bars
This is the hardest part: waiting! Pull the bars out and let them cool right there in the pan for those crucial 20 minutes. We need them mostly set before we move them. After that short cooling time, grab those parchment paper sling handles and lift the entire slab out onto a wire rack. Once they are totally cool—and I mean totally—you can slice them up. If you plan on adding a frosting layer, do it now before you cut them into final squares. It makes the whole Frost And Cut process so much neater afterward!
Tips for Making Bar Cookies for a Crowd Gluten-Free
Since I always need to make sure my avó’s traditions are accessible, thinking gluten-free (GF) is essential for these Bar Cookies for a Crowd! You absolutely don’t have to sacrifice that chewy, dense texture. The main thing to remember is that the brown butter base here is naturally GF, which is a huge win!
When swapping out the all-purpose flour, you need a blend that has a good stabilizer. I find that Measure-for-Measure GF flour blends work perfectly here because they already contain xanthan gum. It mimics the structure of wheat flour, keeping the bars from crumbling apart when you cut them.
Avoid single-flour substitutes like pure almond or coconut flour, as they absorb liquid too differently. Stick to a reliable 1:1 GF blend, and honestly, you’ll get the same rich result meant for sharing!
Storage and Serving Suggestions for Bar Cookies for a Crowd
When you’ve made a massive batch of these fantastic treats, the next question is, “How do I keep them good until the party?” The great news is that these bars are fantastic keepers, which is exactly what you want when baking for a crowd!
Because of that lovely brown butter and the rich chocolate chunks, they stay wonderfully soft. You don’t need to refrigerate them at all, which saves valuable fridge space! Just make sure they are completely cool before you store them. Find a sturdy, airtight container—you can even use the pan they were baked in if you have a snap-on lid.
They sit perfectly happily at room temperature for up to three days. I actually think the flavor deepens slightly on day two, which makes them an excellent make-ahead option! Just make sure to put a layer of parchment paper between the layers if you stack them, just to keep them from sticking together too much.
For serving at a gathering, keep it simple. These little squares are rich enough to stand on their own. They are amazing alongside a hot cup of coffee or even a cold glass of milk—classic pairings always win out for big groups. If you happen to have any leftover Bar Cookies for a Crowd after the party, you can freeze them too! Wrap the individual squares tightly in plastic wrap before tossing them in a freezer bag. They stay good for about two months, though I doubt they’ll ever last that long!
Frequently Asked Questions About Bar Cookies for a Crowd
I get so many lovely messages asking for extra clarification on these big-batch treats. It makes total sense! Adjusting recipes when you’re planning for big numbers can be tricky. Don’t worry, that’s why I’m here to chat about it. Getting these Cookie Bars just right ensures everyone goes home happy! If you ever have a question that isn’t answered here, feel free to reach out via my contact page!
Can I double the recipe for Bar Cookies for a Crowd?
Oh yes, you absolutely can double this recipe! That’s one of the best things about making these for a massive gathering—they scale up like champions. If you double the ingredients, you’ll want to move from that 8-inch pan into a standard half-sheet pan, which gives you way more real estate. When you switch to a larger pan, though, you have to watch that baking time closely. Since the dough is spread thinner on a sheet pan, it might actually bake a little faster, maybe just 18 to 20 minutes depending on your oven. Start checking around the 18-minute mark so you don’t accidentally turn your Easy Dessert into a crisp!
How do I keep these Cookie Bars moist?
Moisture is key, right? Especially when you’re trying to keep them fresh for serving over a couple of days. Honestly, the brown butter and that generous amount of dark chocolate already do a ton of heavy lifting here. But if you want insurance, make sure your cooling time is respected—don’t cut them while they are scorching hot, as that lets all the internal steam escape!
When you store them, the airtight container is your best friend. Also, if you have any anxieties about dryness, try placing a small piece of apple or half a slice of bread in the container with the bars, sealed tight. They’ll absorb that little bit of moisture and keep your Cookie Bars incredibly soft!
Estimated Nutritional Data for Bar Cookies for a Crowd
When you are baking for a crowd, sometimes folks are curious about what they are loading up on, and I totally get that! When I’m calculating ingredients for large batches, especially when I’m trying to balance things for my family, I always track the basics.
Since these are rich, chocolate-packed bars, they definitely hit the decadent scale, but that’s why they are so popular! Below you’ll find the estimates based on dividing the recipe yield of 24 bars. Remember, this is just an approximation since the exact numbers will bounce around depending on the fat content of your butter and the specific chocolate you use.
This data is meant to give you a general idea so you can feel confident serving up these treats!
- Calories: Approximately 250-280 kcal per bar
- Total Fat: Around 15g per bar (Hello, brown butter!)
- Protein: Roughly 3g per bar
- Total Carbohydrates: About 28g per bar
I always want to be clear: these figures are exactly that—estimates based on the standard ingredients listed above. If you substitute the dark chocolate for milk chocolate, or if you use a different flour blend, these numbers wiggle a bit. Think of this as your baseline for these amazing, crowd-friendly bars!
Share Your Experience Making Bar Cookies for a Crowd
Now that you’ve whipped up a pan full of these phenomenal treats, I’d absolutely love to hear how they went over at your house! Sharing these kinds of easy desserts is what baking is all about, seeing the joy on someone’s face when they take that first bite.
Did you manage to keep any for yourself? Tell me! Drop a star rating right below this section so other bakers know what you thought. I live for reading your feedback on how these Bar Cookies for a Crowd performed at your gathering.
Did you add anything fun? Maybe you sprinkled sea salt on top like I sometimes do, or perhaps you got creative with different types of mix-ins? Seriously, don’t be shy—let us all know your twists and successes in the comments!
If you snapped a picture of your beautifully frosted and cut squares, tag me on social media! Seeing your bakes brings such a huge smile to my face. Thanks for joining me in the kitchen today for this truly crowd-friendly recipe. Happy baking, everyone!

Bar Cookies for a Crowd
Ingredients
Equipment
Method
- Preheat your oven to 350°F (180°C). Grease and line an 8-inch (20cm) non-stick baking pan. Leave the parchment extending over the sides to create a sling. You can secure it with binder clips if you like.
- Melt the butter in a medium saucepan over medium heat. Continue to cook, swirling the pan and whisking often, until the butter foams, turns golden brown, and has a nutty aroma. This should take about 3-4 minutes.
- Measure out 110g of the brown butter into a medium bowl. Let it cool for 15-20 minutes so it doesn’t scramble the egg.
- Add the brown sugar and granulated sugar to the bowl with the brown butter. Mix to combine.
- Add the egg and whisk well for 1-2 minutes, or use an electric mixer, until the mixture lightens in color and thickens.
- Stir in the vanilla and mix well.
- Add the flour, baking powder, and salt. Mix with a rubber spatula until some flour streaks remain. This prevents overworking the dough.
- Add the chopped chocolate and mix to incorporate with the rubber spatula.
- Press the dough into the prepared pan, smoothing the top with an offset spatula. You can add a few extra chocolate chunks to the top if desired.
- Bake for 20 to 22 minutes, until the top is golden brown and set, and the edges begin to firm up. For crispier edges, bake a little longer.
- Remove the cookie bars from the oven and let them cool in the pan on a wire rack. Use the parchment paper sling to lift the bars out of the pan. Cut into pieces with a sharp knife.
- Store the cookie bars in an airtight container at room temperature for up to 3 days.
Notes
Tried this recipe?
Let us know how it was!
Gluten-Free Chef & Latin Cuisine Innovation Specialist
My youngest son’s celiac diagnosis at four changed everything. Suddenly, all those traditional Brazilian and Portuguese recipes from my avó needed to be completely reimagined without losing their soul.
After graduating from Johnson & Wales and working Miami’s Latin fusion scene, my son’s diagnosis became my calling. How do you make gluten-free empanadas that taste like childhood? Over eight years, I’ve developed 320+ gluten-free recipes celebrating authentic Latin flavors using cassava flour and plantain alternatives.
My gluten-free empanada recipe won “Best Appetizer” at the 2023 Miami Gluten-Free Food Festival. I ran “Sabores Sin Gluten,” a catering business serving Miami’s Latino community—quinceañeras, family gatherings, all the celebrations that matter.
Food is culture, and everyone deserves to experience the joy of sharing traditional family meals, regardless of dietary restrictions.