There is just something magical about transforming a simple, perfectly baked cookie into a tiny work of art, isn’t there?
If you want your decorated cookies to truly POP, you need the right foundation, and that’s exactly what we’re talking about today: my go-to, super reliable recipe for Royal Icing for Decorated Cookies. This formula gives you that gorgeous, smooth, glossy icing that dries perfectly hard—ready for stacking and gifting!
I remember the first time I decorated cookies with my children; it was a rainy Saturday afternoon, and we were looking for a way to brighten up our day. We mixed up the dough, rolled it out, and when it came time to make the decorations, we discovered the magic of royal icing. Watching my kids’ faces light up as they piped colorful designs was a delightful moment. It was more than just baking; it was a chance for us to bond and express our creativity together. Since then, royal icing for decorated cookies has become a staple in our home, turning ordinary days into sweet, memorable moments.
Why This Royal Icing for Decorated Cookies Recipe Works (E-E-A-T Focus)
You might see recipes that call for meringue powder, but let me tell you, nothing beats the reliability of fresh egg whites for creating that spectacular cookie finish. This specific method for making Royal Icing for Decorated Cookies is fantastic because the protein structure in the egg whites creates an incredibly stable base.
When we beat them just right, they trap air, which is super important. That trapped air is what gives you that beautiful, hard shell once it dries, making your efforts last longer. Trust me, once you see that sheen, you won’t go back!
The Key to Glossy Icing
The science part is simple: you need maximum aeration! You’ve got to whip those egg whites until they look exactly like shaving cream—firm, opaque, and standing straight up when you lift the whisk. That’s the secret to really achieving that beautiful, professional-looking Glossy Icing. Don’t stop mixing too soon, or it will weep!
Gathering Ingredients for Your Royal Icing for Decorated Cookies
Alright, baking buddies! Getting ready to whip up this incredible frosting? The beauty of this recipe for Royal Icing for Decorated Cookies is how straightforward the ingredient list is. You probably have most of this stuff sitting in your pantry right now. Seriously, it’s just three main players, but we need to treat them right!
First up, the egg whites—you need three of them. If you can, make sure they are fresh, and maybe let them sit on the counter for fifteen minutes before you start, just to take the chill off. This helps them whip up faster and get fluffier for us. Then, you need a full pound of confectioners’ sugar, which is exactly 450 grams, if you prefer weighing it out. Don’t try to substitute this powdered sugar; it has to be the fine stuff for that smooth melt.
And finally, just a little splash of vanilla extract for scent—that’s what makes decorating smell so wonderful! If you’re ready to see these simple items transform into something amazing, head over to my main recipe index for all my favorite baking bases. Let’s get mixing!
Step-by-Step Guide to Making Perfect Royal Icing for Decorated Cookies
Okay, this is where the real magic happens! Don’t sweat this part; it’s mostly about letting your mixer do the heavy lifting. Remember, we are aiming for that perfect texture for your Royal Icing for Decorated Cookies to look amazing once it sets. Grab your stand mixer—or a big bowl and an electric hand mixer if you don’t have a stand mixer—and let’s go!
First, start by beating those three egg whites on medium-low speed. You’re looking for them to get frothy, which takes about one minute—don’t over-beat this initial stage! Once they look bubbly, you must add the confectioners’ sugar and vanilla extract slowly, keeping that mixer speed low. If you dump the sugar in fast, you’ll end up with a cloud of sugar dust all over your kitchen, and trust me, no one wants that cleanup!
Achieving Stiff, Shiny Peaks
Once all the sugar is incorporated and you can’t see white powder floating around anymore, it is time to turn up the volume! Boost that mixer speed up to medium-high. This might take a few minutes, but this is the moment you fight for that perfect structure. You need stiff, shiny peaks. When you lift the whisk attachment, the icing should stand straight up, not flop over. That shiny look tells you the air is perfectly trapped, and you’re ready for the next step. You’ll need about 1 hour of drying time after decorating for the icing to set nicely.
Coloring and Storing Your Royal Icing for Decorated Cookies
Once you hit those stiff peaks, you can divide your batch into smaller bowls if you want multiple colors. For coloring, please use gel food coloring, not liquid drops! Liquid coloring messes with the structure too much. When you aren’t actively using a bowl of icing—even if it’s just for two minutes while you mix up another color—slap a piece of plastic wrap directly onto the surface of the icing. This stuff dries faster than anything, and we want to keep our beautiful work soft enough to transfer into your piping bags.
Tips for Mastering Royal Icing Techniques For Decorating
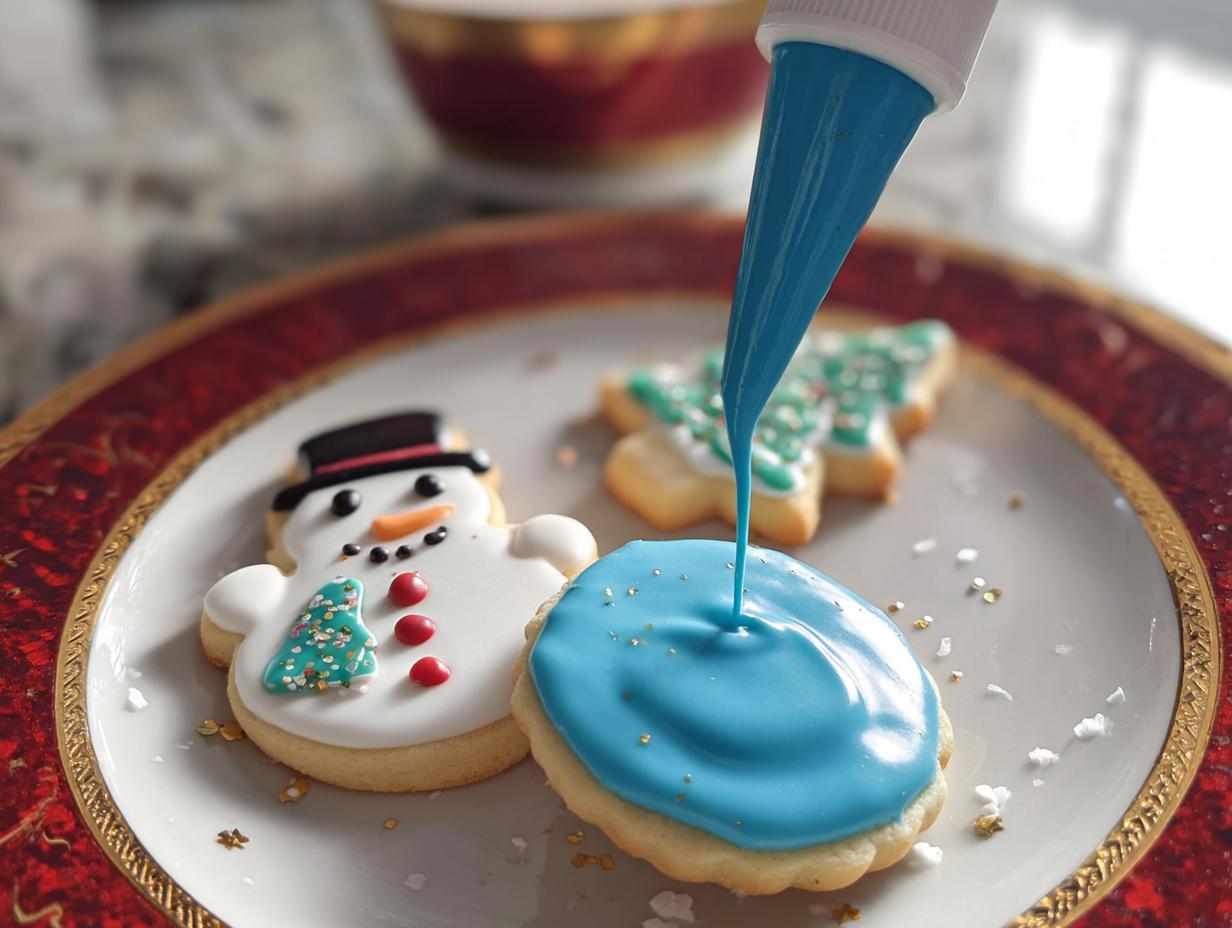
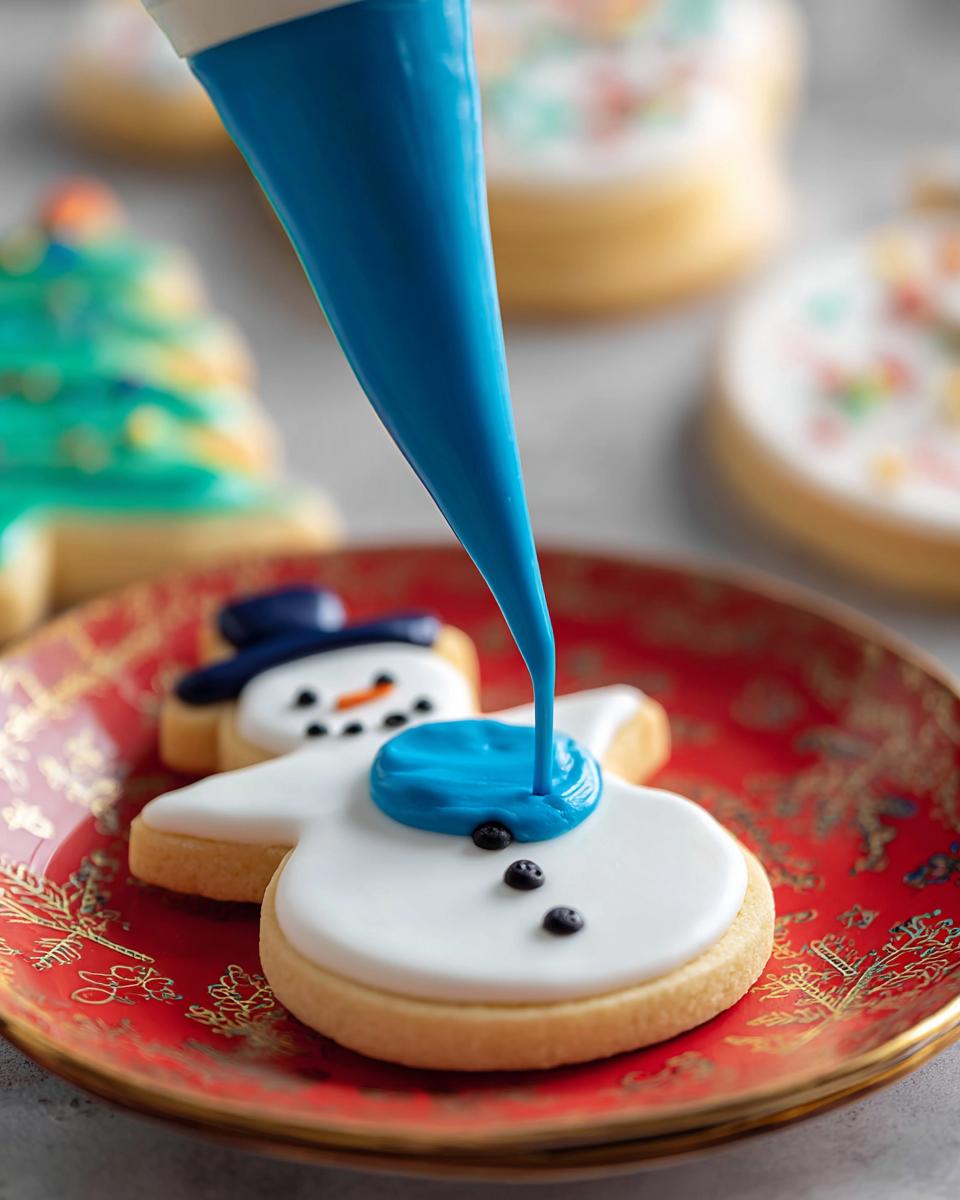
Okay, now that you have your stiff, gorgeous icing mixture, the real fun starts! Making great Royal Icing for Decorated Cookies is one thing, but using it correctly takes a little finesse. If you want to really go wild and Decorate Cookies like a pro, you have to master the consistency. This is where using the right Piping Tips comes into play, but first, we need the right ‘flow’!
The icing straight from the mixer is usually what we call ‘piping consistency’—it holds its shape perfectly for writing little messages or making detailed borders. That’s what you use for structural work!
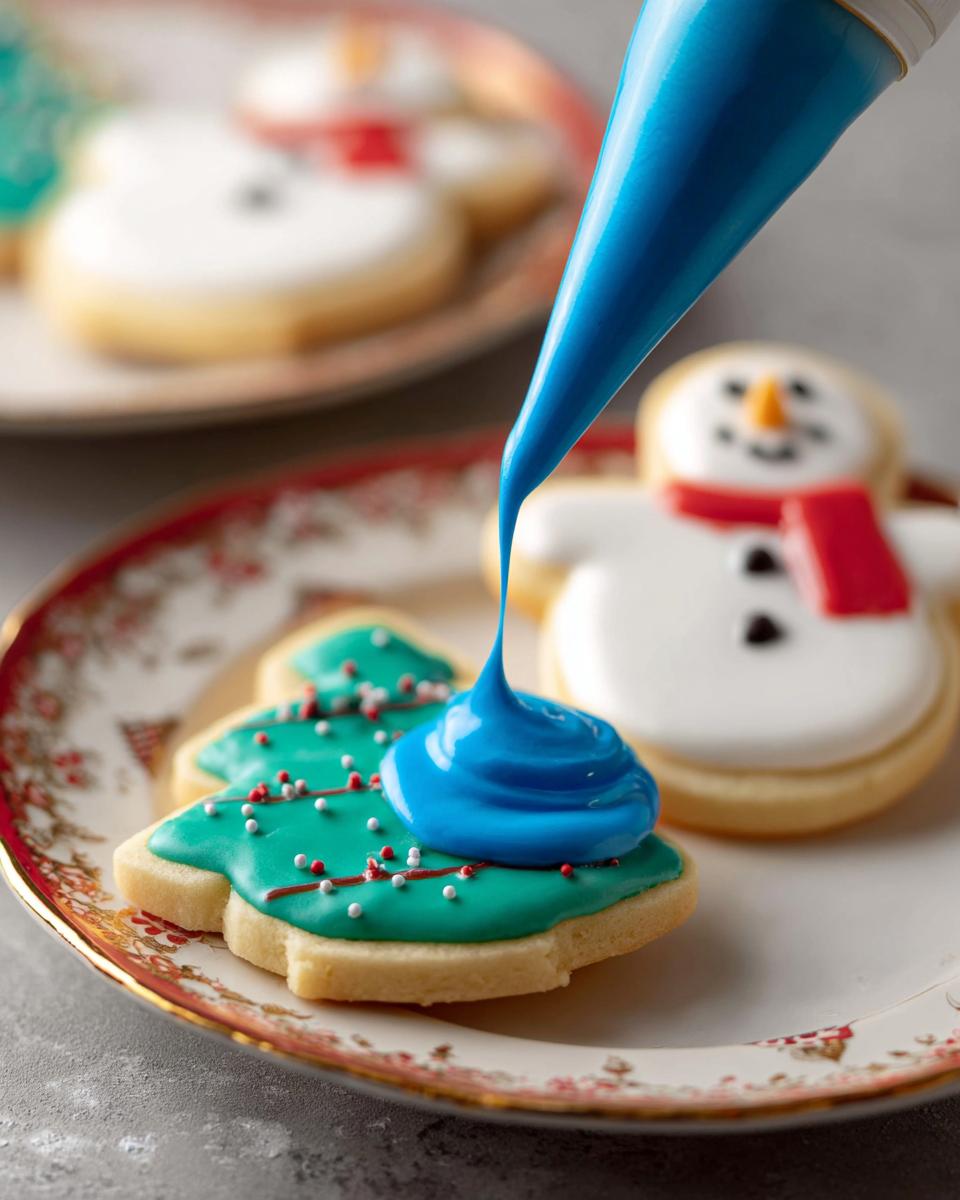
Consistency Control: From Outline to Flood
If you want that smooth, professional look where the color fills the whole cookie, you need ‘flooding consistency.’ This is super thin! To get there, take a small spoonful of your piping icing and mix in water, literally drop by drop. Stir it gently with a spatula—don’t whisk it, or you’ll introduce air bubbles!
When you lift your spatula, the icing should sink back into itself and disappear completely within about 10 to 12 seconds. That’s the sweet spot for flooding! Always do your outline with the thicker icing first, let that set for maybe ten minutes, and then use your thinned royal icing to fill it in. This trick keeps your pretty colors from running right off the edges!

Troubleshooting Royal Icing Issues
Even with the best recipe, sometimes baking throws us a curveball! Don’t panic if your beautiful batch of cookie frosting starts acting up. The most common issue is weeping or cracking, and usually, that boils down to just two things: humidity or too much water.
If your icing isn’t drying hard, like really hard, chances are the air is too humid where you are decorating. Royal icing needs dry air to set properly. If you notice weeping—where little beads of moisture form on the surface—it usually means you added one drop too many of water when thinning it out for flooding.
If cracking happens while it dries, it might mean you over-whipped it initially, incorporating way too much air, or you didn’t use enough sugar for the moisture content. My best tip? If you’re worried, just add a tiny extra spoonful of clean confectioners’ sugar and mix it really slowly with a spatula until it just comes together. That usually fixes most minor texture disasters!
Serving Suggestions for Your Decorated Cookies
Now that your cookies are stunningly decorated with that perfect finish, what’s the best way to share them? Honestly, there’s no wrong time, but these treats truly shine at family gatherings and birthday parties! They are sturdy enough for little hands to grab, which I love, and they make the greatest homemade party favors.
Think about making custom batches using this Royal Icing for Decorated Cookies for major holidays—Christmas, Easter, even just back-to-school celebrations. They are such a wonderful centerpiece. If you want more ideas on how to feature these beauties, check out my posts on seasonal baking inspiration!
Storing and Keeping Your Royal Icing for Decorated Cookies Fresh
Once you’ve finished your stunning creations, the storage is super easy, which is one reason I love this process so much! Finished, decorated cookies using this Royal Icing for Decorated Cookies will last beautifully just sitting on the counter. Keep them in an airtight cookie tin or container at room temperature for up to a week, easy peasy.
Just a quick final reminder, though: If you separated your batch and still have unused icing sitting out, you absolutely must keep that covered with plastic wrap touching the surface—otherwise, you’ll be starting over tomorrow! That’s the only tricky part about this otherwise perfect cookie frosting.
Frequently Asked Questions About This Cookie Frosting
I always get so many questions after I post pictures of these cookies, so let’s clear up a few things about making your own cookie frosting and how to best Decorate Cookies!
Can I use meringue powder instead of fresh egg whites in this Royal Icing Recipe?
Oh, yes, you absolutely can! If you’re worried about using raw egg whites, or if you just need a batch that stays good longer, meringue powder is a fantastic substitute. For this specific Royal Icing Recipe, you can generally swap the 3 egg whites for about 2 tablespoons of meringue powder mixed with 6 tablespoons of water. Just make sure you whip that meringue powder mixture up really well before you start adding the sugar, just like you would the fresh whites!
How long does it take for the icing to dry hard?
This is the million-dollar question! It really depends on the thickness of your icing and how humid your kitchen is. If you’ve done a thin flood coat, it might feel firm to the touch in about 4 to 6 hours. However, for that totally rock-hard finish you need if you plan to stack them or ship them, you should plan on letting them sit out on a rack for at least 8 to 12 hours, maybe even overnight if it’s a rainy day!
What is the best way to store leftover icing?
If you have icing left over in your bowls that you didn’t color, or icing that you colored but didn’t use up, you need to seal it up tight. Just press plastic wrap directly onto the surface of the icing in the bowl—this keeps air away, which is crucial! You can store it in the fridge for a couple of days. When you want to use it again, let it warm up on the counter for a while, and don’t be surprised if it looks a little stiff or separated. Just whip it gently with a spatula or a low-speed mixer for a minute until it becomes smooth again.
Understanding the Estimated Nutrition for This Recipe
Now, I know when we’re whipping up fun treats, nutrition isn’t usually the main focus, but a lot of you ask about the breakdown, so I wanted to give you a quick peek at what’s in this icing. Because this recipe makes one big batch, these numbers reflect the estimated nutrition calculation for the entire batch, not just a tiny dollop!
Remember, this is just a sugary frosting base, so keep that in mind! We are using straight sugar and egg whites here. These figures are totally estimates based on the ingredients listed. If you’re counting calories or carbs, you’ll want to divide these totals based on how many cookies you actually managed to decorate with the batch!
- Calories: About 51 per serving (batch)
- Carbohydrates: Roughly 13 grams
- Sugar Content: About 12 grams
- Protein: Around 1 gram
- Fat: Minimal, about 1 gram
I always say, enjoy it! When you’re decorating cookies with the kids, the memory is the best ingredient anyway. A little bit of magic sweetness never hurt anyone!

Share Your Creative Cookie Decorating Adventures
Okay, friends, that’s the whole process! You’ve made the perfect, glossy Royal Icing for Decorated Cookies, and now comes the best part—seeing what you create!
I absolutely live for seeing your colorful, happy cookie masterpieces. Seriously! When you finish decorating, please hop back here and let me know how this batch turned out for you. Did it dry hard enough for stacking? Were the kids fighting over the piping bags? Spill the details in the comments below!
And if you’re on social media, tag me! I’d love to see photos of the cookies you decorated using this frosting. Which Pinterest Trends designs did you try out? Seeing your joy in the kitchen is genuinely why I share these simple recipes.
Don’t forget to give this recipe a quick star rating right above the comments section if it helped you out! Happy decorating, everyone!

Royal Icing for Decorated Cookies
Ingredients
Equipment
Method
- In the bowl of a stand mixer or large mixing bowl, beat egg whites on medium-low speed until frothy, about 1 minute.
- With the mixer on low speed, slowly add in confectioners’ sugar and vanilla.
- Once fully incorporated, increase speed to medium-high and beat until stiff, shiny peaks form.
- Divide icing among small bowls, and dye with gel food coloring if desired. Keep any icing that isn’t being immediately used covered with plastic wrap as it dries out very quickly. Transfer to piping bags and decorate cookies.
Nutrition
Notes
Tried this recipe?
Let us know how it was!
Gluten-Free Nutritionist & Family Meal Planning Expert
Working as a pediatric dietitian at Children’s Hospital of Denver, I kept meeting families overwhelmed by managing their children’s celiac disease. Parents stressed, kids frustrated, everyone eating bland boxed “gluten-free” products.
That’s when I realized my calling: creating practical, balanced gluten-free solutions for real families with busy schedules. I’ve developed 375+ family-friendly recipes focusing on lunch boxes, after-school snacks, and make-ahead dinners that actually work.
My meal planning system was featured in Parents Magazine, and I presented research at the Rocky Mountain Pediatric Nutrition Conference. My evidence-based approach ensures recipes meet both taste and health standards—families need solutions that work in the real world, not just perfect test kitchens.