Oh, you know the feeling. It’s Sunday afternoon, you’re staring down the barrel of a chaotic work week, and the thought of another sad, gloppy [quick and easy] desk lunch makes you want to cry into your salad bowl. I used to think meal prepping sandwiches meant sacrificing flavor for convenience. Not anymore! I’m Elena Brown, and after years of tweaking—especially making sure everything works beautifully for my gluten-free eating crew—I figured out how to make Sandwich Ideas Recipes Meal Prep That Actually Tastes Great.
I remember the first time I tried to meal prep sandwiches. It was a Sunday afternoon, and I was feeling completely overwhelmed by the busy week ahead. I dove into my nonna’s old recipe book, hoping to sneak some of her cherished, comforting flavors into my weekday fuel. I started experimenting hard with various gluten-free breads and fillings, and honestly, it became an obsession! Together with my newfound passion for meal prep, I created a lineup of sandwiches my whole family adored. Each bite brought back memories of our Sunday dinners, reminding me that even structured meal prep could be both nourishing and deeply nostalgic.
My love for creating beautiful, tasty [sandwich] options has only grown since then, and I’m so excited to share this game-changer with you. Trust me, these wraps are packed with bright flavors and textures that hold up for days!
Why These Sandwich Ideas Recipes Meal Prep That Actually Tastes Great Work All Week
When I create a recipe for meal prep, I’m not just throwing things in a container and hoping for the best—no soggy sadness allowed! These Sweet Potato and Chickpea Wraps are masterpieces of texture retention. They are designed to be packed on Sunday and still taste amazing on Thursday. It’s all about preparing the components correctly so they don’t turn your tortilla into mush.
- The roasted elements stay firm and flavorful, avoiding that sad, wet texture you get from unprepared veggies.
- Hummus acts as a crucial moisture barrier, protecting the wrap from overly wet ingredients.
- The kale is blanched, which softens it perfectly without making it slimy by mid-week.
If you’re looking for more inspiration that stands the test of time, check out my main collection of best gluten-free recipes. Plus, for general tips on keeping your midday meal excellent, I always look at resources like Work Week Lunch!
Flavor Profile and Texture Maintenance
This is where the real magic happens for any true **Sandwich Ideas Recipes Meal Prep That Actually Tastes Great**. We roast the sweet potatoes until they are tender but have developed those gorgeous, slightly caramelized edges. The chickpeas get crisped up with curry powder and paprika in the oven too! Because these elements are dry and flavorful before they even hit the tortilla, they fight sogginess tooth and nail. They offer that perfect substantial chew, which is exactly what you need in a wrap that lasts.
Making Your Lunch Quick and Easy
The beauty of this setup is the batch cooking aspect. You aren’t assembling three wraps every single morning—you’re making the whole veggie filling once! Once the sweet potatoes and chickpeas are roasted, your final assembly for your **lunch** is incredibly **quick and easy**. You whip up the avocado mash, blanch the kale while things cool, and then you’re just layering. That upfront roasting time saves you precious minutes during the morning rush all week long.
Gathering Ingredients for Your Sandwich Ideas Recipes Meal Prep That Actually Tastes Great
Okay, for these wraps to last all week and taste phenomenal, you can’t just eyeball the spices! Meal prep success relies on precision, especially when dealing with textures and flavors that need to stay bright. We organize everything into two main groups for shopping and staging, which makes the actual cooking morning so much less stressful. Don’t worry, nothing here is overly complicated, but having your seasonings ready to go makes all the difference in creating these high-quality **Sandwich Ideas Recipes Meal Prep That Actually Tastes Great**.
For the Roasted Vegetables and Spiced Chickpeas
This is where we build the backbone of the flavor! You’ll need one sweet potato, chopped up into thick fries—you want them chunky enough to hold up to roasting. For the spices, make sure you have cinnamon and cumin ready for the potato bath. For the chickpeas, grab one can, remember to thoroughly rinse and drain them first! Then, grab your paprika and curry powder; these guys are key to giving those chickpeas that savory, slightly spicy kick. Keeping the amounts precise here ensures the sweet and savory balance is perfect.
For the Assembly of the Wrap Sandwich
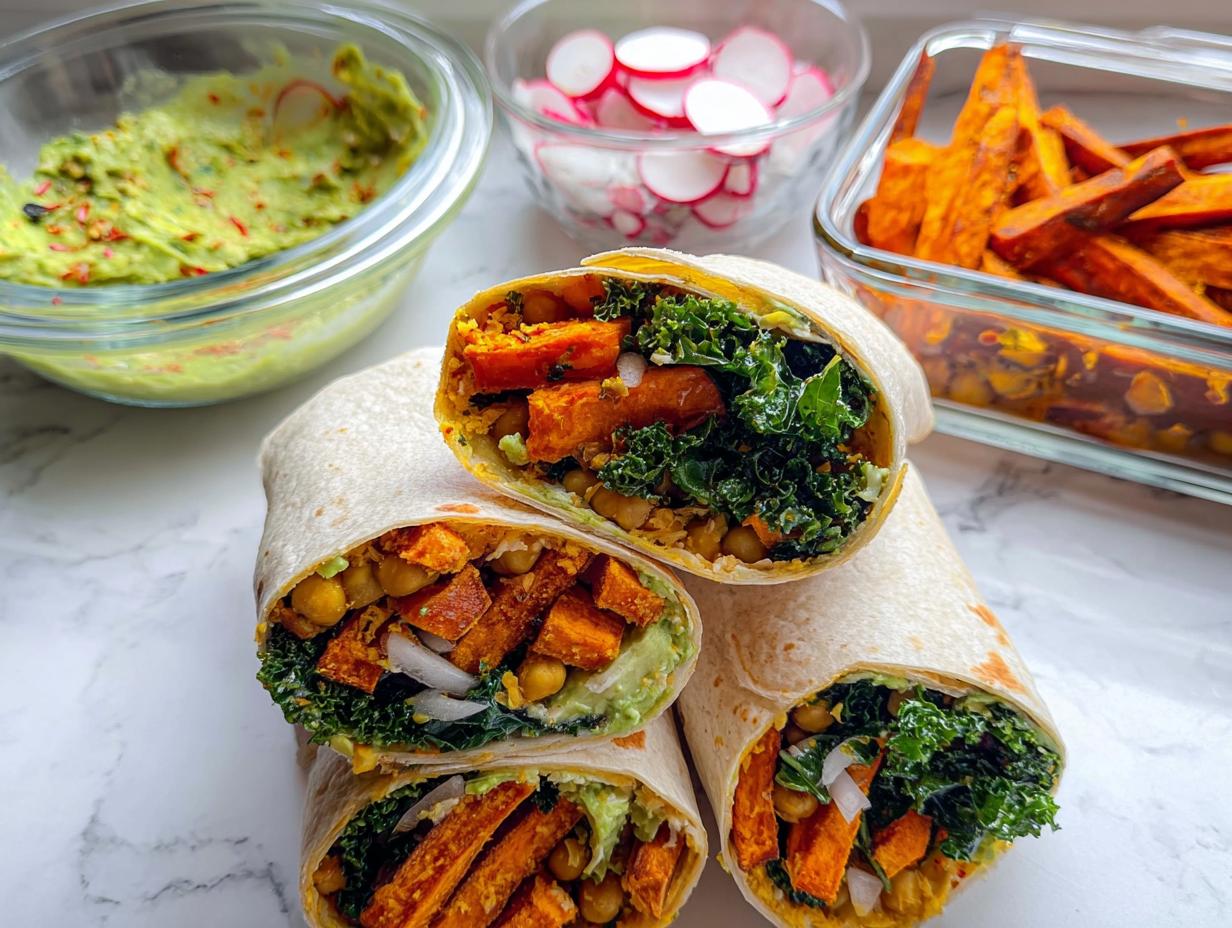
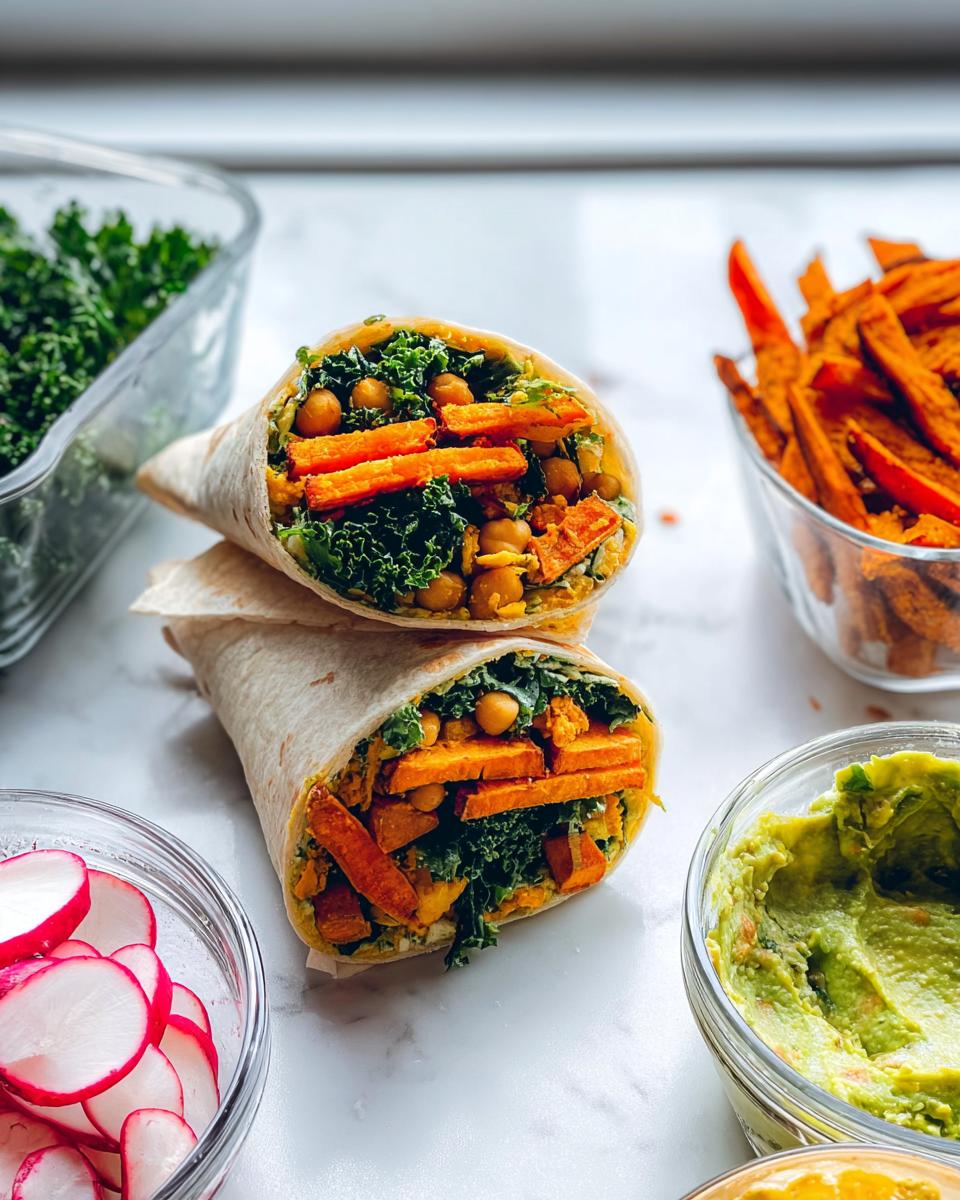
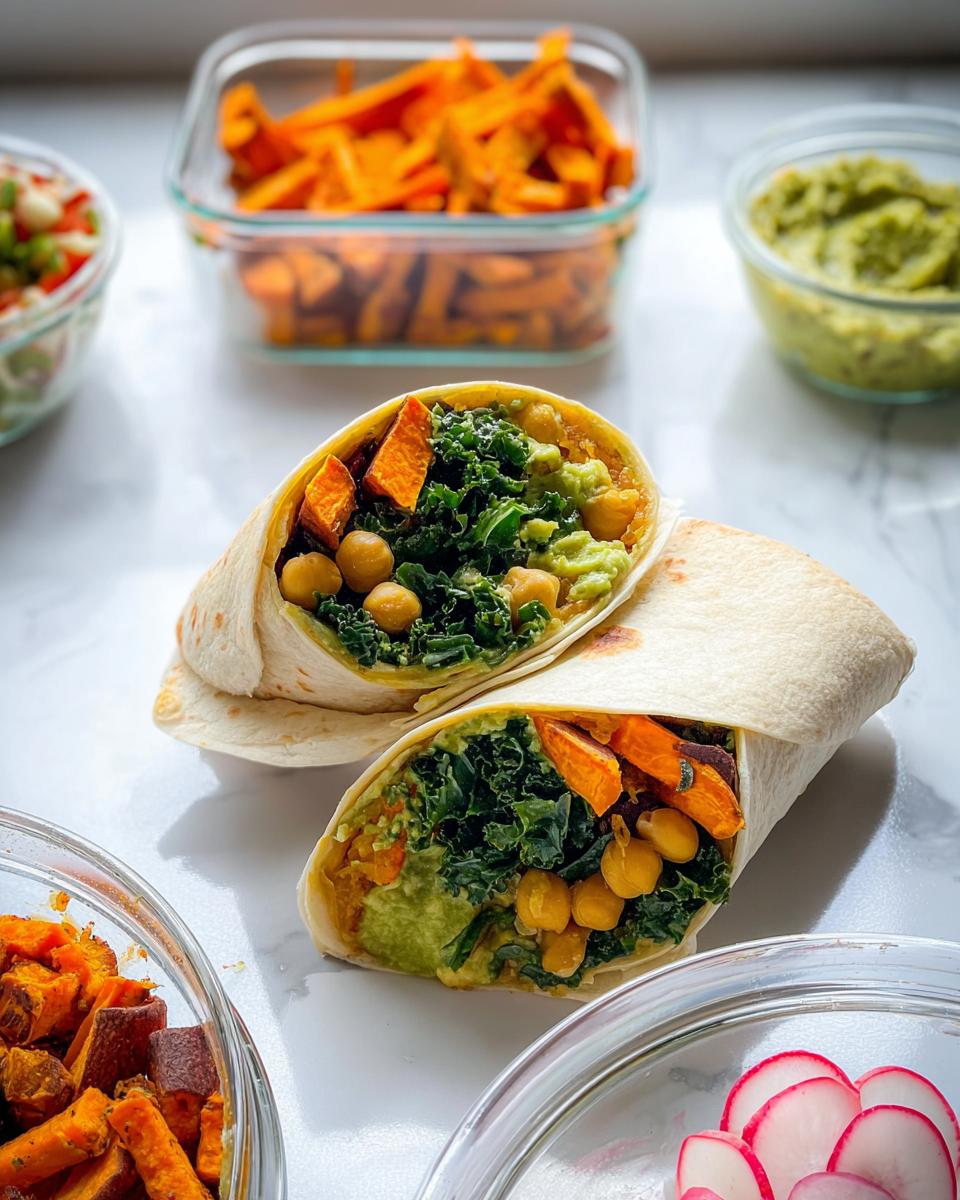
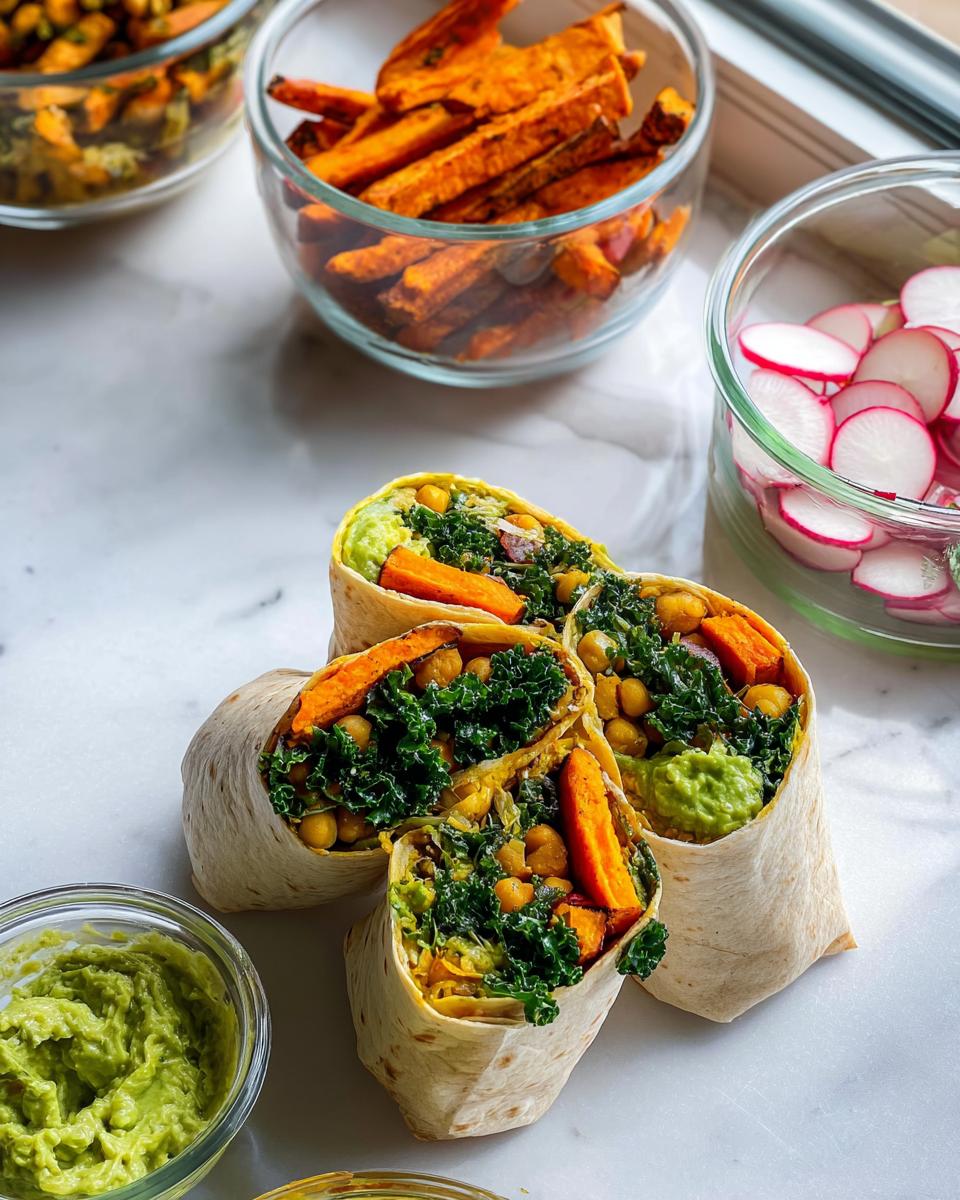
Now for the fresh stuff that holds it all together! You’ll need plenty of kale—about three cups chopped—and one big avocado. Warning: you must mash that avocado immediately with a tablespoon of lemon juice; this is my non-negotiable step to prevent brown mush later in the week! Grab your three 10-inch tortillas, a cup of hummus (my favorite base layer!), and some radishes sliced up for a little crunch. That little bit of acid from the lemon juice is what keeps your final **sandwich** looking fresh!
Step-by-Step Baking for Flavorful Sandwich Ideas Recipes Meal Prep That Actually Tastes Great
This is the part where we transform simple vegetables into sturdy, flavorful meal prep components! Since the sweet potatoes and chickpeas cook differently and often need different spots in the oven, we treat them separately. It might seem like an extra step, but trust me, roasting them correctly ensures your wraps don’t get watery by Wednesday. Think of this as setting the flavor foundation for your entire week’s **lunch**!
When you’re ready, make sure you check out how I handle sheet pan veggies in my Sheet Pan Veggie Bowls—the principles of high heat are similar. We want dry, crispy flavor bombs!
Roasting the Sweet Potatoes
Get that oven cranked up to 425°F (220°C) first thing! Take those chopped sweet potato fries and toss them with half your olive oil and that warm coating of cinnamon and cumin. Spread them out nicely on one baking sheet—they can’t be touching, or they’ll steam instead of roast! They go into the oven for a good 30 to 35 minutes. Remember to flip them halfway through. We are looking for tender centers and slightly darkened, flavorful edges.
Crisping the Spiced Chickpeas
Now for the chickpeas. While the potatoes are roasting, toss those rinsed and drained little guys in the same bowl (no need to wash it!) with the remaining oil, paprika, and curry powder. Spread them onto a separate baking sheet. These need less time—about 15 to 20 minutes on a different rack. They’ll get nice and savory. The most important thing here? Once both components are done, you have to let them cool down completely to room temperature before you even think about assembly. Cooling prevents trapped steam, which keeps your final wrap integrity intact!
Preparing Fresh Components for the Best Sandwich Ideas Recipes Meal Prep That Actually Tastes Great
While our roasted veggies are cooling off—and trust me, you must let them chill completely—we move on to the fresh items. My secret weapon for making greens last all week in a **sandwich**? Blanching! Don’t worry, it sounds fancy, but it’s really just a quick bath that locks in color and softens the kale just enough.
We do this so your greens aren’t tough after three days in the fridge. It’s a little extra step that screams culinary authority, right? It shows we care about the texture of our weekday **lunch**!
Blanching Kale for Optimal Texture
Get a pot of water boiling—don’t forget a nice pinch of salt in there! Drop your chopped kale in for just a minute or two until it looks super vibrant green. Then, immediately plunge it into an ice bath. This stops the cooking process dead in its tracks! Once it’s cold, lay it out on a clean towel and pat it dry. Seriously, pat it dry well. Excess moisture is the enemy of any good meal prep situation!
Avocado and Chickpea Prep
This is a **quick and easy** move that pays off huge. Mash up that avocado, but the second it’s mashed, hit it with half a tablespoon of that lemon juice and a tiny pinch of salt. That acid is what keeps it looking green, not brown, by Thursday. Also, take your cooked chickpeas and gently mash them—we don’t want whole mush, just enough to break them up slightly so they cling to the other ingredients inside the wrap. See? Simple steps, maximum staying power.
Assembling Your Perfect Meal Prep Sandwich Wrap
This is the moment of truth! If we assemble these wraps the wrong way, all that roasting and blanching we did upfront will be for nothing. We need a structural strategy to keep this flavor bomb intact for days. Forget just piling things in the middle; we are building a fortress of flavor here. Follow this layering order exactly, as it’s designed to fight off moisture and keep your tortilla whole, making these the ultimate **Sandwich Ideas Recipes Meal Prep That Actually Tastes Great**.
Once you master this layering, you can check out my guide on simple weekly lunch meal prep for more inspiration on organizing your week!
Layering Strategy for Sandwich Ideas Recipes Meal Prep That Actually Tastes Great
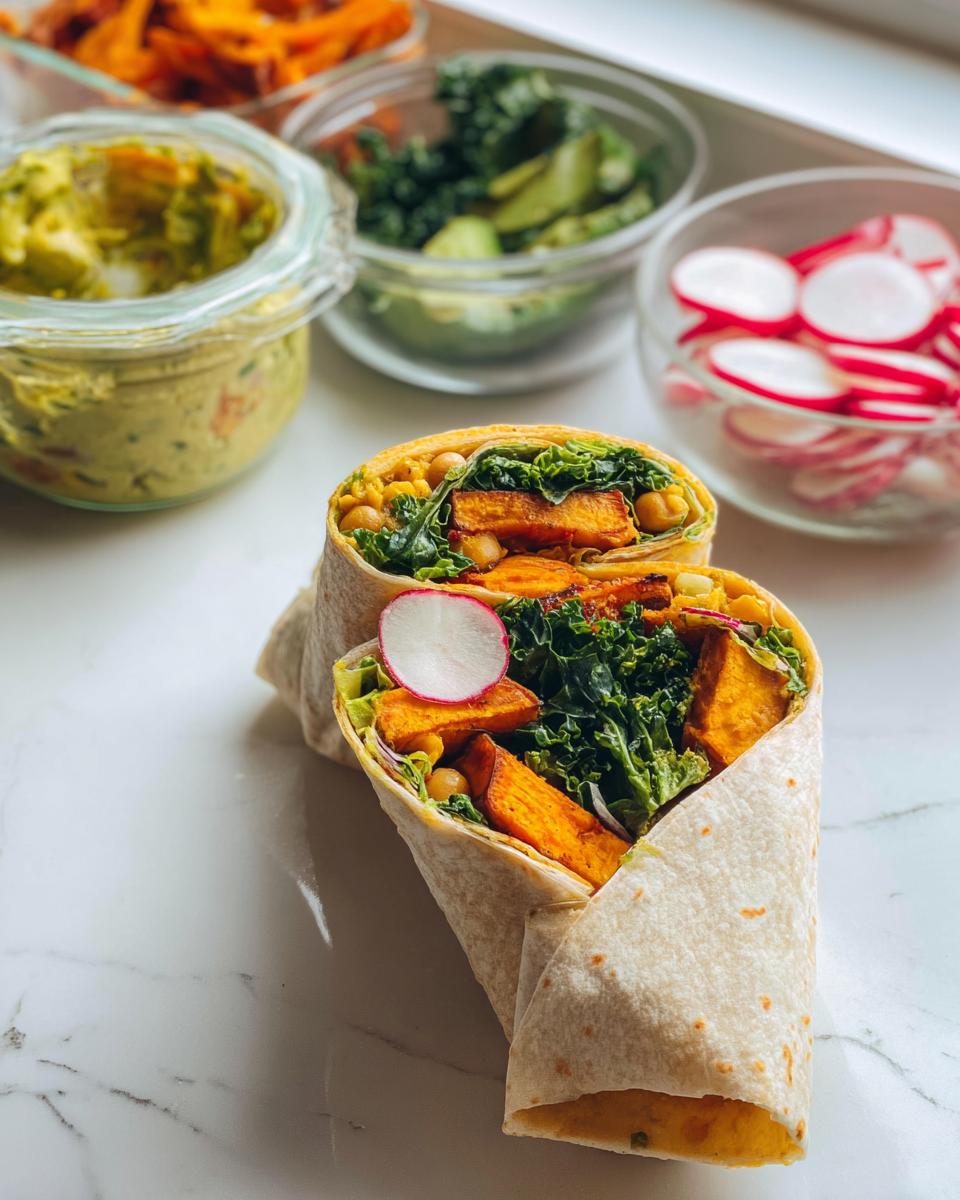
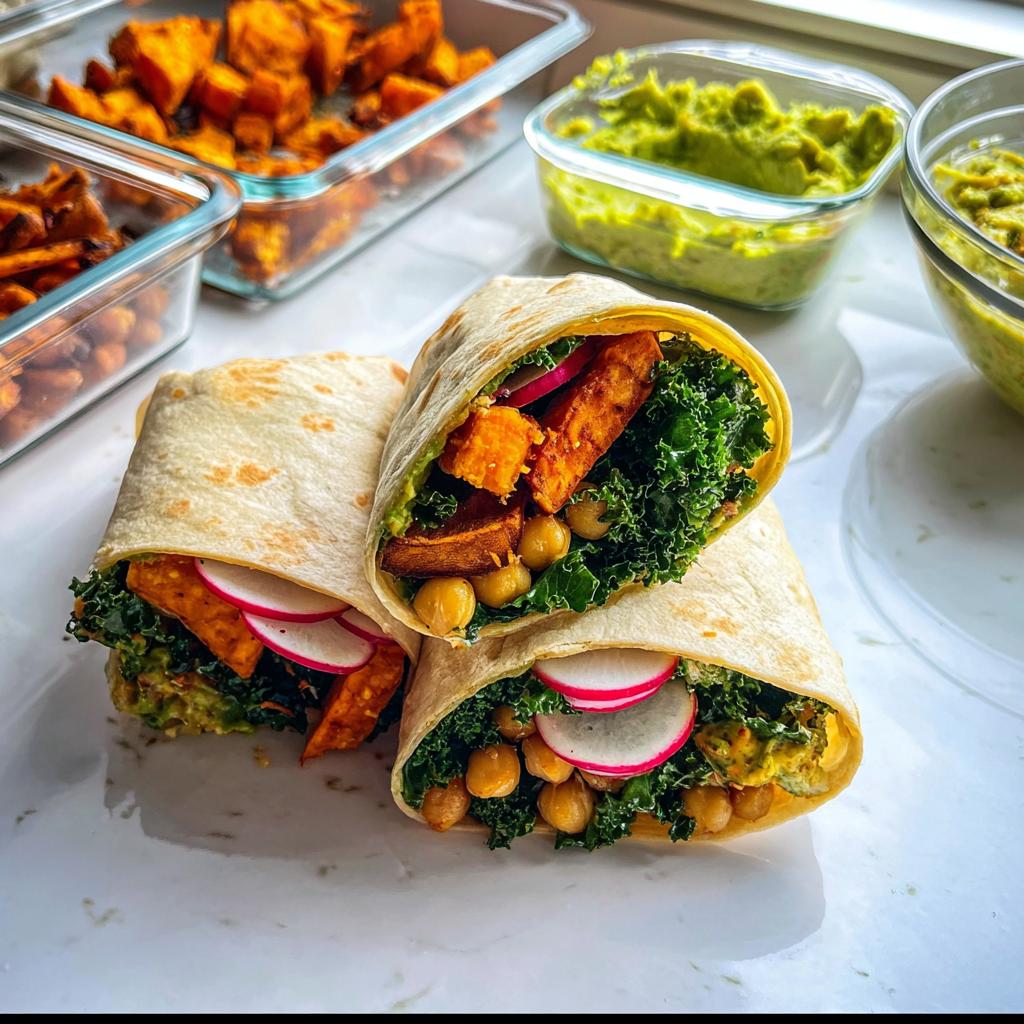
Lay out your tortilla nice and flat. First, spread one-third of your hummus horizontally across the bottom third of the wrap. That hummus is your secret weapon—it’s the moisture barrier! Next, place your dried, blanched kale directly on the hummus. Then, add an even layer of your cooled sweet potato fries, followed by a layer of the mashed avocado. Now, sprinkle on your lightly mashed chickpeas, and finish with that layer of sliced radishes right on top. Don’t overfill, or things will shift!
The Quick and Easy Rolling Technique
Time to seal the deal! First, grab the bottom edge of the tortilla—the side closest to you—and pull it up and over the filling. Tuck that edge in tightly, right underneath the ingredients. Next, fold in both the left and right sides toward the center, wrapping them snugly around the filling. Now you have a neat, contained square. From there, keep rolling the entire package tightly away from you until you reach the top edge. That tight tuck at the beginning is what keeps it from ever falling apart!
Tips for Storing Sandwich Ideas Recipes Meal Prep That Actually Tastes Great
This is the best part of planning ahead! Good news: these wraps last up fantastically. I’ve tested them, and they hold up beautifully for up to four days stored tightly wrapped in an airtight container in the fridge. That means you’re covered almost the entire work week with just one prep session. However, I really need to warn you—they are absolutely not freezer friendly. Things just get weird when they thaw.
Now, since we are talking about **Sandwich Ideas Recipes Meal Prep That Actually Tastes Great**, I have a special note for my gluten-free friends. If you used gluten-free wraps, the texture changes a lot once they sit overnight, often breaking or getting too sticky. For the absolute best experience, if you use GF tortillas, store the filling and the tortillas separately. Then, just assemble it right before you eat! That keeps everything tasting just as fresh as day one.
Variations on These Flavorful Sandwich Ideas Recipes Meal Prep That Actually Tastes Great
If you’re anything like me, you love the core structural integrity of this recipe, but maybe you need a little flavor refresh halfway through the week! Don’t worry about messing up the meal prep structure; we can swap components easily. For instance, if you’re out of kale, go ahead and use fresh spinach instead—just make sure you pat it dry really well. Another fun trick is changing up the spice profile on the chickpeas!
You could swap the curry powder and paprika for some smoked salt and a hint of oregano for a completely different vibe. For a bit more depth, you can even check out how I use chickpeas in my Chickpea and Spinach Coconut Curry for inspiration on new spice mixes. These little tweaks keep your **lunch** exciting!
Frequently Asked Questions About Meal Prepping This Sandwich
It’s smart to plan ahead, but I know you have questions about keeping things fresh and tasty all week long. Meal prepping **sandwich** options can sometimes feel tricky, especially when you want that ‘just made’ crunch. Don’t worry, I’ve gathered the most common ones here to make sure your **lunch** prep goes perfectly!
If you want to know more about my philosophy on gluten-free cooking and keeping traditions alive, you can always check out my About Page!
Can I substitute the tortillas for gluten-free bread for this lunch?
Oh, that’s a fantastic question, especially for my gluten-free readers! Yes, you absolutely can switch to your favorite gluten-free bread slices instead of tortillas. However, you have to make one crucial change for longevity. Because GF bread often absorbs moisture much faster than a sturdy tortilla, I highly recommend you store the main filling—all the roasted veggies and chickpea mix—completely separate from the bread/wraps. Assemble your **lunch** right before you eat it. If you pack them together, the bread will likely get soggy or start to break apart during storage.
How do I prevent the avocado from browning in my quick and easy prep?
This is non-negotiable, seriously! If mashed avocado sits in the fridge for too long, it turns an unappetizing grayish-green. The trick is using that fresh lemon juice right away. When you mash the avocado, make sure you mix in at least half of the tablespoon of fresh lemon juice immediately. That acidity is your shield against oxidation! It keeps the avocado looking bright and ready to go, even if you’re making these a little more **quick and easy** by prepping them on Saturday for Monday lunch.
Can I make these ahead for more than four days?
While I preach about making things last, I draw the line at five days for these wraps, and here’s why: fresh components just start to degrade. The sweet potato and chickpeas hold up beautifully, but elements like that beautiful mashed avocado and the fresh kale really start to lose their punch after day four. If you are planning very far ahead, freeze the sweet potato and chickpea mixture only, but you’ll have to blanch fresh kale and mash fresh avocado on assembly day. For the absolute best taste and structural integrity for your **sandwich**, aim to eat these within four days of making them.
Estimated Nutritional Information for This Lunch Option
Now, I know some of you are tracking macros, and others just want to know if this colorful wrap is secretly packing a sugar bomb! As a recipe developer, I always have to give the disclaimer that since we are dealing with homemade components—and everyone uses different brands of hummus or oils—these numbers are just an educated guess based on the portions listed for three wraps.
But I can tell you this: because we’re skipping heavy sauces and relying on whole vegetables, this is a powerhouse [lunch] that keeps you full without weighing you down. Think of this as a nutritional guideline rather than a binding contract!
Here is the *estimated* breakdown for one of these amazing Sweet Potato and Chickpea Wraps:
- Calories: Approximately 450–500 kcal
- Total Fat: Around 18g (Thanks to that healthy avocado and olive oil!)
- Protein: Roughly 15g (The chickpeas really step up here.)
- Carbohydrates: About 65g (Where most of the needed energy comes from.)
Remember, if you use a lower-fat hummus or skip the sweet potato, those numbers will shift! But overall, these **Sandwich Ideas Recipes Meal Prep That Actually Tastes Great** deliver fantastic flavor alongside balanced refueling!
Share Your Favorite Sandwich Ideas Recipes Meal Prep That Actually Tastes Great
That’s all the detailed magic for the Sweet Potato and Chickpea Wraps! I truly hope these become your new go-to for busy weekdays. I put so much love and flavor science into making sure they taste incredible, even days after you’ve assembled them!
Now, I genuinely want to hear from you! Did you stick exactly to my recipe, or did you throw in some chili flakes with the chickpeas? Maybe you found an even better gluten-free tortilla that stays soft? Please, don’t keep those secrets to yourself!
Take a few minutes to try these out, and then come right back here and leave a rating—five stars if it kept you happily fed all week! Let’s build a community around making weekday **lunch** exciting. If you want to share pictures or just say hello, you can always reach out over at my Contact Page. Happy prepping, friends!
Sweet Potato and Chickpea Wraps for Meal Prep
Ingredients
Equipment
Method
- Preheat your oven to 425°F (220°C).
- To a mixing bowl, add the chopped sweet potato, half of the olive oil, cinnamon, cumin, salt and pepper. Mix well with a wooden spoon or your hands. Pour the sweet potato onto a baking sheet and spread out the “fries” so they’re not touching each other. Bake for 30 to 35 minutes on a lower rack, flipping halfway, until the “fries” are tender and have darkened in color on the outside.
- To the same bowl you used before, add the chickpeas, remaining olive oil, paprika, curry powder and salt to taste. Pepper is optional. Mix with a wooden spoon so the chickpeas are coated in the spices. Pour the chickpeas onto another baking sheet and bake for 15 to 20 minutes on a middle or upper rack. They’ll be a little crispy and darker in color when they’re finished.
- Let the sweet potato and chickpeas cool down to room temperature when finished.
- Meanwhile, bring 4 to 5 cups of water to boil and add a few big pinches of salt. Get a bowl of very cold water (it’s best if you can add a few ice cubes) ready to go next to the stove. When the water is boiling, carefully add the chopped kale and let it cook for 1 to 2 minutes, until it’s vibrantly green. Drain the water from the pot using a strainer and transfer the kale to the bowl of cold water. This stops it from cooking more. Lay a clean kitchen towel on the counter and spread the blanched kale on it to dry before assembling your wraps.
- Mash the avocado in a bowl. Add half of the lemon juice and a pinch of salt and mix. In another bowl, mash the cooked chickpeas gently. Add the remaining lemon juice and mix.
- Lay a tortilla down on a flat clean surface. Spread one-third of the hummus on the lower third of the wrap horizontally, in the shape you want your wrap to be in. Place one-third of the kale on the hummus, followed by an even layer of sweet potatoes. Add one-third of the mashed avocado on the potatoes, followed by one-third of the lightly mashed chickpeas. Top it off with a layer of sliced radishes.
- Fold the bottom of the wrap over the filling. Then fold the two sides over the edges of the filling. With the sides folded in, fold the wrap and filling completely over away from you. Adjust to tuck in the sides and keep rolling until you’re out of tortilla. Repeat these steps two more times to make all three wraps.
Notes
Tried this recipe?
Let us know how it was!
Gluten-Free Culinary Storyteller & Recipe Heritage Specialist
Getting diagnosed with non-celiac gluten sensitivity in my late twenties felt like losing my Italian identity. Growing up in nonna’s Brooklyn kitchen, learning traditional techniques that suddenly became off-limits—I decided to fight for those family food traditions instead of giving up.
With my food journalism background and European baking training, I became obsessed with recreating authentic flavors in gluten-free formats. I’ve adapted 400+ traditional recipes from various cultures, with my gnocchi recipe winning “Recipe of the Year” from the National Gluten-Free Living Awards in 2022.
I collaborate with the Italian-American Cultural Center to document traditional family recipes and volunteer with the Westchester Celiac Support Group, teaching monthly pasta-making classes.
Food is the heart of family storytelling. No one should sacrifice their cultural heritage due to dietary restrictions.