Oh, do I have a weeknight lifesaver for you! If you are like me, sometimes dinner feels like a race you’re guaranteed to lose by 6 PM. But what if I told you that seafood can be your new best friend on those absolutely chaotic evenings? I still remember the first shrimp dish I made for my family after I started focusing on gluten-free cooking. It was a chaotic weekday evening, and I was racing against the clock to get dinner on the table.
With just a handful of ingredients and a bit of creativity, I whipped up a simple garlic shrimp dish that had my kids asking for seconds—and even thirds! That experience taught me that shrimp can be a quick, flavorful solution for busy nights, and since then, I’ve experimented with countless variations tailored for gluten-free diets. This recipe, which I firmly believe is The Only Shrimp Recipes Recipe You’ll Need (2025), was a game-changer in our kitchen. I’m Sophie Williams, by the way—a Gluten-Free Nutritionist and Family Meal Planning Expert—and I developed this coconut shrimp recipe to be fast, flavorful, and worry-free for your whole crew.
Why This is The Only Shrimp Recipes Recipe You’ll Need (2025)
You just can’t beat the efficiency of this dish. Honestly, if you need dinner on the table in under half an hour, this is your go-to solution. We’re talking 10 minutes of prep time and another 10 minutes of cook time. That’s lightning fast, right? It means you can spend less time hovering over the stove and more time actually sitting down with your family.
When I was designing this recipe, I wasn’t just trying to make it quick; I needed it to be something my kids would genuinely ask for—not sigh dramatically about! That coconut shrimp coating is just magical. It tastes like something special you’d order out, but it’s so simple to dredge and fry up right here in the kitchen. Plus, for us navigating gluten-free cooking, this entire recipe shines because the coating is easily customized. It really stands out from those overly complicated other shrimp recipes out there.
Quick Prep and Cook Times for Busy Weeknights
Seriously, look at those numbers: 20 minutes, total! That’s less time than some takeout takes to show up on your porch. Because the prep is so minimal—just setting up a dredging station—you can get the shrimp prepped while the oil is heating up. It’s built for those days when you walk in the door already feeling behind schedule.
Family-Approved Flavor Profile
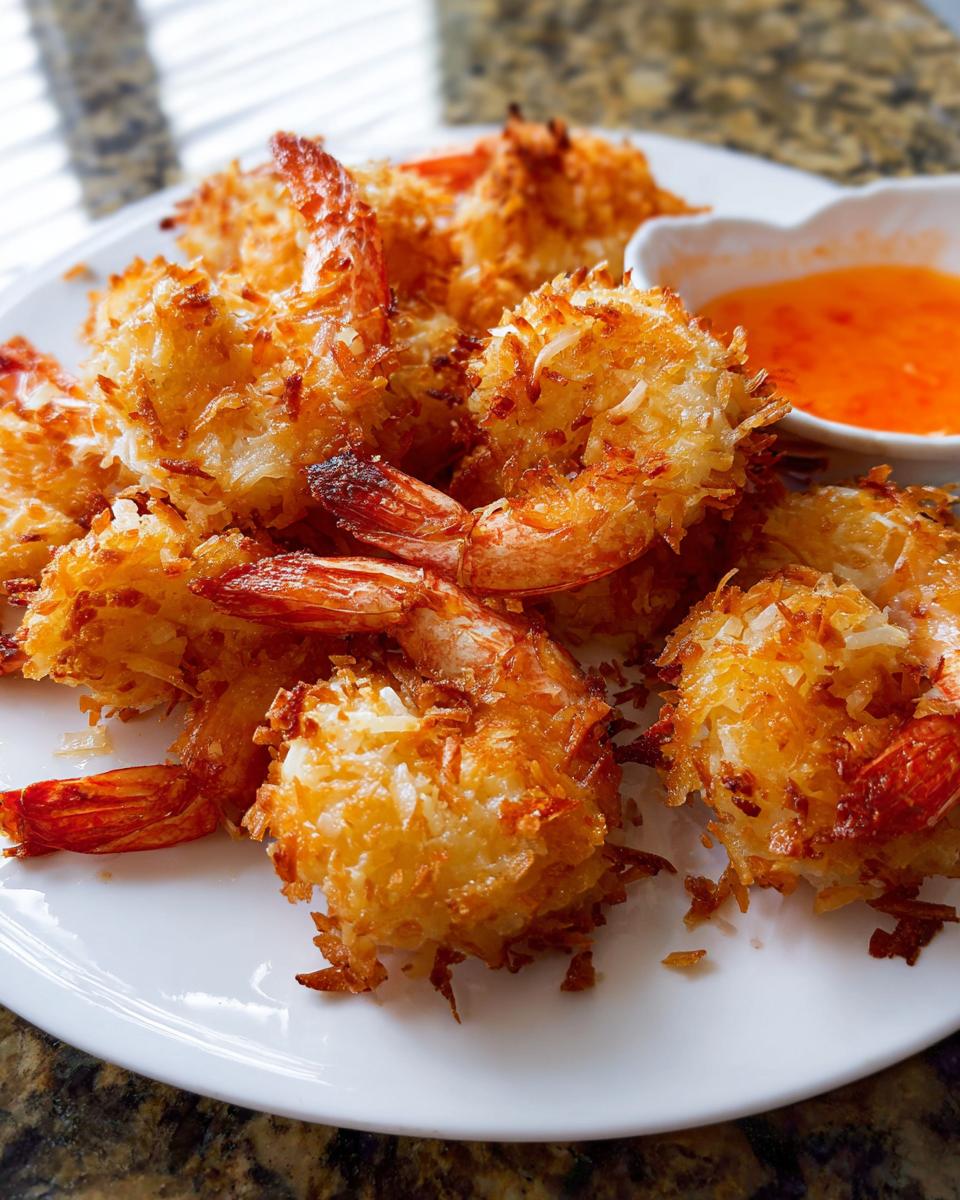
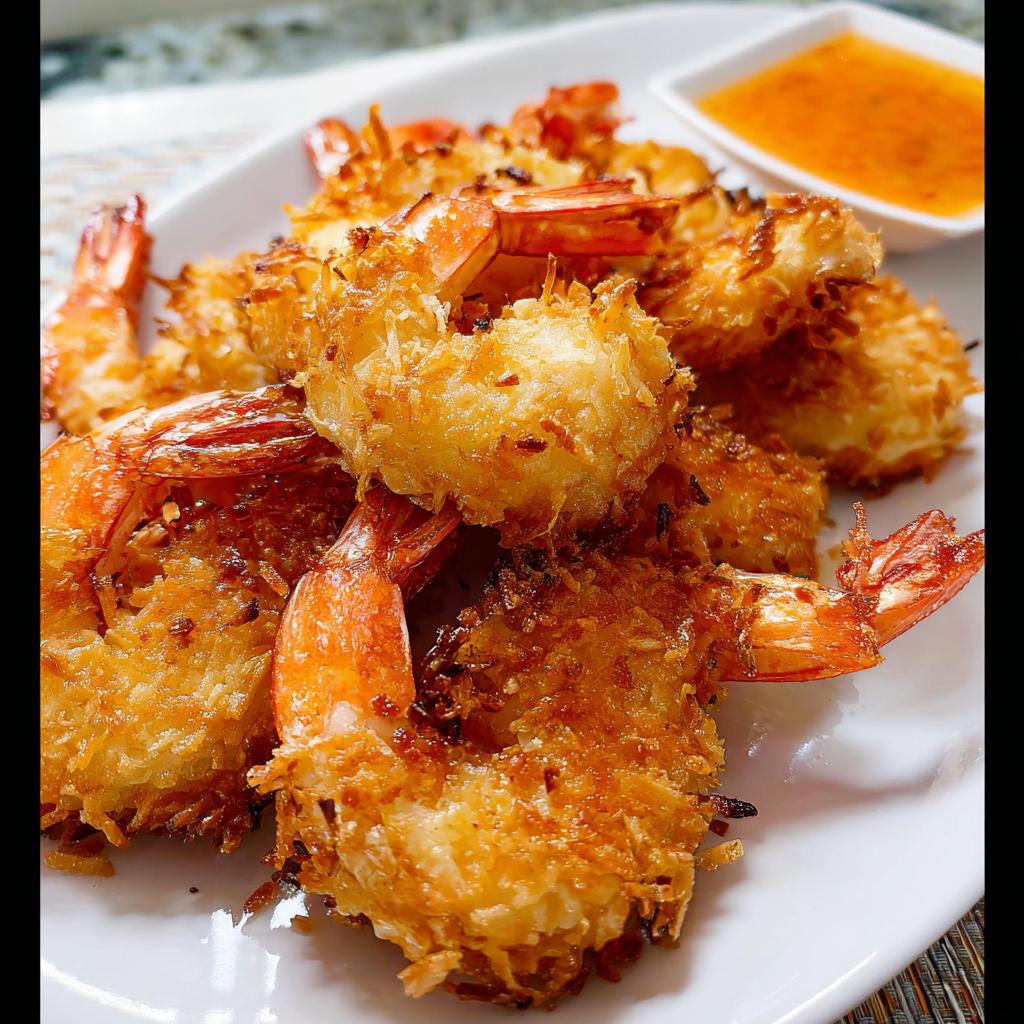
Who doesn’t love a little crunch? The combination of Panko and sweet coconut gives you the best golden crust. It’s satisfying, it’s sweet-and-savory, and kids love handling them (especially if you leave the tails on like I do!). It’s the perfect introduction to making shrimp feel like a fun treat rather than just ‘healthy seafood.’
Gathering Ingredients for The Only Shrimp Recipes Recipe You’ll Need (2025)
Okay, let’s talk about what you need to gather because precision really matters, especially when you’re frying. We aren’t just tossing things in a bowl; we are building layers of flavor and crunch here! When you measure out your flour, make sure you’re spooning it into the cup and leveling it off—otherwise, you end up with too much dry stuff and your coating won’t stick right. Trust me on this technique; it’s a game-changer. Getting your setup right before you start dredging will save you so much heartache!
For the Coconut Shrimp Coating
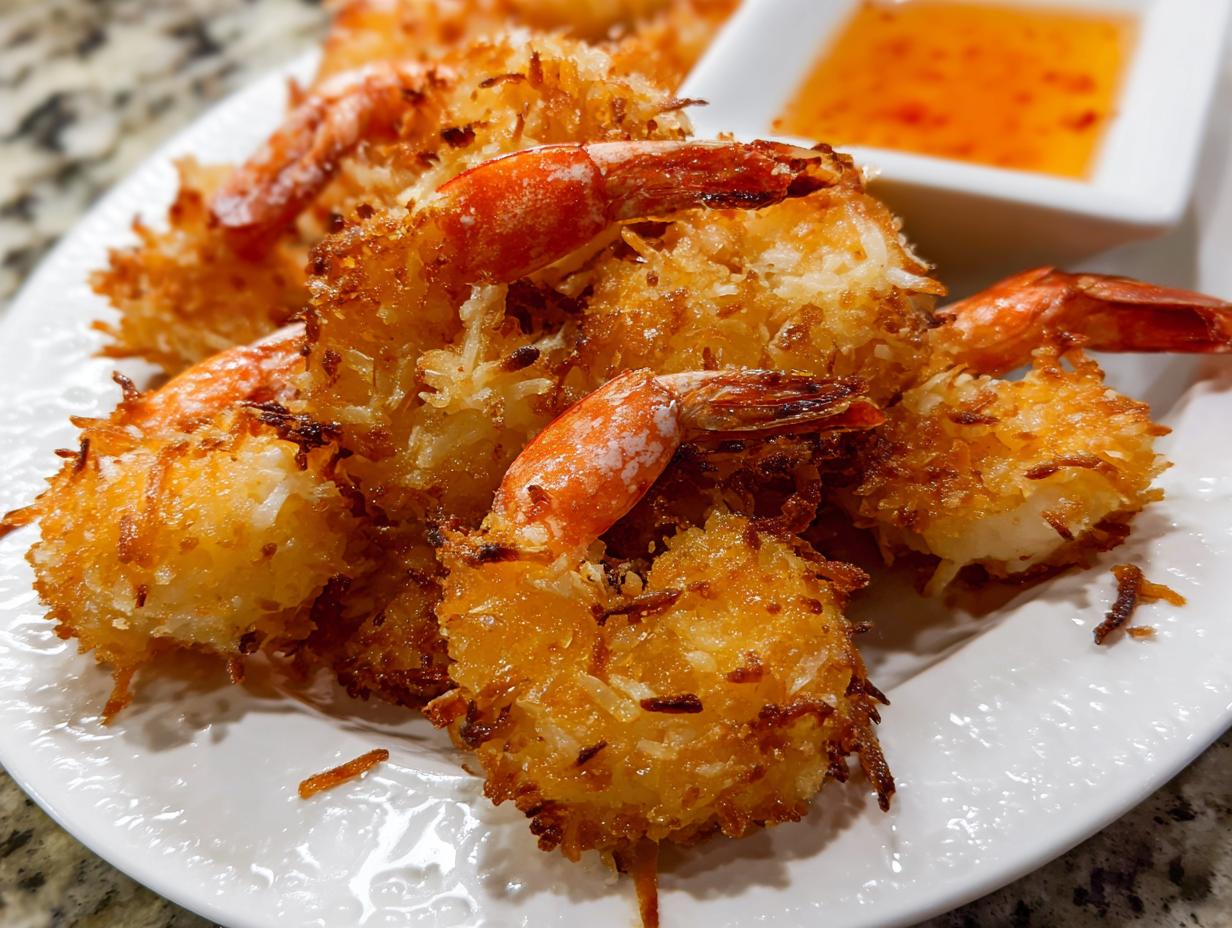
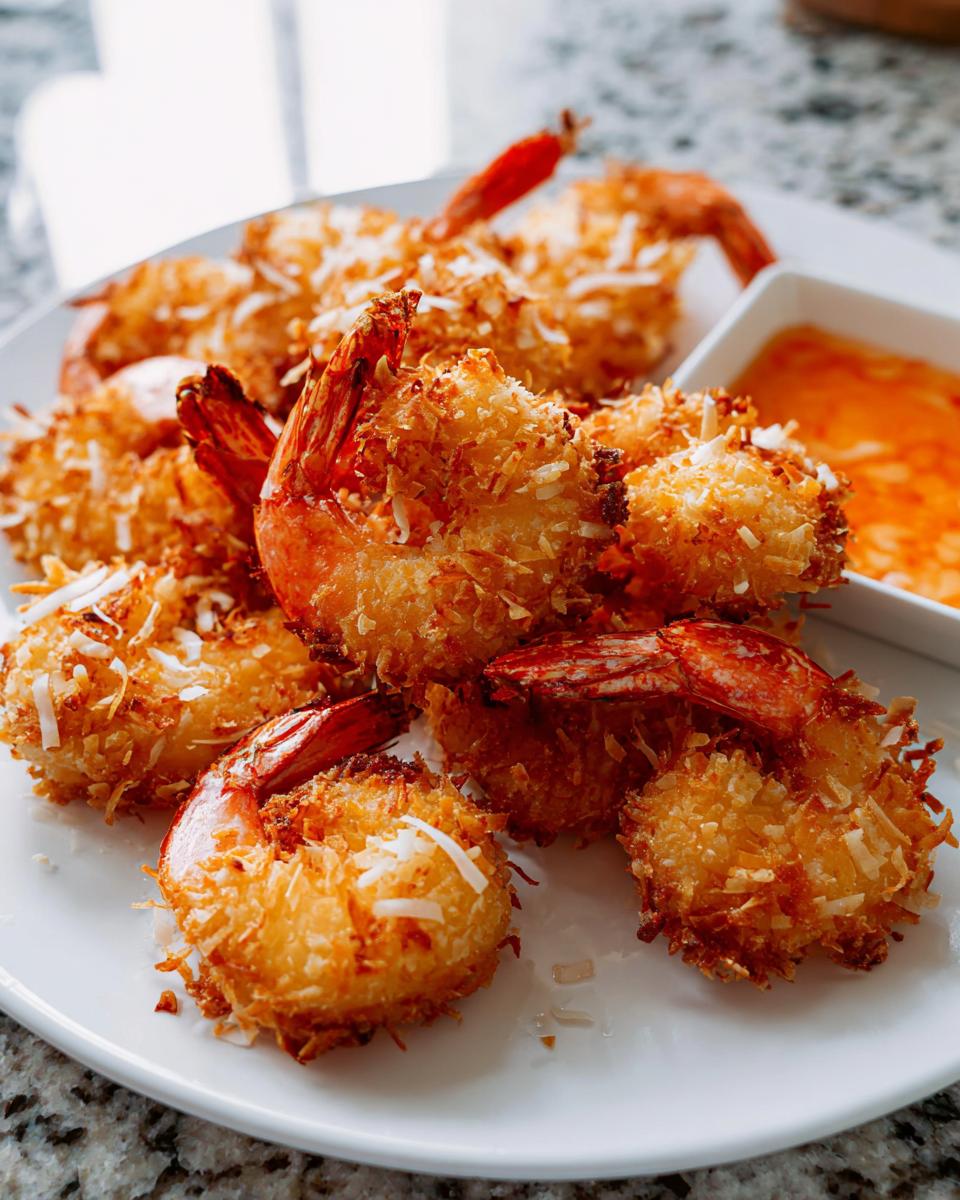
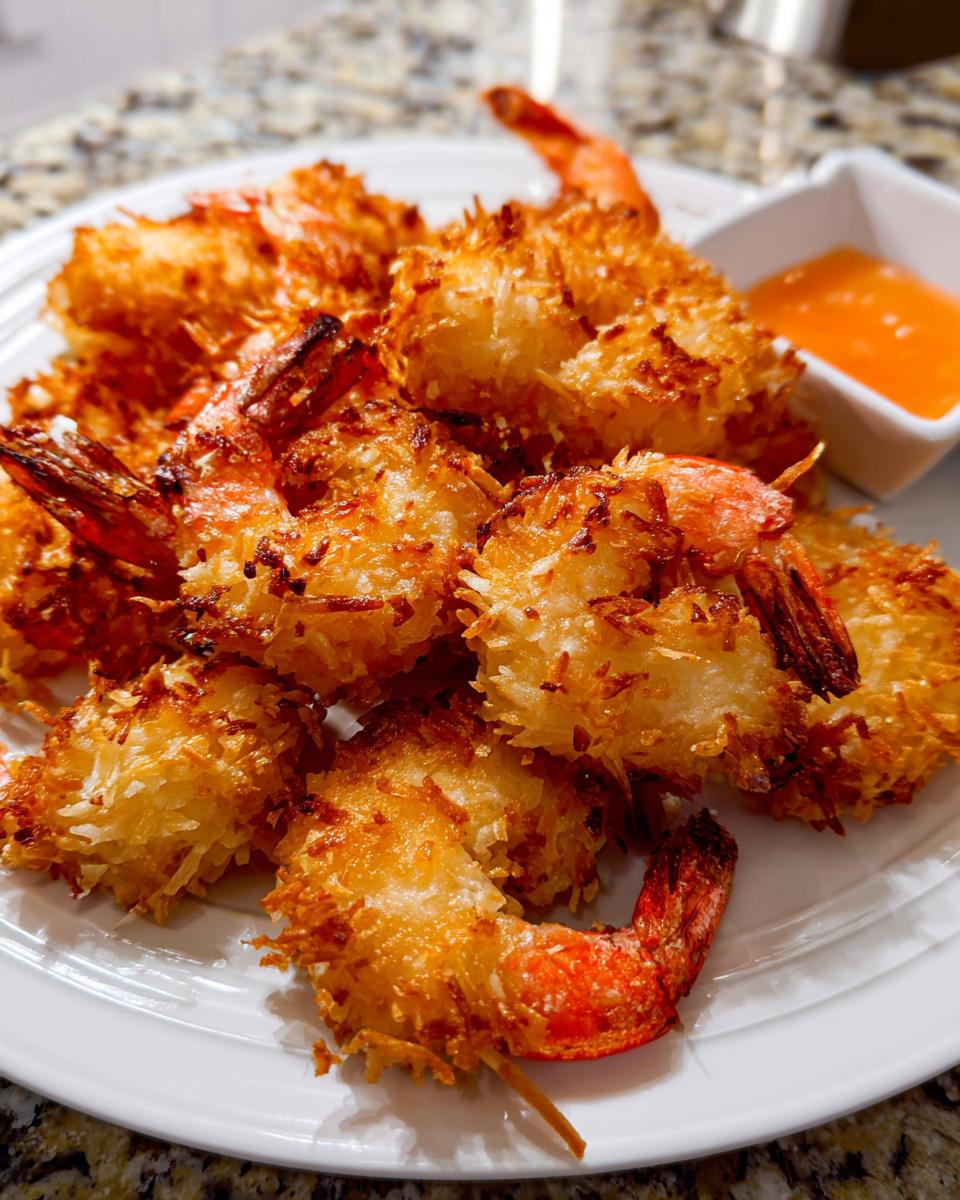
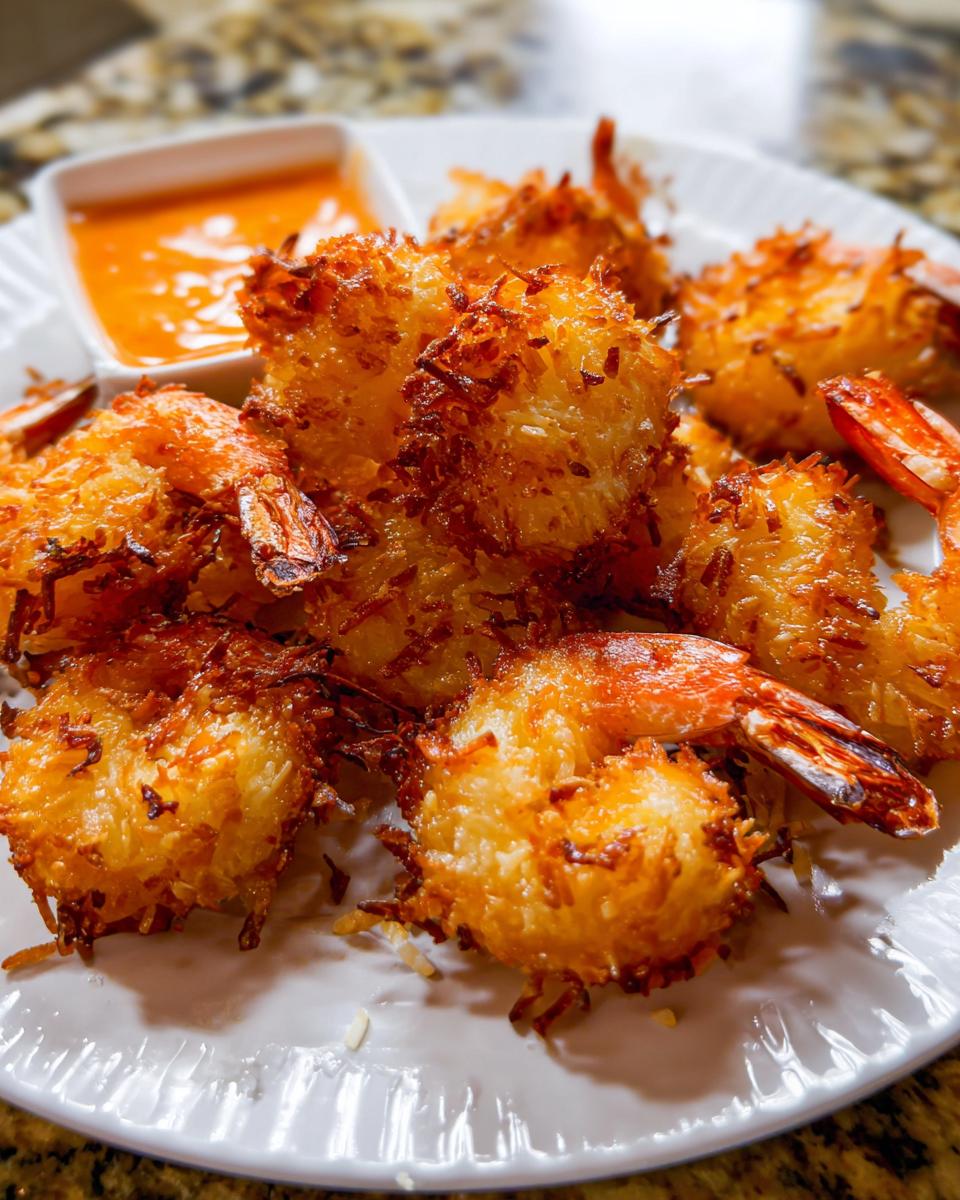
You’ll need three bowls lined up army-style for our dredging process. The first gets that measured flour, plus about half a teaspoon each of salt and fresh black pepper. Don’t skip that seasoning in the flour! The second bowl holds two nice, large eggs that have been beaten well until they are nice and uniform. The real star, the third bowl, combines the Panko bread crumbs with the sweetened shredded coconut. This mix is what gives you that incredible golden crispiness we are aiming for.
The Main Components and Oil Selection
For the actual star of the show, you want a full pound of raw large shrimp. And listen closely: they absolutely need to be peeled and deveined, but please, keep the tails attached! Those tails are what you’ll hang onto while dipping, and they look much nicer on the plate. For frying, I really prefer using coconut oil because it carries that flavor beautifully, but vegetable or olive oil works fine too. You need about 3 or 4 Tablespoons total in the skillet to get a good, shallow fry going; don’t skimp here, or they’ll get soggy!
Optional Dipping Sauce Ingredients
If you want that amazing sweet-and-spicy kick that brings these shrimp to life, you just mix two things together. You need about 3 Tablespoons of Thai chili sauce—you know, the bright red stuff that isn’t *too* hot. Then, you blend that with about 6 Tablespoons of jam or preserves. I usually grab orange, peach, or apricot jam because their fruity tartness cuts through the richness of the coconut perfectly. Mix that up while your shrimp oil heats!
Step-by-Step Easy Shrimp Cooking Instructions for The Only Shrimp Recipes Recipe You’ll Need (2025)
Setting Up the Breading Stations
First things first, get your assembly line ready! You need those three medium bowls perfectly aligned. The first bowl gets your flour mix—that’s the one with the salt and pepper sprinkled in. The second bowl is just your beaten eggs, ready for dipping. The third, and prettiest, bowl holds your Panko and that sweet shredded coconut.
Now, you take one shrimp—remember, hold it by the tail—and dip it gently into the flour mixture first. You just want a light dusting clinging on. Next, give it a good dunk in the egg wash so it’s completely coated. Finally, the grand finale: dredge it heavily in the coconut mixture. Here’s where you use your fingers to really press that coating on. You want a nice, thick layer sticking firmly to the shrimp; this is what stops it from falling off in the hot oil.
Frying the Coconut Shrimp to Golden Perfection
Grab your large skillet and pour in enough oil to generously cover the bottom—we talked about 3 to 4 Tablespoons earlier. Get that heated over medium heat. You want it hot enough to bubble nicely when the shrimp hits it, but not so hot that it burns instantly. This is important: fry your shrimp in small batches, maybe just 7 or 8 shrimp at a time. If you overcrowd the pan, the temperature drops, and you get soggy shrimp instead of crispy shrimp, and we definitely don’t want that! If you want to see another way I handle quick seafood, check out my garlic shrimp and asparagus skillet for variety.
Once they are in, let them fry for about 2 minutes until the bottom looks beautifully crisp. Then, use your tongs to flip them over. They typically need another 2 minutes on the second side, but honestly, I usually sneak them an extra 30 seconds per side, so about 2:30 to 3 minutes total for a deeper, richer golden-brown color. That’s my little trick to make them extra special!
Finishing and Serving
As soon as they look perfectly golden on both sides, pull those babies out right away! Lay them on a plate lined with paper towels so they can drain off any extra oil. That’s super important for keeping that crunch intact. If you’re feeling fancy, sprinkle a little finely chopped cilantro over the top—it adds a lovely color pop.
While those are draining, quickly whisk together the jam and the chili sauce in a small bowl for your dipping sauce. Or, if you skipped the sauce, just serve them warm immediately! See? That wasn’t complicated at all. This easy shrimp cooking process is officially complete, and dinner is ready in blink!
Expert Tips for Perfect Coconut Shrimp Every Time
I want you to nail this recipe every single time, so I’m sharing a few non-negotiable things I learned watching my own attempts fail and succeed over the years. These aren’t complicated steps, but they make the difference between decent shrimp and absolutely knockout shrimp. If you listen to nothing else, listen to this part!
First, let’s talk about the shrimp prep itself. If you’re using shrimp even semi-frozen, you absolutely must thaw them completely before you start. Soggy shrimp equals a gummy coating, and we are fighting for crispiness here! Also, make sure they are dried really well with paper towels after thawing and rinsing. Water is the enemy of a perfect crust; dry shrimp grab onto that flour and egg way better.
Remember how I mentioned I prefer coconut oil for frying? I highly recommend it if you have it on hand! It just lends this wonderful, subtle warmth that complements the sweet coconut perfectly. You need enough oil—at least 3 to 4 Tablespoons—to create that shallow fry environment without drowning them. And like I mentioned in the notes, using large shrimp with the tails still attached is honestly just better for everyone. It keeps you from touching the warm part of the shrimp, and they look so much nicer when you serve them up as appetizers.
If you want even more inspiration for quick seafood dinners, you should check out my garlic butter shrimp stir-fry idea. Quick, versatile, and always a winner!
Storage and Reheating The Only Shrimp Recipes Recipe You’ll Need (2025)
Don’t you hate when you make something delicious only to find it soggy the next day? Luckily, this coconut shrimp freezes surprisingly well, which is a lifesaver for meal prepping! If you have leftovers right after dinner, you can totally stash them in the fridge. Just put them in an airtight container, and they should stay tasty for up to 3 days. Make sure they are completely cool before you seal up that lid, though!
Now, for the freezing part—this is where we really save the day for a later weeknight. You can freeze the cooked shrimp for up to two whole months. I always lay them out on a baking sheet first, making sure they aren’t touching much, and flash-freeze them for an hour or so. Once they are hard little nuggets, you can toss them all into a zip-top freezer bag. That way, they don’t stick together like one giant shrimp ball!
When it’s time to eat them straight from the freezer, ditch the microwave! Microwaved fried food just never regains that beautiful crunch we worked so hard to achieve. Instead, you want to reheat your frozen shrimp for about 10 minutes in a 350°F (177°C) oven until they are completely thawed and nice and warm all the way through. It gets them almost as good as fresh!
If you’re looking for another really solid make-ahead, easy dinner that freezes well, you might want to check out my recipe for healthy one-pot chicken and brown rice. It’s hearty and family-friendly!
Serving Suggestions to Complete Your Meal
So you’ve got your perfect, crispy coconut shrimp ready to go. Now what? Since this recipe is so quick—remember, only 20 minutes!—we want the sides to match that speed. Nobody wants to spend an hour steaming broccoli after dealing with oil and frying. I keep it super simple so that dinner feels balanced without feeling like extra work.
My absolute favorite pairing is fluffy white rice, maybe with a tiny splash of lime juice mixed in right at the end. The rice is a perfect, neutral base for soaking up any extra dipping sauce you’ve got lingering on the plate. It just works so well with the sweetness of the coconut coating.
If you’re looking for a vegetable, go for something green and easy. Steamed green beans are fantastic, or sometimes I’ll quickly sauté some shelled edamame with just a little salt. They cook faster than you think! If you want something a bit brighter, a super quick Asian-inspired slaw is great. Just grab some pre-shredded cabbage mix and toss it with a tiny drizzle of rice vinegar and sesame oil. It adds the perfect crunch and brightness.
For a slightly more involved, but still super-fast option, you could try a sheet pan meal alongside this, maybe like my sheet pan balsamic chicken and Brussels sprouts, but just make sure the shrimp is served immediately after frying since those flavors might clash a bit! Seriously though, rice and green beans are the backbone of a fast, tasty shrimp night.
Variations on The Only Shrimp Recipes Recipe You’ll Need (2025)
Even though this recipe is pretty much perfect—if I do say so myself!—I know sometimes you just need to shake things up a little bit in the kitchen. Family meals can get boring fast if you cook the exact same thing every time. Luckily, this coconut preparation method is so sturdy and tasty that it takes modifications like a champ. You don’t need to toss the whole thing out; just tweak one or two components!
For those of you who don’t need to worry about gluten, or maybe you’re cooking for guests who aren’t gluten-free, you can absolutely swap out the Panko bread crumbs. I sometimes use finely crushed pretzels or even toasted, crushed almonds for an extra layer of savory deliciousness. Just be careful—if you use nuts, you need to take care that they are chopped fine enough to stick during the fry without burning too quickly. It adds such a fun, grown-up flavor!
The easiest thing to change, in my opinion, is that dipping sauce. We love it with the jam and chili sauce, but you can get creative there easily. If you want to take that jam sauce and give it a zesty punch, just add a teaspoon or two of fresh lime juice right into the mix. It brightens everything up instantly and makes the shrimp taste almost tropical! You can also switch the jam flavor entirely; instead of apricot, try pineapple preserves if you want maximum coconut synergy.
If you’re looking for a completely different flavor profile that still involves coconut, you might want to check out my recipe for chickpea and spinach coconut curry later in the week. But for this crunchy shrimp, sticking to small adjustments on the coating or the sauce is the way to go!
Frequently Asked Questions About This Shrimp Recipe
I get so many messages about this recipe because people want to make sure their quick family meals turn out perfectly! It’s only natural to have a few questions when trying a new shrimp recipe, especially when you’re trying to keep things strictly gluten-free on a busy night. Here are the most common things folks ask me about making The Only Shrimp Recipes Recipe You’ll Need (2025) a success.
Can I make this coconut shrimp recipe in an air fryer?
Yes, you absolutely can! I know some of you are trying to cut down on the oil used for frying, and the air fryer is great for that. If you go this route, make sure your shrimp are coated really well, and then give them a very light spray with oil—don’t drench them, just mist them. Air fry them at about 375°F, checking them frequently because they cook fast! They usually take about 8 to 10 minutes total, flipping halfway through, to get that beautiful golden color without actually sinking into the oil.
What is the best gluten-free flour substitute for this recipe?
When it comes to substituting the all-purpose flour in the initial dredging step, I strongly recommend looking for a high-quality 1-to-1 gluten-free flour blend. These blends are specifically designed to mimic the structure of wheat flour, often containing xanthan gum, which helps the coating adhere nicely. Avoid using just single flours like rice flour or almond flour alone in that first step, as they can either clump up or fall right off during the fry. The 1:1 blend keeps the texture consistent with my original method.
I often get asked if this counts as one of those fun 2025 shrimp recipes you see trending, and honestly, this one is evergreen because it’s so reliable! It’s an easy shrimp cooking staple.
How do I know if my shrimp is safe to eat after thawing?
Safety first, always! When buying shrimp, they should smell fresh, like the ocean, not fishy or sour. If you’re thawing, do it slowly in the fridge overnight. Once thawed, they should still look plump and slightly translucent. If they are slimy, dry at the edges, or have a strong ammonia smell, please toss them, no matter how quickly you need dinner! We want flavorful, safe meals that don’t stress anyone out.
Do I really need to use Panko bread crumbs?
Oh, you really should! Panko bread crumbs are Japanese-style bread crumbs, and they are known for being lighter and flakier than standard bread crumbs. That difference is what gives you the *volume* and the delicate crunch that doesn’t feel heavy in your mouth. If you don’t have Panko, you can use crushed cornflakes in a pinch—they also provide great texture—but skip regular fine bread crumbs if you can. That crispiness is important for happy eaters!
Sharing Your Experience with The Only Shrimp Recipes Recipe You’ll Need (2025)
Now that you’ve seen how simple it is to create this delicious, quick meal, I absolutely need to hear from you! Cooking for family, especially when balancing dietary needs, is a journey, and sharing our successes helps everyone feel more capable in the kitchen. I truly hope this recipe becomes your new standard for fast seafood.
When you give this a try, please come back and let me know how it went! Don’t be shy—give me a star rating right here on the recipe card! Were your kids instantly addicted to that sweet coconut crunch? Did it save your weeknight dinner plans? Drop a friendly comment down below telling me all about your experience. Hearing how this helped streamline your evening meals really makes my day.
And if you snap a picture of your beautiful, golden coconut shrimp—maybe showing off the dipping sauce or your quick side dish—please share it on social media! Tag me so I can see your amazing work. I love seeing how this recipe pops up in kitchens all over the place.
We’re all learning together, right? So, beyond this recipe, what other quick dinner wins have you discovered lately? Knowing what saves you time and brings smiles to your table is valuable for the whole community. Head over to my About page if you want to learn more about how I structure family meal plans!
The Only Shrimp Recipes Recipe You’ll Need (2025)
Ingredients
Equipment
Method
- Prepare three medium bowls. Combine flour, salt, and pepper in the first bowl. Beat the eggs in the second bowl. Combine Panko bread crumbs and coconut in the third bowl.
- Dip each shrimp into the flour mixture first. Next, dip it into the beaten eggs. Finally, dredge the shrimp in the coconut mixture, pressing gently so the coating sticks well. You want a thick layer of coconut on each shrimp. Place the coated shrimp on a plate while you coat the rest.
- Add enough oil to the large skillet to cover the bottom. Heat the oil over medium heat. Fry the coconut shrimp in batches of 7 or 8 shrimp at a time; do not overcrowd the pan.
- Flip the shrimp after 2 minutes and fry the other side for 2 minutes, or until golden brown. I fry mine for about 2:30 to 3 minutes per side for a darker color.
- Place the cooked coconut shrimp on a plate lined with a paper towel as you finish frying the remaining shrimp. Sprinkle with finely chopped cilantro if using. Mix the dipping sauce ingredients together and serve with the shrimp.
- Cover and store leftover shrimp in the refrigerator for up to 3 days.
Notes
Tried this recipe?
Let us know how it was!
Gluten-Free Nutritionist & Family Meal Planning Expert
Working as a pediatric dietitian at Children’s Hospital of Denver, I kept meeting families overwhelmed by managing their children’s celiac disease. Parents stressed, kids frustrated, everyone eating bland boxed “gluten-free” products.
That’s when I realized my calling: creating practical, balanced gluten-free solutions for real families with busy schedules. I’ve developed 375+ family-friendly recipes focusing on lunch boxes, after-school snacks, and make-ahead dinners that actually work.
My meal planning system was featured in Parents Magazine, and I presented research at the Rocky Mountain Pediatric Nutrition Conference. My evidence-based approach ensures recipes meet both taste and health standards—families need solutions that work in the real world, not just perfect test kitchens.