There’s just nothing that beats the Sunday morning ritual, right? That beautiful moment when the coffee is brewing and you know a delicious, towering stack of pancakes is on its way. For years, family breakfast felt complicated, especially after my youngest son’s celiac diagnosis. I desperately wanted to bring back the joy we found in my avó’s classic recipe, so transforming it into a gluten-free masterpiece felt like my mission.
And guess what? I cracked the code! Since then, this has become Fluffy Pancakes: The Ultimate Recipe You NEED in our house. The aroma alone—sweet and rich—fills the whole kitchen. I was nervous trying to match avó’s texture, but when I poured the batter and watched those babies puff up perfectly, it was pure euphoria. I knew we were back in business. Come see how we get this amazing height and lightness every single time!
Why This Fluffy Pancakes: The Ultimate Recipe You NEED is a Family Favorite
Honestly, this recipe changed my mornings! It’s so much more than just flour and milk; it’s about achieving that perfect breakfast moment we all crave. Once you master this, you’ll never go back to the thin, sad versions of the past. If you’re looking for more cozy morning recipes, you can check out my latest breakfast roundup here: awesome breakfast ideas!
- Achieving Extra Fluffy Pancakes Texture: They are truly light as air! This comes down to the science of the reaction between the cultured buttermilk and our leaveners, which whips up amazing air bubbles.
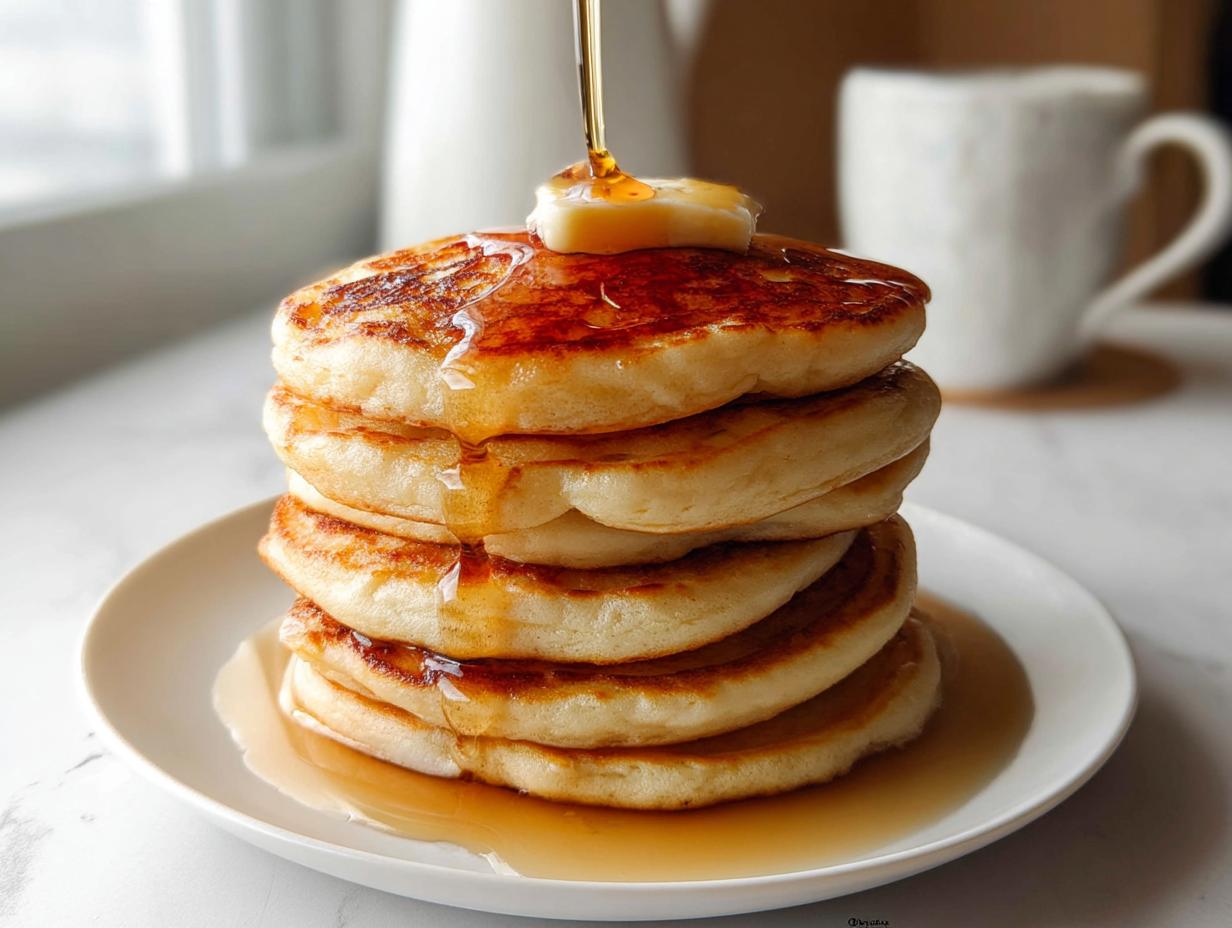
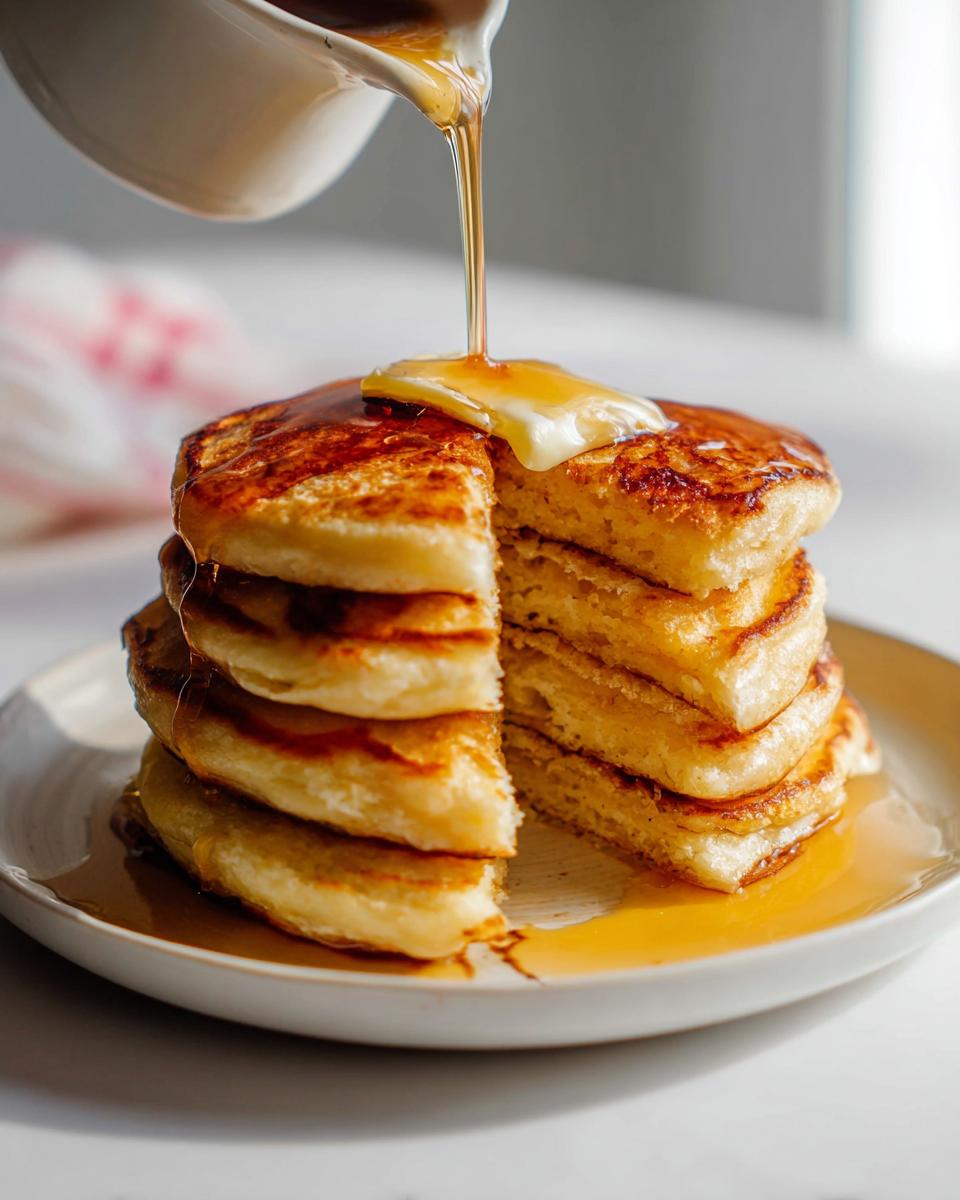
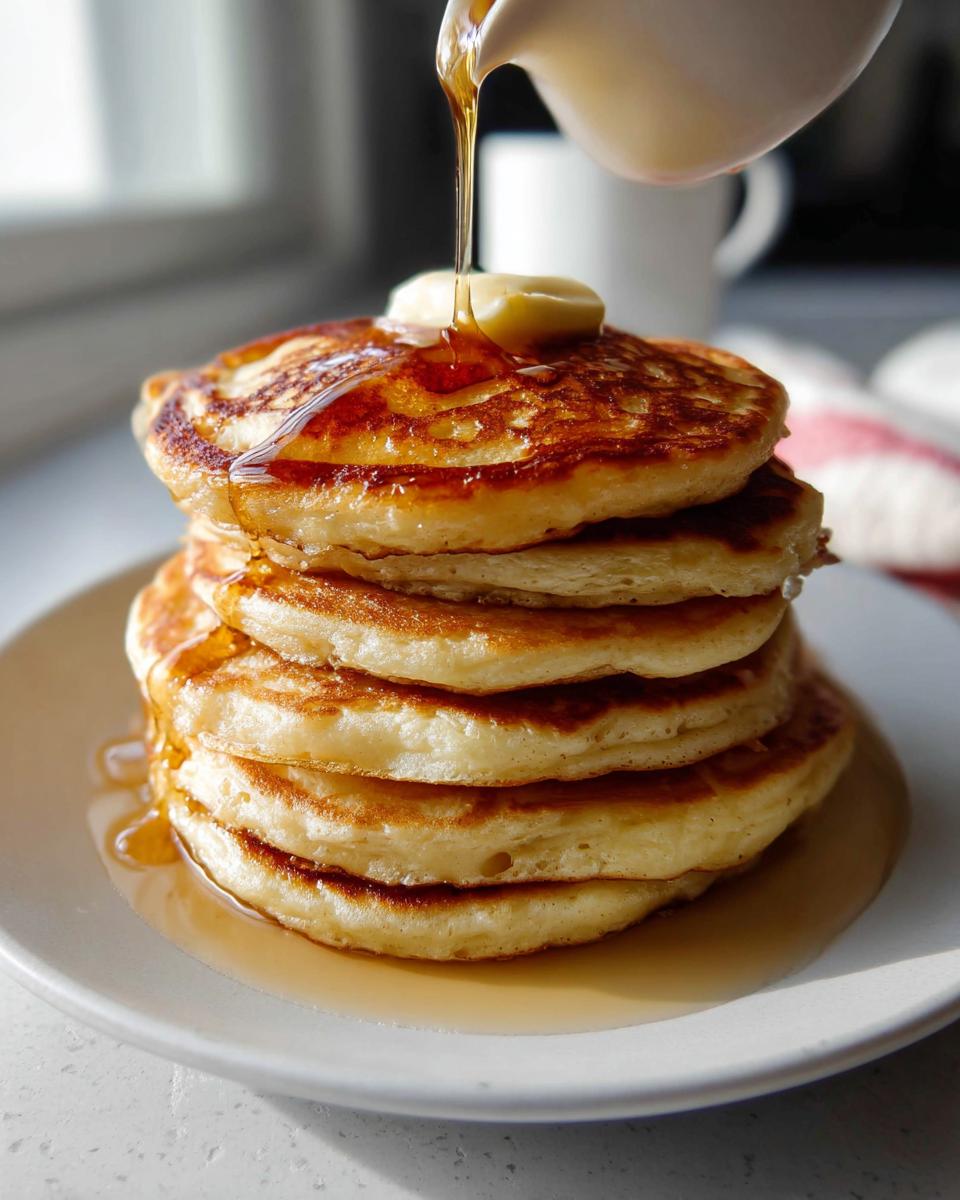
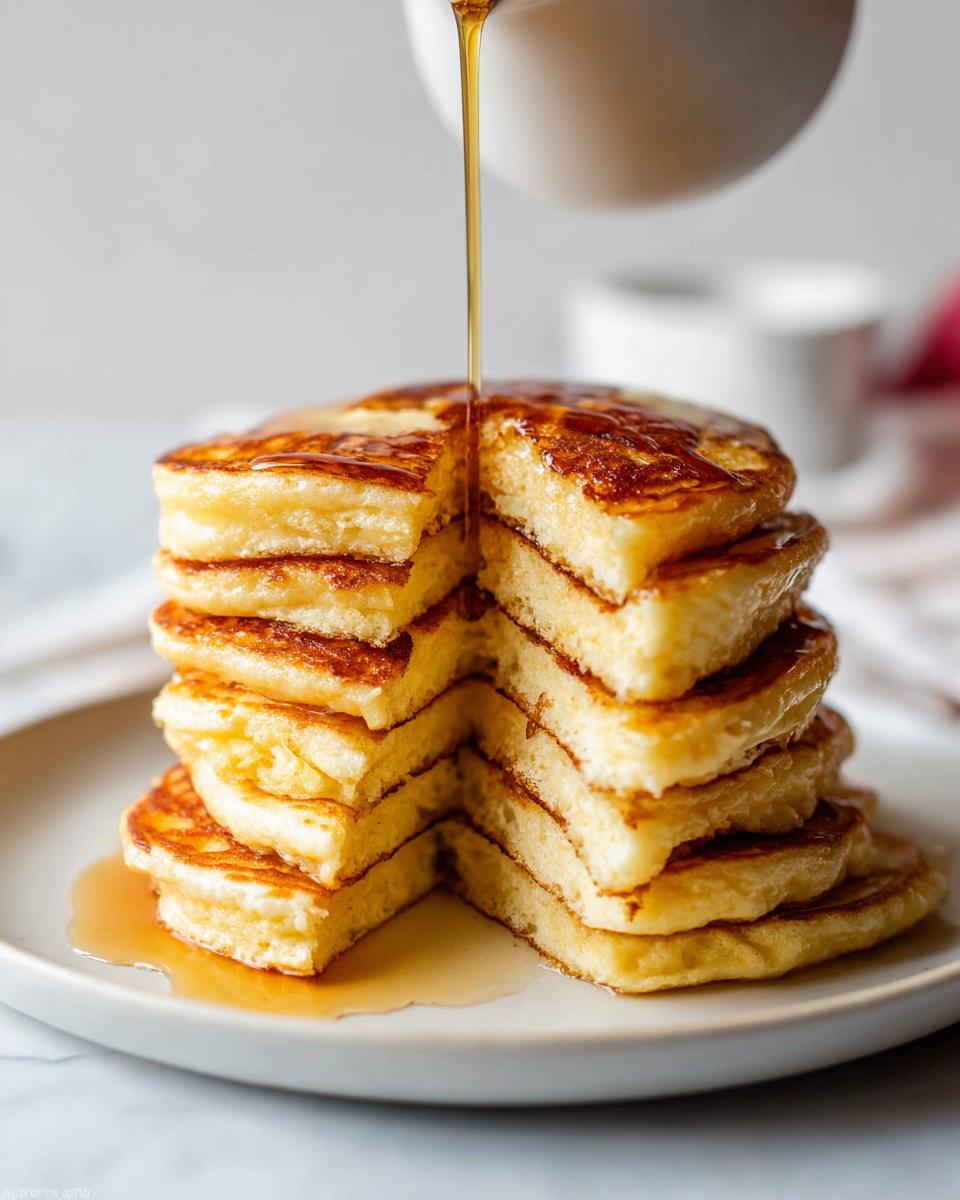
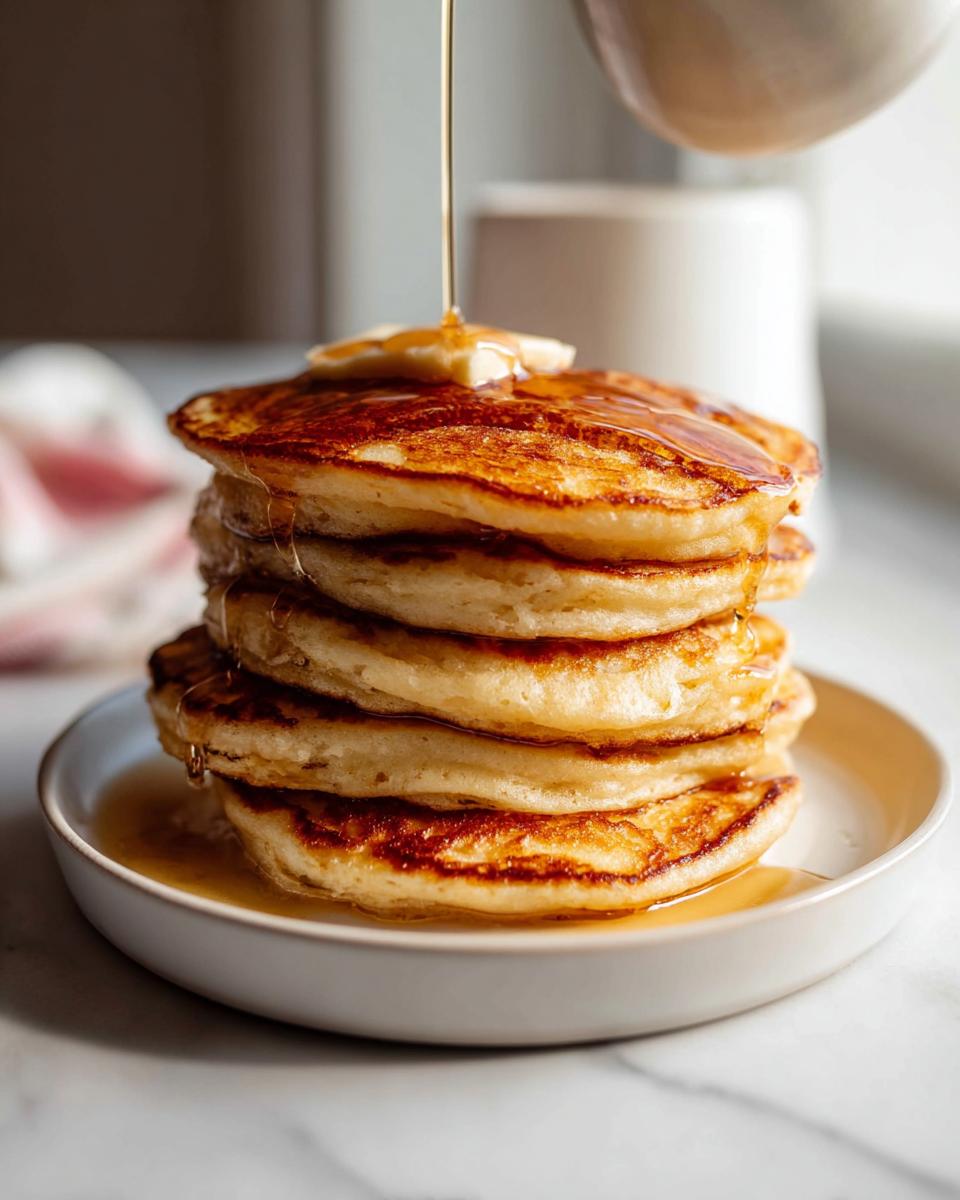
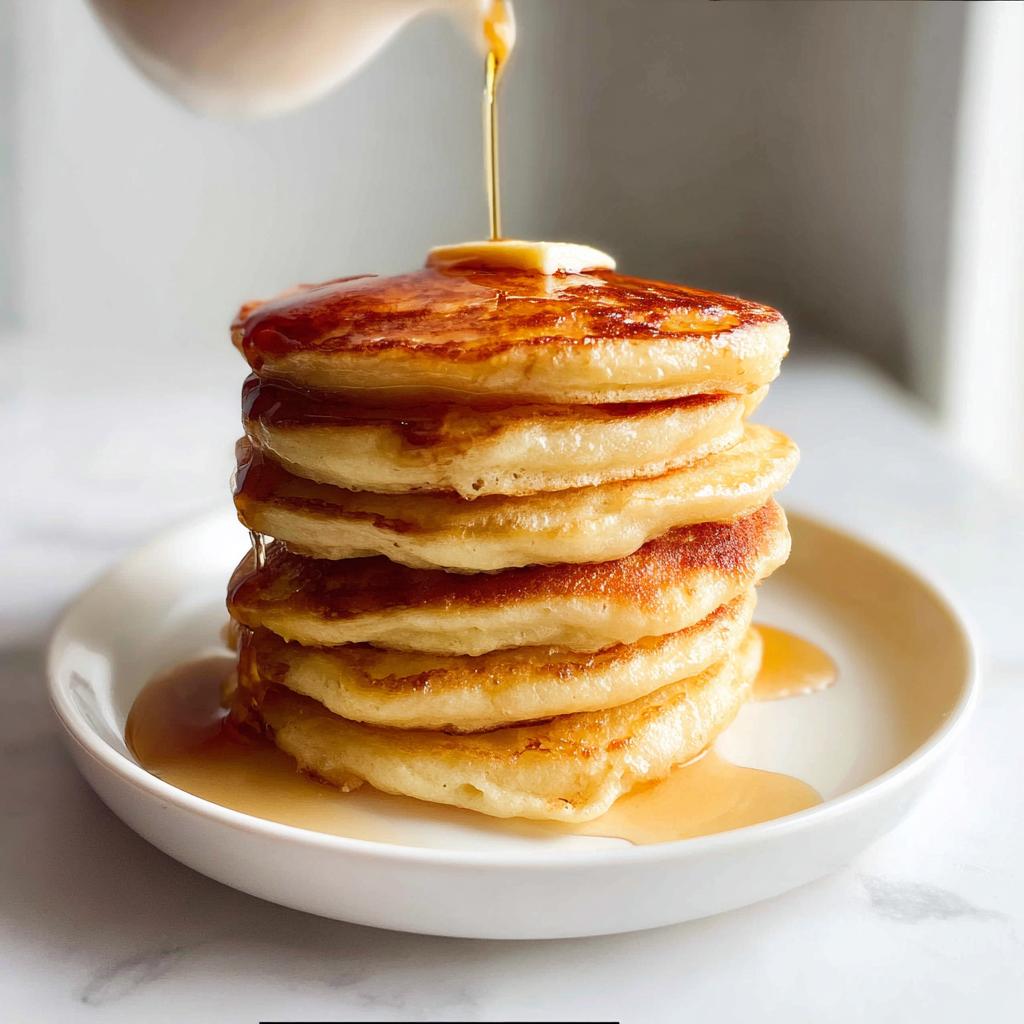
- Perfect for a Tall Pancake Stack: Trust me, these stack beautifully. The batter is sturdy enough to hold its shape, giving you that magazine-worthy, tall pancake stack every time you pull them off the griddle.
- A Kid Approved Breakfast Classic: Even the pickiest eaters around here devour these slathered in butter and syrup. They are simple, comforting, and the ultimate kid approved breakfast winner.
Achieving Extra Fluffy Pancakes Texture
The magic happens because we use both baking powder AND baking soda, activated by the acid in the buttermilk. When they meet, they create carbon dioxide gas super fast. If you’re careful not to overmix, all those little gas pockets get trapped in the batter, leading directly to those beautiful, extra fluffy pancakes you see.
Perfect for a Tall Pancake Stack
This batter is intentionally thicker than most standard recipes you might see elsewhere. Don’t thin it out if you want that height! That lovely thickness means the pancake doesn’t spread too wide when it hits the heat, forcing it upward. They hold their structure beautifully, which is exactly what you need for a towering, impressive tall pancake stack.
A Kid Approved Breakfast Classic
I developed this specifically when I needed a guaranteed win for my son, and it’s never let me down. They are slightly sweet on their own, so they are wonderful drizzled with just maple syrup, but they also hold up great under berries, chocolate chips, or whipped cream. It’s the definition of a kid approved breakfast.
Essential Ingredients for Fluffy Pancakes: The Ultimate Recipe You NEED
When you’re aiming for the highest, lightest pancakes possible, you simply cannot skimp on quality here. Every single item matters, believe me! I use the exact measurements from my avó’s recipe because she knew the balance. If you are looking for a great resource on sourcing quality ingredients, check out Sally’s excellent guide here: baking ingredient tips.
We’ve got the dry crew and the wet crew, and they need to be handled separately until the last moment. Remember everything needs to be measured precisely. For the flour, you absolutely have to spoon & level it; don’t just scoop it out of the bag or you’ll end up with dense hockey pucks instead of fluff!
Ingredient Notes and Substitutions
Let’s talk about the heavy hitters. First, the buttermilk. Please, please use real, full-fat or low-fat buttermilk. You can’t substitute it easily! It’s the acid that reacts with our baking soda and powder to give us that major lift we want. Even when I develop my gluten-free versions, the buttermilk remains non-negotiable.
Speaking of leavening, both baking powder AND baking soda are required here. The powder gives one lift, and the soda reacts with the buttermilk for the second, extra lift. Also, make sure that melted butter cools down just a touch before adding it; too hot and it scorches the eggs, and we lose all that precious air we just worked to create!
The Science Behind Fluffy Pancakes: The Ultimate Recipe You NEED
If you truly want to master the art of the perfect, airy pancake, you have to understand what’s happening in that bowl. It’s not magic; it’s chemistry, and it’s actually really simple once you see it in action! This is the key secret to achieving those gorgeous, extra fluffy pancakes that seem to defy gravity.
We’re using two main players here: an acid and a base. Our buttermilk is the acid, and that’s why I always tell people not to substitute it! When that acidic buttermilk hits the baking soda (the base), they create an immediate fizz of carbon dioxide gas. That gas gets trapped when you mix gently.
Then, the baking powder steps in. It provides an extra boost of lift, usually when it gets hot on the griddle. It’s this one-two punch that creates those big, lofty air pockets, ensuring that when you serve these up, you get a spectacular, tall pancake stack every time. Simple science makes delicious breakfast!
Step-by-Step Instructions for Fluffy Pancakes: The Ultimate Recipe You NEED
Alright, let’s get cooking! Getting truly fluffy pancakes requires a bit of focus on timing, especially around the mixing stage. Remember, we are building height here, so gentle handling is key. If you want to see an example of how I handle a tricky batter like this, check out my guide on making my scratch pancake process for some extra visual cues!
Here is how we turn simple pantry items into the best breakfast stack you’ve ever made, serving 8 happy people!
- First things first: melt your 6 tablespoons of unsalted butter. You can use the microwave or the stovetop—just let it set aside to cool down a bit while you work on the rest. We don’t want hot butter scrambling our eggs later, so don’t rush this part.
- Next, grab your big bowl and whisk together all the dry stuff: that’s the flour, sugar, baking powder, baking soda, and salt. Give it a good whisk until everything looks perfectly integrated.
- In a separate bowl, this is where the wet ingredients come together. Whisk your eggs, then add the buttermilk and vanilla extract. Now, gently whisk in that slightly cooled, melted butter.
- Time for the crucial moment! Pour the wet mixture right into the dry ingredients. Now listen carefully: you need to whisk only until you see no more dry flour streaks. That’s it! Stop mixing, even if you see lumps. Lumps mean air is trapped!
- Let that wonderful, thick batter rest for about five minutes while you get your griddle going.
- Finally, heat up your griddle or skillet over medium heat. Make sure you coat it well with butter or spray for each batch. Once it’s hot, pour about 1/4 cup of batter per pancake.
- Cook until you see those beautiful bubbles forming all over the surface and the edges look dry, which usually takes about two minutes. Flip it gently and cook the other side for another minute or two.
- Once done, slide them onto a plate and keep them warm in a 200°F oven while you finish the rest of the batches.
Mixing the Batter: Lumps are Your Friend
This is my biggest rule for achieving those extra fluffy pancakes—do not try to make the batter perfectly smooth! When you combine the wet and dry ingredients, as soon as you can’t see any ribbons of dry white flour anymore, you must stop mixing. Seriously, put the whisk down!
If you keep beating it until it looks silky smooth, you’re developing gluten, and that gluten makes pancakes tough and flat. A few lumps are not a mistake; they are pockets of potential fluffiness waiting to expand on the heat.
Griddle Prep and Cooking Technique
Temperature control is everything for getting that perfect rise and a beautiful gold color. Set your griddle or skillet to **medium heat**. If it’s too low, the pancakes take forever and flatten out while waiting for heat; if it’s too high, the outside burns before the inside cooks. It should be hot enough that a drop of water sizzles and evaporates quickly.
You’ll know it’s time to flip when the surface has many little holes that stay open, and the edges look set and dry—not wet. Once flipped onto the second side, they cook much faster, usually just a minute or two more. And trust me on this one: keep your finished pancakes nestled on a plate in a 200°F oven. This keeps them ready and warm until you have built that majestic tall pancake stack for the table!
Tips for Success with Fluffy Pancakes: The Ultimate Recipe You NEED
I am telling you, nailing this recipe is all about respecting the batter! It’s so easy to rush breakfast, but rushing is what separates a good pancake from a *great* one. I learned this the hard way years ago when I was trying to make a double batch for a big family brunch. I skipped the resting time, mixed like a maniac, and ended up with eight thick, chewy discs. They tasted fine, but they certainly weren’t the fluffy masterpieces I aimed for!
Here are a few non-negotiable tips I use now every single time to guarantee those beautiful, light layers:
Give the Batter Just a Few Minutes to Rest
After you whisk the wet and dry ingredients together—and remember, that means stopping when you still see lumps—you absolutely must let the batter rest. Give it five to ten minutes on the counter. Seriously, don’t touch it!
That rest time does two wonderful things. First, it allows the flour to fully hydrate, which means the gluten that *did* form gets relaxed, making the pancake tender. Second, it gives the baking powder a little head start to begin working its magic before it even hits the pan. It firms up the batter just enough so when you ladle it onto the griddle, it holds its shape beautifully for a higher rise.
Maintain Consistent Medium Heat
You simply cannot fluctuate the heat when you are going for height. If your pan is too cool, the batter sits there soaking up grease before it has a chance to puff up, making it dense. Too hot, and you get that awful burnt exterior with a raw, gooey center.
I always test the heat by flicking a tiny drop of water onto the surface. If it sizzles immediately and evaporates within a second or two, it’s perfect. Keep that temperature steady by occasionally lifting the pan off the burner for 10 seconds between batches to regulate things, especially if your stove runs hot.
Never Overmix—Seriously, Stop Whisking!
I know I’ve hammered this point home already, but this is the #1 way people accidentally destroy the fluffiness. If you’re used to mixing cake batter until it’s smooth, you need to retrain your hands here. Overmixing activates too much gluten, and gluten means chewiness, not lightness.
When you combine wet and dry, you are aiming for a thick, lumpy mess. If you mix until it’s smooth, you’re basically guaranteeing a flat pancake. Your visual cue should be: stop whisking when you think you’ve almost gone too far, because that’s usually the perfect point! It’s all about trusting the ingredients to work without your excessive stirring.
Serving Suggestions for Your Cozy Morning Recipes
Once you have that perfect, tall pancake stack shimmering hot off the griddle, the presentation is half the fun! Making these into truly cozy morning recipes is all about the way you dress them up. This recipe is designed to be a wonderful canvas, whether you’re serving up a slow Saturday breakfast or a much-needed mid-week treat.
For the classic experience that always makes my little ones cheer, you simply can’t beat high-quality maple syrup—the real stuff—and a big pat of melting butter right in the center that slowly drips down the sides. If you need some inspiration for other wonderful breakfast plates, be sure to explore my collection of breakfast ideas and inspiration!
But Marco wouldn’t be Marco if I didn’t suggest one or two Latin-inspired twists! These light pancakes pair unbelievably well with bright, fresh flavors that cut through the richness of the buttermilk.
- The Berry Brightener: A simple mix of fresh raspberries and sliced strawberries with a dollop of Greek yogurt adds tang and color. The contrast between the warm, fluffy pancake and the cool fruit is heavenly.
- Dulce de Leche Drizzle: If you’re feeling indulgent, warm up some good quality dulce de leche. Drizzle it lightly over the stack instead of plain syrup. It’s rich, caramel-y heaven—a perfect nod to my heritage!
- Citrus Zest Pop: A tiny sprinkle of fresh orange zest over the final plate awakens the whole dish. It works especially well if you add a splash of fresh lime juice to your syrup as well.
- Cinnamon Whipped Cream: Lightly whip heavy cream and mix in a generous pinch of cinnamon. This makes the whole experience feel extra special and ties beautifully into the cozy morning recipes feel.
No matter how you top them, remember these pancakes are best enjoyed immediately. Gather everyone around the table and watch them disappear!
Storage and Reheating Fluffy Pancakes: The Ultimate Recipe You NEED
Okay, so you managed to make a massive, glorious tall pancake stack, and maybe—just maybe—you didn’t eat every single one. Good job! That means you have leftovers for a quick breakfast later this week, which is almost as good as making them fresh. I promise reheating these is super easy, and they keep that lovely fluffiness surprisingly well when stored right. If you’re interested in other meals you can prep ahead, you might enjoy reading about my make-ahead breakfast bakes for variety!
My avó always hated waste, so mastering storage was essential in her kitchen. Here’s exactly how I keep these beauties tasting almost bakery-fresh days later.
Refrigerating Your Leftover Fluffy Pancakes
If you plan to eat them within three or four days, the fridge is the spot. You have to keep the air away from them, or they get hard and stale fast. I like to let my cooked pancakes cool completely first—never store warm food! Then, I stack them with a little square of parchment paper between each one. Parchment is key; it stops them from sticking into one giant, sad pancake brick.
Once stacked, slide the pile into an airtight container or a zip-top freezer bag. They stay great here for about 3–4 days. The baking soda/buttermilk combo works wonders to keep them from drying out too quickly, but protection from ambient fridge air is still necessary.
Freezing for Later Snacking
For the real make-ahead power move, freezing is the best option for these extra fluffy pancakes. They freeze like a dream for up to three whole months! The freezing process is almost identical to refrigeration, but you definitely need that parchment paper barrier between every single pancake.
Seal them tightly in a heavy-duty freezer bag, squeezing out as much air as you can before sealing. Mark the date on the bag so you know when they were made—it goes fast when you have easy breakfast access!
The Best Way to Reheat Them to Perfection
Forget the soggy microwave blast if you can help it! While the microwave will certainly heat them up fast, you want to restore some texture. The best methods are the oven or a toaster oven.
If you are reheating several at once, preheat your oven to 350°F (177°C). Lay the frozen or refrigerated pancakes out on a baking sheet lined with foil or parchment paper (to catch any crumbs). Cover them loosely with another piece of foil and heat for about 6 to 8 minutes. They come out perfectly warm and surprisingly fluffy again. For just one or two, a quick 30 to 60 seconds in the microwave will work in a pinch, but I still like to toss them crispy side down into a dry, hot pan for 30 seconds after to bring back a little sear.
Frequently Asked Questions About Fluffy Pancakes
I know sometimes after baking, questions pop up out of nowhere! It happens to me all the time. I gathered the most common things people ask me about achieving that perfect lift and presentation. Hopefully, these quick answers help you nail the recipe on your first try!
Can I make these extra fluffy pancakes ahead of time?
This one is tricky, and the answer depends on what part of the process you mean. You absolutely cannot make the *batter* ahead of time. Once you mix the buttermilk and the baking powder/soda, the chemical reaction starts immediately to create those lovely bubbles. If the batter sits overnight, those gases escape, and you end up with flat pancakes instead of our beautiful, extra fluffy pancakes!
However, the *cooked* pancakes store wonderfully! You can absolutely cook the whole batch, let them cool, and store them in the fridge or freezer to reheat later. That’s how I always have a quick weekend breakfast ready to go!
What is the best way to ensure a tall pancake stack?
It boils down to two things that we talked about, but it’s worth repeating because it’s crucial for that height! First, **do not overmix**. Seriously. Lumpy batter equals fluffy pancakes. Second, make sure your heat is steady at medium. If the heat is wrong, the batter either spreads too thinly or burns before it can rise.
If you follow those two steps—lumpy batter combined with medium heat—you are guaranteed to get a magnificent, impressive tall pancake stack that looks incredible on the plate.
Can I use regular milk instead of buttermilk for this kid approved breakfast?
Oh, this is a very common question when someone realizes they are out of buttermilk! You *can* use regular milk, yes, but I strongly advise against it if you are aiming for the fluffiness promised in this recipe. Real buttermilk is essential because it’s acidic, and that acidity is what triggers the baking soda to produce maximum lift.
If you use regular milk, the reaction won’t be nearly as strong, and your pancakes will come out noticeably flatter and denser. If you are in a pinch and have no buttermilk, you can make a quick substitute by adding one tablespoon of white vinegar or lemon juice to one cup of milk and letting it sit for five minutes. It mimics the acidity just enough to save that kid approved breakfast, but honestly, real buttermilk is always worth buying for this recipe!
Share Your Fluffy Pancakes: The Ultimate Recipe You NEED Experience
I truly hope this recipe brings as much joy and ease to your kitchen as it has to mine since I figured out how to honor my avó’s legacy while making sure my son could enjoy every bite! There is nothing better than seeing someone else achieve that perfect, light, airy breakfast they thought was out of reach.
Now, it’s your turn! I want to hear all about it. Did you manage to build an epic, tall pancake stack that scraped the ceiling? Did your favorite kid approve of the results? Please take a moment and leave a rating below—it truly helps me know which recipes to keep perfecting for our community.
If you made these Fluffy Pancakes: The Ultimate Recipe You NEED and want to share a picture of your success, tag me on social media! I absolutely adore seeing your beautiful breakfasts. Feel free to reach out with any final questions or feedback via my contact page, too. I read every message!
Happy cooking, and may your mornings always smell this sweet!
Warmly,
Marco Santos
Fluffy Pancakes: The Ultimate Recipe You NEED
Ingredients
Equipment
Method
- Melt the 6 Tablespoons (85g) of butter. Use a microwave or stovetop. Set the butter aside to cool slightly until step 3. Do not let it get too hot.
- In a large bowl, whisk the flour, sugar, baking powder, baking soda, and salt together until combined. Set this dry mixture aside.
- In another large bowl, whisk the eggs, buttermilk, and vanilla extract together. Whisk in the melted butter. Pour the wet ingredients into the dry ingredients. Gently whisk to combine. Stop mixing when you see no dry flour patches at the bottom. The batter will be thick, and some lumps are acceptable. Set the batter aside while you heat the cooking surface.
- Heat a griddle or large skillet over medium heat. Coat the surface generously with butter or nonstick spray. Once hot, pour about 1/4 cup of batter onto the griddle for each pancake. Cook until the edges look set and holes appear around the border, about 2 minutes. Flip the pancake and cook the other side until done, about 1–2 more minutes. Coat the griddle or skillet with butter or spray again if needed for the next batch.
- Keep the cooked pancakes warm in a preheated 200°F (93°C) oven until you finish cooking all the batter. Serve the pancakes right away with your preferred toppings.
Notes
Tried this recipe?
Let us know how it was!
Gluten-Free Chef & Latin Cuisine Innovation Specialist
My youngest son’s celiac diagnosis at four changed everything. Suddenly, all those traditional Brazilian and Portuguese recipes from my avó needed to be completely reimagined without losing their soul.
After graduating from Johnson & Wales and working Miami’s Latin fusion scene, my son’s diagnosis became my calling. How do you make gluten-free empanadas that taste like childhood? Over eight years, I’ve developed 320+ gluten-free recipes celebrating authentic Latin flavors using cassava flour and plantain alternatives.
My gluten-free empanada recipe won “Best Appetizer” at the 2023 Miami Gluten-Free Food Festival. I ran “Sabores Sin Gluten,” a catering business serving Miami’s Latino community—quinceañeras, family gatherings, all the celebrations that matter.
Food is culture, and everyone deserves to experience the joy of sharing traditional family meals, regardless of dietary restrictions.