Oh my gosh, isn’t New Year’s Eve the best excuse to completely over-the-top with glitter and great food? I’m Sophie, and trust me, nothing says ‘Cheers to a fresh start!’ like a ridiculously stunning dessert that tastes even better than it looks. If you’re planning a bash, you absolutely need to check out these 12 New Year’s Eve Cakes That Wow—I promise, they are showstoppers.
I still remember the year I decided to bake that towering chocolate cake all covered in edible gold dust. The kitchen was a total disaster zone, flour everywhere, but when I presented it right before midnight, the look on everyone’s faces? Priceless! That cake taught me that making things beautiful and delicious for *everyone* at the party is what truly matters. It’s all about joy and connection, and these recipes deliver! I believe every celebration deserves a centerpiece, regardless of dietary needs.
Why This New Year’s Eve Chocolate Cake Will Be One of the 12 New Year’s Eve Cakes That Wow
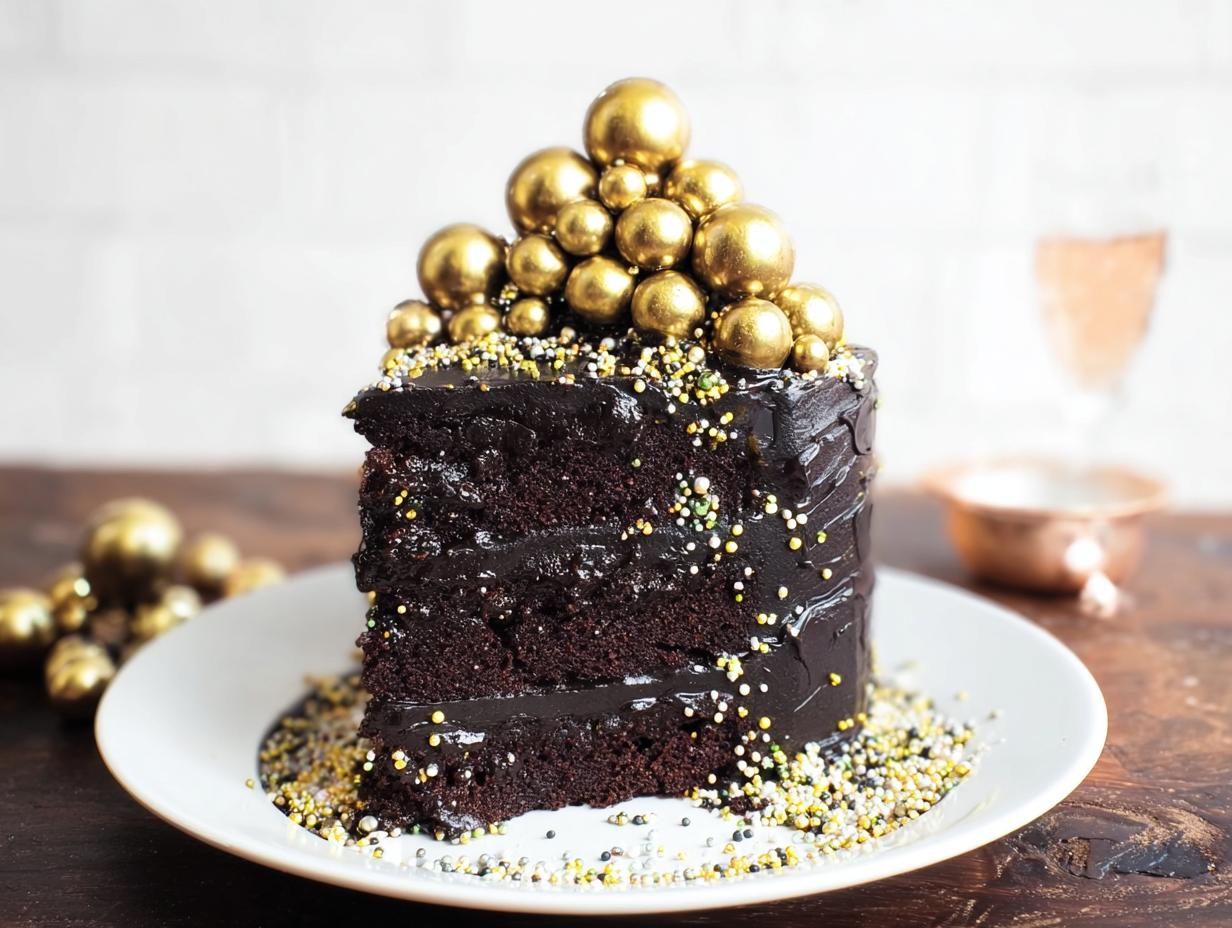
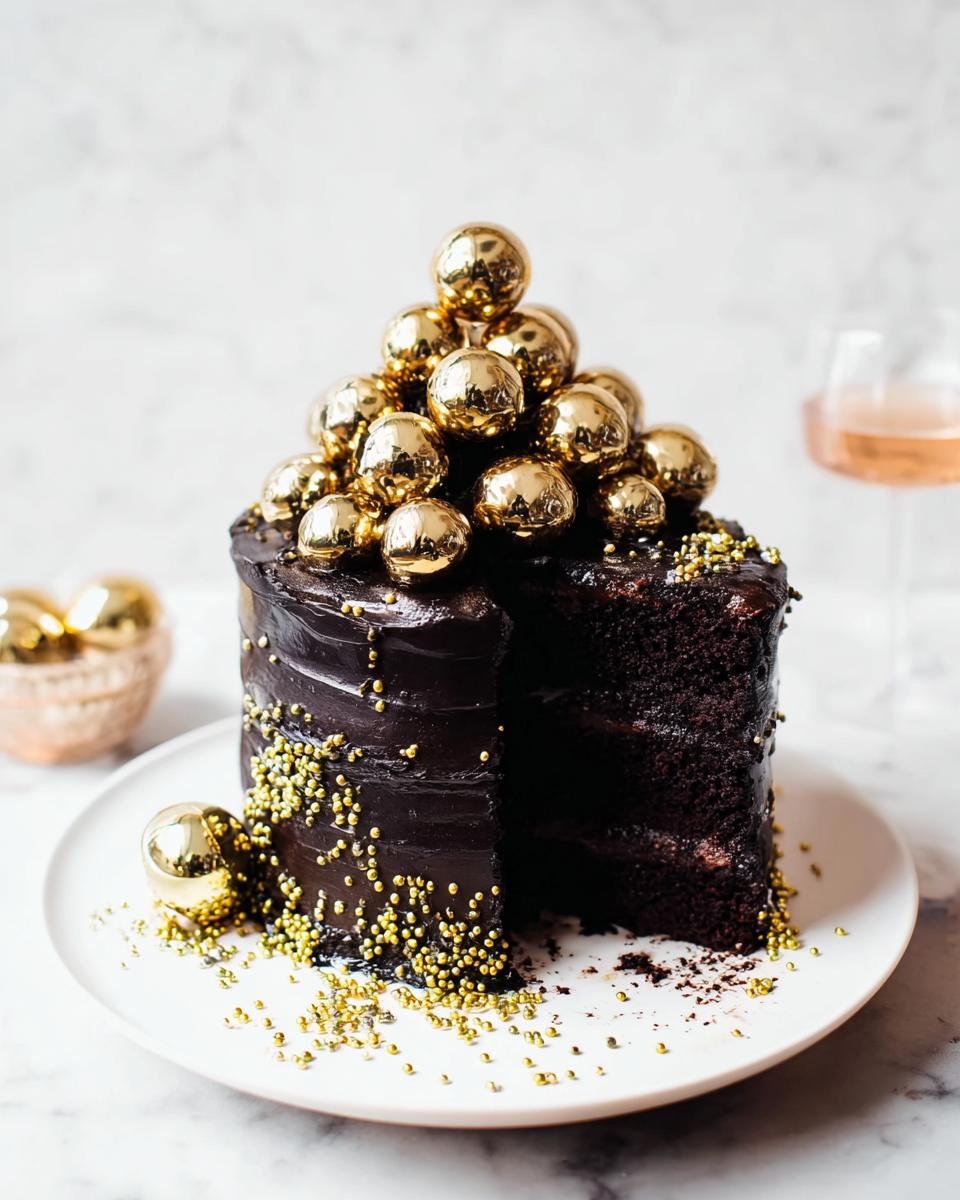
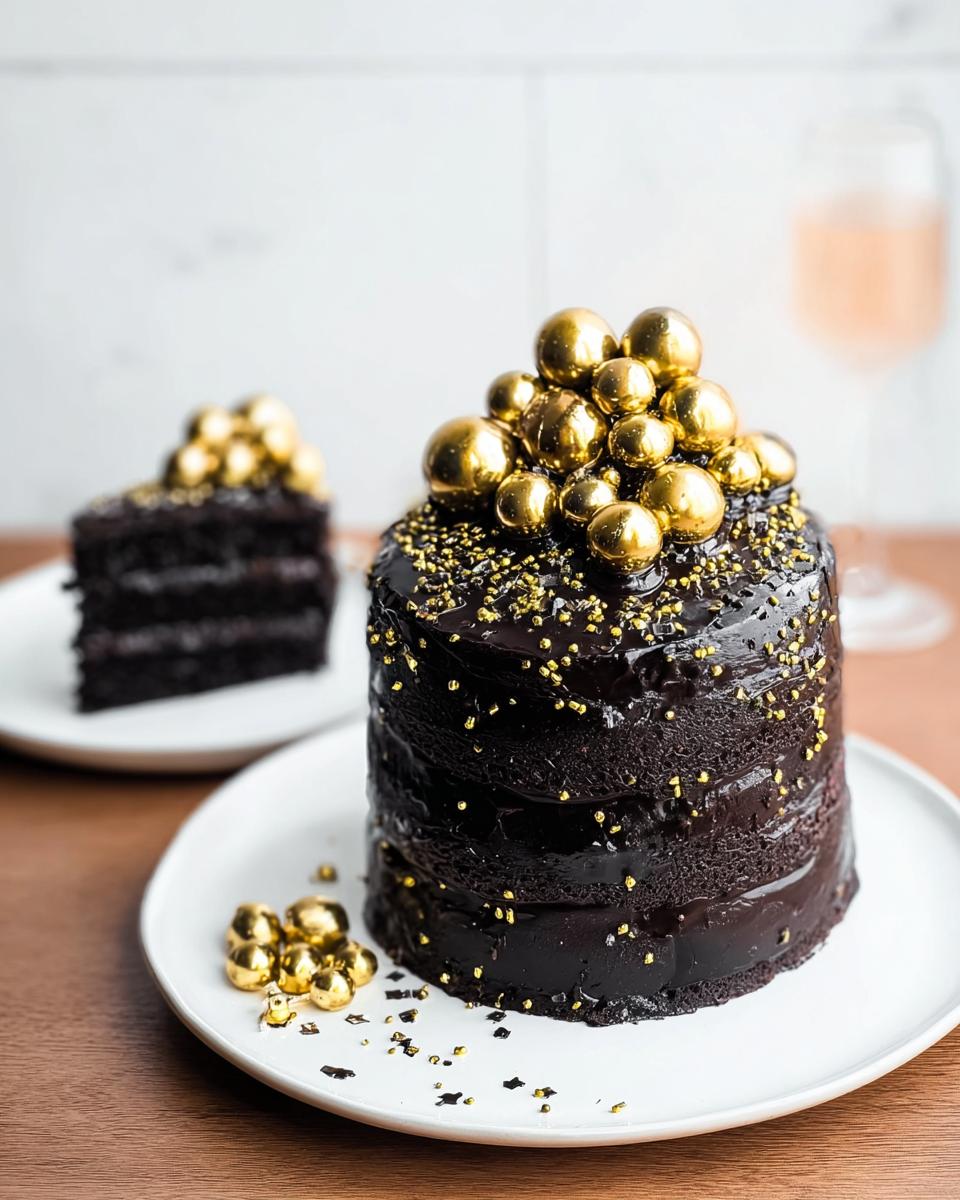
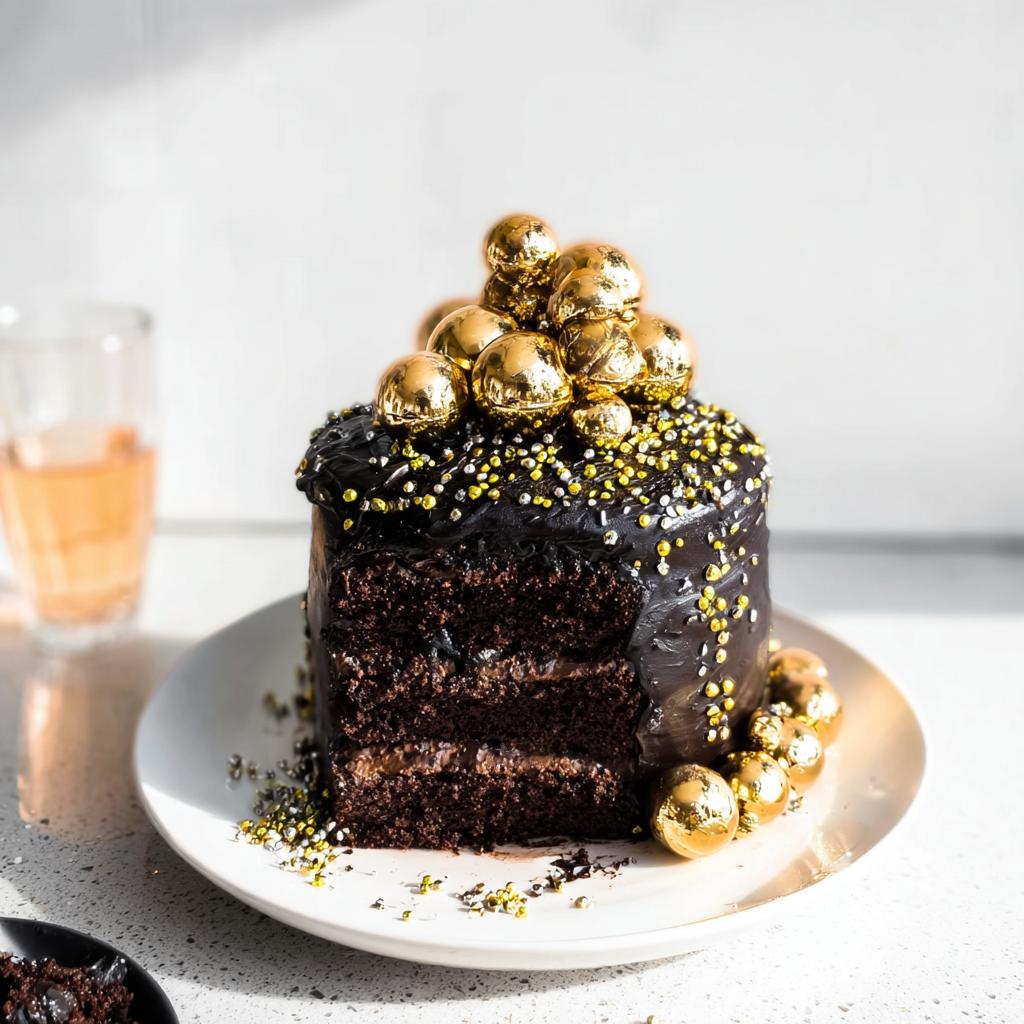
If you’re looking for that ultimate centerpiece from the list, this is it. We’re diving deep into rich flavors with a gorgeous chocolate base covered in a dramatic, nearly black Dark Chocolate Frosting. Seriously, the color contrast is everything!
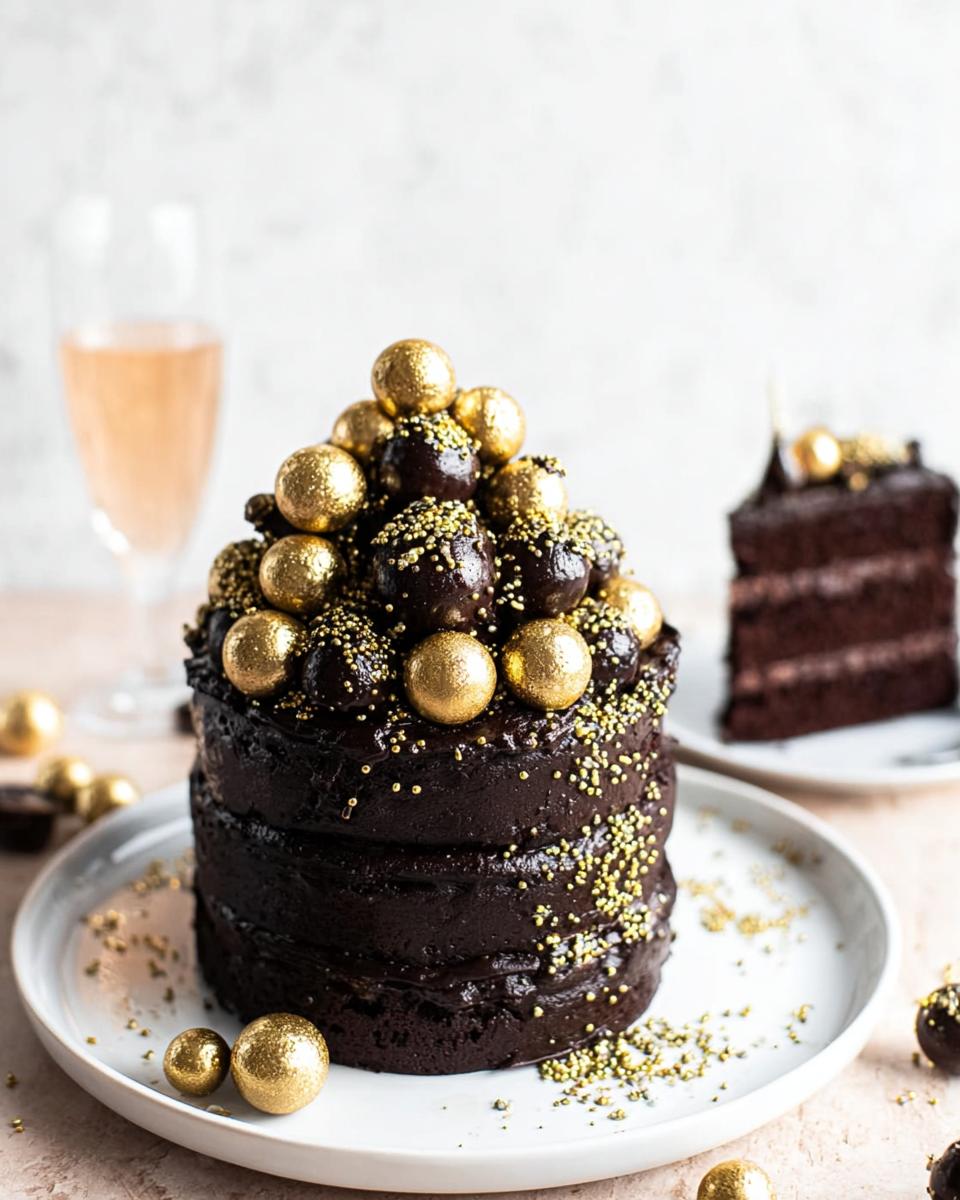
But the real showstopper? Those incredible, perfect spheres painted with Edible Gold. They catch the light and scream ‘Happy New Year!’ I love that they feel super fancy, but honestly, making them is really fun once you get the hang of it. It proves that incredible presentation doesn’t have to be complicated, and everyone deserves a glorious slice when the ball drops!
Essential Ingredients for Your New Year’s Cake
When you’re aiming for a showstopper like this, you can’t just toss things in willy-nilly—especially when dealing with deep colors and delicate decorations! Getting these ingredients sorted ahead of time means the actual assembly goes smoothly. Don’t skip the details here; that’s how we guarantee a memorable slice!
For the Cake Layers
For this recipe, we are leaning on a tried-and-true chocolate base. Think of this as the sturdy, delicious foundation that holds up all the fun on top. If you have a fudge cake recipe you absolutely adore, use that—I won’t tell!
- 3 layers of 6-inch chocolate cake layers (use your favorite recipe, or you can use a rich fudge sundae cake recipe if you need a suggestion!)
For the Frosting and Decoration: Achieving a Stunning New Year’s Cake
This is where the drama happens! Getting that midnight black color takes a bit of commitment, and the gold spheres require a few special bits and pieces. And of course, we need some fun Sprinkles for extra sparkle!
- 4.5 cups of Chocolate frosting (be prepared—you’ll need a good amount of coloring!)
- Black gel food coloring (use the good stuff, this takes quantity!)
- 10 oz of Yellow candy melts (these are for those perfect spheres)
- Gold powdered food coloring (the key for that metallic shine)
- A few drops of Vodka (this is just for thinning the gold paint, so don’t worry about soaking the cake!)
- 1 package of Fancy Sprinkles in Black Widow
- 1 package of Fancy Sprinkles in Metallic Golden Dragee Melange
Step-by-Step Instructions to Create One of the 12 New Year’s Eve Cakes That Wow
Okay, this is where the real magic happens! We are going from assembled layers to a glittering masterpiece. Don’t rush the chilling steps; they are essential for that super smooth, crisp finish everyone expects from a fantastic New Year’s Cake. Watch your time on this part, especially if you’re working close to midnight! If you want to check out where I pull some of my best general baking instructions from, have a peek at my recipe archives.
Preparing the Cake Base and Frosting
First things first, get those three 6-inch chocolate cake layers ready to go. If you’re making the recipe from scratch, awesome! If not, no sweat, just make sure they are level. You want a perfect stack later on.
Next, grab your chocolate frosting, but listen closely: to get that deep, midnight black, you’re going to need more black gel food coloring than you think. Seriously, just keep adding it until you get the color you want! Once you stack the layers, spreading about half an inch between each one, it’s time for the secret weapon: the crumb coat. Slather a very thin layer of that dark frosting all over the cake and plop it into the fridge for maybe 10 to 15 minutes until it feels set. This traps all those pesky crumbs. Once that coat is firm, go ahead and cover the whole thing with the rest of your beautiful, dark frosting.
Now, take your Black Widow Sprinkles and press them gently onto the bottom half of the cake. It just gives some lovely texture right where the party starts!
Crafting the Edible Gold Spheres
This is my favorite part because it feels like jewelry making! Grab your yellow candy melts and zap them in the microwave. Start with 30 seconds, stir, and then switch to 10-second bursts until they are completely melted and smooth as silk. You need them liquid enough to pour, but not so hot they melt your counter.
Carefully fill up those 1-inch and 1 1/2-inch sphere molds. You’ll want to invert them over parchment paper and just give them a gentle tap—you want hollow shells, not blocks! Use your bench scraper to clean up any messy edges around the opening of the mold. Pop those into the fridge for about 10 minutes until they are totally firm.
When they’re hard as rocks, gently coax the half-spheres out. Don’t yank! To make a full sphere, warm up a pan on low heat. Lightly press the open, flat edge of one half-sphere onto that warm pan just until it starts to look a little shiny, then immediately press it against the edge of another half right away. I use my finger—very gently—to smooth out any extra melted candy that squeezes out the seam. Now you have perfect orbs!
If you’re worried about them sticking, you can find some great tips over here on making sure the seams disappear completely.
Assembling and Decorating Your Celebration Cake
Time for the glamour! Mix your gold powdered food coloring with just a couple of drops of vodka. Seriously, just enough to make a paintable consistency. Using a small brush, paint those candy spheres until they shine like actual treasure. It seals the yellow and gives them that incredible metallic look.
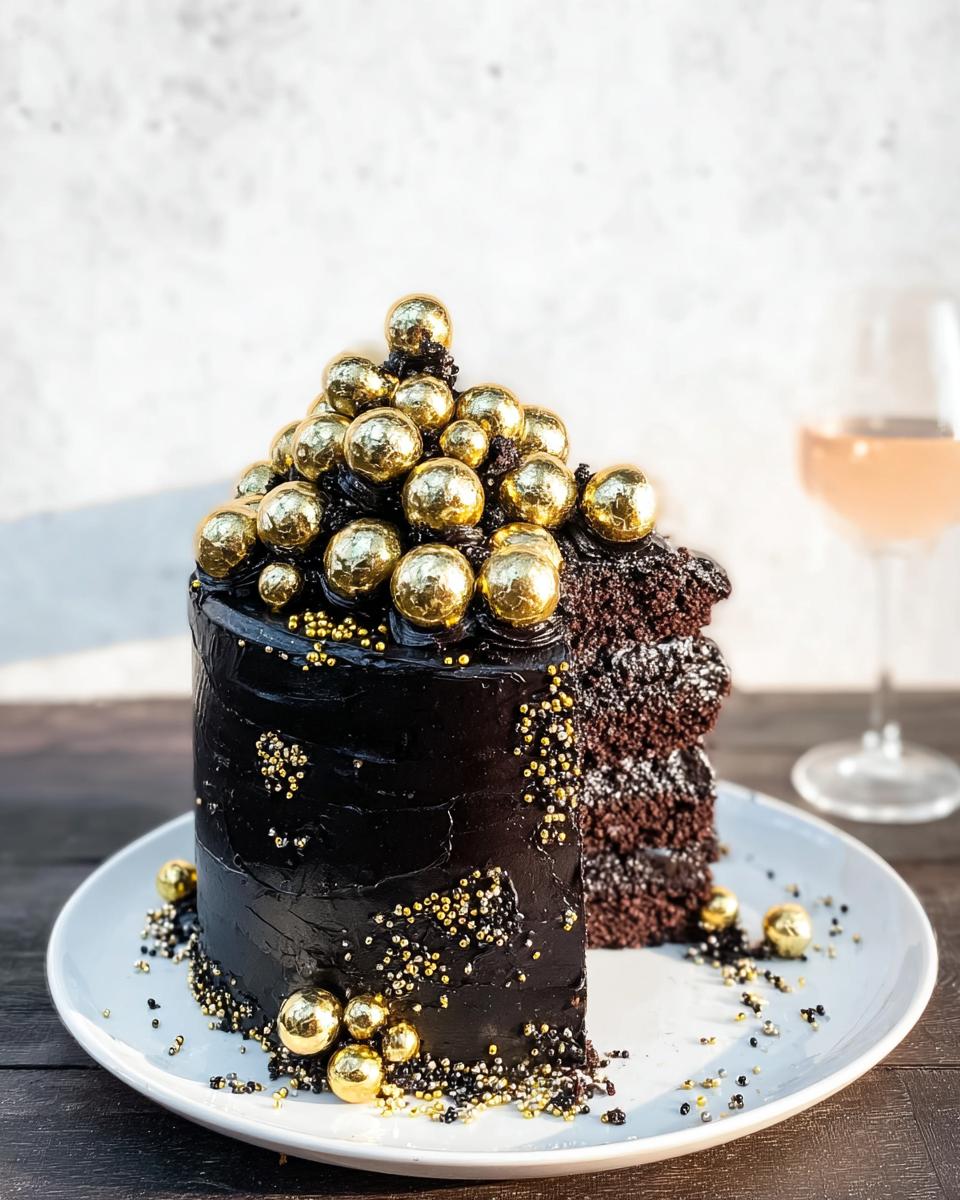
Once they’re dry, carefully start inserting them into the frosting of your cake. Just press them in gently so they sit nicely. If you want to stack a few on top for extra drama, use a tiny bit of leftover melted candy melt as ‘glue’ to attach them to each other. Finally, finish off your incredible Celebration Cake by sprinkling that Metallic Golden Dragee Melange all over the top. It catches the light perfectly for every countdown!
Tips for Success When Baking 12 New Year’s Eve Cakes That Wow
Baking something this high-impact means small details make a huge difference! I’ve learned a few tricks over the years to make sure your cake looks exactly like those magazine photos, not like a spooky Halloween mess. Don’t let the black frosting or shiny gold scare you off; with a little insider knowledge, you’ve got this!
When you’re aiming for that super deep black color, you have to be brave with the gel coloring. It’s better to add it slowly while the frosting is slightly warm—it sets darker when it cools down. If you use liquid coloring, the frosting will get soupy too fast, so please stick to high-quality gel coloring. Trust me, using powdered coloring for the gold paint is better than trying to mix the gold color into the main surface frosting!
For those beautiful candy melt spheres, air bubbles are the enemy of smoothness. When you pour the melted candy into the molds, try tapping the sides of the mold against the counter a few good times *before* you chill them. This helps release trapped air pockets. Once they are fully set in the fridge, try to handle them as little as possible before painting. If they crack, sometimes a tiny dot of fresh melted candy melts painted on as ‘glue’ can patch it up before you apply the gold paint over the top!
Also, a little word on the vodka for your gold paint: it evaporates super fast, which is why bakers love it! Just mix enough paint to cover the section you are working on; don’t make a huge batch, or it might dry out before you use it up. For a fantastically smooth finish, use a soft, clean brush—a cheap, stiff paintbrush will leave streaks. You want soft, sweeping strokes to maximize that metallic sheen. If you want more ideas on making stunning candy decorations, you have to check out these other festive inspiration treats!
Making Ahead and Storing Your 12 New Year’s Eve Cakes That Wow
Planning ahead is crucial when you have a major visual statement like this cake! You can totally make the gold spheres a day or two early. Just keep them in a cool, dry spot, covered loosely—humidity makes them weep! Store them away from any strong smells because candy melts can absorb them weirdly.
For the actual cake, once it’s fully frosted black, an airtight container in the fridge is your best friend. The cold keeps that gorgeous, deep black frosting from getting greasy or smudgy looking. If you need to store it for longer, you can freeze it! I just wouldn’t put the gold spheres on until about two hours before you plan to serve it, just to make sure that shiny paint stays perfect. Check out my holiday archives for general make-ahead tips for festive bakes!
Serving Suggestions for Your Festive New Year’s Cake
Once you’ve put all that love and sparkle into your cake, you don’t want to serve it with something that clashes or steals the spotlight! Since this is such a rich, statement-making New Year’s Cake, the best accompaniments are often simple but elegant. We want to let that dramatic dark frosting and the shimmering gold do all the talking, right?
For drinks, I always opt for something bubbly. A crisp Prosecco or even a good quality sparkling cider works wonders. The slight acidity and effervescence cut right through the richness of the dark chocolate frosting, giving your palate a little reset before the next bite of glorious cake. Don’t you just love that contrast?
If you feel like you need a little something extra on the plate, keep it refined. A few fresh raspberries scattered around the base of the slice add a tiny pop of color that complements the general festive vibe without competing with the gold spheres. Or, honestly? Serve it completely on its own! This cake is the whole party.
If you need more ideas for pairing desserts or just want to see what other incredible homemade treats I’ve been loving, check out my homemade dessert inspiration board. Happy toasting!
Frequently Asked Questions About 12 New Year’s Eve Cakes That Wow
These questions always pop up when people are planning their big countdown dessert! Don’t worry, I’ve got the answers so your baking goes off without a hitch. It’s all about making this festive baking fun and stress-free!
Can I make the gold spheres ahead of time?
Yes, absolutely! That’s one of my favorite ways to get ahead of the game. Once the candy melts are fully hardened and you’ve sealed them into full spheres, store them in a cool, dry place. Keep them in an airtight container, but avoid the fridge if you can, as condensation can make the pretty gold paint look damp or spotty. If you’re worried about them getting dusty before the big night, just cover them loosely with plastic wrap. They should be perfect waiting for their moment to shine on your **New Year’s Cake**!
What if I don’t have sphere molds for my New Year’s Cake?
Oh, no sphere molds? No problem at all! We can pivot to an equally gorgeous look. If you don’t have those specific round molds, why not try making some sharp, geometric shapes? You can melt your candy melts and pour them onto parchment paper in small dollops or even use a spatula to create rough diamond or shard shapes. Once they cool, you can paint those with the gold mixture too! Or, you can use a simple star tip with your **Dark Chocolate Frosting** and pipe little stars all over the top for a textured sparkle that still feels incredibly celebratory.
How do I get the frosting truly black?
Achieving that deep, inky black is all about persistence and using the right kind of coloring—you cannot skimp here if you want true midnight magic! You must use a high-quality black *gel* food coloring, not the liquid food coloring you use for Easter eggs. Gel is highly concentrated and won’t thin out your frosting. Keep mixing it in gradually; your frosting will look purple or grey at first, but keep folding it in until it gets darker. If it seems a little soft after mixing in the coloring, chill it for about 15 minutes; it will firm up and the color will deepen spectacularly as it cools. This patient approach is the secret to making sure your final look is dramatic and professional!
If you have any more burning questions about timing your bakes or need help troubleshooting flavor swaps, feel free to reach out to me directly on my Contact Page!
Share Your Experience with These 12 New Year’s Eve Cakes That Wow
Now that you’ve seen how stunning this cake can be, I really, really want to know how it turns out for you! Baking should always be a shared adventure, right? Don’t be shy—whether you nailed those gold spheres on the first try or you ended up with a beautiful, artistic mess, I want to hear all about it.
When you take that first bite right at midnight, snap a picture! Tag me on social media so I can see your incredible work. We are all part of this baking community, and seeing your unique versions of these incredible desserts just fuels my passion for festive baking all year long.
Did you add extra liquor to soak the layers? Did you use a different sprinkle combination? Drop a comment below and give us all the details! If you are wondering about how I handle user data and privacy while you share your stories, you can check out my Privacy Policy here. Let’s celebrate your triumphant New Year’s baking!
New Year’s Eve Chocolate Cake with Gold Spheres
Ingredients
Equipment
Method
- Prepare your three 6-inch chocolate cake layers. If you do not have a preferred recipe, consider using a fudge sundae cake recipe.
- Color your chocolate frosting black. This may require a substantial amount of black food coloring. You might need to refrigerate the frosting to firm it up if it becomes too soft.
- Level your cake layers if necessary. Spread approximately 1/2 inch of frosting between each layer. Apply a thin layer of frosting over the entire cake (crumb coat) and chill in the refrigerator for about 10-15 minutes until set.
- Once the crumb coat is firm, apply the remaining frosting to cover the cake completely.
- Press Fancy Sprinkles in Black Widow onto the bottom half of the cake for added decoration.
- Melt the yellow candy melts in the microwave, starting with 30-second intervals and then 10-second increments until smooth.
- Fill your 1-inch and 1 1/2-inch sphere molds with the melted candy melts.
- Invert the molds over parchment paper and gently tap to allow excess candy melts to drip out.
- Use a bench scraper to remove any excess candy melts around the mold openings. Refrigerate until firm, about 10 minutes.
- Gently remove the half spheres from the molds. To join two half spheres, warm a pan over low heat, lightly press the open edge of each half sphere onto the warm pan until it begins to melt, then press them together.
- Use your finger to smooth out any excess candy melt that squeezes from the edges.
- Mix the gold powdered food coloring with a few drops of vodka. Paint the candy spheres with the gold mixture.
- Insert the gold spheres into the frosting of the cake by gently pressing them in.
- To stack the spheres, use any remaining melted candy melts as ‘glue’ to attach them to each other. Garnish the cake with Fancy Sprinkles in Metallic Golden Dragee Melange.
Notes
Tried this recipe?
Let us know how it was!
Gluten-Free Nutritionist & Family Meal Planning Expert
Working as a pediatric dietitian at Children’s Hospital of Denver, I kept meeting families overwhelmed by managing their children’s celiac disease. Parents stressed, kids frustrated, everyone eating bland boxed “gluten-free” products.
That’s when I realized my calling: creating practical, balanced gluten-free solutions for real families with busy schedules. I’ve developed 375+ family-friendly recipes focusing on lunch boxes, after-school snacks, and make-ahead dinners that actually work.
My meal planning system was featured in Parents Magazine, and I presented research at the Rocky Mountain Pediatric Nutrition Conference. My evidence-based approach ensures recipes meet both taste and health standards—families need solutions that work in the real world, not just perfect test kitchens.